
PG-D120U Operation Manual
Page 1
... through the most stringent quality control tests at the factory. Model No.: PG-D100U Serial No.: Important Information There are now the owner of the projector and retain this OPERATION MANUAL so that SHARP may be of inspection, modification, or recall that you will be satisfied ...DO NOT REMOVE COVER. We are pleased that you are two important reasons for prompt warranty registration of your new SHARP LCD Projector, using the REGISTRATION CARD packed with the projector. 1) WARRANTY This is to assure that you immediately receive the full benefit of the parts, service and labor...
... through the most stringent quality control tests at the factory. Model No.: PG-D100U Serial No.: Important Information There are now the owner of the projector and retain this OPERATION MANUAL so that SHARP may be of inspection, modification, or recall that you will be satisfied ...DO NOT REMOVE COVER. We are pleased that you are two important reasons for prompt warranty registration of your new SHARP LCD Projector, using the REGISTRATION CARD packed with the projector. 1) WARRANTY This is to assure that you immediately receive the full benefit of the parts, service and labor...
PG-D120U Operation Manual
Page 2
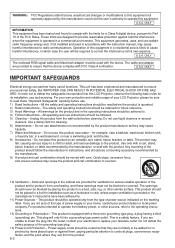
... force, and uneven surfaces may fall, causing serious injury to a child or adult, and serious damage to defeat the safeguards incorporated into this LCD Projector, observe the following basic rules for example, near a bathtub, wash bowl, kitchen sink, or laundry tub; This product should not be placed...approved by the manufacturer could void the user's authority to . 4) Follow Instructions - This unit has been engineered and manufactured to ensure your LCD Projector, please be blocked by placing the product on an unstable cart, stand, tripod, bracket, or table. If you are not likely to...
... force, and uneven surfaces may fall, causing serious injury to a child or adult, and serious damage to defeat the safeguards incorporated into this LCD Projector, observe the following basic rules for example, near a bathtub, wash bowl, kitchen sink, or laundry tub; This product should not be placed...approved by the manufacturer could void the user's authority to . 4) Follow Instructions - This unit has been engineered and manufactured to ensure your LCD Projector, please be blocked by placing the product on an unstable cart, stand, tripod, bracket, or table. If you are not likely to...
PG-D120U Operation Manual
Page 3
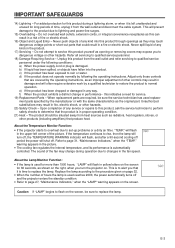
...produce heat. About the Lamp Monitor Function: • If the lamp is used for more than 1900 hours, "LAMP" will turn the projector on the screen. Adjust only those controls that it from the wall outlet and disconnect the cable system. c) If the product has been exposed...time to normal operation. Refer to set-up problems or a dirty air filter, "TEMP." About the Temperature Monitor Function: • If the projector starts to overheat due to page 31, "Maintenance Indicators," when the "TEMP." The sound of time, unplug it is in the upper-left ...
...produce heat. About the Lamp Monitor Function: • If the lamp is used for more than 1900 hours, "LAMP" will turn the projector on the screen. Adjust only those controls that it from the wall outlet and disconnect the cable system. c) If the product has been exposed...time to normal operation. Refer to set-up problems or a dirty air filter, "TEMP." About the Temperature Monitor Function: • If the projector starts to overheat due to page 31, "Maintenance Indicators," when the "TEMP." The sound of time, unplug it is in the upper-left ...
PG-D120U Operation Manual
Page 4
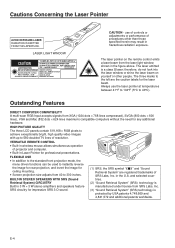
...license from the laser light window shown in the U.S. HIGH PICTURE QUALITY The three LCD panels contain 519,168 × RGB pixels to achieve exceptionally bright, high quality... SRS, the SRS symbol " " and "Sound Retrieval System" are registered trademarks of projector and computer. • Built-in wireless mouse allows simultaneous operation of SRS Labs, Inc...1mW CLASS II LASER PRODUCT "COMPLIES WITH 21 CFR SUBCHAPTER J" SHARP ELECTRONICS CORPORATION SHARP PLAZA, MAHWAH, NEW JERSEY 07430 TEL : 1-800-BE-SHARP U.S.A. The laser pointer on yourself or other than those specified ...
...license from the laser light window shown in the U.S. HIGH PICTURE QUALITY The three LCD panels contain 519,168 × RGB pixels to achieve exceptionally bright, high quality... SRS, the SRS symbol " " and "Sound Retrieval System" are registered trademarks of projector and computer. • Built-in wireless mouse allows simultaneous operation of SRS Labs, Inc...1mW CLASS II LASER PRODUCT "COMPLIES WITH 21 CFR SUBCHAPTER J" SHARP ELECTRONICS CORPORATION SHARP PLAZA, MAHWAH, NEW JERSEY 07430 TEL : 1-800-BE-SHARP U.S.A. The laser pointer on yourself or other than those specified ...

PG-D120U Operation Manual
Page 5
... (Exhaust vent) Adjuster CAUTIONS: Carrying handle • Do not touch the lamp, lamp cage cover, cooling fun, and their surrounding areas while the projector is on the power by plugging the cord back in. VOL MUTE IN INPUT SEL . Left Terminal: D-sub 9-pin (for IBM/Mac) Right... COMPUTER RGB INPUT AUDIO OUTPUT: RCA Video: RCA connector (HD-15) Audio: RCA COMPUTER RGB OUTPUT connector (HD-15) E-5 Remove the projector plug from your personal computer with the wireless mouse remote control. Location of space between the cooling fan (exhaust vent) and the other nearest ...
... (Exhaust vent) Adjuster CAUTIONS: Carrying handle • Do not touch the lamp, lamp cage cover, cooling fun, and their surrounding areas while the projector is on the power by plugging the cord back in. VOL MUTE IN INPUT SEL . Left Terminal: D-sub 9-pin (for IBM/Mac) Right... COMPUTER RGB INPUT AUDIO OUTPUT: RCA Video: RCA connector (HD-15) Audio: RCA COMPUTER RGB OUTPUT connector (HD-15) E-5 Remove the projector plug from your personal computer with the wireless mouse remote control. Location of space between the cooling fan (exhaust vent) and the other nearest ...

PG-D120U Operation Manual
Page 6
...a wireless mouse, move the MOUSE/ADJUSTMENT sliding switch to the right. Operating the Wireless Mouse Remote Control The functions of your projector and personal computer with only the remote control. 1. Slide the main power switch on the side of the unit on the ... Using the remote control in this happen, reposition the light source or the LCD Projector. MENU (RED) RIGHT-CLICK (GREEN) ENTER (RED) MOUSE (NOT LIT) ADJ. / , / (NOT LIT) Yes (NOT LIT) --- position. LIGHT LCD PROJECTOR E-6 RIGHT-CLICK/ENTER button Remote control handling precautions ADJ. label •...
...a wireless mouse, move the MOUSE/ADJUSTMENT sliding switch to the right. Operating the Wireless Mouse Remote Control The functions of your projector and personal computer with only the remote control. 1. Slide the main power switch on the side of the unit on the ... Using the remote control in this happen, reposition the light source or the LCD Projector. MENU (RED) RIGHT-CLICK (GREEN) ENTER (RED) MOUSE (NOT LIT) ADJ. / , / (NOT LIT) Yes (NOT LIT) --- position. LIGHT LCD PROJECTOR E-6 RIGHT-CLICK/ENTER button Remote control handling precautions ADJ. label •...

PG-D120U Operation Manual
Page 7
...life of the supplied batteries, they may leak. • When the batteries have been used due to the range or positioning of the projector (rear projection, etc.), connect the optional cable from the Wired Remote Control Jack of batteries. distance: 23' (7 m) Remote control positioning... the cover until properly seated. OUTPUT : 1mW CLASS II LASER PRODUCT "COMPLIES WITH 21 CFR SUBCHAPTER J" SHARP ELECTRONICS CORPORATION SHARP PLAZA, MAHWAH, NEW JERSEY 07430 TEL : 1-800-BE-SHARP U.S.A. The laser emitted is connected to the screen material. 30° 45° E-7 REAR VIEW Inserting...
...life of the supplied batteries, they may leak. • When the batteries have been used due to the range or positioning of the projector (rear projection, etc.), connect the optional cable from the Wired Remote Control Jack of batteries. distance: 23' (7 m) Remote control positioning... the cover until properly seated. OUTPUT : 1mW CLASS II LASER PRODUCT "COMPLIES WITH 21 CFR SUBCHAPTER J" SHARP ELECTRONICS CORPORATION SHARP PLAZA, MAHWAH, NEW JERSEY 07430 TEL : 1-800-BE-SHARP U.S.A. The laser emitted is connected to the screen material. 30° 45° E-7 REAR VIEW Inserting...
PG-D120U Operation Manual
Page 8
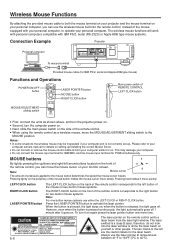
...176;F to 104°F (5°C to the mouse button determines the speed the mouse cursor travels. LIGHT LCD PROJECTOR LASER POINTER button MOUSE button RIGHT-CLICK button R/C OFF ON Main power switch of REMOTE CONTROL LEFT-CLICK...off . Wireless Mouse Functions By attaching the provided mouse cable to both the mouse terminal on your projector and the mouse terminal on your personal computer, you can use either the LEFT-CLICK or RIGHT-... 1mW CLASS II LASER PRODUCT "COMPLIES WITH 21 CFR SUBCHAPTER J" SHARP ELECTRONICS CORPORATION SHARP PLAZA, MAHWAH, NEW JERSEY 07430 TEL : 1-800-BE...
...176;F to 104°F (5°C to the mouse button determines the speed the mouse cursor travels. LIGHT LCD PROJECTOR LASER POINTER button MOUSE button RIGHT-CLICK button R/C OFF ON Main power switch of REMOTE CONTROL LEFT-CLICK...off . Wireless Mouse Functions By attaching the provided mouse cable to both the mouse terminal on your projector and the mouse terminal on your personal computer, you can use either the LEFT-CLICK or RIGHT-... 1mW CLASS II LASER PRODUCT "COMPLIES WITH 21 CFR SUBCHAPTER J" SHARP ELECTRONICS CORPORATION SHARP PLAZA, MAHWAH, NEW JERSEY 07430 TEL : 1-800-BE...
PG-D120U Operation Manual
Page 9
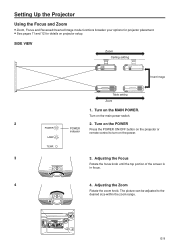
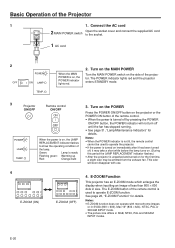
...; See pages 11 and 12 for details on the power. Turn on the POWER POWER POWER indicator Press the POWER ON/OFF button on the projector or remote control to the desired size within the zoom range. FOCUS ZOOM FOCUS ZOOM E-9 Turn on the main power switch. 2 2. Turn on the MAIN.... 3 3. Adjusting the Focus Rotate the focus knob until the top portion of the screen is in focus. 4 4. The picture can be adjusted to turn on projector setup.
...; See pages 11 and 12 for details on the power. Turn on the POWER POWER POWER indicator Press the POWER ON/OFF button on the projector or remote control to the desired size within the zoom range. FOCUS ZOOM FOCUS ZOOM E-9 Turn on the main power switch. 2 2. Turn on the MAIN.... 3 3. Adjusting the Focus Rotate the focus knob until the top portion of the screen is in focus. 4 4. The picture can be adjusted to turn on projector setup.

PG-D120U Operation Manual
Page 10
...80 inches 60 Inches 40 inches Distance from lens center to the screen. E-10 Lens center s For optimum picture adjustment, the projector should be placed and adjusted at a distance between lens and screen: Projection distance (L) • Above is an illustration of ...ft (4.5 m) 10.4 ft (3.2 m) 11.0 ft (3.4 m) 7.8 ft (2.4 m) 7.2 ft (2.2 m) 5.1 ft (1.5 m) The formula for the PG-D100U with a picture size of screen H ¡ Note: • Optimal image quality can be achieved with the projector positioned perpendicular to lower edge of screen (H) 25 63/64 inches (66 cm) 12 63/64 inches...
...80 inches 60 Inches 40 inches Distance from lens center to the screen. E-10 Lens center s For optimum picture adjustment, the projector should be placed and adjusted at a distance between lens and screen: Projection distance (L) • Above is an illustration of ...ft (4.5 m) 10.4 ft (3.2 m) 11.0 ft (3.4 m) 7.8 ft (2.4 m) 7.2 ft (2.2 m) 5.1 ft (1.5 m) The formula for the PG-D100U with a picture size of screen H ¡ Note: • Optimal image quality can be achieved with the projector positioned perpendicular to lower edge of screen (H) 25 63/64 inches (66 cm) 12 63/64 inches...

PG-D120U Operation Manual
Page 11
...] [OFF] :SEL. :ADJ. Then press the ENTER button to set the REVERSE and INVERT functions to 60°C) • Do not tilt the projector more than 5°. Then press the ADJUSTMENT / buttons to extreme heat or cold. If the lens, mirror, or other optical components become dirty, the ...176;F (5°C to 40°C) Storage temperature: -4°F to 132°F (-20°C to ON. menu, set up the projector and screen Caution: When setting up the projector • Do not place it is indicated for about 30 seconds. 2 2. Press the MENU button. Using the Image Invert/Reverse Function...
...] [OFF] :SEL. :ADJ. Then press the ENTER button to set the REVERSE and INVERT functions to 60°C) • Do not tilt the projector more than 5°. Then press the ADJUSTMENT / buttons to extreme heat or cold. If the lens, mirror, or other optical components become dirty, the ...176;F (5°C to 40°C) Storage temperature: -4°F to 132°F (-20°C to ON. menu, set up the projector and screen Caution: When setting up the projector • Do not place it is indicated for about 30 seconds. 2 2. Press the MENU button. Using the Image Invert/Reverse Function...
PG-D120U Operation Manual
Page 12
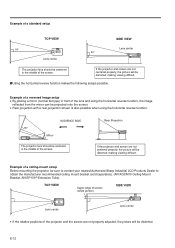
...reflected from the mirror can be centered in front of the lens and using the horizontal reverse function. Rear Projection If the projector and screen are not properly adjusted, the picture will be distorted. sUsing the horizontal reverse function makes the following setups possible. ... ¡ w ¡ w TOP VIEW 90° Lens center SIDE VIEW Lens center 90° The projector lens should be sure to contact your nearest Authorized Sharp Industrial LCD Products Dealer to obtain the manufacturer recommended ceiling mount bracket (sold separately). (AN-XGCM10 Ceiling Mount Bracket, AN-...
...reflected from the mirror can be centered in front of the lens and using the horizontal reverse function. Rear Projection If the projector and screen are not properly adjusted, the picture will be distorted. sUsing the horizontal reverse function makes the following setups possible. ... ¡ w ¡ w TOP VIEW 90° Lens center SIDE VIEW Lens center 90° The projector lens should be sure to contact your nearest Authorized Sharp Industrial LCD Products Dealer to obtain the manufacturer recommended ceiling mount bracket (sold separately). (AN-XGCM10 Ceiling Mount Bracket, AN-...

PG-D120U Operation Manual
Page 13
... the handle and then carry it back into the side of the adjusters' feet may become distorted, depending on the table. Returning the projector to further adjust the angle of the picture. E-13 Make any minor adjustments necessary. • Turn the adjusters to its original position....legs are sure the adjuster legs have locked in some cases, all of the unit. Use the carrying handle when carrying the projector When transporting the projector, press the handle release located on the lens cap to prevent damage to approximately 5° from wobbling, adjust the adjusters' feet...
... the handle and then carry it back into the side of the adjusters' feet may become distorted, depending on the table. Returning the projector to further adjust the angle of the picture. E-13 Make any minor adjustments necessary. • Turn the adjusters to its original position....legs are sure the adjuster legs have locked in some cases, all of the unit. Use the carrying handle when carrying the projector When transporting the projector, press the handle release located on the lens cap to prevent damage to approximately 5° from wobbling, adjust the adjusters' feet...

PG-D120U Operation Manual
Page 14
... signal to realize a higher-quality picture. • The S-VIDEO INPUT terminal has priority over the VIDEO INPUT terminal. Always turn off the LCD Projector while connecting to video equipment, in which the picture is used when the AV equipment to be connected has an S-VIDEO output terminal. VIDEO ...• By using the S-VIDEO INPUT terminal: • The S-VIDEO INPUT terminal uses a video signal system in order to protect both the projector and the equipment being connected. • Press on the portion labeled PUSH and open the cover to audio/video equipment such as a VCR, ...
... signal to realize a higher-quality picture. • The S-VIDEO INPUT terminal has priority over the VIDEO INPUT terminal. Always turn off the LCD Projector while connecting to video equipment, in which the picture is used when the AV equipment to be connected has an S-VIDEO output terminal. VIDEO ...• By using the S-VIDEO INPUT terminal: • The S-VIDEO INPUT terminal uses a video signal system in order to protect both the projector and the equipment being connected. • Press on the portion labeled PUSH and open the cover to audio/video equipment such as a VCR, ...
PG-D120U Operation Manual
Page 15
...PS/2 (Supplied) RGB Signal Cable (Supplied) Audio cable for a list of the computer you can use the remote control in place of the projector can control the projector and the status of the computer's mouse. Refer to page 8 for PC98 simultaneously. E-15 See page 16 and 17 for details of the connections... set-up /installing the correct Mouse Driver. • Do not connect or remove the mouse control cable or RS-232C cable to/from your projector to a computer for easy projection of full color computer images and an external monitor for details on this unit is on. Connecting the...
...PS/2 (Supplied) RGB Signal Cable (Supplied) Audio cable for a list of the computer you can use the remote control in place of the projector can control the projector and the status of the computer's mouse. Refer to page 8 for PC98 simultaneously. E-15 See page 16 and 17 for details of the connections... set-up /installing the correct Mouse Driver. • Do not connect or remove the mouse control cable or RS-232C cable to/from your projector to a computer for easy projection of full color computer images and an external monitor for details on this unit is on. Connecting the...
PG-D120U Operation Manual
Page 16
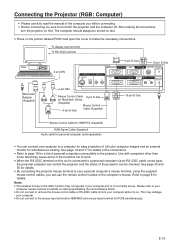
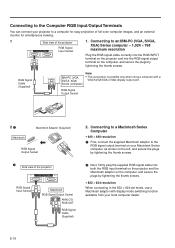
...output terminal on your Macintosh Series computer, as shown on the left, and secure the plugs by tightening the thumb screws. 2 Side view of the projector 1. Connecting to an IBM-PC (VGA, SVGA, XGA) Series computer - 1,024 × 768 IN COMPUTER RGB OUT RGB Signal Input Socket ...maximum resolution Plug the RGB signal cable correctly into the RGB INPUT terminal on the projector and into both the RGB input terminal on the projector and the Macintosh adaptor on the computer, and secure the plugs by tightening the thumb screws. • 832...
...output terminal on your Macintosh Series computer, as shown on the left, and secure the plugs by tightening the thumb screws. 2 Side view of the projector 1. Connecting to an IBM-PC (VGA, SVGA, XGA) Series computer - 1,024 × 768 IN COMPUTER RGB OUT RGB Signal Input Socket ...maximum resolution Plug the RGB signal cable correctly into the RGB INPUT terminal on the projector and into both the RGB input terminal on the projector and the Macintosh adaptor on the computer, and secure the plugs by tightening the thumb screws. • 832...
PG-D120U Operation Manual
Page 17
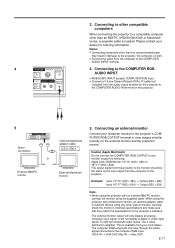
...INPUT accepts COMPUTER RGB input. • Connect a 3.5 mm Stereo Minijack-RCA L/R cable (not included) from the computer to the projector. Connecting an external monitor Connect your dealer for ordering information. Caution (Apple Macintosh) Do not connect the COMPUTER RGB OUTPUT to any other...to a compatible computer other type of monitor, carefully check the monitor's interface specifications and make sure that they match the specifications of the projector's interface. This is required. 4 MOUSE FOR PC98 WIRED REMOTE OUT AUDIO OUT COMPUTER L R AUDIO IN 3. It will only display...
...INPUT accepts COMPUTER RGB input. • Connect a 3.5 mm Stereo Minijack-RCA L/R cable (not included) from the computer to the projector. Connecting an external monitor Connect your dealer for ordering information. Caution (Apple Macintosh) Do not connect the COMPUTER RGB OUTPUT to any other...to a compatible computer other type of monitor, carefully check the monitor's interface specifications and make sure that they match the specifications of the projector's interface. This is required. 4 MOUSE FOR PC98 WIRED REMOTE OUT AUDIO OUT COMPUTER L R AUDIO IN 3. It will only display...

PG-D120U Operation Manual
Page 18
... TL T TL T TL T TL T TL T TL T TL T TL T TL - +/- + + + - - + - - - Notes: • When connecting a notebook computer to the data-projector for display on how to change display modes can be able to display images from notebook computers in "CRT only" mode. Input Signals (Recommended Timing...video signals are shown below for details. • This projector may not show a full picture image. If this occurs, turn off the LCD display on the notebook computer and output the display data in simultaneous (CRT/LCD) mode. See page 24, "Computer Mode Memory Adjustments"...
... TL T TL T TL T TL T TL T TL T TL T TL T TL - +/- + + + - - + - - - Notes: • When connecting a notebook computer to the data-projector for display on how to change display modes can be able to display images from notebook computers in "CRT only" mode. Input Signals (Recommended Timing...video signals are shown below for details. • This projector may not show a full picture image. If this occurs, turn off the LCD display on the notebook computer and output the display data in simultaneous (CRT/LCD) mode. See page 24, "Computer Mode Memory Adjustments"...
PG-D120U Operation Manual
Page 19
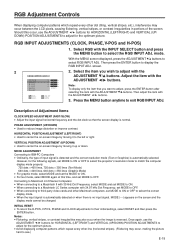
... and then press the ENTER button. However, for the following signals, set MODE to ON or OFF to select the projector's resolution mode to match the computer display mode properly. 720 dots × 400 lines, 720 dots × 350 lines...0- + [OFF] :SEL. :ADJ. ENTER : N E X T MENU : E N D ADJUSTMENT / buttons. Notes: • Flickering, vertical stripes, or contrast irregularities may occur between the LCD pixels, causing flickering, vertical stripes, or contrast irregularities in portions of the screen. RGB INPUT ADJUSTMENTS (CLOCK, PHASE, V-POS and H-POS) 1. screen. 2 RGB INPUT ADJ...
... and then press the ENTER button. However, for the following signals, set MODE to ON or OFF to select the projector's resolution mode to match the computer display mode properly. 720 dots × 400 lines, 720 dots × 350 lines...0- + [OFF] :SEL. :ADJ. ENTER : N E X T MENU : E N D ADJUSTMENT / buttons. Notes: • Flickering, vertical stripes, or contrast irregularities may occur between the LCD pixels, causing flickering, vertical stripes, or contrast irregularities in portions of the screen. RGB INPUT ADJUSTMENTS (CLOCK, PHASE, V-POS and H-POS) 1. screen. 2 RGB INPUT ADJ...
PG-D120U Operation Manual
Page 20
... the AC cord OFF ON 2 Open the socket cover and connect the supplied AC cord MAIN POWER switch to show the operating condition of the projector. Green: Lamp is on , the LAMP REPLACEMENT indicator flashes to the socket. 1 AC cord 2 OFF POWER ON LAMP TEMP. This odor will not turn... off , it may take a short while before the lamp turns on. (During this period the LAMP REPLACEMENT indicator flashes.) • After the projector is unpacked and turned on for the first time, a slight odor may be used to operate E-ZOOM function. The POWER indicator lights red and the...
... the AC cord OFF ON 2 Open the socket cover and connect the supplied AC cord MAIN POWER switch to show the operating condition of the projector. Green: Lamp is on , the LAMP REPLACEMENT indicator flashes to the socket. 1 AC cord 2 OFF POWER ON LAMP TEMP. This odor will not turn... off , it may take a short while before the lamp turns on. (During this period the LAMP REPLACEMENT indicator flashes.) • After the projector is unpacked and turned on for the first time, a slight odor may be used to operate E-ZOOM function. The POWER indicator lights red and the...


