Operation Manual
Page 1
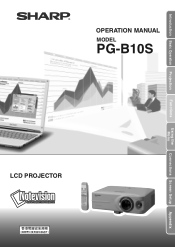
OPERATION MANUAL MODEL PG-B10S LCD PROJECTOR Introduction Basic Operation Projection Functions Using the Menu Connections Screen Setup Appendix
OPERATION MANUAL MODEL PG-B10S LCD PROJECTOR Introduction Basic Operation Projection Functions Using the Menu Connections Screen Setup Appendix
Operation Manual
Page 6
... screen TVs, video systems and video cameras, there are located in the United States of the unit. NE REMPLACER QUE PAR UNE LAMPE SHARP DE TYPE BQC-PGB10S//1. When Attaching the "QUICK GUIDE" Label Attaching the "QUICK GUIDE" Label (supplied) on page 65. LAMP REPLACEMENT CAUTION BEFORE REMOVING THE SCREW, DISCONNECT POWER CORD. ETEINDRE LA LAMPE AVANT DE PROCEDER A L'ENTRETIEN. This SHARP projector uses an LCD (Liquid Crystal Display) panel. This will help...
... screen TVs, video systems and video cameras, there are located in the United States of the unit. NE REMPLACER QUE PAR UNE LAMPE SHARP DE TYPE BQC-PGB10S//1. When Attaching the "QUICK GUIDE" Label Attaching the "QUICK GUIDE" Label (supplied) on page 65. LAMP REPLACEMENT CAUTION BEFORE REMOVING THE SCREW, DISCONNECT POWER CORD. ETEINDRE LA LAMPE AVANT DE PROCEDER A L'ENTRETIEN. This SHARP projector uses an LCD (Liquid Crystal Display) panel. This will help...
Operation Manual
Page 8
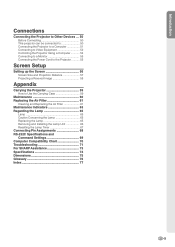
...Adjustment 39 Adjusting the Computer Image 39 Special Modes (Special Mode Settings 39 Auto Sync (Auto Sync Adjustment 40 Signal Info (Checking the Input Signal 40 Using the "Options" Menu 41 Lamp Timer (Life) (Checking the Lamp Life Status 41 OSD Display (Setting On-screen Display 41 Video System (Setting the Video System 42 Background (Selecting a Startup and Background Image) .... 42 Eco Mode (Setting the Eco Mode 43 Auto Power Off (Auto Power Off Function 43 Menu Position (Selecting the Menu Screen Position 44 Menu Color (Selecting the Menu Color 44 Password (Setting a Password...
...Adjustment 39 Adjusting the Computer Image 39 Special Modes (Special Mode Settings 39 Auto Sync (Auto Sync Adjustment 40 Signal Info (Checking the Input Signal 40 Using the "Options" Menu 41 Lamp Timer (Life) (Checking the Lamp Life Status 41 OSD Display (Setting On-screen Display 41 Video System (Setting the Video System 42 Background (Selecting a Startup and Background Image) .... 42 Eco Mode (Setting the Eco Mode 43 Auto Power Off (Auto Power Off Function 43 Menu Position (Selecting the Menu Screen Position 44 Menu Color (Selecting the Menu Color 44 Password (Setting a Password...
Operation Manual
Page 9
... Connecting to Video Equipment 52 Controlling the Projector Using a Computer 54 Connecting to a Monitor 55 Connecting the Power Cord to the Projector 55 Screen Setup Setting up the Screen 56 Screen Size and Projection Distance 57 Projecting a Revered Image 58 Appendix Carrying the Projector 59 How to Use the Carrying Case 59 Maintenance 60 Replacing the Air Filter 61 Cleaning and Replacing the Air Filter 61 Maintenance Indicators 63 Regarding the Lamp 65 Lamp 65 Caution Concerning the Lamp 65 Replacing the Lamp 65 Removing and Installing...
... Connecting to Video Equipment 52 Controlling the Projector Using a Computer 54 Connecting to a Monitor 55 Connecting the Power Cord to the Projector 55 Screen Setup Setting up the Screen 56 Screen Size and Projection Distance 57 Projecting a Revered Image 58 Appendix Carrying the Projector 59 How to Use the Carrying Case 59 Maintenance 60 Replacing the Air Filter 61 Cleaning and Replacing the Air Filter 61 Maintenance Indicators 63 Regarding the Lamp 65 Lamp 65 Caution Concerning the Lamp 65 Replacing the Lamp 65 Removing and Installing...
Operation Manual
Page 11
... the fan may vary depending on the projector will blink, and after a 90-second cooling-off the equipment to the projector. Internal cleaning should be performed by holding the lens. I The storage temperature of the projector is automatically controlled. Rest your projector. If the temperature continues to the normal operating condition. See "Replacing the Lamp" on how to it is regularly cleaned, use an appropriate power cord for instructions...
... the fan may vary depending on the projector will blink, and after a 90-second cooling-off the equipment to the projector. Internal cleaning should be performed by holding the lens. I The storage temperature of the projector is automatically controlled. Rest your projector. If the temperature continues to the normal operating condition. See "Replacing the Lamp" on how to it is regularly cleaned, use an appropriate power cord for instructions...

Operation Manual
Page 14
... MENU button For displaying adjustment and setting screens. Remote control 15 sensor Zoom knob 22 Front adjustment foot 23 (on the bottom of the projector) HEIGHT ADJUST button 23 Attaching and removing the lens cap • Press on the two buttons of the lens cap and remove it from the lens. 22 Focus ring 60 Intake vent Speaker 24 Lens shift lever -10 Power indicator 63 STANDBY button 21 For putting the projector into the standby mode. Part Names Numbers...
... MENU button For displaying adjustment and setting screens. Remote control 15 sensor Zoom knob 22 Front adjustment foot 23 (on the bottom of the projector) HEIGHT ADJUST button 23 Attaching and removing the lens cap • Press on the two buttons of the lens cap and remove it from the lens. 22 Focus ring 60 Intake vent Speaker 24 Lens shift lever -10 Power indicator 63 STANDBY button 21 For putting the projector into the standby mode. Part Names Numbers...

Operation Manual
Page 22
...-screen display to another language, reset the language according to the procedure on page 48. 1 Plug the power cord into focus or adjusting the projection image size, see page 22. • When adjusting the projection angle, see "Using the Adjustment Feet" on page 23 or "Variable Lens Shift Feature" on page 24. Enter the keycode. Power indicator ON button Lamp indicator Note • The lamp indicator illuminates, indicating the status of the lamp. Image Projection Turning the Projector on Connect...
...-screen display to another language, reset the language according to the procedure on page 48. 1 Plug the power cord into focus or adjusting the projection image size, see page 22. • When adjusting the projection angle, see "Using the Adjustment Feet" on page 23 or "Variable Lens Shift Feature" on page 24. Enter the keycode. Power indicator ON button Lamp indicator Note • The lamp indicator illuminates, indicating the status of the lamp. Image Projection Turning the Projector on Connect...

Operation Manual
Page 25
... pro- The cooling fan in this projector continues to run for 16:9. Projection Turning the Power off (Putting the Projector into the standby mode. Compresses lower side. This can also adjust the Keystone Cor- played, to put the projector into the Standby Mode) 1 Press on the projector or STANDBY on the remote control, then press that button again while the confirmation message is dis- Info • Do not unplug the power cord...
... pro- The cooling fan in this projector continues to run for 16:9. Projection Turning the Power off (Putting the Projector into the standby mode. Compresses lower side. This can also adjust the Keystone Cor- played, to put the projector into the Standby Mode) 1 Press on the projector or STANDBY on the remote control, then press that button again while the confirmation message is dis- Info • Do not unplug the power cord...

Operation Manual
Page 44
... Sync" menu screen for INPUT 1 mode Description of Auto Sync Adjustment Selectable Settings Description ON OFF Auto Sync adjustment will display the number of the computer connected to a computer. ments. (See page 39.) Note • The projector will occur when the projector is turned on the "Fine Sync" menu to check the current input signal information. Select "Auto Sync" on the image of scanned lines available from audio-visual equipment such as a DVD player or Digital Video. -40 ment) Used...
... Sync" menu screen for INPUT 1 mode Description of Auto Sync Adjustment Selectable Settings Description ON OFF Auto Sync adjustment will display the number of the computer connected to a computer. ments. (See page 39.) Note • The projector will occur when the projector is turned on the "Fine Sync" menu to check the current input signal information. Select "Auto Sync" on the image of scanned lines available from audio-visual equipment such as a DVD player or Digital Video. -40 ment) Used...
Operation Manual
Page 45
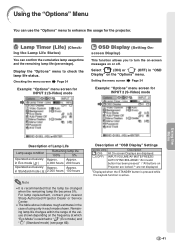
.../ AUTO SYNC/ENLARGE/ "An invalid button has been pressed." / "All buttons on or off. Display the "Options" menu to turn the on-screen messages on Projector are locked."* are not displayed. *Displayed when the STANDBY button is pressed while the keylock function is recommended that the lamp be changed when the remaining lamp life becomes 5%. Setting the menu screen Page 34 Example: "Options" menu screen for INPUT 2 (S-Video) mode Using the Menu Description of using only in Standard mode ( ) 2,000 hours 100 hours...
.../ AUTO SYNC/ENLARGE/ "An invalid button has been pressed." / "All buttons on or off. Display the "Options" menu to turn the on-screen messages on Projector are locked."* are not displayed. *Displayed when the STANDBY button is pressed while the keylock function is recommended that the lamp be changed when the remaining lamp life becomes 5%. Setting the menu screen Page 34 Example: "Options" menu screen for INPUT 2 (S-Video) mode Using the Menu Description of using only in Standard mode ( ) 2,000 hours 100 hours...
Operation Manual
Page 50
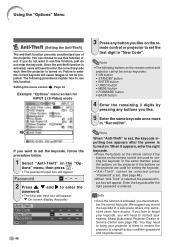
... the projector to set . (See page 45.) • When "Anti-Theft" is entered. Once the anti-theft function is turned on the remote control are used for INPUT 2 (S-Video) mode If you record the keycode in "New Code". We suggest you want to set as keycodes: • ON button • STANDBY button • ENTER button • UNDO button • MENU button • FORWARD button • BACK button 4 Enter the remaining 3 digits by...
... the projector to set . (See page 45.) • When "Anti-Theft" is entered. Once the anti-theft function is turned on the remote control are used for INPUT 2 (S-Video) mode If you record the keycode in "New Code". We suggest you want to set as keycodes: • ON button • STANDBY button • ENTER button • UNDO button • MENU button • FORWARD button • BACK button 4 Enter the remaining 3 digits by...

Operation Manual
Page 67
.../ indicator Red on Red blinks The power indicator blinks in red when the projector is on rising, the lamp will turn off and the temperature warning indicator will blink, the cooling fan will run for repair. I If a problem occurs, either the temperature warning indicator or the lamp indicator will illuminate red, and the projector will enter the standby mode. I The lamp life becomes 0%, when used for approximately 4,000 hours with "Eco Mode" or when used for approximately 2,000 hours with proper ventilation. • Clean the air filter...
.../ indicator Red on Red blinks The power indicator blinks in red when the projector is on rising, the lamp will turn off and the temperature warning indicator will blink, the cooling fan will run for repair. I If a problem occurs, either the temperature warning indicator or the lamp indicator will illuminate red, and the projector will enter the standby mode. I The lamp life becomes 0%, when used for approximately 4,000 hours with "Eco Mode" or when used for approximately 2,000 hours with proper ventilation. • Clean the air filter...
Operation Manual
Page 69
... projector to a lapse of the projector. All service of time up to note that failure can be obtained through a Sharp Autho- For the name of use. The period of this projector under warranty, including lamp replacement, must be checked with this projector is backed by following the instructions described in the picture and color quality. It is important to failure largely varies depending on -screen display. A loud sound may indicate lamp failure...
... projector to a lapse of the projector. All service of time up to note that failure can be obtained through a Sharp Autho- For the name of use. The period of this projector under warranty, including lamp replacement, must be checked with this projector is backed by following the instructions described in the picture and color quality. It is important to failure largely varies depending on -screen display. A loud sound may indicate lamp failure...

Operation Manual
Page 71
... correctly installed, the power will not turn on the projector. • "LAMP 0000H" is displayed, indicating that the lamp timer is connected to the projector. Resetting the Lamp Timer Reset the lamp timer after replacing the lamp. 1 Connect the power cord. • Plug the power cord into the lamp unit compartment. Fasten the securing screws. 7 Replace the lamp unit cover. • Align the tab on the lamp unit cover (1) and place it while pressing the tab (2) to close it . 6 Insert the new lamp...
... correctly installed, the power will not turn on the projector. • "LAMP 0000H" is displayed, indicating that the lamp timer is connected to the projector. Resetting the Lamp Timer Reset the lamp timer after replacing the lamp. 1 Connect the power cord. • Plug the power cord into the lamp unit compartment. Fasten the securing screws. 7 Replace the lamp unit cover. • Align the tab on the lamp unit cover (1) and place it while pressing the tab (2) to close it . 6 Insert the new lamp...

Operation Manual
Page 73
... to the computer. Computer P OWR _ _ _ 1 → ← Projector OK BUTTONS & REMOTE CONTROL KEY CONTROL CONTENTS Standby Power On INPUT1 INPUT2 INPUT3 INPUT1 SIGNAL TYPE : AUTO INPUT1 SIGNAL TYPE : RGB INPUT1 SIGNAL TYPE : COMPONENT Lamp Usage Time (hour) Remaining Lamp Life (Percentage) Lamp Status Unit Status Model Name Check AV Mute Off AV Mute On Auto Sync Start COMMAND PARAMETER RETURN P O W R _ _ _ 0 OK or ERR P O W R _ _ _ 1 OK or ERR I R G B _ _ _ 1 OK or ERR I V E D _ _ _ 1 OK or ERR I V E D _ _ _ 2 OK or ERR...
... to the computer. Computer P OWR _ _ _ 1 → ← Projector OK BUTTONS & REMOTE CONTROL KEY CONTROL CONTENTS Standby Power On INPUT1 INPUT2 INPUT3 INPUT1 SIGNAL TYPE : AUTO INPUT1 SIGNAL TYPE : RGB INPUT1 SIGNAL TYPE : COMPONENT Lamp Usage Time (hour) Remaining Lamp Life (Percentage) Lamp Status Unit Status Model Name Check AV Mute Off AV Mute On Auto Sync Start COMMAND PARAMETER RETURN P O W R _ _ _ 0 OK or ERR P O W R _ _ _ 1 OK or ERR I R G B _ _ _ 1 OK or ERR I V E D _ _ _ 1 OK or ERR I V E D _ _ _ 2 OK or ERR...

Operation Manual
Page 75
... room temperature changes. Maintenance • See "Maintenance Indicators". 63 indicator illuminates. Check • Projector power cord is not plugged into the If the keylock is set to ON, all the buttons are incorrectly set. (Video Input only) • Video input system is incorrectly set. (INPUT 1 only) • Input signal type (RGB/Component) is incorrectly set when connecting notebook computer. • The filter cover or the lamp unit cover is not installed correctly. • Cables incorrectly connected to rear panel...
... room temperature changes. Maintenance • See "Maintenance Indicators". 63 indicator illuminates. Check • Projector power cord is not plugged into the If the keylock is set to ON, all the buttons are incorrectly set. (Video Input only) • Video input system is incorrectly set. (INPUT 1 only) • Input signal type (RGB/Component) is incorrectly set when connecting notebook computer. • The filter cover or the lamp unit cover is not installed correctly. • Cables incorrectly connected to rear panel...
Operation Manual
Page 77
...://www.sharp.at Benelux Australia New Zealand Singapore Hong Kong Taiwan Malaysia U.A.E. Ltd. 1300-135-022 http://www.sharp.net.au Sharp Corporation of Australia Pty. For SHARP Assistance If you encounter any problems during setup or operation of this operation manual does not answer your question, please contact the SHARP Service departments listed below. If this projector, first refer to the "Troubleshooting" section...
...://www.sharp.at Benelux Australia New Zealand Singapore Hong Kong Taiwan Malaysia U.A.E. Ltd. 1300-135-022 http://www.sharp.net.au Sharp Corporation of Australia Pty. For SHARP Assistance If you encounter any problems during setup or operation of this operation manual does not answer your question, please contact the SHARP Service departments listed below. If this projector, first refer to the "Troubleshooting" section...
Operation Manual
Page 78
... (including adjustment foot and projecting parts) Weight (approx.) 6.0 lbs. (2.7 kg) Supplied accessories Remote control, Two R-6 batteries, Power cord for U.S., Canada etc. (6', 1.8 m), Power cord for Europe, except U.K. (6', 1.8 m), Power cord for U.K., Hong Kong and Singapore (6', 1.8 m), Power cord for Australia, New Zealand and Oceania (6', 1.8 m), RGB cable (9'10", 3.0 m), Carrying case, Lens cap (attached), Extra air filter, Lens shipping block (attached), Projector manual and technical reference CD-ROM, "QUICK GUIDE" label, Operation manual Replacement parts Lamp unit (Lamp/cage module...
... (including adjustment foot and projecting parts) Weight (approx.) 6.0 lbs. (2.7 kg) Supplied accessories Remote control, Two R-6 batteries, Power cord for U.S., Canada etc. (6', 1.8 m), Power cord for Europe, except U.K. (6', 1.8 m), Power cord for U.K., Hong Kong and Singapore (6', 1.8 m), Power cord for Australia, New Zealand and Oceania (6', 1.8 m), RGB cable (9'10", 3.0 m), Carrying case, Lens cap (attached), Extra air filter, Lens shipping block (attached), Projector manual and technical reference CD-ROM, "QUICK GUIDE" label, Operation manual Replacement parts Lamp unit (Lamp/cage module...
Operation Manual
Page 80
... High quality resizing of a computer and video image is not correctly entered, the projector will not operate even if signals are displayed in their native resolution. Keylock Mode that offers a richer image by the IEC (International Electrotechnical Commission). When phase level is being output. Gamma Image quality enhancement function that can be made in the projector is 4:3. Password A password is incorrect. Auto Sync Optimizes projected computer images by using...
... High quality resizing of a computer and video image is not correctly entered, the projector will not operate even if signals are displayed in their native resolution. Keylock Mode that offers a richer image by the IEC (International Electrotechnical Commission). When phase level is being output. Gamma Image quality enhancement function that can be made in the projector is 4:3. Password A password is incorrect. Auto Sync Optimizes projected computer images by using...

Operation Manual
Page 81
... Power cord 55 Power indicator 63 PRJ mode (Reversing Projected Images 49 Rear adjustment foot 23 Red 36 Remote control 14 Remote control sensor 15 Replacing the lamp 65 RESIZE button 26 RGB cable 51 RGB OUTPUT terminal 55 RS-232C terminal 54 Sharp 36 Signal Info 40 Signal Type 38 Special Modes 39 sRGB 37 STANDBY button 21 STRETCH 26 Supplied accessories 9 Temperature warning indicator 63 Tint 36 UNDO button 21 Video System 42 Volume buttons 19 V-Pos 39 Zoom...
... Power cord 55 Power indicator 63 PRJ mode (Reversing Projected Images 49 Rear adjustment foot 23 Red 36 Remote control 14 Remote control sensor 15 Replacing the lamp 65 RESIZE button 26 RGB cable 51 RGB OUTPUT terminal 55 RS-232C terminal 54 Sharp 36 Signal Info 40 Signal Type 38 Special Modes 39 sRGB 37 STANDBY button 21 STRETCH 26 Supplied accessories 9 Temperature warning indicator 63 Tint 36 UNDO button 21 Video System 42 Volume buttons 19 V-Pos 39 Zoom...


