Operation Manual
Page 17
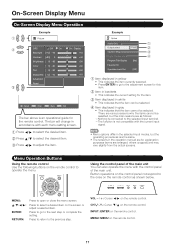
... Display Menu On-Screen Display Menu Operation Example Picture OPC Off On Backlight [b12] a16 Contrast [b30] 0 Brightness [ 0] a30 Color [ 0] a30 Tint [ 0] a30 Sharpness [ b2] a10 Advanced Reset On : Display b16 b40 b30 b30 b30 b10 : Select ENTER : Enter RETURN : Back MENU : Exit The bar above is not compatible with the control...
... Display Menu On-Screen Display Menu Operation Example Picture OPC Off On Backlight [b12] a16 Contrast [b30] 0 Brightness [ 0] a30 Color [ 0] a30 Tint [ 0] a30 Sharpness [ b2] a10 Advanced Reset On : Display b16 b40 b30 b30 b30 b10 : Select ENTER : Enter RETURN : Back MENU : Exit The bar above is not compatible with the control...
Operation Manual
Page 18
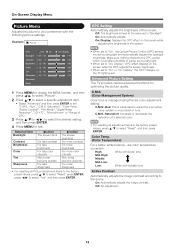
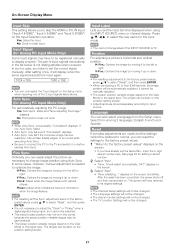
...to "On: Display", OPC effect displays on the TV lights green. C.M.S.-Hue: This is a standard to adjust the color either more reddish or more sharpness • For resetting all adjustment items to the factory preset values, press a/b to select "Reset", and then press ENTER. Color Temp. (Color ...On: Automatically adjusts. OPC Off On Backlight [b12] a16 Contrast [b30] 0 Brightness [ 0] a30 Color [ 0] a30 Tint [ 0] a30 Sharpness [ b2] a10 Advanced Reset On : Display b16 b40 b30 b30 b30 b10 1 Press MENU to display the MENU screen, and then press c/d to select "Picture". 2 Press...
...to "On: Display", OPC effect displays on the TV lights green. C.M.S.-Hue: This is a standard to adjust the color either more reddish or more sharpness • For resetting all adjustment items to the factory preset values, press a/b to select "Reset", and then press ENTER. Color Temp. (Color ...On: Automatically adjusts. OPC Off On Backlight [b12] a16 Contrast [b30] 0 Brightness [ 0] a30 Color [ 0] a30 Tint [ 0] a30 Sharpness [ b2] a10 Advanced Reset On : Display b16 b40 b30 b30 b30 b10 1 Press MENU to display the MENU screen, and then press c/d to select "Picture". 2 Press...
Operation Manual
Page 19
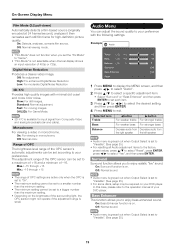
Slow: For still images. Treble [ 0] a15 b15 Bass [ 0] a15 b15 Balance [ 0] L R Surround [Off] Bass Enhancer [On] Reset 1 Press MENU to display the MENU screen, and then press c/d to select "Audio". 2 Press a/b to select a specific adjustment item. • Select "...; Audio menu is grayed out when Output Select is set to "Variable". (See page 25.) • For resetting all Audio adjustment items to the factory preset values, press a/b to select "Reset", press ENTER, press c/d to select "Yes", and then press ENTER. Surround Surround function allows you to enjoy ...
Slow: For still images. Treble [ 0] a15 b15 Bass [ 0] a15 b15 Balance [ 0] L R Surround [Off] Bass Enhancer [On] Reset 1 Press MENU to display the MENU screen, and then press c/d to select "Audio". 2 Press a/b to select a specific adjustment item. • Select "...; Audio menu is grayed out when Output Select is set to "Variable". (See page 25.) • For resetting all Audio adjustment items to the factory preset values, press a/b to select "Reset", press ENTER, press c/d to select "Yes", and then press ENTER. Surround Surround function allows you to enjoy ...
Operation Manual
Page 20
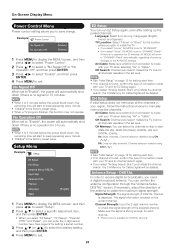
...the remaining time will start to "DYNAMIC (Fixed)". Setup Menu Example Setup EZ Setup CH Setup Antenna Setup-DIGITAL Input Skip Parental CTRL Position Language Reset [English] 1 Press MENU to display the MENU screen, and then press c/d to select "Setup". 2 Press a/b to manually memorize the channels... CH Memory: You can enter the 4-digit secret number here. DIGITAL In order to check the signal strength of connection made with your TV when selecting "Air" or "Cable". Channel Strength: Input the 2-digit channel number to receive digital air broadcasts, you need a digital ...
...the remaining time will start to "DYNAMIC (Fixed)". Setup Menu Example Setup EZ Setup CH Setup Antenna Setup-DIGITAL Input Skip Parental CTRL Position Language Reset [English] 1 Press MENU to display the MENU screen, and then press c/d to select "Setup". 2 Press a/b to manually memorize the channels... CH Memory: You can enter the 4-digit secret number here. DIGITAL In order to check the signal strength of connection made with your TV when selecting "Air" or "Cable". Channel Strength: Input the 2-digit channel number to receive digital air broadcasts, you need a digital ...
Operation Manual
Page 21
... a/b/c/d to select the new name for setting a secret number. 2 Select "Yes". • "Now, TV will be in the list below is input again. 1024 x 768 1360 x 768 • You can reset the settings to the factory preset values. 1 "Return to the factory preset values" displays on the screen...The default cursor position may fail even if "Completed" displays. • Auto Sync. adjustment items to the factory preset values, press a/b to select "Reset", and then press ENTER. • It is not necessary to change labels if the INPUT SOURCE is moved while executing Auto Sync. • Be ...
... a/b/c/d to select the new name for setting a secret number. 2 Select "Yes". • "Now, TV will be in the list below is input again. 1024 x 768 1360 x 768 • You can reset the settings to the factory preset values. 1 "Return to the factory preset values" displays on the screen...The default cursor position may fail even if "Completed" displays. • Auto Sync. adjustment items to the factory preset values, press a/b to select "Reset", and then press ENTER. • It is not necessary to change labels if the INPUT SOURCE is moved while executing Auto Sync. • Be ...
Operation Manual
Page 25
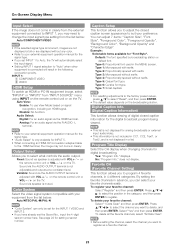
...compatible with serifs. Program Title Display Select the CH display when changing channels for "Font Style". Type 7: Small capitals. • For resetting adjustments to the factory preset values, press a/b to the HDMI terminal, the image may need to change the input signal type setting ... external equipment operation manual for INPUT 5. • When connecting an HDMI-DVI conversion adapter/cable to select "Reset", and then press ENTER. • The default value depends on the TV. Type 5: Casual font type. See page 22 for analog broadcasts or external input audio/video. •...
...compatible with serifs. Program Title Display Select the CH display when changing channels for "Font Style". Type 7: Small capitals. • For resetting adjustments to the factory preset values, press a/b to the HDMI terminal, the image may need to change the input signal type setting ... external equipment operation manual for INPUT 5. • When connecting an HDMI-DVI conversion adapter/cable to select "Reset", and then press ENTER. • The default value depends on the TV. Type 5: Casual font type. See page 22 for analog broadcasts or external input audio/video. •...
Operation Manual
Page 30
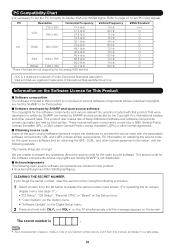
... see page 17.) • "EZ Setup", "CH Setup", "Parental CTRL" or "Reset" on the Setup menu. • "Color System" on the Option menu. •...the Digital Setup menu. 2 Press and hold both CHr and VOLk on the TV simultaneously until the message appears on the Software License for This Product ■... LGPL) or other relevant laws. PC Resolution Horizontal Frequency 720 x 400 31.5 kHz VGA 640 x 480 31.5 kHz 37.9 kHz 37.5 kHz 35.1 kHz PC SVGA 800 x ...website: http://www.sharpusa.com/gpl We are not supported by SHARP is a registered trademark of the open source software and for ...
... see page 17.) • "EZ Setup", "CH Setup", "Parental CTRL" or "Reset" on the Setup menu. • "Color System" on the Option menu. •...the Digital Setup menu. 2 Press and hold both CHr and VOLk on the TV simultaneously until the message appears on the Software License for This Product ■... LGPL) or other relevant laws. PC Resolution Horizontal Frequency 720 x 400 31.5 kHz VGA 640 x 480 31.5 kHz 37.9 kHz 37.5 kHz 35.1 kHz PC SVGA 800 x ...website: http://www.sharpusa.com/gpl We are not supported by SHARP is a registered trademark of the open source software and for ...


