
Operation Manual
Page 2
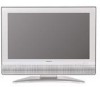
... operation manual are located at the rear of loss or theft, please record the TV's model and serial numbers in the space provided. LC-26SH2 U LC-32SH2 U LiQUiD CRYSTAL TELEViSiON ENGLISH OPERATION MANUAL • The illustrations and on the LC-32SH20U model. The lightning flash with arrow-head symbol, within an equilateral triangle, is intended...
... operation manual are located at the rear of loss or theft, please record the TV's model and serial numbers in the space provided. LC-26SH2 U LC-32SH2 U LiQUiD CRYSTAL TELEViSiON ENGLISH OPERATION MANUAL • The illustrations and on the LC-32SH20U model. The lightning flash with arrow-head symbol, within an equilateral triangle, is intended...

Operation Manual
Page 5
... a swimming pool; The product should !a!a!: . TdehteailLsi.quid Crystal panel is made of the product. Precautions when transporting the TV . When transporting the TV, never carry it can cause overheating and/or shorten the life of glass. protection for ventilation. or near water - Select...I II I II I The Liquid Crystal panel used in an enclosed place such as a fixed point of the /_, /LY / IIl'/ F-X IJl// J TV. Use only a cart, stand, tripod, bracket or table _ | recommended by holding it is dropped or applied with two hands -- Therefore, it from heat...
... a swimming pool; The product should !a!a!: . TdehteailLsi.quid Crystal panel is made of the product. Precautions when transporting the TV . When transporting the TV, never carry it can cause overheating and/or shorten the life of glass. protection for ventilation. or near water - Select...I II I II I The Liquid Crystal panel used in an enclosed place such as a fixed point of the /_, /LY / IIl'/ F-X IJl// J TV. Use only a cart, stand, tripod, bracket or table _ | recommended by holding it is dropped or applied with two hands -- Therefore, it from heat...

Operation Manual
Page 6
... ANTENNA LEAD IN WIRE ANTENNA DISCHARGE UNIT (NEC SECTION 810-20) NEC -- I o prevent fire or shock hazard, do not place the AC cord under the TV set . Use a soft cloth and gently wipe the surface of antenna-discharge unit, connection to grounding electrodes, and requirements for a long time, as this product...
... ANTENNA LEAD IN WIRE ANTENNA DISCHARGE UNIT (NEC SECTION 810-20) NEC -- I o prevent fire or shock hazard, do not place the AC cord under the TV set . Use a soft cloth and gently wipe the surface of antenna-discharge unit, connection to grounding electrodes, and requirements for a long time, as this product...

Operation Manual
Page 7
... hex key II Long screw Short screw _4 _%_ hex key • To detach the stand, perform the steps in the TV falling over the base area to lay the TV on the rear of the stand unit to follow the instructions. 1. Before performing work spread cushioning over . * Be sure ...to each other using the 4 short screws and the hex key (supplied with the TV. Short screws (X4) (used in step 2) Long screws (X4) (used in the correct direction. Confirm the 8 screws supplied with the product) as shown. 3. ...
... hex key II Long screw Short screw _4 _%_ hex key • To detach the stand, perform the steps in the TV falling over the base area to lay the TV on the rear of the stand unit to follow the instructions. 1. Before performing work spread cushioning over . * Be sure ...to each other using the 4 short screws and the hex key (supplied with the TV. Short screws (X4) (used in step 2) Long screws (X4) (used in the correct direction. Confirm the 8 screws supplied with the product) as shown. 3. ...

Operation Manual
Page 8
...-- To clean the outer cabinet, use liquid or aerosol cleaners. How to the AC outlet, and keep the wrapping on either side of the TV. (See page 13.) 4. The television is glass and can be adjusted. _=7 Gently wipe and avoid pressing on television. 2. QUICK INSTALLATION TIPS ... POWER on the screen. VOL + V CH /X INPUT POWER B) POWER indicator on the front of the television lights GREEN. • Place the TV close to turn on the television for stability. 1. Do not use the same method. QUICK REFERENCE STOP! To safely remove the television from the box...
...-- To clean the outer cabinet, use liquid or aerosol cleaners. How to the AC outlet, and keep the wrapping on either side of the TV. (See page 13.) 4. The television is glass and can be adjusted. _=7 Gently wipe and avoid pressing on television. 2. QUICK INSTALLATION TIPS ... POWER on the screen. VOL + V CH /X INPUT POWER B) POWER indicator on the front of the television lights GREEN. • Place the TV close to turn on the television for stability. 1. Do not use the same method. QUICK REFERENCE STOP! To safely remove the television from the box...
Operation Manual
Page 9
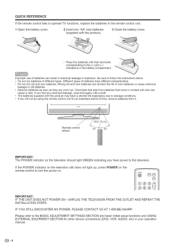
...instructions below. • Do not mix batteries of batteries have different characteristics. IF YOU STILL ENCOUNTER NO POWER, PLEASE CONTACT US AT 1-800-BE-SHARP. I Open the battery cover. 2 Insert two "AA" size batteries (supplied with a cloth. If you will not be using the remote ... power to storage conditions. If the POWER indicator on the television still does not light up, press POWER on the remote control to operate TV functions, replace the batteries in your operation manual. _=8 CDCD MUTE (::3 I_ DISPLAY INPUT @® IMPORTANT: IF THE UNIT DOES NOT POWER...
...instructions below. • Do not mix batteries of batteries have different characteristics. IF YOU STILL ENCOUNTER NO POWER, PLEASE CONTACT US AT 1-800-BE-SHARP. I Open the battery cover. 2 Insert two "AA" size batteries (supplied with a cloth. If you will not be using the remote ... power to storage conditions. If the POWER indicator on the television still does not light up, press POWER on the remote control to operate TV functions, replace the batteries in your operation manual. _=8 CDCD MUTE (::3 I_ DISPLAY INPUT @® IMPORTANT: IF THE UNIT DOES NOT POWER...
Operation Manual
Page 10
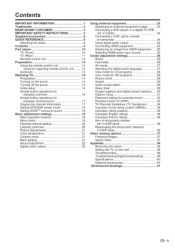
...SHARP CUSTOMER 3 iMPORTANT SAFETY iNSTRUCTiONS 3 Supplied accessories 6 QUICK REFERENCE 6 Attaching the stand 6 Contents 9 Part names 10 TV (Front 10 TV (Rear 11 Remote control unit 12 Preparation 13 Using the remote control unit 13 Cautions regarding remote control unit ......... 13 Antennas 13 Watching TV...Closed captions and digital closed captions ...... 30 Caption setup 31 Password setting for parental control 32 Parental control (V-CHIP 33 TV Parental Guidelines (TV Guidelines 34 Voluntary movie rating system (MPAA 34 Canadian rating systems 35 Canadian English ratings ...
...SHARP CUSTOMER 3 iMPORTANT SAFETY iNSTRUCTiONS 3 Supplied accessories 6 QUICK REFERENCE 6 Attaching the stand 6 Contents 9 Part names 10 TV (Front 10 TV (Rear 11 Remote control unit 12 Preparation 13 Using the remote control unit 13 Cautions regarding remote control unit ......... 13 Antennas 13 Watching TV...Closed captions and digital closed captions ...... 30 Caption setup 31 Password setting for parental control 32 Parental control (V-CHIP 33 TV Parental Guidelines (TV Guidelines 34 Voluntary movie rating system (MPAA 34 Canadian rating systems 35 Canadian English ratings ...
Operation Manual
Page 13
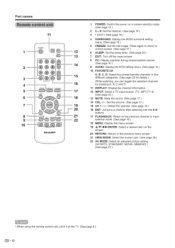
...While watching, you can toggle the selected channels 16 by pressing A, B, C and D. 11 DISPLAY: Display the channel information. 17 12 INPUT: Select a TV input source. (TV, INPUT1-4) (See page 23.) 18 13 MUTE: Mute the sound. (See page 17.) 14 VOL +/-: Set the volume. (See page 17.) 19 ... AV MODE: Select an adjusted picture setting. (SPORTS, STANDARD, MOVIE, MEMORY.) (See page 27.) • When using the remote control unit, point it at the TV. (See page 8.) _=12 Select a desired item on or enters standby mode. (See page 14.) 2 0 = 9: Set the channel. (See page 16.) 3 _ (DOT): (...
...While watching, you can toggle the selected channels 16 by pressing A, B, C and D. 11 DISPLAY: Display the channel information. 17 12 INPUT: Select a TV input source. (TV, INPUT1-4) (See page 23.) 18 13 MUTE: Mute the sound. (See page 17.) 14 VOL +/-: Set the volume. (See page 17.) 19 ... AV MODE: Select an adjusted picture setting. (SPORTS, STANDARD, MOVIE, MEMORY.) (See page 27.) • When using the remote control unit, point it at the TV. (See page 8.) _=12 Select a desired item on or enters standby mode. (See page 14.) 2 0 = 9: Set the channel. (See page 16.) 3 _ (DOT): (...

Operation Manual
Page 14
... with F-type connector that can easily be attached to liquids, and do not expose the remote control unit to a terminal without a CATV Cable TV lead-In _ converter r, Combination VHF/UHF _y antenna HomeA...n.t terminal (75-ohm) [_ 7 Separate VHF/UHF antenna 75-ohm coaxial cable (round... enjoy a clearer picture, use an outdoor antenna. Preparation Use the remote control unit by pointing it towards the remote control sensor on the TV is under direct sunlight. A 300-ohm system is a flat "twin-lead" cable that can be finger-tightened only. Connecting Antenna Cable...
... with F-type connector that can easily be attached to liquids, and do not expose the remote control unit to a terminal without a CATV Cable TV lead-In _ converter r, Combination VHF/UHF _y antenna HomeA...n.t terminal (75-ohm) [_ 7 Separate VHF/UHF antenna 75-ohm coaxial cable (round... enjoy a clearer picture, use an outdoor antenna. Preparation Use the remote control unit by pointing it towards the remote control sensor on the TV is under direct sunlight. A 300-ohm system is a flat "twin-lead" cable that can be finger-tightened only. Connecting Antenna Cable...
Operation Manual
Page 15
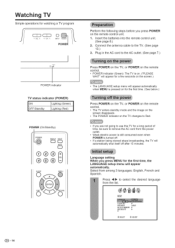
... is still consumed even when POWER is pressed on for the first time. (See below.) Press POWER on the TV, or POWER on the remote control. • The TV enters standby mode and the image on the screen disappears. • The POWER indicator on the remote control unit.... SETUP CLOCK SET AIR/CABLE CABLE AUTO CH MEMORY ADD/DELETE T L_I:SELECT I_J:AD3UST _=14 VOL + V OH /_ INPUT POWER I !°d POWER indicator TV status indicator (POWER) ON Lighting (Green) OFF/Standby Lighting (Red) POWER (On/Standby) MUTE CD @@@ SLEEP MENU i Perform the following steps before you press...
... is still consumed even when POWER is pressed on for the first time. (See below.) Press POWER on the TV, or POWER on the remote control. • The TV enters standby mode and the image on the screen disappears. • The POWER indicator on the remote control unit.... SETUP CLOCK SET AIR/CABLE CABLE AUTO CH MEMORY ADD/DELETE T L_I:SELECT I_J:AD3UST _=14 VOL + V OH /_ INPUT POWER I !°d POWER indicator TV status indicator (POWER) ON Lighting (Green) OFF/Standby Lighting (Red) POWER (On/Standby) MUTE CD @@@ SLEEP MENU i Perform the following steps before you press...

Operation Manual
Page 16
... date and time manually. Set the DAY, YEAR and TIME (hour and minute) as above step. Channel search AUTO CHANNEL MEMORY makes the TV look for selected channel. AUTOCH MEMORY EXIT:CANCEL Antenna setting Make sure what kind of connection is applied. • To add a digital channel... to select _ (SETUP). Now, skipping channel is made with your area. Press ,&IV to select "ADD/DELETE", and then press 4/I_. The TV will begin memorizing all the channels from channel memory: Select "CLEAR ALL" after step 3, and the press 4/1_. Now, the channel list becomes selectable...
... date and time manually. Set the DAY, YEAR and TIME (hour and minute) as above step. Channel search AUTO CHANNEL MEMORY makes the TV look for selected channel. AUTOCH MEMORY EXIT:CANCEL Antenna setting Make sure what kind of connection is applied. • To add a digital channel... to select _ (SETUP). Now, skipping channel is made with your area. Press ,&IV to select "ADD/DELETE", and then press 4/I_. The TV will begin memorizing all the channels from channel memory: Select "CLEAR ALL" after step 3, and the press 4/1_. Now, the channel list becomes selectable...

Operation Manual
Page 17
...DISPLAY INPUT MUTE CD FREEZE SURROUND FLASHBACK CZ) CD SLEEP MENU 5 AUDIO CC VIEWMODE AVMODE CD CD C:::)C:::) CK)GD CE)CZ} FAVORITE CH SHARP Method 1 Using CH A/V TV. C • FLASHBACK wilt not work if no operation within a few seconds, (_=16 Method 2 1 Press FLASHBACK to switch to the ...CATV/DIGITAL To select a 1 or 2-digit channel number (e. To select a 3=digit channel number (e. on the remote control unit or on . Watching TV You can change , it actually moves from the digital channel to the analog channel. If you enter 0=9 and o (DOT), channel selection wilt be...
...DISPLAY INPUT MUTE CD FREEZE SURROUND FLASHBACK CZ) CD SLEEP MENU 5 AUDIO CC VIEWMODE AVMODE CD CD C:::)C:::) CK)GD CE)CZ} FAVORITE CH SHARP Method 1 Using CH A/V TV. C • FLASHBACK wilt not work if no operation within a few seconds, (_=16 Method 2 1 Press FLASHBACK to switch to the ...CATV/DIGITAL To select a 1 or 2-digit channel number (e. To select a 3=digit channel number (e. on the remote control unit or on . Watching TV You can change , it actually moves from the digital channel to the analog channel. If you enter 0=9 and o (DOT), channel selection wilt be...

Operation Manual
Page 18
...• V-CHIP RATING • Program name • HD or SD mark • Closed Caption mark • V-Chip mark • VOL+/= on the TV operates the same as VOL+/= on the remote control unit. or MUTE. _=17 Press DISPLAY again, the analog information wilt appear. • Clock • Channel... again to display the current channel (or input source)information on the screen for approx. 10 seconds. • Mute can change the volume on the TV or on the remote control unit. V CH A INPUT POWER (9@@ @@@ Using VOL +/= • To increase the volume, press VOL+. • To decrease...
...• V-CHIP RATING • Program name • HD or SD mark • Closed Caption mark • V-Chip mark • VOL+/= on the TV operates the same as VOL+/= on the remote control unit. or MUTE. _=17 Press DISPLAY again, the analog information wilt appear. • Clock • Channel... again to display the current channel (or input source)information on the screen for approx. 10 seconds. • Mute can change the volume on the TV or on the remote control unit. V CH A INPUT POWER (9@@ @@@ Using VOL +/= • To increase the volume, press VOL+. • To decrease...

Operation Manual
Page 19
..., stereo sound and Secondary Audio Programs (SAP). This feature is a special combination of SRS Labs audio technologies that allows reception of three features; The TV with deep, rich bass from _ (AUDIO) menu. Press SURROUND and the _ (AUDIO) menu screen displays. Press AUDIO again or 4/_ to the..., tow or off the surround sound effect. "MTS" Will be highlighted. You can enter to select "STR 'STEREO)", "SAP" or "MONO". Your TV's audio will be highlighted. Press 4/1_ to turn on or off . Press AUDIO and the _i (AUDIO) menu screen displays. AUDIO A FOCUS TruBass ...
..., stereo sound and Secondary Audio Programs (SAP). This feature is a special combination of SRS Labs audio technologies that allows reception of three features; The TV with deep, rich bass from _ (AUDIO) menu. Press SURROUND and the _ (AUDIO) menu screen displays. Press AUDIO again or 4/_ to the..., tow or off the surround sound effect. "MTS" Will be highlighted. You can enter to select "STR 'STEREO)", "SAP" or "MONO". Your TV's audio will be highlighted. Press 4/1_ to turn on or off . Press AUDIO and the _i (AUDIO) menu screen displays. AUDIO A FOCUS TruBass ...
Operation Manual
Page 23
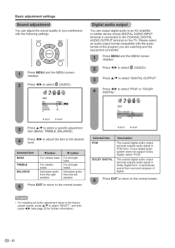
... sound quality to your digital audio system does not support Dolby Digital, select "PCM". Press 4/t_ to the COAXIAL DIGITAL AUDIO OUTPUT terminal on the TV. Press 4/t_ to adjust the item to select "DIGITAL OUTPUT". Basic adjustment settings You can output digital audio to an AV amplifier or similar device...
... sound quality to your digital audio system does not support Dolby Digital, select "PCM". Press 4/t_ to the COAXIAL DIGITAL AUDIO OUTPUT terminal on the TV. Press 4/t_ to adjust the item to select "DIGITAL OUTPUT". Basic adjustment settings You can output digital audio to an AV amplifier or similar device...
Operation Manual
Page 24
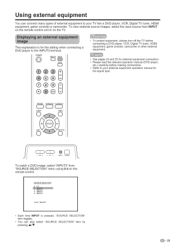
... Refer to the INPUT3 terminal, POWER CD DISPLAY INPUT MUTE CD @® • To protect equipment, always turn off the TV before connecting a DVD player, VCR, Digital TV tuner, HDMI equipment, game console, camcorder or other external equipment. • See pages 24 and 25 for the signal type.... select "SOURCE SELECTION" item by pressing A/V. _= 23 To view external source images, select the input source from "SOURCE SELECTION" menu using 0-4 on the TV. INPUT3 4. VOL + V CH /N ®C3 INPUT POWER To watch a DVD image, select "INPUT3" from INPUT on the remote control unit or...
... Refer to the INPUT3 terminal, POWER CD DISPLAY INPUT MUTE CD @® • To protect equipment, always turn off the TV before connecting a DVD player, VCR, Digital TV tuner, HDMI equipment, game console, camcorder or other external equipment. • See pages 24 and 25 for the signal type.... select "SOURCE SELECTION" item by pressing A/V. _= 23 To view external source images, select the input source from "SOURCE SELECTION" menu using 0-4 on the TV. INPUT3 4. VOL + V CH /N ®C3 INPUT POWER To watch a DVD image, select "INPUT3" from INPUT on the remote control unit or...

Operation Manual
Page 25
... It is possible to output audio through the COXIAL DIGITAL AUDIO OUTPUT terminal, (See page 22 for connecting a DVD player or a Digital TV STB to the HDMI terminal. AV cable (commercially available) _ S-video cable _ (commercially available) VCPJGame console/ © Camcorder To coa... (INPUT1 or 2} Component video cable (commercially available Audio cable (commercially available) AV cable (commercially available) DVD played Digital TV STB DVD player/ Digital TV STB • See page 25 for details,) PCM audio outputs from the terminal, • The S-video terminal takes priority...
... It is possible to output audio through the COXIAL DIGITAL AUDIO OUTPUT terminal, (See page 22 for connecting a DVD player or a Digital TV STB to the HDMI terminal. AV cable (commercially available) _ S-video cable _ (commercially available) VCPJGame console/ © Camcorder To coa... (INPUT1 or 2} Component video cable (commercially available Audio cable (commercially available) AV cable (commercially available) DVD played Digital TV STB DVD player/ Digital TV STB • See page 25 for details,) PCM audio outputs from the terminal, • The S-video terminal takes priority...
Operation Manual
Page 26
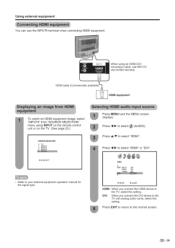
INPUT 4 When using INPUT on the remote control unit or on the TV. (See page 23.) SOURCE SELECTION 0. TV 1. INPUT3 [0-4]:SELECT • Refer to the normal screen. (_)= 25 Press EXIT to return to your external equipment operation manual for the signal type. ...AUDIO A WOW SRS 3D OFF FOCUS OFF TruBass OFF T _:SELECT L_qADJUST HDMI: When you connect the DVl device to the TV with analog audio cords, select this setting. Press A/V to the TV, select this setting. INPUT1 2. HDMI cable (Commercially available To watch an HDMI equipment image, select "INPUT4" from "SOURCE ...
INPUT 4 When using INPUT on the remote control unit or on the TV. (See page 23.) SOURCE SELECTION 0. TV 1. INPUT3 [0-4]:SELECT • Refer to the normal screen. (_)= 25 Press EXIT to return to your external equipment operation manual for the signal type. ...AUDIO A WOW SRS 3D OFF FOCUS OFF TruBass OFF T _:SELECT L_qADJUST HDMI: When you connect the DVl device to the TV with analog audio cords, select this setting. Press A/V to the TV, select this setting. INPUT1 2. HDMI cable (Commercially available To watch an HDMI equipment image, select "INPUT4" from "SOURCE ...
Operation Manual
Page 27
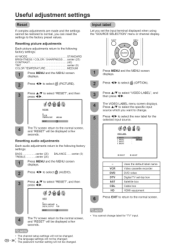
...You cannot change . Resetting audio adjustments Each audio adjustments return to the following factory settings: AV MODE STANDARD BRIGHTNESS / COLOR / SHARPNESS .....center (25) CONTRAST 40) TINT center (0) COLOR TEMPERATURE MEDIUM Press MENU and the MENU screen displays. INPUT4 (_J:SELECT... and then _ress 4/1_. INPUT3 4. Press 4/t_ to sel,ect. :_:_(,PICTURE). The VIDEO LABEL menu screen displays. The TV screen return to the following factory settings: BASS center (25) TREBLE center (25) BALANCE ...... Resetting picture adjustments Each picture adjustments...
...You cannot change . Resetting audio adjustments Each audio adjustments return to the following factory settings: AV MODE STANDARD BRIGHTNESS / COLOR / SHARPNESS .....center (25) CONTRAST 40) TINT center (0) COLOR TEMPERATURE MEDIUM Press MENU and the MENU screen displays. INPUT4 (_J:SELECT... and then _ress 4/1_. INPUT3 4. Press 4/t_ to sel,ect. :_:_(,PICTURE). The VIDEO LABEL menu screen displays. The TV screen return to the following factory settings: BASS center (25) TREBLE center (25) BALANCE ...... Resetting picture adjustments Each picture adjustments...

Operation Manual
Page 28
Press A/Y to select your desired language, then press ENTER. PICTURE BRIGHTNESS 25 CONTRAST 40 COLOR 25 TINT 0 SHARPNESS 25 T L_I:SELECT @:ADJUST AUDIO A DIGITAL OUTPUT PCM RESET {_qSELECT I_I:ADJUST Press A/'V to select "AUDIO LANGUAGE", and then press 4/1_. NOINFO 6. You can ... for sports viewing For a highly defined image in a digital signal, you four viewing options to choose from to best match the surrounding environment of the TV, which can vary due to the normal screen. • Each time AV MODE is pressed, AV MODE item toggles. • You can select a different ...
Press A/Y to select your desired language, then press ENTER. PICTURE BRIGHTNESS 25 CONTRAST 40 COLOR 25 TINT 0 SHARPNESS 25 T L_I:SELECT @:ADJUST AUDIO A DIGITAL OUTPUT PCM RESET {_qSELECT I_I:ADJUST Press A/'V to select "AUDIO LANGUAGE", and then press 4/1_. NOINFO 6. You can ... for sports viewing For a highly defined image in a digital signal, you four viewing options to choose from to best match the surrounding environment of the TV, which can vary due to the normal screen. • Each time AV MODE is pressed, AV MODE item toggles. • You can select a different ...


