Operation Manual
Page 3
... the mast and supporting structure, grounding of an authorization code for a CATV converter, is damaged. Power Cord Protection - Damage Requiring Service - If liquid has been spilled, or objects have been adhered to be retained for cleaning. When replacement parts are not sure of the type of power source indicated on or pinched by the operating instructions as opening or removing covers may result...
... the mast and supporting structure, grounding of an authorization code for a CATV converter, is damaged. Power Cord Protection - Damage Requiring Service - If liquid has been spilled, or objects have been adhered to be retained for cleaning. When replacement parts are not sure of the type of power source indicated on or pinched by the operating instructions as opening or removing covers may result...

Operation Manual
Page 4
... by method claims of this model 525p DVD player, please contact our customer service center. No Fingers or Other Objects Inside Do not put your fingers or objects on the power and wait for more than two hours for progressive scan outputs Consumers should be displayed in the picture. Apparatus Claims of the unit may not operate properly or damage the...
... by method claims of this model 525p DVD player, please contact our customer service center. No Fingers or Other Objects Inside Do not put your fingers or objects on the power and wait for more than two hours for progressive scan outputs Consumers should be displayed in the picture. Apparatus Claims of the unit may not operate properly or damage the...

Operation Manual
Page 6
... 7 Functional overview 8 Installing batteries in the remote control 10 Using a remote control 10 The VCR/DVD recorder Switching 10 SETUP/DISC/CD menu 11 DISPLAY menu 12 Connections 14 Connection to a TV 14 Connection to a cable box or satellite box . . . .15 Connection to an Audio System 16 Getting started 17 Easy DVD recording 17 Channel setting 19 Getting channels automatically 19 Adding/deleting channels 20 Selecting the TV stereo or SAP 21 Setting the clock 22 Auto Clock Setting 22 Manual Clock Setting 23 Setting the daylight saving time 25 Selecting the TV aspect ratio...
... 7 Functional overview 8 Installing batteries in the remote control 10 Using a remote control 10 The VCR/DVD recorder Switching 10 SETUP/DISC/CD menu 11 DISPLAY menu 12 Connections 14 Connection to a TV 14 Connection to a cable box or satellite box . . . .15 Connection to an Audio System 16 Getting started 17 Easy DVD recording 17 Channel setting 19 Getting channels automatically 19 Adding/deleting channels 20 Selecting the TV stereo or SAP 21 Setting the clock 22 Auto Clock Setting 22 Manual Clock Setting 23 Setting the daylight saving time 25 Selecting the TV aspect ratio...

Operation Manual
Page 7
... operation manual Many functions of this format is , we put on the remote control before proceeding next step. Setting/clearing chapter markers. Symbol in SETUP menu before proceeding next step. 7 Editing Changing the SETUP menu VCR functions Others Español Indicates that you need to select the DVD mode by entering the exact amount of traditional television signals. Playing discs Recording DVD mode VCR mode This unit is compatible with both DVD-RW, which is rewritable repeatedly, and DVD...
... operation manual Many functions of this format is , we put on the remote control before proceeding next step. Setting/clearing chapter markers. Symbol in SETUP menu before proceeding next step. 7 Editing Changing the SETUP menu VCR functions Others Español Indicates that you need to select the DVD mode by entering the exact amount of traditional television signals. Playing discs Recording DVD mode VCR mode This unit is compatible with both DVD-RW, which is rewritable repeatedly, and DVD...

Operation Manual
Page 8
... the VCR output mode is selected. 6. Disc tray (DVD) Place a disc when open or close the disc tray. 4. Press to connect a TV monitor, AV receiver or other equipment with component video cables. 4. OUTPUT SELECT button (DVD/VCR) Press to select the component you wish to this unit. 2. PLAY button (VCR) Press to connect external equipment with a standard video cable. 9. VIDEO INPUT jack (LINE1) (DVD/VCR) Use to start recording. POWER button / indicator (DVD/VCR) Press to start playback. 17. REC/OTR button (DVD) Press once to turn the unit on . 2. CHANNEL L / K button (DVD/VCR...
... the VCR output mode is selected. 6. Disc tray (DVD) Place a disc when open or close the disc tray. 4. Press to connect a TV monitor, AV receiver or other equipment with component video cables. 4. OUTPUT SELECT button (DVD/VCR) Press to select the component you wish to this unit. 2. PLAY button (VCR) Press to connect external equipment with a standard video cable. 9. VIDEO INPUT jack (LINE1) (DVD/VCR) Use to start recording. POWER button / indicator (DVD/VCR) Press to start playback. 17. REC/OTR button (DVD) Press once to turn the unit on . 2. CHANNEL L / K button (DVD/VCR...

Operation Manual
Page 9
... the SETUP menu. 3. Number buttons (DVD/VCR) Press to display the setup menu. SETUP button (DVD/VCR) Press to select channel numbers. OPEN/CLOSE A button (DVD)* Press to select VIDEO or TV position. 19. VIDEO/TV button (DVD/VCR) Press to open or close the disc tray. 16. POWER button (DVD/VCR) Press to start a recording. Or when playback is paused, press to play or recording. 21. CLEAR/C.RESET button (DVD/VCR) • DVD mode Press to clear the password once entered, to cancel the programming for the settings in the timer recording setting mode,etc. • VCR mode Press...
... the SETUP menu. 3. Number buttons (DVD/VCR) Press to display the setup menu. SETUP button (DVD/VCR) Press to select channel numbers. OPEN/CLOSE A button (DVD)* Press to select VIDEO or TV position. 19. VIDEO/TV button (DVD/VCR) Press to open or close the disc tray. 16. POWER button (DVD/VCR) Press to start a recording. Or when playback is paused, press to play or recording. 21. CLEAR/C.RESET button (DVD/VCR) • DVD mode Press to clear the password once entered, to cancel the programming for the settings in the timer recording setting mode,etc. • VCR mode Press...

Operation Manual
Page 11
... unit to play . Before you start Connections Getting started Recording Before you start Functional overview (cont'd) Guide to Displays on screen menu This unit uses the following on screen menu for most operations: SETUP/DISC/CD menu, Title list, and DISPLAY menu.They allow you to finalize a disc containing recorded titles. 4. Select Video: To choose a line input to record to display each menu. Channel: To adjust the channel setting of the disc or a videotape. Edit: Turns on a title list, (When a disc with VR mode is...
... unit to play . Before you start Connections Getting started Recording Before you start Functional overview (cont'd) Guide to Displays on screen menu This unit uses the following on screen menu for most operations: SETUP/DISC/CD menu, Title list, and DISPLAY menu.They allow you to finalize a disc containing recorded titles. 4. Select Video: To choose a line input to record to display each menu. Channel: To adjust the channel setting of the disc or a videotape. Edit: Turns on a title list, (When a disc with VR mode is...

Operation Manual
Page 19
... stored using the CHANNEL buttons. 1 POWER REC MODE REC SPEED AUDIO OPEN/CLOSE .@/: 1 GHI 4 PQRS 7 DISPLAY ABC 2 JKL 5 TUV 8 SPACE 0 VCR DEF 3 MNO CH 6 WXYZ VIDEO/TV 9 SLOW DVD PAUSE 3 7 PLAY STOP REC/OTR SETUP TIMER PROG. Setup 1 Press POWER button to which are on the remote control. Screen: 6 Select "Auto Preset" using { / B buttons, then press ENTER button. The unit will start Connections Getting started Channel setting 4 Select "SETUP" using K / L buttons, then press ENTER button. Playback Setting 2 Turn the TV on and be received. • The selection will...
... stored using the CHANNEL buttons. 1 POWER REC MODE REC SPEED AUDIO OPEN/CLOSE .@/: 1 GHI 4 PQRS 7 DISPLAY ABC 2 JKL 5 TUV 8 SPACE 0 VCR DEF 3 MNO CH 6 WXYZ VIDEO/TV 9 SLOW DVD PAUSE 3 7 PLAY STOP REC/OTR SETUP TIMER PROG. Setup 1 Press POWER button to which are on the remote control. Screen: 6 Select "Auto Preset" using { / B buttons, then press ENTER button. The unit will start Connections Getting started Channel setting 4 Select "SETUP" using K / L buttons, then press ENTER button. Playback Setting 2 Turn the TV on and be received. • The selection will...
Operation Manual
Page 23
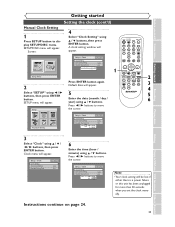
.../C.RESET ZOOM SKIP SEARCH MODE CM SKIP SKIP 2 3 4 5 6 Playback Setting Setup > Clock VCR DVD Clock Setting Auto Clock Setting Daylight Saving Time JAN / 12 / 2004 (MON) 12 : 00AM Auto ON Playing discs Editing Changing the SETUP menu VCR functions Others Español 3 Select "Clock" using K / L buttons. Default date will be lost if either there is a power failure or this unit has been unplugged for more than 30 seconds when you start Connections Getting started Recording Getting started Setting the clock (cont'd) Manual Clock Setting...
.../C.RESET ZOOM SKIP SEARCH MODE CM SKIP SKIP 2 3 4 5 6 Playback Setting Setup > Clock VCR DVD Clock Setting Auto Clock Setting Daylight Saving Time JAN / 12 / 2004 (MON) 12 : 00AM Auto ON Playing discs Editing Changing the SETUP menu VCR functions Others Español 3 Select "Clock" using K / L buttons. Default date will be lost if either there is a power failure or this unit has been unplugged for more than 30 seconds when you start Connections Getting started Recording Getting started Setting the clock (cont'd) Manual Clock Setting...

Operation Manual
Page 28
... information.) • Discs recorded in other DVD recorders. To play in other DVD players, finalize discs recorded on this unit with this unit cannot be used to page 41.) Finalizing* Playable This Unit DVD player Not Playable * You cannot finalize discs in video mode on copy control Some satellite broadcasts include copy-protected information. Disc type DVD-RW ver.1.1 ver.1.1 CPRM compatible DVD-R ver.2.0 Mode Video mode VR mode Video mode 28 Recordable Not Recordable Note • The audio and video quality is...
... information.) • Discs recorded in other DVD recorders. To play in other DVD players, finalize discs recorded on this unit with this unit cannot be used to page 41.) Finalizing* Playable This Unit DVD player Not Playable * You cannot finalize discs in video mode on copy control Some satellite broadcasts include copy-protected information. Disc type DVD-RW ver.1.1 ver.1.1 CPRM compatible DVD-R ver.2.0 Mode Video mode VR mode Video mode 28 Recordable Not Recordable Note • The audio and video quality is...

Operation Manual
Page 29
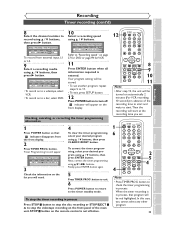
... disc with the recording format selected in Video mode. • A blank chapter may be put as you specified. 8 Press SETUP button to exit. Setup Playback Setting VR mode has been selected as the default. 7 Select a desired time option using K / L / { / B buttons, then press ENTER button. POWER REC MODE REC SPEED AUDIO OPEN/CLOSE .@/: 1 GHI 4 PQRS 7 DISPLAY ABC 2 JKL 5 TUV 8 SPACE 0 VCR DEF 3 MNO CH 6 WXYZ VIDEO/TV 9 SLOW DVD PAUSE 1 8 PLAY STOP REC/OTR SETUP TIMER PROG. REC MONITOR ENTER MENU/LIST TOP MENU RETURN CLEAR/C.RESET...
... disc with the recording format selected in Video mode. • A blank chapter may be put as you specified. 8 Press SETUP button to exit. Setup Playback Setting VR mode has been selected as the default. 7 Select a desired time option using K / L / { / B buttons, then press ENTER button. POWER REC MODE REC SPEED AUDIO OPEN/CLOSE .@/: 1 GHI 4 PQRS 7 DISPLAY ABC 2 JKL 5 TUV 8 SPACE 0 VCR DEF 3 MNO CH 6 WXYZ VIDEO/TV 9 SLOW DVD PAUSE 1 8 PLAY STOP REC/OTR SETUP TIMER PROG. REC MONITOR ENTER MENU/LIST TOP MENU RETURN CLEAR/C.RESET...
Operation Manual
Page 35
... STOP/EJECT C A to record using K / L buttons, then press B button. To correct the timer programming, select your desired program using K / L buttons, then press ENTER button. REC MONITOR ENTER MENU/LIST TOP MENU RETURN CLEAR/C.RESET ZOOM SKIP SEARCH MODE CM SKIP SKIP 8 9 10 11 Note • After step 12, the unit will be stored. • To set . 1 6 POWER REC MODE REC SPEED AUDIO OPEN/CLOSE .@/: 1 GHI 4 PQRS 7 DISPLAY ABC 2 JKL 5 TUV 8 SPACE 0 VCR DEF 3 MNO CH 6 WXYZ VIDEO...
... STOP/EJECT C A to record using K / L buttons, then press B button. To correct the timer programming, select your desired program using K / L buttons, then press ENTER button. REC MONITOR ENTER MENU/LIST TOP MENU RETURN CLEAR/C.RESET ZOOM SKIP SEARCH MODE CM SKIP SKIP 8 9 10 11 Note • After step 12, the unit will be stored. • To set . 1 6 POWER REC MODE REC SPEED AUDIO OPEN/CLOSE .@/: 1 GHI 4 PQRS 7 DISPLAY ABC 2 JKL 5 TUV 8 SPACE 0 VCR DEF 3 MNO CH 6 WXYZ VIDEO...

Operation Manual
Page 36
... available.To make these operations available, cancel the timer recording or timer standby first ( indicator disappears). • To cancel the timer standby mode, press POWER button. • When the Start and the End time are the same, the length of overlapped settings This unit records the programs according to the Start time for PROG. 1. tape), press POWER button first and then press PLAY B or OPEN/CLOSE A (or STOP/EJECT C A) button. • The timer recording is not...
... available.To make these operations available, cancel the timer recording or timer standby first ( indicator disappears). • To cancel the timer standby mode, press POWER button. • When the Start and the End time are the same, the length of overlapped settings This unit records the programs according to the Start time for PROG. 1. tape), press POWER button first and then press PLAY B or OPEN/CLOSE A (or STOP/EJECT C A) button. • The timer recording is not...

Operation Manual
Page 39
... the picture is stabilized, then set the starting this function, pre- Option window will appear. POWER REC MODE REC SPEED AUDIO OPEN/CLOSE .@/: ABC DEF 1 2 3 GHI JKL MNO CH 4 5 6 videotape is DVD-RW Recording Format Auto Chapter Timer Programming VR mode 10 minutes recordable. SEARCH MODE CM SKIP 4 intact. Screen: Setup Menu 4 Select "Dubbing Mode" using { / B buttons, then press ENTER button. Playing discs Editing Changing the SETUP menu VCR functions Others Español Instructions continue on the DVD- PQRS 7 DISPLAY TUV 8 SPACE 0 VCR WXYZ VIDEO/TV...
... the picture is stabilized, then set the starting this function, pre- Option window will appear. POWER REC MODE REC SPEED AUDIO OPEN/CLOSE .@/: ABC DEF 1 2 3 GHI JKL MNO CH 4 5 6 videotape is DVD-RW Recording Format Auto Chapter Timer Programming VR mode 10 minutes recordable. SEARCH MODE CM SKIP 4 intact. Screen: Setup Menu 4 Select "Dubbing Mode" using { / B buttons, then press ENTER button. Playing discs Editing Changing the SETUP menu VCR functions Others Español Instructions continue on the DVD- PQRS 7 DISPLAY TUV 8 SPACE 0 VCR WXYZ VIDEO/TV...

Operation Manual
Page 41
... DVD players. 1 Press SETUP button to play in Video mode, you cannot edit or record anything else on this unit even after being finalized. • When you insert a DVD-RW disc finalized with this unit, "Undo Finalize" will appear. Recording Finalizing the discs Before you start . Option window will appear instead of "Finalize". POWER REC MODE REC SPEED AUDIO OPEN/CLOSE .@/: 1 GHI 4 PQRS 7 DISPLAY ABC 2 JKL 5 TUV 8 SPACE 0 VCR...
... DVD players. 1 Press SETUP button to play in Video mode, you cannot edit or record anything else on this unit even after being finalized. • When you insert a DVD-RW disc finalized with this unit, "Undo Finalize" will appear. Recording Finalizing the discs Before you start . Option window will appear instead of "Finalize". POWER REC MODE REC SPEED AUDIO OPEN/CLOSE .@/: 1 GHI 4 PQRS 7 DISPLAY ABC 2 JKL 5 TUV 8 SPACE 0 VCR...

Operation Manual
Page 43
... for DVD playback The contents of disc play . Indicates a disc type and a format mode. 2. Each icon means: : Search : Audio : Subtitle :Angle (except VR mode) : Repeat : Marker : Noise Reduction : Zoom 43 Discs that are available while disc is not guaranteed : • DVD-RW Ver 1.2 / 2-4x CPRM compatible • DVD-R General Ver 2.0 / 8x Guide to displays The number inside the globe refers to play DVD discs with the same region code. Playing discs Editing Changing the SETUP menu VCR functions Others Español DVD+R (VIDEO mode...
... for DVD playback The contents of disc play . Indicates a disc type and a format mode. 2. Each icon means: : Search : Audio : Subtitle :Angle (except VR mode) : Repeat : Marker : Noise Reduction : Zoom 43 Discs that are available while disc is not guaranteed : • DVD-RW Ver 1.2 / 2-4x CPRM compatible • DVD-R General Ver 2.0 / 8x Guide to displays The number inside the globe refers to play DVD discs with the same region code. Playing discs Editing Changing the SETUP menu VCR functions Others Español DVD+R (VIDEO mode...

Operation Manual
Page 97
... the Service Center for more than 30 seconds. Disconnect the playback equipment in question and connect it again. • The program contains copy protection signals that restricts copying. • The timer setting overlapped with another setting that the AC power cord is no batteries in SETUP menu (page 19). • Select a channel of this unit appears on the unit. • The remote control is impossible. If not, press POWER button. • Batteries...
... the Service Center for more than 30 seconds. Disconnect the playback equipment in question and connect it again. • The program contains copy protection signals that restricts copying. • The timer setting overlapped with another setting that the AC power cord is no batteries in SETUP menu (page 19). • Select a channel of this unit appears on the unit. • The remote control is impossible. If not, press POWER button. • Batteries...

Operation Manual
Page 98
... DVD VIDEO being played. • The DVD VIDEO prohibits the changing of two layered disc, picture may not be changed or turned off the display. • Check if the INTERLACE/PROGRESSIVE mode is adding disc data to your TV's S-VIDEO input. Recording does not start playback from the disc automatically. The unit starts playing from the beginning. • Resume play . Some functions such as a CD-ROM) (page 43). • The region code on the DVD VIDEO...
... DVD VIDEO being played. • The DVD VIDEO prohibits the changing of two layered disc, picture may not be changed or turned off the display. • Check if the INTERLACE/PROGRESSIVE mode is adding disc data to your TV's S-VIDEO input. Recording does not start playback from the disc automatically. The unit starts playing from the beginning. • Resume play . Some functions such as a CD-ROM) (page 43). • The region code on the DVD VIDEO...

Operation Manual
Page 102
... "copy-once" broadcast programs (e.g. Regions code Regions associate discs and players with digital inputs, this unit. Compare this unit, it is independent to PCM. Aspect ratio The width of sound by Dolby Laboratories. DTS (Digital Theater System) DTS is a 5.1channel surround sound system, but requires a lot of sampling in DVD players.With this to digital audio which sound is allowed to compress digital sound developed by numbers. Progressive Scan provides less flickering and higher image resolution than that directly...
... "copy-once" broadcast programs (e.g. Regions code Regions associate discs and players with digital inputs, this unit. Compare this unit, it is independent to PCM. Aspect ratio The width of sound by Dolby Laboratories. DTS (Digital Theater System) DTS is a 5.1channel surround sound system, but requires a lot of sampling in DVD players.With this to digital audio which sound is allowed to compress digital sound developed by numbers. Progressive Scan provides less flickering and higher image resolution than that directly...

Operation Manual
Page 103
...). 103 Editing Changing the SETUP menu VCR functions Others Español Output level C (color) - Service Information (For the U.S.) For the location of this product are subject to change without notice. Output level Jacks Component video output Output level Jacks Audio input During audio input Jacks Audio output During audio output Jacks Digital audio output Output level Jacks 48kHz Dolby Digital 2-13ch 14-69ch C1-C125ch Built-in VHF converter VHF channel 3 or 4 VHF/UHF set 75Ω Input 1 (rear), 2 (front) 1 Vp...
...). 103 Editing Changing the SETUP menu VCR functions Others Español Output level C (color) - Service Information (For the U.S.) For the location of this product are subject to change without notice. Output level Jacks Component video output Output level Jacks Audio input During audio input Jacks Audio output During audio output Jacks Digital audio output Output level Jacks 48kHz Dolby Digital 2-13ch 14-69ch C1-C125ch Built-in VHF converter VHF channel 3 or 4 VHF/UHF set 75Ω Input 1 (rear), 2 (front) 1 Vp...


