
ARC265P Operation Manual
Page 4
Multi-purpose Tray 68 Consumables and Replacement Supplies 72 Life Expectancy 72 Part Numbers 72 Replace a Toner Cartridge 73 Replace an Image Drum 79 Replace the Fuser 87 Printer Settings (Menu Settings 91 Print a list of the current settings 91 Changing Settings 92 Reset to Factory Defaults 94 ... Cleaning Page 160 Printer Drivers 162 General Information 162 Install 162 Which Printer Driver to Use 163 Change Driver Settings 164 Save Driver Settings 165 Sharp AR-C265P User's Guide 4
Multi-purpose Tray 68 Consumables and Replacement Supplies 72 Life Expectancy 72 Part Numbers 72 Replace a Toner Cartridge 73 Replace an Image Drum 79 Replace the Fuser 87 Printer Settings (Menu Settings 91 Print a list of the current settings 91 Changing Settings 92 Reset to Factory Defaults 94 ... Cleaning Page 160 Printer Drivers 162 General Information 162 Install 162 Which Printer Driver to Use 163 Change Driver Settings 164 Save Driver Settings 165 Sharp AR-C265P User's Guide 4
ARC265P Operation Manual
Page 19
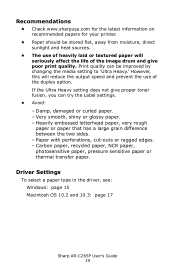
... or ragged edges. - Driver Settings To select a paper type in the driver, see: Windows: page 15 Macintosh OS 10.2 and 10.3: page 17 Sharp AR-C265P User's Guide 19 If the Ultra Heavy setting does not give poor print quality. Very smooth, shiny or glossy paper. - However, this will seriously affect... sunlight and heat sources. • The use of heavily laid or textured paper will reduce the output speed and prevent the use of the image drum and give proper toner fusion, you can try the Label settings. • Avoid: - Recommendations • Check www.sharpusa.com for the latest ...
... or ragged edges. - Driver Settings To select a paper type in the driver, see: Windows: page 15 Macintosh OS 10.2 and 10.3: page 17 Sharp AR-C265P User's Guide 19 If the Ultra Heavy setting does not give poor print quality. Very smooth, shiny or glossy paper. - However, this will seriously affect... sunlight and heat sources. • The use of heavily laid or textured paper will reduce the output speed and prevent the use of the image drum and give proper toner fusion, you can try the Label settings. • Avoid: - Recommendations • Check www.sharpusa.com for the latest ...

ARC265P Operation Manual
Page 20
... be used • which paper exit path can be used • whether you can use in the printer driver. Print quality can be improved by Sharp AR-C265P User's Guide 20 Application settings override driver settings. US Bond (90 g/m²) • Xerox® 4024, 20 lb.US Bond (75 g/m²) Recommendations • Check... • 35 lb Index = 64 g/m2 For more information, go to www.paper-paper.com/ weight.html The size, weight, and type of the image drum and give poor print quality. These settings can be made in the printer menu or in copiers and laser printers.
... be used • which paper exit path can be used • whether you can use in the printer driver. Print quality can be improved by Sharp AR-C265P User's Guide 20 Application settings override driver settings. US Bond (90 g/m²) • Xerox® 4024, 20 lb.US Bond (75 g/m²) Recommendations • Check... • 35 lb Index = 64 g/m2 For more information, go to www.paper-paper.com/ weight.html The size, weight, and type of the image drum and give poor print quality. These settings can be made in the printer menu or in copiers and laser printers.
ARC265P Operation Manual
Page 22
... exit path can be used . Application settings override driver settings. Letterhead General Information The size, weight, and type of the image drum is also known as simplex printing. Driver settings override printer menu settings. These settings can be made in the printer menu or in the printer driver. Sharp AR-C265P User's Guide 22
... exit path can be used . Application settings override driver settings. Letterhead General Information The size, weight, and type of the image drum is also known as simplex printing. Driver settings override printer menu settings. These settings can be made in the printer menu or in the printer driver. Sharp AR-C265P User's Guide 22
ARC265P Operation Manual
Page 23
...paper. - Very smooth, shiny or glossy paper. - Carbon paper, recycled paper, NCR paper, photosensitive paper, pressure sensitive paper or thermal transfer paper. Sharp AR-C265P User's Guide 23 Print quality can try the Label settings. • Avoid: - Paper with perforations, cut-outs or ragged edges. - If the Ultra... heat sources. • The use of heavily laid or textured paper will reduce the output speed and prevent the use of the image drum and give proper toner fusion, you can be improved by changing the media setting to withstand 446°F (230°C) for 0.2 second...
...paper. - Very smooth, shiny or glossy paper. - Carbon paper, recycled paper, NCR paper, photosensitive paper, pressure sensitive paper or thermal transfer paper. Sharp AR-C265P User's Guide 23 Print quality can try the Label settings. • Avoid: - Paper with perforations, cut-outs or ragged edges. - If the Ultra... heat sources. • The use of heavily laid or textured paper will reduce the output speed and prevent the use of the image drum and give proper toner fusion, you can be improved by changing the media setting to withstand 446°F (230°C) for 0.2 second...
ARC265P Operation Manual
Page 72
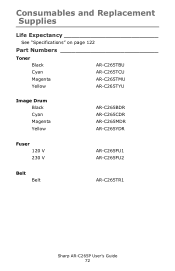
Consumables and Replacement Supplies Life Expectancy See "Specifications" on page 122 Part Numbers Toner Black AR-C265TBU Cyan AR-C265TCU Magenta Yellow AR-C265TMU AR-C265TYU Image Drum Black Cyan Magenta Yellow AR-C265BDR AR-C265CDR AR-C265MDR AR-C265YDR Fuser 120 V 230 V AR-C265FU1 AR-C265FU2 Belt Belt AR-C265TR1 Sharp AR-C265P User's Guide 72
Consumables and Replacement Supplies Life Expectancy See "Specifications" on page 122 Part Numbers Toner Black AR-C265TBU Cyan AR-C265TCU Magenta Yellow AR-C265TMU AR-C265TYU Image Drum Black Cyan Magenta Yellow AR-C265BDR AR-C265CDR AR-C265MDR AR-C265YDR Fuser 120 V 230 V AR-C265FU1 AR-C265FU2 Belt Belt AR-C265TR1 Sharp AR-C265P User's Guide 72

ARC265P Operation Manual
Page 76
Hold the cartridge by its top center with the colored release lever to the right. Do not touch the toner release lever until the toner cartridge is installed in the image drum. Push it will open the toner release slot and spill toner. 7. Insert the left end of the cartridge into the top of the cartridge. If you do, it firmly against the spring on the drum unit. 6. CAUTION! c53_80_tonrout.jpg Sharp AR-C265P User's Guide 76 Remove the adhesive tape from the underside of the image drum.
Hold the cartridge by its top center with the colored release lever to the right. Do not touch the toner release lever until the toner cartridge is installed in the image drum. Push it will open the toner release slot and spill toner. 7. Insert the left end of the cartridge into the top of the cartridge. If you do, it firmly against the spring on the drum unit. 6. CAUTION! c53_80_tonrout.jpg Sharp AR-C265P User's Guide 76 Remove the adhesive tape from the underside of the image drum.

ARC265P Operation Manual
Page 77
c53_75_tonrlvrclose.jpg Sharp AR-C265P User's Guide 77 Lower the right end of the cartridge into the image drum unit. Press it in place. Then, push the colored lock lever back to open the toner slot and lock it firmly down in place. c53_73_tonerdrum.jpg 8.
c53_75_tonrlvrclose.jpg Sharp AR-C265P User's Guide 77 Lower the right end of the cartridge into the image drum unit. Press it in place. Then, push the colored lock lever back to open the toner slot and lock it firmly down in place. c53_73_tonerdrum.jpg 8.

ARC265P Operation Manual
Page 78
The lever should move easily. Close and latch the top cover. Press back on the toner cartridge to be sure that it does not, STOP! To avoid toner spillage, DO NOT open the toner release lever until the toner cartridge is properly seated in the image drum. 9. Use the provided LED lens cleaner. c53_45_latchcvr.jp g Sharp AR-C265P User's Guide 78 Gently wipe the LED. c5x_ledarray_bw.jpg 10. If it is firmly seated in the image drum. Push down on the lever again. IMPORTANT!
The lever should move easily. Close and latch the top cover. Press back on the toner cartridge to be sure that it does not, STOP! To avoid toner spillage, DO NOT open the toner release lever until the toner cartridge is properly seated in the image drum. 9. Use the provided LED lens cleaner. c53_45_latchcvr.jp g Sharp AR-C265P User's Guide 78 Gently wipe the LED. c5x_ledarray_bw.jpg 10. If it is firmly seated in the image drum. Push down on the lever again. IMPORTANT!

ARC265P Operation Manual
Page 79
Press the cover release and open the top cover fully. c53_02_opencvr.jpg Sharp AR-C265P User's Guide 79 Replace an Image Drum c53_31_drumREV.jpg and c53_30_single_toner.JPG REPLACE IMAGE DRUM nnn: ZZZZ DRUM LIFE nnn: ZZZZ = 350: YELLOW 351: MAGENTA 352: CYAN 353: BLACK Important! The life expectancy of the cartridge will be reduced as the toner charges the new drum. 1. You must replace the toner cartridge when you replace the image drum.
Press the cover release and open the top cover fully. c53_02_opencvr.jpg Sharp AR-C265P User's Guide 79 Replace an Image Drum c53_31_drumREV.jpg and c53_30_single_toner.JPG REPLACE IMAGE DRUM nnn: ZZZZ DRUM LIFE nnn: ZZZZ = 350: YELLOW 351: MAGENTA 352: CYAN 353: BLACK Important! The life expectancy of the cartridge will be reduced as the toner charges the new drum. 1. You must replace the toner cartridge when you replace the image drum.

ARC265P Operation Manual
Page 80
WARNING! If the printer has been powered on, the fuser is clearly labelled. This area is HOT. Do not touch it in accordance with its toner cartridge, out of the four image drums: Cyan (1), Magenta (2), Yellow (3), Black (4). Lift the image drum, complete with your local regulations. c53_53_drumremove.jpg Sharp AR-C265P User's Guide 80 Note the positions of the printer. Discard it . 2. c53_09_lidup.jpg 3.
WARNING! If the printer has been powered on, the fuser is clearly labelled. This area is HOT. Do not touch it in accordance with its toner cartridge, out of the four image drums: Cyan (1), Magenta (2), Yellow (3), Black (4). Lift the image drum, complete with your local regulations. c53_53_drumremove.jpg Sharp AR-C265P User's Guide 80 Note the positions of the printer. Discard it . 2. c53_09_lidup.jpg 3.

ARC265P Operation Manual
Page 81
CAUTION! 4. Image drum handling The image drum contains toner. c53_31_drum.jpg, Checkmark.bmp c53_79_drumtilt_3.jpg c53_78_drumtilt_2.jpg Sharp AR-C265P User's Guide 81 To avoid spilling toner, be careful to keep it upright. Unpack the new image drum.
CAUTION! 4. Image drum handling The image drum contains toner. c53_31_drum.jpg, Checkmark.bmp c53_79_drumtilt_3.jpg c53_78_drumtilt_2.jpg Sharp AR-C265P User's Guide 81 To avoid spilling toner, be careful to keep it upright. Unpack the new image drum.

ARC265P Operation Manual
Page 82
... Grasp the white tape tab and peel the tape off the drum. The green surface at the base of each image drum is very delicate and light sensitive. • Do not touch the green surface. • Never expose the drum to direct sunlight or to very bright room lighting. •... more than 5 minutes. • If the image drum must be out of the printer for longer than 5 minutes, place the image drum inside a black plastic bag or carefully place it in a drawer or cabinet to keep it away from light. 5. c53_28_removedrumtape.jpg 6. c53_26removepaper.jpg Sharp AR-C265P User's Guide 82 CAUTION!
... Grasp the white tape tab and peel the tape off the drum. The green surface at the base of each image drum is very delicate and light sensitive. • Do not touch the green surface. • Never expose the drum to direct sunlight or to very bright room lighting. •... more than 5 minutes. • If the image drum must be out of the printer for longer than 5 minutes, place the image drum inside a black plastic bag or carefully place it in a drawer or cabinet to keep it away from light. 5. c53_28_removedrumtape.jpg 6. c53_26removepaper.jpg Sharp AR-C265P User's Guide 82 CAUTION!

ARC265P Operation Manual
Page 84
Place the image drum in the printer. c53_84_removedrumwithorange.jpg 10. c53_83_removeorangething.jpg Sharp AR-C265P User's Guide 84 Remove the orange drum seal. 9.
Place the image drum in the printer. c53_84_removedrumwithorange.jpg 10. c53_83_removeorangething.jpg Sharp AR-C265P User's Guide 84 Remove the orange drum seal. 9.

ARC265P Operation Manual
Page 85
See "Install a Toner Cartridge" on page 75. c53_04_shk_tnr_CROP.JPG c53_05_remv_tape_CROP.jpg c53_80_tonrout_CROP.JPG c53_75crop_tonrlvrclose.jpg Sharp AR-C265P User's Guide 85 11. Install the new toner cartridge in the image drum.
See "Install a Toner Cartridge" on page 75. c53_04_shk_tnr_CROP.JPG c53_05_remv_tape_CROP.jpg c53_80_tonrout_CROP.JPG c53_75crop_tonrlvrclose.jpg Sharp AR-C265P User's Guide 85 11. Install the new toner cartridge in the image drum.

ARC265P Operation Manual
Page 95
Press the cover release and open the top cover fully. Do not touch it. 2. This area is essential that they go back in the correct order! c53_09_lidup.jpg Sharp AR-C265P User's Guide 95 c53_02_opencvr.jpg WARNING! Note the positions of the four image drums: Cyan (1), Magenta (2), Yellow (3), Black (4). It is clearly labelled. If the printer has been powered on, the fuser is located under the four image drums. 1. Replace the Belt Unit REPLACE BELT 355: BELT LIFE The belt unit is HOT.
Press the cover release and open the top cover fully. Do not touch it. 2. This area is essential that they go back in the correct order! c53_09_lidup.jpg Sharp AR-C265P User's Guide 95 c53_02_opencvr.jpg WARNING! Note the positions of the four image drums: Cyan (1), Magenta (2), Yellow (3), Black (4). It is clearly labelled. If the printer has been powered on, the fuser is located under the four image drums. 1. Replace the Belt Unit REPLACE BELT 355: BELT LIFE The belt unit is HOT.

ARC265P Operation Manual
Page 96
... or cabinet to keep it away from direct sources of heat and light. c53_48_belt1.jpg Sharp AR-C265P User's Guide 96 CAUTION! Locate the two blue locks (1) and the handle (2). The green surface at the base of each of the image drum units out of the printer for longer than 5 minutes, place the image... drum inside a black plastic bag or carefully place it to normal room light for more than 5 minutes. • If the...
... or cabinet to keep it away from direct sources of heat and light. c53_48_belt1.jpg Sharp AR-C265P User's Guide 96 CAUTION! Locate the two blue locks (1) and the handle (2). The green surface at the base of each of the image drum units out of the printer for longer than 5 minutes, place the image... drum inside a black plastic bag or carefully place it to normal room light for more than 5 minutes. • If the...

ARC265P Operation Manual
Page 99
Place the four image drums/toner cartridges back in the correct order! c53_45_latchcvr.jpg Sharp AR-C265P User's Guide 99 It is essential that they go back in the printer (1 = Cyan, 2 = Magenta, 3 = Yellow, 4 = Black). 10. Close and latch the top cover. c53_09_lidup.jpg 11.
Place the four image drums/toner cartridges back in the correct order! c53_45_latchcvr.jpg Sharp AR-C265P User's Guide 99 It is essential that they go back in the printer (1 = Cyan, 2 = Magenta, 3 = Yellow, 4 = Black). 10. Close and latch the top cover. c53_09_lidup.jpg 11.

ARC265P Operation Manual
Page 104
... Explanation DENSITY CONTROL AUTO MANUAL AUTO = image density is automatically adjusted: • at power on • when a new image drum or toner cartridge is done at intervals of 100, 300 and 500 drum counts Auto adjustment takes up . C REG FINE ADJUST M REG FINE ADJUST Y REG FINE ADJUST -3 to + 3 in Performs fine... bold. Normally this will perform the auto density set up to their default values when the next print job is opened and then closed. Sharp AR-C265P User's Guide 104 A positive setting will lighten the color. The items on and when the top cover is complete.
... Explanation DENSITY CONTROL AUTO MANUAL AUTO = image density is automatically adjusted: • at power on • when a new image drum or toner cartridge is done at intervals of 100, 300 and 500 drum counts Auto adjustment takes up . C REG FINE ADJUST M REG FINE ADJUST Y REG FINE ADJUST -3 to + 3 in Performs fine... bold. Normally this will perform the auto density set up to their default values when the next print job is opened and then closed. Sharp AR-C265P User's Guide 104 A positive setting will lighten the color. The items on and when the top cover is complete.

ARC265P Operation Manual
Page 110
...position of print face vertically in 0.25 increments. If you are shown in 0.25 increments. Sharp AR-C265P User's Guide 110 Item Settings Explanation X ADJUST Y ADJUST DUPLEX X ADJUST† DUPLEX Y ADJUST† DRUM CLEANING -2.00MILLIMETER TO +2.00MILLIMETER Default = 0.00 -2.00MILLIMETER TO +2.00MILLIMETER Default = 0.00 .... Leaving this setting to ON will cause an extra blank sheet to print, cleaning the drum prior to printing. This will reduce the image drum life. Adjusts overall print position vertically in 0.25 increments. Careful! System Adjust Menu Notes:...
...position of print face vertically in 0.25 increments. If you are shown in 0.25 increments. Sharp AR-C265P User's Guide 110 Item Settings Explanation X ADJUST Y ADJUST DUPLEX X ADJUST† DUPLEX Y ADJUST† DRUM CLEANING -2.00MILLIMETER TO +2.00MILLIMETER Default = 0.00 -2.00MILLIMETER TO +2.00MILLIMETER Default = 0.00 .... Leaving this setting to ON will cause an extra blank sheet to print, cleaning the drum prior to printing. This will reduce the image drum life. Adjusts overall print position vertically in 0.25 increments. Careful! System Adjust Menu Notes:...


