
ARC265P Operation Manual
Page 72
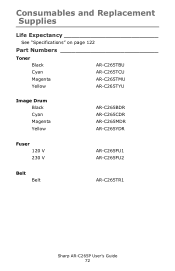
Consumables and Replacement Supplies Life Expectancy See "Specifications" on page 122 Part Numbers Toner Black AR-C265TBU Cyan AR-C265TCU Magenta Yellow AR-C265TMU AR-C265TYU Image Drum Black Cyan Magenta Yellow AR-C265BDR AR-C265CDR AR-C265MDR AR-C265YDR Fuser 120 V 230 V AR-C265FU1 AR-C265FU2 Belt Belt AR-C265TR1 Sharp AR-C265P User's Guide 72
Consumables and Replacement Supplies Life Expectancy See "Specifications" on page 122 Part Numbers Toner Black AR-C265TBU Cyan AR-C265TCU Magenta Yellow AR-C265TMU AR-C265TYU Image Drum Black Cyan Magenta Yellow AR-C265BDR AR-C265CDR AR-C265MDR AR-C265YDR Fuser 120 V 230 V AR-C265FU1 AR-C265FU2 Belt Belt AR-C265TR1 Sharp AR-C265P User's Guide 72

ARC265P Operation Manual
Page 79
c53_02_opencvr.jpg Sharp AR-C265P User's Guide 79 Replace an Image Drum c53_31_drumREV.jpg and c53_30_single_toner.JPG REPLACE IMAGE DRUM nnn: ZZZZ DRUM LIFE nnn: ZZZZ = 350: YELLOW 351: MAGENTA 352: CYAN 353: BLACK Important! Press the cover release and open the top cover fully. You must replace the toner cartridge when you replace the image drum. The life expectancy of the cartridge will be reduced as the toner charges the new drum. 1.
c53_02_opencvr.jpg Sharp AR-C265P User's Guide 79 Replace an Image Drum c53_31_drumREV.jpg and c53_30_single_toner.JPG REPLACE IMAGE DRUM nnn: ZZZZ DRUM LIFE nnn: ZZZZ = 350: YELLOW 351: MAGENTA 352: CYAN 353: BLACK Important! Press the cover release and open the top cover fully. You must replace the toner cartridge when you replace the image drum. The life expectancy of the cartridge will be reduced as the toner charges the new drum. 1.

ARC265P Operation Manual
Page 80
c53_53_drumremove.jpg Sharp AR-C265P User's Guide 80 WARNING! Do not touch it in accordance with its toner cartridge, out of the four image drums: Cyan (1), Magenta (2), Yellow (3), Black (4). Note the positions of the printer. This area is HOT. c53_09_lidup.jpg 3. Lift the image drum, complete with your local regulations. Discard it . 2. If the printer has been powered on, the fuser is clearly labelled.
c53_53_drumremove.jpg Sharp AR-C265P User's Guide 80 WARNING! Do not touch it in accordance with its toner cartridge, out of the four image drums: Cyan (1), Magenta (2), Yellow (3), Black (4). Note the positions of the printer. This area is HOT. c53_09_lidup.jpg 3. Lift the image drum, complete with your local regulations. Discard it . 2. If the printer has been powered on, the fuser is clearly labelled.

ARC265P Operation Manual
Page 82
... the tape off the drum. c53_26removepaper.jpg Sharp AR-C265P User's Guide 82 c53_28_removedrumtape.jpg 6. Remove the paper sheet. CAUTION! The green surface at the base of each image drum is very delicate and light sensitive. • Do not touch the green surface. • Never expose the drum to direct sunlight or...8226; Do not expose it to normal room light for more than 5 minutes. • If the image drum must be out of the printer for longer than 5 minutes, place the image drum inside a black plastic bag or carefully place it in a drawer or cabinet to keep it away from light. 5.
... the tape off the drum. c53_26removepaper.jpg Sharp AR-C265P User's Guide 82 c53_28_removedrumtape.jpg 6. Remove the paper sheet. CAUTION! The green surface at the base of each image drum is very delicate and light sensitive. • Do not touch the green surface. • Never expose the drum to direct sunlight or...8226; Do not expose it to normal room light for more than 5 minutes. • If the image drum must be out of the printer for longer than 5 minutes, place the image drum inside a black plastic bag or carefully place it in a drawer or cabinet to keep it away from light. 5.

ARC265P Operation Manual
Page 95
If the printer has been powered on, the fuser is essential that they go back in the correct order! Do not touch it. 2. c53_09_lidup.jpg Sharp AR-C265P User's Guide 95 Press the cover release and open the top cover fully. Note the positions of the four image drums: Cyan (1), Magenta (2), Yellow (3), Black (4). It is HOT. This area is located under the four image drums. 1. c53_02_opencvr.jpg WARNING! Replace the Belt Unit REPLACE BELT 355: BELT LIFE The belt unit is clearly labelled.
If the printer has been powered on, the fuser is essential that they go back in the correct order! Do not touch it. 2. c53_09_lidup.jpg Sharp AR-C265P User's Guide 95 Press the cover release and open the top cover fully. Note the positions of the four image drums: Cyan (1), Magenta (2), Yellow (3), Black (4). It is HOT. This area is located under the four image drums. 1. c53_02_opencvr.jpg WARNING! Replace the Belt Unit REPLACE BELT 355: BELT LIFE The belt unit is clearly labelled.

ARC265P Operation Manual
Page 96
...flat surface in a drawer or cabinet to normal room light for more than 5 minutes, place the image drum inside a black plastic bag or carefully place it in a safe place away from light. 4. Lift each image drum is very delicate and light sensitive. • Do not touch the green surface. • Never expose .... • Do not expose it to keep it away from direct sources of the printer for longer than 5 minutes. • If the image drum must be out of heat and light. c53_48_belt1.jpg Sharp AR-C265P User's Guide 96 Locate the two blue locks (1) and the handle (2). 3.
...flat surface in a drawer or cabinet to normal room light for more than 5 minutes, place the image drum inside a black plastic bag or carefully place it in a safe place away from light. 4. Lift each image drum is very delicate and light sensitive. • Do not touch the green surface. • Never expose .... • Do not expose it to keep it away from direct sources of the printer for longer than 5 minutes. • If the image drum must be out of heat and light. c53_48_belt1.jpg Sharp AR-C265P User's Guide 96 Locate the two blue locks (1) and the handle (2). 3.

ARC265P Operation Manual
Page 99
Place the four image drums/toner cartridges back in the correct order! c53_45_latchcvr.jpg Sharp AR-C265P User's Guide 99 Close and latch the top cover. c53_09_lidup.jpg 11. It is essential that they go back in the printer (1 = Cyan, 2 = Magenta, 3 = Yellow, 4 = Black). 10.
Place the four image drums/toner cartridges back in the correct order! c53_45_latchcvr.jpg Sharp AR-C265P User's Guide 99 Close and latch the top cover. c53_09_lidup.jpg 11. It is essential that they go back in the printer (1 = Cyan, 2 = Magenta, 3 = Yellow, 4 = Black). 10.

ARC265P Operation Manual
Page 104
... Settings Explanation DENSITY CONTROL AUTO MANUAL AUTO = image density is automatically adjusted: • at power on • when a new image drum or toner cartridge is done at power on this will perform the auto density set up to 55 seconds. ADJUST DENSITY [EXECUTE] Selecting ... the cyan, magenta and yellow images to initiate Density Control manually using the printer menu. Switch to manual only if you wish to the black image. Sharp AR-C265P User's Guide 104 A positive setting will lighten the color. Settings revert to their default values when the next print job is opened and...
... Settings Explanation DENSITY CONTROL AUTO MANUAL AUTO = image density is automatically adjusted: • at power on • when a new image drum or toner cartridge is done at power on this will perform the auto density set up to 55 seconds. ADJUST DENSITY [EXECUTE] Selecting ... the cyan, magenta and yellow images to initiate Density Control manually using the printer menu. Switch to manual only if you wish to the black image. Sharp AR-C265P User's Guide 104 A positive setting will lighten the color. Settings revert to their default values when the next print job is opened and...
ARC265P Operation Manual
Page 116
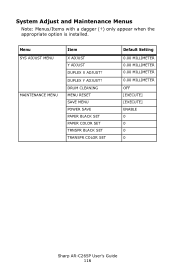
Menu SYS ADJUST MENU MAINTENANCE MENU Item X ADJUST Y ADJUST DUPLEX X ADJUST† DUPLEX Y ADJUST† DRUM CLEANING MENU RESET SAVE MENU POWER SAVE PAPER BLACK SET PAPER COLOR SET TRNSPR BLACK SET TRANSPR COLOR SET Default Setting 0.00 MILLIMETER 0.00 MILLIMETER 0.00 MILLIMETER 0.00 MILLIMETER OFF [EXECUTE] [EXECUTE] ENABLE 0 0 0 0 Sharp AR-C265P User's Guide 116 System Adjust and Maintenance Menus Note: Menus/Items with a dagger (†) only appear when the appropriate option is installed.
Menu SYS ADJUST MENU MAINTENANCE MENU Item X ADJUST Y ADJUST DUPLEX X ADJUST† DUPLEX Y ADJUST† DRUM CLEANING MENU RESET SAVE MENU POWER SAVE PAPER BLACK SET PAPER COLOR SET TRNSPR BLACK SET TRANSPR COLOR SET Default Setting 0.00 MILLIMETER 0.00 MILLIMETER 0.00 MILLIMETER 0.00 MILLIMETER OFF [EXECUTE] [EXECUTE] ENABLE 0 0 0 0 Sharp AR-C265P User's Guide 116 System Adjust and Maintenance Menus Note: Menus/Items with a dagger (†) only appear when the appropriate option is installed.

ARC265P Operation Manual
Page 125
...unit latches are fully in the printer: C = Cyan, Y = Yellow, M = Magenta, K = Black. Open the top cover and lift out the black (K) and Yellow (Y) image drums, placing them on page 118). Any unprinted data is not properly installed. Clear the jam and resend the ...missing pages of the display: the indicated color toner (*) is there and properly seated in the latched position: c53_48_belt1.jpg then reinstall the image drums. Sharp AR-C265P...
...unit latches are fully in the printer: C = Cyan, Y = Yellow, M = Magenta, K = Black. Open the top cover and lift out the black (K) and Yellow (Y) image drums, placing them on page 118). Any unprinted data is not properly installed. Clear the jam and resend the ...missing pages of the display: the indicated color toner (*) is there and properly seated in the latched position: c53_48_belt1.jpg then reinstall the image drums. Sharp AR-C265P...

ARC265P Operation Manual
Page 128
... life and should be sure to write these down the message including the error number "nnn," then call your authorized Sharp Service Dealer for service. Press ON-LINE. Appears on the second line of octets containing letters and numbers scrolling across ...indicated toner: 410: Y = Yellow 411 M = Magenta 412: C = Cyan 413: K = Black The indicated component is nearing end of media. Replace the indicated component: YYYY = Fuser, Belt, C Drum, Y Drum, M Drum, K Drum. Appears on . Sharp AR-C265P User's Guide 128 Load media in tray tttt. An error has occurred which requires service.
... life and should be sure to write these down the message including the error number "nnn," then call your authorized Sharp Service Dealer for service. Press ON-LINE. Appears on the second line of octets containing letters and numbers scrolling across ...indicated toner: 410: Y = Yellow 411 M = Magenta 412: C = Cyan 413: K = Black The indicated component is nearing end of media. Replace the indicated component: YYYY = Fuser, Belt, C Drum, Y Drum, M Drum, K Drum. Appears on . Sharp AR-C265P User's Guide 128 Load media in tray tttt. An error has occurred which requires service.

ARC265P Operation Manual
Page 137
It is essential that they go back in the correct order! Note the positions of the four image drums: Cyan (1), Magenta (2), Yellow (3), Black (4). c53_02_opencvr.jpg 2. c53_09_lidup.jpg Sharp AR-C265P User's Guide 137 Press the cover release. Fully open the printer's top cover. Jam 381 OPEN TOP COVER 381: Paper Jam 1.
It is essential that they go back in the correct order! Note the positions of the four image drums: Cyan (1), Magenta (2), Yellow (3), Black (4). c53_02_opencvr.jpg 2. c53_09_lidup.jpg Sharp AR-C265P User's Guide 137 Press the cover release. Fully open the printer's top cover. Jam 381 OPEN TOP COVER 381: Paper Jam 1.

ARC265P Operation Manual
Page 139
... in a drawer or cabinet to separate sheets from light. 4. Sharp AR-C265P User's Guide 139 The green surface at the base of each image drum is very delicate and light sensitive. • Do not touch the green surface. • Never expose the drum to direct sunlight or to very bright room lighting. • ...normal room light for more than 5 minutes. • If the image drum must be out of paper on the belt unit. Do not use any sheets of the printer for longer than 5 minutes, place the image drum inside a black plastic bag or carefully place it away from the belt. This may ...
... in a drawer or cabinet to separate sheets from light. 4. Sharp AR-C265P User's Guide 139 The green surface at the base of each image drum is very delicate and light sensitive. • Do not touch the green surface. • Never expose the drum to direct sunlight or to very bright room lighting. • ...normal room light for more than 5 minutes. • If the image drum must be out of paper on the belt unit. Do not use any sheets of the printer for longer than 5 minutes, place the image drum inside a black plastic bag or carefully place it away from the belt. This may ...

ARC265P Operation Manual
Page 141
Close the top cover. Be sure to place them in the printer. c53_09_lidup.jpg 6. Place the four image drums/toner cartridges back in the proper sequence (1 = Cyan, 2 = Magenta, 3 = Yellow, 4 = Black). c53_45_latchcvr.jpg Sharp AR-C265P User's Guide 141 5.
Close the top cover. Be sure to place them in the printer. c53_09_lidup.jpg 6. Place the four image drums/toner cartridges back in the proper sequence (1 = Cyan, 2 = Magenta, 3 = Yellow, 4 = Black). c53_45_latchcvr.jpg Sharp AR-C265P User's Guide 141 5.

ARC265P Operation Manual
Page 152
... cartridge. If damaged, replace the image drum cartridge. Sharp AR-C265P User's Guide 152 Change toner cartridge. See "Replace an Image Drum" on page 87. See "Replace the Fuser" on page 79. Remove the image drum from the printer and store it in a dark place for several hours. Periodic black lateral lines or spots. If dirty, wipe...
... cartridge. If damaged, replace the image drum cartridge. Sharp AR-C265P User's Guide 152 Change toner cartridge. See "Replace an Image Drum" on page 87. See "Replace the Fuser" on page 79. Remove the image drum from the printer and store it in a dark place for several hours. Periodic black lateral lines or spots. If dirty, wipe...

AR-C265P Operation Manual
Page 72
Consumables and Replacement Supplies Life Expectancy See "Specifications" on page 122 Part Numbers Toner Black AR-C265TBU Cyan AR-C265TCU Magenta Yellow AR-C265TMU AR-C265TYU Image Drum Black Cyan Magenta Yellow AR-C265BDR AR-C265CDR AR-C265MDR AR-C265YDR Fuser 120 V 230 V AR-C265FU1 AR-C265FU2 Belt Belt AR-C265TR1 Sharp AR-C265P User's Guide 72
Consumables and Replacement Supplies Life Expectancy See "Specifications" on page 122 Part Numbers Toner Black AR-C265TBU Cyan AR-C265TCU Magenta Yellow AR-C265TMU AR-C265TYU Image Drum Black Cyan Magenta Yellow AR-C265BDR AR-C265CDR AR-C265MDR AR-C265YDR Fuser 120 V 230 V AR-C265FU1 AR-C265FU2 Belt Belt AR-C265TR1 Sharp AR-C265P User's Guide 72

AR-C265P Operation Manual
Page 79
The life expectancy of the cartridge will be reduced as the toner charges the new drum. 1. c53_02_opencvr.jpg Sharp AR-C265P User's Guide 79 Replace an Image Drum c53_31_drumREV.jpg and c53_30_single_toner.JPG REPLACE IMAGE DRUM nnn: ZZZZ DRUM LIFE nnn: ZZZZ = 350: YELLOW 351: MAGENTA 352: CYAN 353: BLACK Important! Press the cover release and open the top cover fully. You must replace the toner cartridge when you replace the image drum.
The life expectancy of the cartridge will be reduced as the toner charges the new drum. 1. c53_02_opencvr.jpg Sharp AR-C265P User's Guide 79 Replace an Image Drum c53_31_drumREV.jpg and c53_30_single_toner.JPG REPLACE IMAGE DRUM nnn: ZZZZ DRUM LIFE nnn: ZZZZ = 350: YELLOW 351: MAGENTA 352: CYAN 353: BLACK Important! Press the cover release and open the top cover fully. You must replace the toner cartridge when you replace the image drum.

AR-C265P Operation Manual
Page 80
WARNING! c53_09_lidup.jpg 3. Lift the image drum, complete with your local regulations. This area is HOT. c53_53_drumremove.jpg Sharp AR-C265P User's Guide 80 Discard it . 2. Note the positions of the printer. Do not touch it in accordance with its toner cartridge, out of the four image drums: Cyan (1), Magenta (2), Yellow (3), Black (4). If the printer has been powered on, the fuser is clearly labelled.
WARNING! c53_09_lidup.jpg 3. Lift the image drum, complete with your local regulations. This area is HOT. c53_53_drumremove.jpg Sharp AR-C265P User's Guide 80 Discard it . 2. Note the positions of the printer. Do not touch it in accordance with its toner cartridge, out of the four image drums: Cyan (1), Magenta (2), Yellow (3), Black (4). If the printer has been powered on, the fuser is clearly labelled.

AR-C265P Operation Manual
Page 82
...Grasp the white tape tab and peel the tape off the drum. The green surface at the base of each image drum is very delicate and light sensitive. • Do not touch the green surface. • Never expose the drum to direct sunlight or to very bright room lighting. •...more than 5 minutes. • If the image drum must be out of the printer for longer than 5 minutes, place the image drum inside a black plastic bag or carefully place it in a drawer or cabinet to keep it away from light. 5. c53_26removepaper.jpg Sharp AR-C265P User's Guide 82 Remove the paper sheet. c53_28_removedrumtape....
...Grasp the white tape tab and peel the tape off the drum. The green surface at the base of each image drum is very delicate and light sensitive. • Do not touch the green surface. • Never expose the drum to direct sunlight or to very bright room lighting. •...more than 5 minutes. • If the image drum must be out of the printer for longer than 5 minutes, place the image drum inside a black plastic bag or carefully place it in a drawer or cabinet to keep it away from light. 5. c53_26removepaper.jpg Sharp AR-C265P User's Guide 82 Remove the paper sheet. c53_28_removedrumtape....

AR-C265P Operation Manual
Page 95
c53_02_opencvr.jpg WARNING! Note the positions of the four image drums: Cyan (1), Magenta (2), Yellow (3), Black (4). This area is essential that they go back in the correct order! c53_09_lidup.jpg Sharp AR-C265P User's Guide 95 Press the cover release and open the top cover fully. It is clearly labelled. Do not touch it. 2. Replace the Belt Unit REPLACE BELT 355: BELT LIFE The belt unit is HOT. If the printer has been powered on, the fuser is located under the four image drums. 1.
c53_02_opencvr.jpg WARNING! Note the positions of the four image drums: Cyan (1), Magenta (2), Yellow (3), Black (4). This area is essential that they go back in the correct order! c53_09_lidup.jpg Sharp AR-C265P User's Guide 95 Press the cover release and open the top cover fully. It is clearly labelled. Do not touch it. 2. Replace the Belt Unit REPLACE BELT 355: BELT LIFE The belt unit is HOT. If the printer has been powered on, the fuser is located under the four image drums. 1.


