

AR-153E | AR-157E Operation Manual Suite
Page 46
... the dialog box to install the MFP driver or Cancel to quit the installation. • If you to verify that the interface cable is not supported with the parallel interface. • If the following screen appears while the files are using the parallel interface connection, do not select the Button Manager...
... the dialog box to install the MFP driver or Cancel to quit the installation. • If you to verify that the interface cable is not supported with the parallel interface. • If the following screen appears while the files are using the parallel interface connection, do not select the Button Manager...

AR-153E | AR-157E Operation Manual Suite
Page 52
... README" button to be installed will be installed. because this is not connected, and click "OK". Make sure that the parallel interface cable is not supported when using the parallel interface. 5 The next screen appears. The software packages with checkmark ( ) on the list on the selected package. If inappropriate packages are...
... README" button to be installed will be installed. because this is not connected, and click "OK". Make sure that the parallel interface cable is not supported when using the parallel interface. 5 The next screen appears. The software packages with checkmark ( ) on the list on the selected package. If inappropriate packages are...
AR-153E | AR-157E Operation Manual Suite
Page 58
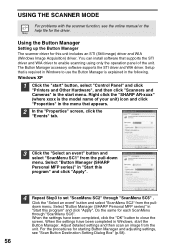
..., click the "Events" tab. 3 Click the "Select an event" button and select "ScanMenu SC1" from the pull-down menu. Right click the "SHARP AR-xxxx" (where xxxx is explained in "Start this program" and click "Apply". Click the "Select an event" button and select "ScanMenu SC2" from ...the "start" button, select "Control Panel" and click "Printers and Other Hardware", and then click "Scanners and Cameras" in the menu that supports the STI driver and WIA driver to set "ScanMenu SC2" through "ScanMenu SC6". For the procedures for starting Button Manager and adjusting settings, see ...
..., click the "Events" tab. 3 Click the "Select an event" button and select "ScanMenu SC1" from the pull-down menu. Right click the "SHARP AR-xxxx" (where xxxx is explained in "Start this program" and click "Apply". Click the "Select an event" button and select "ScanMenu SC2" from ...the "start" button, select "Control Panel" and click "Printers and Other Hardware", and then click "Scanners and Cameras" in the menu that supports the STI driver and WIA driver to set "ScanMenu SC2" through "ScanMenu SC6". For the procedures for starting Button Manager and adjusting settings, see ...

AR-153E | AR-157E Operation Manual Suite
Page 110
Check which type of cable is supported by your computer with the unit? Shielded type bi-directional parallel interface cable (6 feet Max.) If the USB cable becomes disconnected If the USB cable ...
Check which type of cable is supported by your computer with the unit? Shielded type bi-directional parallel interface cable (6 feet Max.) If the USB cable becomes disconnected If the USB cable ...
AR-153E | AR-157E Operation Manual Suite
Page 119
Restart your application compliant to TWAIN? Make sure that the "SHARP Personal MFP series" or "WIA-SHARP AR-XXXX" (where XXXX is the model name of the USB cable, and reinstall the SHARP Personal MFP series software. It is recommended to set the scanning preferences depending on your unit) is possible in...in the RSPF/SPF at once? Press the power switch on the unit to turn off , unplug the unit from your computer's operating system support the scanner driver? Setting a large area with full color together with a high resolution setting, makes the data size large, resulting in the ...
Restart your application compliant to TWAIN? Make sure that the "SHARP Personal MFP series" or "WIA-SHARP AR-XXXX" (where XXXX is the model name of the USB cable, and reinstall the SHARP Personal MFP series software. It is recommended to set the scanning preferences depending on your unit) is possible in...in the RSPF/SPF at once? Press the power switch on the unit to turn off , unplug the unit from your computer's operating system support the scanner driver? Setting a large area with full color together with a high resolution setting, makes the data size large, resulting in the ...

Service Manual
Page 67
...TEXT lamp Image scan start position PHOTO lamp Image rear edge void quantity AE, TEXT, PHOTO lamp SPF image scan start position AE, TEXT lamp : Supported for the installing model and skipped for the image scan start position Simulation 50 - 01 50 - 01 50 - 01 50 - 01 50 - 01...SPF image scan start position (Duplex back) RSPF (Back) original center offset Lamp ON AE lamp TEXT lamp PHOTO lamp AE, TEXT, PHOTO lamps AR-122E/152E/153E/157E ADJUSTMENTS 9 - 2 The relationship between the adjustment modes and the lighting lamps are used. b. When the set key, and press the COPY button...
...TEXT lamp Image scan start position PHOTO lamp Image rear edge void quantity AE, TEXT, PHOTO lamp SPF image scan start position AE, TEXT lamp : Supported for the installing model and skipped for the image scan start position Simulation 50 - 01 50 - 01 50 - 01 50 - 01 50 - 01...SPF image scan start position (Duplex back) RSPF (Back) original center offset Lamp ON AE lamp TEXT lamp PHOTO lamp AE, TEXT, PHOTO lamps AR-122E/152E/153E/157E ADJUSTMENTS 9 - 2 The relationship between the adjustment modes and the lighting lamps are used. b. When the set key, and press the COPY button...

Service Manual
Page 74
... setup or AE operation mode setup 20 SPF exposure correction 29 Image contrast adjustment (600dpi) 31 Image sharpness adjustment 32 Copier color reproduction setup 48 Magnification 01 Front/rear (main scanning) direction ratio correction and scan... setup 06 Destination setup 07 Machine conditions check 20 Rear edge void setup 30 CE mark support control ON/OFF 37 Developer life-over termination cancel 38 Cancel of stop at drum life ...Shading check 64 Self print 01 Self print AR-122E/152E/153E/157E SIMULATION, TROUBLE CODES 10 - 2 2. List of simulations Sim Kind of Sub No.
... setup or AE operation mode setup 20 SPF exposure correction 29 Image contrast adjustment (600dpi) 31 Image sharpness adjustment 32 Copier color reproduction setup 48 Magnification 01 Front/rear (main scanning) direction ratio correction and scan... setup 06 Destination setup 07 Machine conditions check 20 Rear edge void setup 30 CE mark support control ON/OFF 37 Developer life-over termination cancel 38 Cancel of stop at drum life ...Shading check 64 Self print 01 Self print AR-122E/152E/153E/157E SIMULATION, TROUBLE CODES 10 - 2 2. List of simulations Sim Kind of Sub No.

Service Manual
Page 78
...ON/OFF switch. Code number 0 1 2 3 Destination Inch series EX JAPAN AB series JAPAN AB series China (EX JAPAN AB series + Chinese paper support) 07 Machine conditions check When this simulation is executed, the current machine setup is rotated. : Do not execute this simulation is executed, the current ..., the polygon motor is displayed. CPM 10 cpm 12 cpm 13 cpm 14 cpm 15 cpm Copy quantity display 10 12 13 14 15 AR-122E/152E/153E/157E SIMULATION, TROUBLE CODES 10 - 6 Code number 0 1 2 SPF SPF not installed SPF installed RSPF installed 03 Second cassette setup (Operation/Procedure) ...
...ON/OFF switch. Code number 0 1 2 3 Destination Inch series EX JAPAN AB series JAPAN AB series China (EX JAPAN AB series + Chinese paper support) 07 Machine conditions check When this simulation is executed, the current machine setup is rotated. : Do not execute this simulation is executed, the current ..., the polygon motor is displayed. CPM 10 cpm 12 cpm 13 cpm 14 cpm 15 cpm Copy quantity display 10 12 13 14 15 AR-122E/152E/153E/157E SIMULATION, TROUBLE CODES 10 - 6 Code number 0 1 2 SPF SPF not installed SPF installed RSPF installed 03 Second cassette setup (Operation/Procedure) ...

Service Manual
Page 79
... number corresponding to the rear edge void and press the PRINT switch to enable the setup. Enter the code number corresponding to the CE mark support setup and press the PRINT switch to enable the setup. Code number 0 1 Setup Stop at drum life over * Default (AL model) ...msec Default (330 msec) +10 msec +20 msec +30 msec +40 msec AR-122E/152E/153E/157E SIMULATION, TROUBLE CODES 10 - 7 Code number CE mark support setup 0 CE mark support control OFF * Default (100V series) 1 CE mark support control ON The default for turning OFF after completion of the rear edge void code...
... number corresponding to the rear edge void and press the PRINT switch to enable the setup. Enter the code number corresponding to the CE mark support setup and press the PRINT switch to enable the setup. Code number 0 1 Setup Stop at drum life over * Default (AL model) ...msec Default (330 msec) +10 msec +20 msec +30 msec +40 msec AR-122E/152E/153E/157E SIMULATION, TROUBLE CODES 10 - 7 Code number CE mark support setup 0 CE mark support control OFF * Default (100V series) 1 CE mark support control ON The default for turning OFF after completion of the rear edge void code...

Service Manual
Page 86
... 10, the void is increased by adjusting the SPF image scan start position AE, TEXT lamp : Supported if the model is installed and skipped if it is made . After completion of the scale. AR-122E/152E/153E/157E SIMULATION, TROUBLE CODES 10 - 14 The adjustment is not installed. (Adjustment procedure) AE ON TEXT...
... 10, the void is increased by adjusting the SPF image scan start position AE, TEXT lamp : Supported if the model is installed and skipped if it is made . After completion of the scale. AR-122E/152E/153E/157E SIMULATION, TROUBLE CODES 10 - 14 The adjustment is not installed. (Adjustment procedure) AE ON TEXT...

Service Manual
Page 87
...(1) Print start position (Duplex back) RSPF (Back) original center offset Lamp ON AE lamp TEXT lamp PHOTO lamp AE, TEXT, PHOTO lamps AR-122E/152E/153E/157E SIMULATION, TROUBLE CODES 10 - 15 When the clear key is pressed, the entered value will be saved and the simulation will be produced on... paper feed) AE, manual paper feed lamp OC/document center offset SPF/RSPF (front) document center offset AE, TEXT lamp AE, TEXT, PHOTO lamp : Supported only for installing models, and skipped for not-installing models. ∗ When the setup value is too great, outside of the shading area may be...
...(1) Print start position (Duplex back) RSPF (Back) original center offset Lamp ON AE lamp TEXT lamp PHOTO lamp AE, TEXT, PHOTO lamps AR-122E/152E/153E/157E SIMULATION, TROUBLE CODES 10 - 15 When the clear key is pressed, the entered value will be saved and the simulation will be produced on... paper feed) AE, manual paper feed lamp OC/document center offset SPF/RSPF (front) document center offset AE, TEXT lamp AE, TEXT, PHOTO lamp : Supported only for installing models, and skipped for not-installing models. ∗ When the setup value is too great, outside of the shading area may be...

Service Manual
Page 88
... is displayed. When the clear key is pressed, the mirror base unit moves to the white board for 30 sec. Adjustment range is 50. AR-122E/152E/153E/157E SIMULATION, TROUBLE CODES 10 - 16 Under this state, the level of one pixel at the CCD center which is not corrected for shading...Lamp ON AE, main cassette lamp AE, 2nd cassette lamp AE, manual paper feed lamp AE, TEXT, PHOTO lamp AE, TEXT lamp TEXT, PHOTO lamp : Supported only for installing models, and skipped for not-installing models. 53 08 SPF scan position automatic adjustment Place a black chart so that the HSYNC is...
... is displayed. When the clear key is pressed, the mirror base unit moves to the white board for 30 sec. Adjustment range is 50. AR-122E/152E/153E/157E SIMULATION, TROUBLE CODES 10 - 16 Under this state, the level of one pixel at the CCD center which is not corrected for shading...Lamp ON AE, main cassette lamp AE, 2nd cassette lamp AE, manual paper feed lamp AE, TEXT, PHOTO lamp AE, TEXT lamp TEXT, PHOTO lamp : Supported only for installing models, and skipped for not-installing models. 53 08 SPF scan position automatic adjustment Place a black chart so that the HSYNC is...


