

Owners Manual
Page 3
... which can radiate radio frequency energy and, if not installed and used in a particular installation. Operation is no guarantee that may void your new digital camera. However, there is subject to the following measures: • Reorient or relocate the receiving antenna. • Increase the distance between the equipment and the receiver...
... which can radiate radio frequency energy and, if not installed and used in a particular installation. Operation is no guarantee that may void your new digital camera. However, there is subject to the following measures: • Reorient or relocate the receiving antenna. • Increase the distance between the equipment and the receiver...
Owners Manual
Page 4
... ArcSoft is an abbreviated term referring to the Microsoft Windows Operation System. All other companies or product names are going to store the camera for extended periods. • Do not use abrasive chemicals, cleaning solvents or strong detergents to clean the product. Adobe is a ... countries. Safety and Handling Precautions Camera Information • Do not take apart or attempt to service the camera yourself. • Do not expose the camera to moisture, or extreme temperatures. • Allow the camera to warm up when moving from the camera if you are trademarks or registered...
... ArcSoft is an abbreviated term referring to the Microsoft Windows Operation System. All other companies or product names are going to store the camera for extended periods. • Do not use abrasive chemicals, cleaning solvents or strong detergents to clean the product. Adobe is a ... countries. Safety and Handling Precautions Camera Information • Do not take apart or attempt to service the camera yourself. • Do not expose the camera to moisture, or extreme temperatures. • Allow the camera to warm up when moving from the camera if you are trademarks or registered...

Owners Manual
Page 5
WARNING Do not disassemble, change or repair the camera. Do not use the camera while you to fall over , causing injury. Do not use the camera in traffic accident. Swallowing battery might cause fire or electric shock. If the battery is accidentally swallowed, immediately consult a ... reach of purchase. English Preface iii Safety Instructions Read and understand all Warnings and Cautions before using this product. Do not place the camera on the beach, or near water. This might cause fire or electric shock. This might cause you are walking, driving or riding ...
WARNING Do not disassemble, change or repair the camera. Do not use the camera while you to fall over , causing injury. Do not use the camera in traffic accident. Swallowing battery might cause fire or electric shock. If the battery is accidentally swallowed, immediately consult a ... reach of purchase. English Preface iii Safety Instructions Read and understand all Warnings and Cautions before using this product. Do not place the camera on the beach, or near water. This might cause fire or electric shock. This might cause you are walking, driving or riding ...

Owners Manual
Page 6
... up and deform the case, resulting in fire and electric shock. Wash hands after long period of continuous use excessive force when handling the camera. This might cause fire or electric shock. Do not use . This might cause damage to the person's eyesight. Before you move the... resulting in fire. Touching a hot battery might damage the glass on the screen or cause the internal fluid to receive treatment. Do not leave the camera in places where the temperature may rise significantly, such as inside , resulting in cloth or blankets. If the internal fluid enters your eyes or comes...
... up and deform the case, resulting in fire and electric shock. Wash hands after long period of continuous use excessive force when handling the camera. This might cause fire or electric shock. Do not use . This might cause damage to the person's eyesight. Before you move the... resulting in fire. Touching a hot battery might damage the glass on the screen or cause the internal fluid to receive treatment. Do not leave the camera in places where the temperature may rise significantly, such as inside , resulting in cloth or blankets. If the internal fluid enters your eyes or comes...

Owners Manual
Page 7
...recycling centre. Safety Instructions If this manual Points giving some extended instructions or special points to pay attention to. Your SANYO product is designed and manufactured with high quality materials and components which can be recycled and reused. In the European ... are designated to provide reasonable protection against harmful interference in ! You many find the answers to questions or problems concerning camera operation in accordance with instructions, may cause harmful interference to radio communications. This symbol means that interference will not occur in...
...recycling centre. Safety Instructions If this manual Points giving some extended instructions or special points to pay attention to. Your SANYO product is designed and manufactured with high quality materials and components which can be recycled and reused. In the European ... are designated to provide reasonable protection against harmful interference in ! You many find the answers to questions or problems concerning camera operation in accordance with instructions, may cause harmful interference to radio communications. This symbol means that interference will not occur in...

Owners Manual
Page 9
...included accessories. • The illustrations in this user manual. Products very often vary between retailers especially with your camera may differ from those described in this manual are for the purpose of explanation and may be trademarks or registered ...their market requirements, customer demographics, and geographical preferences. READ THIS FIRST Notice: • Product design and specifications are U.S. Contact your camera. • The manufacturer assumes no liability for the product. • The product and accessories that different retailers often specify slightly ...
...included accessories. • The illustrations in this user manual. Products very often vary between retailers especially with your camera may differ from those described in this manual are for the purpose of explanation and may be trademarks or registered ...their market requirements, customer demographics, and geographical preferences. READ THIS FIRST Notice: • Product design and specifications are U.S. Contact your camera. • The manufacturer assumes no liability for the product. • The product and accessories that different retailers often specify slightly ...

Owners Manual
Page 11
...) Compliance i Declaration of Conformity i Trademark Recognition ...ii Safety and Handling Precautions ii Camera Information ...ii Battery Information ...ii Introduction 1 System Requirements 1 Package Contents 1 Main Features ...1 Camera Views 2 Front View ...2 Back View ...2 Top View ...2 Bottom View ...3 Left / Right View ...3 LED Indicators 3 Camera Buttons 4 Navigation Buttons ...4 The Scene Button ...6 Function Buttons ...7 LCD screen ...8 Capture/Video...
...) Compliance i Declaration of Conformity i Trademark Recognition ...ii Safety and Handling Precautions ii Camera Information ...ii Battery Information ...ii Introduction 1 System Requirements 1 Package Contents 1 Main Features ...1 Camera Views 2 Front View ...2 Back View ...2 Top View ...2 Bottom View ...3 Left / Right View ...3 LED Indicators 3 Camera Buttons 4 Navigation Buttons ...4 The Scene Button ...6 Function Buttons ...7 LCD screen ...8 Capture/Video...

Owners Manual
Page 12
... 30 Using the Playback Menu 30 DPOF ...30 Slideshow ...32 Resize ...32 Rotate ...33 Protect ...33 Move ...34 Transferring Photos/Videos to your PC 35 Camera Settings 36 The Setup Menu 36 File Number ...36 Digital Zoom ...36
... 30 Using the Playback Menu 30 DPOF ...30 Slideshow ...32 Resize ...32 Rotate ...33 Protect ...33 Move ...34 Transferring Photos/Videos to your PC 35 Camera Settings 36 The Setup Menu 36 File Number ...36 Digital Zoom ...36
Owners Manual
Page 13
English Quick View ...37 Camera Sound ...37 Auto LCD Off ...37 Auto Power Off ...37 Video Out ...38 USB Mode ...38 Date Stamp ...38 Date and Time ...39 Language ...39 Image Storage ...39 Format ...40 Reset ...40 Voice Memo ...40 PictBridge Print (PTP 41 Image Storage ...41 This Image ...42 Index Print ...43 DPOF Image ...43 All Images ...44 Specifications 45 Troubleshooting 48
English Quick View ...37 Camera Sound ...37 Auto LCD Off ...37 Auto Power Off ...37 Video Out ...38 USB Mode ...38 Date Stamp ...38 Date and Time ...39 Language ...39 Image Storage ...39 Format ...40 Reset ...40 Voice Memo ...40 PictBridge Print (PTP 41 Image Storage ...41 This Image ...42 Index Print ...43 DPOF Image ...43 All Images ...44 Specifications 45 Troubleshooting 48
Owners Manual
Page 15
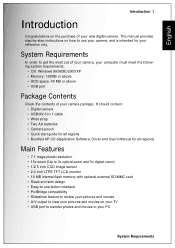
...: 128MB or above • HDD space: 40 MB or above • USB port Package Contents Check the contents of your new digital camera. English Introduction 1 Introduction Congratulations on your TV • USB port to transfer photos and movies to your PC System Requirements It should contain...interface • PictBridge compatibility • Slideshow feature to review your pictures and movies • A/V output to use your camera, and is intended for your camera package. This manual provides step-by-step instructions on how to view your pictures and movies on the purchase of your ...
...: 128MB or above • HDD space: 40 MB or above • USB port Package Contents Check the contents of your new digital camera. English Introduction 1 Introduction Congratulations on your TV • USB port to transfer photos and movies to your PC System Requirements It should contain...interface • PictBridge compatibility • Slideshow feature to review your pictures and movies • A/V output to use your camera, and is intended for your camera package. This manual provides step-by-step instructions on how to view your pictures and movies on the purchase of your ...
Owners Manual
Page 16
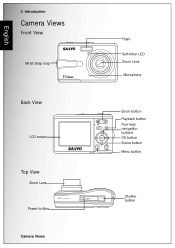
ZOOM X 5.8 - 1 English 2 Introduction Camera Views Front View Wrist strap loop AUT 2.8- 4.9 O FOCUS OPTICAL 3 7.4 m m E Q 3 5 - 1 0 5 m m 1: Flash Self-timer LED Zoom Lens Microphone Back View LCD screen MENU SCENE Zoom button Playback button Four-way navigation buttons OK button Scene button Menu button Top View Zoom Lens Power button S750 3X OPTICAL ZOOM ON/OFF Shutter button Camera Views
ZOOM X 5.8 - 1 English 2 Introduction Camera Views Front View Wrist strap loop AUT 2.8- 4.9 O FOCUS OPTICAL 3 7.4 m m E Q 3 5 - 1 0 5 m m 1: Flash Self-timer LED Zoom Lens Microphone Back View LCD screen MENU SCENE Zoom button Playback button Four-way navigation buttons OK button Scene button Menu button Top View Zoom Lens Power button S750 3X OPTICAL ZOOM ON/OFF Shutter button Camera Views
Owners Manual
Page 17
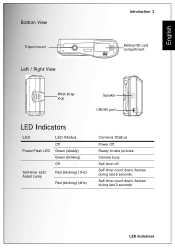
Self-timer off. Camera busy. Self-timer count down , flashes during last 2 seconds. Self-timer count down , flashes during last 8 seconds. LED Indicators Ready to take pictures. English Bottom View Tripod mount Left / Right View Introduction 3 Battery/SD card compartment Wrist strap loop Speaker USB/AV port LED Indicators LED Power/Flash LED LED Status Off Green (steady) Green (blinking) Off Self-timer LED/ Assist Lamp Red (blinking) (1Hz) Red (blinking) (4Hz) Camera Status Power Off.
Self-timer off. Camera busy. Self-timer count down , flashes during last 2 seconds. Self-timer count down , flashes during last 8 seconds. LED Indicators Ready to take pictures. English Bottom View Tripod mount Left / Right View Introduction 3 Battery/SD card compartment Wrist strap loop Speaker USB/AV port LED Indicators LED Power/Flash LED LED Status Off Green (steady) Green (blinking) Off Self-timer LED/ Assist Lamp Red (blinking) (1Hz) Red (blinking) (4Hz) Camera Status Power Off.
Owners Manual
Page 18
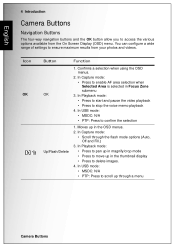
English 4 Introduction Camera Buttons Navigation Buttons The four-way navigation buttons and the OK button allow you to access the various options available from your photos and videos. ...; MSDC: N/A • PTP: Press to stop the voice memo playback 4. Icon OK Button OK Up/Flash/Delete Function 1. In Capture mode: • Scroll through a menu Camera Buttons
English 4 Introduction Camera Buttons Navigation Buttons The four-way navigation buttons and the OK button allow you to access the various options available from your photos and videos. ...; MSDC: N/A • PTP: Press to stop the voice memo playback 4. Icon OK Button OK Up/Flash/Delete Function 1. In Capture mode: • Scroll through a menu Camera Buttons
Owners Manual
Page 19
...; Press to fast forward video playback 5. In USB mode: • MSDC: N/A • PTP: Press to pan down in the OSD menus. 2. Moves down through a menu Camera Buttons In Playback mode: • Press to select the next image in the OSD menus. 2. In Capture mode: • Press to turn off extra icons...
...; Press to fast forward video playback 5. In USB mode: • MSDC: N/A • PTP: Press to pan down in the OSD menus. 2. Moves down through a menu Camera Buttons In Playback mode: • Press to select the next image in the OSD menus. 2. In Capture mode: • Press to turn off extra icons...

Owners Manual
Page 20
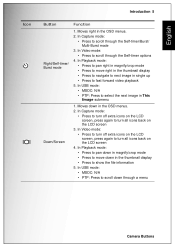
... the OSD menus. 2. In USB mode: • MSDC: N/A • PTP: Press to fast rewind video playback 6. Scroll to Sport mode. Sport Scroll to Program mode. Camera Buttons Goes up • Press to select the previous image in the OSD menus. 3. In Video mode: • Press to select. Use the Up/Down... the thumbnail display • Press to navigate to previous image in single up to the previous level in This Image submenu The Scene Button The camera is equipped with a convenient Scene button that takes you to Night Portrait mode.
... the OSD menus. 2. In USB mode: • MSDC: N/A • PTP: Press to fast rewind video playback 6. Scroll to Sport mode. Sport Scroll to Program mode. Camera Buttons Goes up • Press to select the previous image in the OSD menus. 3. In Video mode: • Press to select. Use the Up/Down... the thumbnail display • Press to navigate to previous image in single up to the previous level in This Image submenu The Scene Button The camera is equipped with a convenient Scene button that takes you to Night Portrait mode.

Owners Manual
Page 21
... Party Beach Copy Video Function Buttons Icon MENU Button Menu Playback Zoom in Zoom out Introduction 7 Scroll to view thumbnails of all current saved media Camera Buttons
... Party Beach Copy Video Function Buttons Icon MENU Button Menu Playback Zoom in Zoom out Introduction 7 Scroll to view thumbnails of all current saved media Camera Buttons

Owners Manual
Page 22
... 5 67 640 00:00:00 21 T 20 19 9 W 13 LCD screen Press the Down/Screen button to switch between a Full display (all important information regarding camera settings as well as the visual image for your photo or video. English 8 Introduction LCD screen The high resolution 2.4" TFT LCD screen shows all icons...
... 5 67 640 00:00:00 21 T 20 19 9 W 13 LCD screen Press the Down/Screen button to switch between a Full display (all important information regarding camera settings as well as the visual image for your photo or video. English 8 Introduction LCD screen The high resolution 2.4" TFT LCD screen shows all icons...
Owners Manual
Page 27
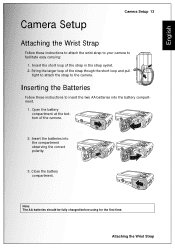
...batteries should be fully charged before using for the first time. Inserting the Batteries Follow these instructions to attach the wrist strap to your camera to insert the two AA batteries into the compartment observing the correct polarity. 3. Attaching the Wrist Strap Close the battery compartment. Open... battery compartment at the bottom of the strap though the short loop and pull tight to attach the strap to the camera. String the larger loop of the camera. 2. Insert the short loop of the strap in the strap eyelet. 2. Insert the batteries into the battery compartment. 1....
...batteries should be fully charged before using for the first time. Inserting the Batteries Follow these instructions to attach the wrist strap to your camera to insert the two AA batteries into the compartment observing the correct polarity. 3. Attaching the Wrist Strap Close the battery compartment. Open... battery compartment at the bottom of the strap though the short loop and pull tight to attach the strap to the camera. String the larger loop of the camera. 2. Insert the short loop of the strap in the strap eyelet. 2. Insert the batteries into the battery compartment. 1....

Owners Manual
Page 28
... out the card carefully. Close the battery compartment. Inserting an SD/MMC Memory Card Follow these instructions to turn off the camera, press the Power button again. To remove the SD/MMC card, gently push the card until it pops out. Insert the SD/MMC card into ... as shown. 3. Turning On Press and hold the Power button to insert the SD/MMC card. 1. To turn on the camera. English 14 Camera Setup Inserting an SD/MMC Memory Card The camera features 16 MB internal flash memory but you may also use an optional SD/MMC memory card for additional storage.
... out the card carefully. Close the battery compartment. Inserting an SD/MMC Memory Card Follow these instructions to turn off the camera, press the Power button again. To remove the SD/MMC card, gently push the card until it pops out. Insert the SD/MMC card into ... as shown. 3. Turning On Press and hold the Power button to insert the SD/MMC card. 1. To turn on the camera. English 14 Camera Setup Inserting an SD/MMC Memory Card The camera features 16 MB internal flash memory but you may also use an optional SD/MMC memory card for additional storage.
Owners Manual
Page 29
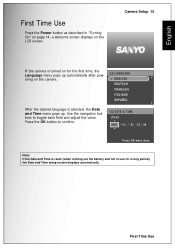
... ENGLISH DEUTSCH FRANCAIS ITALIANO ESPANOL After the desired language is turned on for a long period), the Date and Time setup screen displays automatically. Camera Setup 15 If the camera is selected, the Date and Time menu pops up automatically after powering on the LCD screen. DATE & TIME (Year) 2007 / 01 / 01 12...: If the Date and Time is reset (when running out the battery and not in "Turning On" on page 14, a welcome screen displays on the camera. First Time Use Use the navigation buttons to confirm.
... ENGLISH DEUTSCH FRANCAIS ITALIANO ESPANOL After the desired language is turned on for a long period), the Date and Time setup screen displays automatically. Camera Setup 15 If the camera is selected, the Date and Time menu pops up automatically after powering on the LCD screen. DATE & TIME (Year) 2007 / 01 / 01 12...: If the Date and Time is reset (when running out the battery and not in "Turning On" on page 14, a welcome screen displays on the camera. First Time Use Use the navigation buttons to confirm.


