Owners Manual
Page 1
... must accept any interference received, including interference that may cause harmful interference to provide reasonable protection against harmful interference in the manual. EN-1 Operation is connected. If this equipment does cause harmful interference to radio or television reception, which can radiate radio... guarantee that to stop operation of the FCC rules. Consult the dealer or an experienced radio/TV technician for Class B digital devices, pursuant to correct the interference by turning the equipment off and on a circuit different from that interference will not ...
... must accept any interference received, including interference that may cause harmful interference to provide reasonable protection against harmful interference in the manual. EN-1 Operation is connected. If this equipment does cause harmful interference to radio or television reception, which can radiate radio... guarantee that to stop operation of the FCC rules. Consult the dealer or an experienced radio/TV technician for Class B digital devices, pursuant to correct the interference by turning the equipment off and on a circuit different from that interference will not ...
Owners Manual
Page 2
... or discrepancies in this manual are for the purpose of Intel Corporation. J Macintosh® is a registered trademark of explanation and may differ from those described in this user manual. Products very often vary between retailers especially with your camera may be different from ...the actual design of Apple Computer, Inc. Contact your camera. J Pentium® is a trademark of your dealer for the...
... or discrepancies in this manual are for the purpose of Intel Corporation. J Macintosh® is a registered trademark of explanation and may differ from those described in this user manual. Products very often vary between retailers especially with your camera may be different from ...the actual design of Apple Computer, Inc. Contact your camera. J Pentium® is a trademark of your dealer for the...
Owners Manual
Page 7
... manual Points giving some extended instructions or special points to pay attention to questions or problems concerning camera operation in this device must accept any interference received, including interference that may cause undesired operation. Canadian ICES-003 information This class B digital apparatus complies with Part 15 of Conformity Model number: VPC-T700 Trade Name: SANYO Responsible...
... manual Points giving some extended instructions or special points to pay attention to questions or problems concerning camera operation in this device must accept any interference received, including interference that may cause undesired operation. Canadian ICES-003 information This class B digital apparatus complies with Part 15 of Conformity Model number: VPC-T700 Trade Name: SANYO Responsible...
Owners Manual
Page 12
Package Contents Carefully unpack your camera and ensure that you have the following items. Common Product Components: J Digital camera J User's manual J Software CD-ROM J USB cable J AV cable J Camera strap J Camera pouch J AC power adapter J Adapter converter (for "DC Jack to mini USB cable") J Rechargeable lithium-ion battery Common (Optional) Accessories: J SD/SDHC memory card EN-12
Package Contents Carefully unpack your camera and ensure that you have the following items. Common Product Components: J Digital camera J User's manual J Software CD-ROM J USB cable J AV cable J Camera strap J Camera pouch J AC power adapter J Adapter converter (for "DC Jack to mini USB cable") J Rechargeable lithium-ion battery Common (Optional) Accessories: J SD/SDHC memory card EN-12

Owners Manual
Page 16
... button is pressed halfway) 7. Capture mode [Blank] Single [ ] Continuous [ AEB] AEB 8. Date and time 12. White balance [Blank] Auto [ ] Incandescent [ 1 ] Fluorescent 1 [ 2 ] Fluorescent 2 [ ] Day Light [ ] Cloudy [ ] Manual 17. Focus mode [Blank] Auto focus [ ] Macro [ ] Infinity 18. Flash mode [ Blank] Auto Flash [ ] Red-eye Reduction [ ] Forced Flash [ ] Flash Off 5. [ ] Histogram 6. Possible number of...
... button is pressed halfway) 7. Capture mode [Blank] Single [ ] Continuous [ AEB] AEB 8. Date and time 12. White balance [Blank] Auto [ ] Incandescent [ 1 ] Fluorescent 1 [ 2 ] Fluorescent 2 [ ] Day Light [ ] Cloudy [ ] Manual 17. Focus mode [Blank] Auto focus [ ] Macro [ ] Infinity 18. Flash mode [ Blank] Auto Flash [ ] Red-eye Reduction [ ] Forced Flash [ ] Flash Off 5. [ ] Histogram 6. Possible number of...
Owners Manual
Page 33
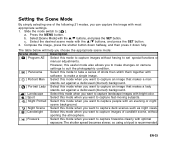
..., and press the SET button. EN-33 Slide the mode switch to [ ]. However, this useful mode also allows you to make changes on camera settings to suit the photographic condition. [ ] Panorama Select this mode to take a series of candlelit scene, without having to set special functions or... manual adjustments. Setting the Scene Mode By simply selecting one of the following 21 modes, you can capture the image with an evening or night...
..., and press the SET button. EN-33 Slide the mode switch to [ ]. However, this useful mode also allows you to make changes on camera settings to suit the photographic condition. [ ] Panorama Select this mode to take a series of candlelit scene, without having to set special functions or... manual adjustments. Setting the Scene Mode By simply selecting one of the following 21 modes, you can capture the image with an evening or night...

Owners Manual
Page 34
... this mode when you want to capture the soft flowing water. This mode allows you want to capture a sepia image. Select this mode when you manually set the setting parameters and all these settings will be memorized.
... this mode when you want to capture the soft flowing water. This mode allows you want to capture a sepia image. Select this mode when you manually set the setting parameters and all these settings will be memorized.
Owners Manual
Page 43
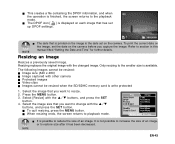
... The date that you want to resize. 2. It is the date set the date on the camera. Select [Resize] with the changed image. J When resizing ends, the screen returns to section in this manual titled "Setting the Date and Time" for further details. To print the correct date on the image..., set on the camera before you want to change with other camera J Protected images J Video clips J Images cannot be resized when the...
... The date that you want to resize. 2. It is the date set the date on the camera. Select [Resize] with the changed image. J When resizing ends, the screen returns to section in this manual titled "Setting the Date and Time" for further details. To print the correct date on the image..., set on the camera before you want to change with other camera J Protected images J Video clips J Images cannot be resized when the...
Owners Manual
Page 46
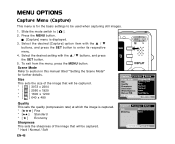
... enter its respective menu. 4. Select the desired [Capture] option item with the S / T buttons, and press the SET button. 5. Scene Mode Refer to section in this manual titled " Setting the Scene Mode" for the basic settings to be used when capturing still images. 1. Quality This sets the quality (compression rate) at which...
... enter its respective menu. 4. Select the desired [Capture] option item with the S / T buttons, and press the SET button. 5. Scene Mode Refer to section in this manual titled " Setting the Scene Mode" for the basic settings to be used when capturing still images. 1. Quality This sets the quality (compression rate) at which...

Owners Manual
Page 47
... select [Execute] determine the subject (such as a white paper) that are seen by the human eye. * [ Blank ] Auto * [ ] Incandescent *[ 1] *[2] *[ ] Fluorescent 1 Fluorescent 2 Day Light * [ ] Cloudy * [ ] Manual Manual WB This manually sets the white balance and stores it. EN-47 When the sensitivity is raised (and the ISO figure is increased), photography will become possible...
... select [Execute] determine the subject (such as a white paper) that are seen by the human eye. * [ Blank ] Auto * [ ] Incandescent *[ 1] *[2] *[ ] Fluorescent 1 Fluorescent 2 Day Light * [ ] Cloudy * [ ] Manual Manual WB This manually sets the white balance and stores it. EN-47 When the sensitivity is raised (and the ISO figure is increased), photography will become possible...

Owners Manual
Page 48
... press the SET button. 5. J [Function] menu is automatically fixed at a time. * [ ] Continuous: Permits continuous photography of 3 images max. * [AEB] AEB: Permits 3 consecutive images in this manual titled "Recording Voice Memos" for further details. * On / Off EN-48 Select the desired [Function] option item with the S / T buttons, and press the SET button...
... press the SET button. 5. J [Function] menu is automatically fixed at a time. * [ ] Continuous: Permits continuous photography of 3 images max. * [AEB] AEB: Permits 3 consecutive images in this manual titled "Recording Voice Memos" for further details. * On / Off EN-48 Select the desired [Function] option item with the S / T buttons, and press the SET button...
Owners Manual
Page 51
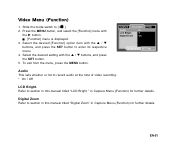
... to record audio at the time of video recording. * On / Off LCD Bright. Audio This sets whether or not to [ ]. 2. Digital Zoom Refer to section in this manual titled "Digital Zoom" in this manual titled "LCD Bright." Refer to enter its respective menu. 4. To exit from the menu, press the MENU button. Press the...
... to record audio at the time of video recording. * On / Off LCD Bright. Audio This sets whether or not to [ ]. 2. Digital Zoom Refer to section in this manual titled "Digital Zoom" in this manual titled "LCD Bright." Refer to enter its respective menu. 4. To exit from the menu, press the MENU button. Press the...
Owners Manual
Page 52
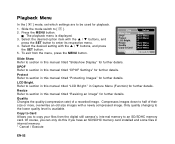
...menu. 4. LCD Bright. Resize Refer to section in this manual titled "Slideshow Display" for further details. Slide the mode switch to the lower quality level is displayed. 3. Press the MENU button. To exit from the digital still camera's internal memory to an SD/SDHC memory card. Slide ...Show Refer to section in Capture Menu (Function) for playback. 1. Of course, you can only do this manual titled "LCD Bright." J The playback menu is available. ...
...menu. 4. LCD Bright. Resize Refer to section in this manual titled "Slideshow Display" for further details. Slide the mode switch to the lower quality level is displayed. 3. Press the MENU button. To exit from the digital still camera's internal memory to an SD/SDHC memory card. Slide ...Show Refer to section in Capture Menu (Function) for playback. 1. Of course, you can only do this manual titled "LCD Bright." J The playback menu is available. ...
Owners Manual
Page 53
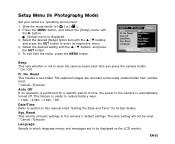
... / T buttons, and press the SET button to be reset. * Cancel / Execute Language Specify in this manual titled "Setting the Date and Time" for a specific period of time, the power to the camera's default settings. Beep This sets whether or not to [ ] or [ ]. 2. EN-53 Slide the...The captured images are to enter its respective menu. 4. Select the desired setting with the X button. Reset This returns all basic settings to the camera is automatically turned off. Reset This creates a new folder. Sys. Press the MENU button, and select the [Setup] menu with the S /...
... / T buttons, and press the SET button to be reset. * Cancel / Execute Language Specify in this manual titled "Setting the Date and Time" for a specific period of time, the power to the camera's default settings. Beep This sets whether or not to [ ] or [ ]. 2. EN-53 Slide the...The captured images are to enter its respective menu. 4. Select the desired setting with the X button. Reset This returns all basic settings to the camera is automatically turned off. Reset This creates a new folder. Sys. Press the MENU button, and select the [Setup] menu with the S /...

Owners Manual
Page 54
Select the desired [Setup] option item with the S / T buttons, and press the SET button to the camera. * NTSC / PAL EN-54 Beep Refer to section in this manual titled "Fr. Fr. Reset" in Setup Menu (In Photography Mode) for further details. Video Output This sets video output ...Select the desired setting with the X button. This displays the free capacity of the camera. Setup Menu (In Playback Mode) 1. Card Info. System Info. Play MENU:Exit SET:Adj. Language Refer to section in this manual titled "Beep" in Setup Menu (In Photography Mode) for further details. J [Setup...
Select the desired [Setup] option item with the S / T buttons, and press the SET button to the camera. * NTSC / PAL EN-54 Beep Refer to section in this manual titled "Fr. Fr. Reset" in Setup Menu (In Photography Mode) for further details. Video Output This sets video output ...Select the desired setting with the X button. This displays the free capacity of the camera. Setup Menu (In Playback Mode) 1. Card Info. System Info. Play MENU:Exit SET:Adj. Language Refer to section in this manual titled "Beep" in Setup Menu (In Photography Mode) for further details. J [Setup...


