
Owners Manual
Page 2
... trademarks of their market requirements, customer demographics, and geographical preferences. J Macintosh® is a registered trademark of your camera. J The product and accessories that different retailers often specify slightly different product inclusions and accessories to suit their respective owners...This includes primary product specifications, software, software drivers, and user's manual. This User Manual is a trademark. Contact your camera may be trademarks or registered trademarks of Microsoft Corporation. EN-2 J SDTM is a general reference guide for precise product ...
... trademarks of their market requirements, customer demographics, and geographical preferences. J Macintosh® is a registered trademark of your camera. J The product and accessories that different retailers often specify slightly different product inclusions and accessories to suit their respective owners...This includes primary product specifications, software, software drivers, and user's manual. This User Manual is a trademark. Contact your camera may be trademarks or registered trademarks of Microsoft Corporation. EN-2 J SDTM is a general reference guide for precise product ...
Owners Manual
Page 3
... OFF and remove the battery and the AC power adapter. For repair or internal inspection, ask the store of purchase. Do not use the camera while you to fall over , causing injury. This might cause fire or electric shock. If the battery is accidentally swallowed, immediately consult a ... shock. Use with the indicated power supply voltage. This might cause you are walking, driving or riding a vehicle. Do not use the camera in traffic accident. Consult the store of purchase. Use the specified AC power adapter only with any other power supply voltage might cause fire...
... OFF and remove the battery and the AC power adapter. For repair or internal inspection, ask the store of purchase. Do not use the camera while you to fall over , causing injury. This might cause fire or electric shock. If the battery is accidentally swallowed, immediately consult a ... shock. Use with the indicated power supply voltage. This might cause you are walking, driving or riding a vehicle. Do not use the camera in traffic accident. Consult the store of purchase. Use the specified AC power adapter only with any other power supply voltage might cause fire...
Owners Manual
Page 4
... damage the glass on the screen or cause the internal fluid to leak. Inserting the battery with fresh water. This might cause damage to the camera. If the internal fluid enters your eyes or comes into contact with your eyes, consult a physician to receive treatment. Touching a hot battery might ...or damage to the surrounding areas due to the battery rupturing or leaking. Do not drop it, strike it in fire. Do not leave the camera in places where the temperature may rise significantly, such as inside , resulting in cloth or blankets. If the internal fluid has entered your body...
... damage the glass on the screen or cause the internal fluid to leak. Inserting the battery with fresh water. This might cause damage to the camera. If the internal fluid enters your eyes or comes into contact with your eyes, consult a physician to receive treatment. Touching a hot battery might ...or damage to the surrounding areas due to the battery rupturing or leaking. Do not drop it, strike it in fire. Do not leave the camera in places where the temperature may rise significantly, such as inside , resulting in cloth or blankets. If the internal fluid has entered your body...
Owners Manual
Page 7
... extended instructions or special points to pay attention to questions or problems concerning camera operation in the sections "Troubleshooting". EN-7 Canadian ICES-003 information This class B digital apparatus complies with Part 15 of Conformity Model number: VPC-T700 Trade Name: SANYO Responsible party: SANYO FISHER COMPANY Address: 21605 Plummer Street Chatsworth, California 91311 Telephone No.: (818...
... extended instructions or special points to pay attention to questions or problems concerning camera operation in the sections "Troubleshooting". EN-7 Canadian ICES-003 information This class B digital apparatus complies with Part 15 of Conformity Model number: VPC-T700 Trade Name: SANYO Responsible party: SANYO FISHER COMPANY Address: 21605 Plummer Street Chatsworth, California 91311 Telephone No.: (818...
Owners Manual
Page 8
... for a long time in a fully charged state, its performance and lifetime, we recommend that can shorten the battery life and reduce camera performance. J Always keep the battery terminals in extremely cold environments as low temperatures can be charged 8 hours as first time use the...rechargeable battery or rechargeable battery that has not been used for at least one complete cycle before use of time, store it from the camera to the recycle instructions. J The battery may be used batteries according to prevent leakage or corrosion. J We recommend the battery should...
... for a long time in a fully charged state, its performance and lifetime, we recommend that can shorten the battery life and reduce camera performance. J Always keep the battery terminals in extremely cold environments as low temperatures can be charged 8 hours as first time use the...rechargeable battery or rechargeable battery that has not been used for at least one complete cycle before use of time, store it from the camera to the recycle instructions. J The battery may be used batteries according to prevent leakage or corrosion. J We recommend the battery should...
Owners Manual
Page 9
... Front View 14 Rear View 16 LCD Monitor Icons GETTING STARTED 18 Attaching the Camera Strap 18 Inserting and Removing the Battery 19 Charging the Battery 20 Inserting and Removing the SD/SDHC Memory Card (Optional Accessory) 21 Setting the ... SD/SDHC Memory Card or Internal Memory 23 Setting Image Resolution and Quality PHOTOGRAPHY MODE 26 [ ] Capture Mode 27 Recording Voice Memos 28 Using the Digital Zoom 29 Setting the Flash 30 Setting the Focus 31 Setting the Self-timer 32 Exposure Compensation/Backlight Correction 33 Setting the Scene Mode 35...
... Front View 14 Rear View 16 LCD Monitor Icons GETTING STARTED 18 Attaching the Camera Strap 18 Inserting and Removing the Battery 19 Charging the Battery 20 Inserting and Removing the SD/SDHC Memory Card (Optional Accessory) 21 Setting the ... SD/SDHC Memory Card or Internal Memory 23 Setting Image Resolution and Quality PHOTOGRAPHY MODE 26 [ ] Capture Mode 27 Recording Voice Memos 28 Using the Digital Zoom 29 Setting the Flash 30 Setting the Focus 31 Setting the Self-timer 32 Exposure Compensation/Backlight Correction 33 Setting the Scene Mode 35...

Owners Manual
Page 10
CONNECTING TO A PICTBRIDGE COMPLIANT PRINTER TRANSFERRING RECORDED IMAGES AND VIDEOS TO YOUR COMPUTER 57 Connecting the Camera to Your Computer 58 Downloading Images and Video Files USING THE CAMERA AS A PC CAMERA 59 Install the PC Camera Driver 60 Connect the Camera to Your Computer 60 Run Your Application Software (i.e. Windows NetMeeting) EDITING SOFTWARE INSTALLATION 61 Installing Photo Explorer 61 Installing Photo Express 62 Installing Cool 360 CAMERA SPECIFICATIONS TROUBLESHOOTING EN-10
CONNECTING TO A PICTBRIDGE COMPLIANT PRINTER TRANSFERRING RECORDED IMAGES AND VIDEOS TO YOUR COMPUTER 57 Connecting the Camera to Your Computer 58 Downloading Images and Video Files USING THE CAMERA AS A PC CAMERA 59 Install the PC Camera Driver 60 Connect the Camera to Your Computer 60 Run Your Application Software (i.e. Windows NetMeeting) EDITING SOFTWARE INSTALLATION 61 Installing Photo Explorer 61 Installing Photo Express 62 Installing Cool 360 CAMERA SPECIFICATIONS TROUBLESHOOTING EN-10
Owners Manual
Page 11
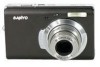
.... Scene mode - External memory supports SD/SDHC memory card. Capturing high-quality digital images is capable of capturing images with this camera is fast and easy with a resolution of -the-art smart camera. Digital zoom - 4x digital zoom and 3x optical zoom permit zoom photography of up to enlarge a selected ...portion of the new digital camera. INTRODUCTION Overview Congratulations on the LCD monitor for the results you shoot for easier and quicker selection of images. Recording media ...
.... Scene mode - External memory supports SD/SDHC memory card. Capturing high-quality digital images is capable of capturing images with this camera is fast and easy with a resolution of -the-art smart camera. Digital zoom - 4x digital zoom and 3x optical zoom permit zoom photography of up to enlarge a selected ...portion of the new digital camera. INTRODUCTION Overview Congratulations on the LCD monitor for the results you shoot for easier and quicker selection of images. Recording media ...
Owners Manual
Page 12
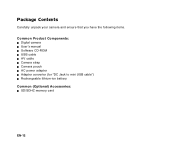
Package Contents Carefully unpack your camera and ensure that you have the following items. Common Product Components: J Digital camera J User's manual J Software CD-ROM J USB cable J AV cable J Camera strap J Camera pouch J AC power adapter J Adapter converter (for "DC Jack to mini USB cable") J Rechargeable lithium-ion battery Common (Optional) Accessories: J SD/SDHC memory card EN-12
Package Contents Carefully unpack your camera and ensure that you have the following items. Common Product Components: J Digital camera J User's manual J Software CD-ROM J USB cable J AV cable J Camera strap J Camera pouch J AC power adapter J Adapter converter (for "DC Jack to mini USB cable") J Rechargeable lithium-ion battery Common (Optional) Accessories: J SD/SDHC memory card EN-12
Owners Manual
Page 13
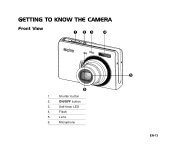
Self-timer LED 4. Flash 5. Shutter button 2. GETTING TO KNOW THE CAMERA Front View 1 23 4 6 1. ON/OFF button 3. Lens 6. Microphone 5 EN-13
Self-timer LED 4. Flash 5. Shutter button 2. GETTING TO KNOW THE CAMERA Front View 1 23 4 6 1. ON/OFF button 3. Lens 6. Microphone 5 EN-13
Owners Manual
Page 18
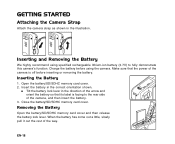
... memory card cover. 2. Make sure that its label is off before using specified rechargeable lithium-ion battery (3.7V) to the rear side of the camera, and then insert the battery. 3. Tilt the battery lock lever in the direction of the arrow and orient the battery so that the power of... the way. GETTING STARTED Attaching the Camera Strap Attach the camera strap as shown in the correct orientation shown. Charge the battery before inserting or removing the battery. When the battery has come out...
... memory card cover. 2. Make sure that its label is off before using specified rechargeable lithium-ion battery (3.7V) to the rear side of the camera, and then insert the battery. 3. Tilt the battery lock lever in the direction of the arrow and orient the battery so that the power of... the way. GETTING STARTED Attaching the Camera Strap Attach the camera strap as shown in the correct orientation shown. Charge the battery before inserting or removing the battery. When the battery has come out...
Owners Manual
Page 19
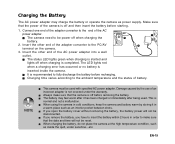
... red when a charging error has occurred or no battery is not covered under sunshine...etc. J When charging the battery, do not place the camera at the high temperature condition, such as power supply. EN-19 J Always make sure that the date and time will not be power off...without removing the battery, the battery power will not be used . J The battery may charge the battery or operate the camera as inside the camera. Make sure that the camera is off when charging is normal and not a malfunction. This is completed. Charging the Battery The AC power adapter may ...
... red when a charging error has occurred or no battery is not covered under sunshine...etc. J When charging the battery, do not place the camera at the high temperature condition, such as power supply. EN-19 J Always make sure that the date and time will not be power off...without removing the battery, the battery power will not be used . J The battery may charge the battery or operate the camera as inside the camera. Make sure that the camera is off when charging is normal and not a malfunction. This is completed. Charging the Battery The AC power adapter may ...
Owners Manual
Page 20
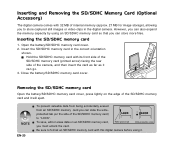
...Open the battery/SD/SDHC memory card cover. 2. Inserting and Removing the SD/SDHC Memory Card (Optional Accessory) The digital camera comes with 32 MB of internal memory (approx. 27 MB for image storage), allowing you to format an SD/SDHC ... card with its front side of the SD/SDHC memory card (printed arrow) facing the rear side of the camera, and then insert the card as far as it can go. 3. Close the battery/SD/SDHC memory card ...SD/SDHC memory card) to "LOCK". J Hold the SD/SDHC memory card with this digital camera before using an SD/SDHC memory card so that you must unlock the card.
...Open the battery/SD/SDHC memory card cover. 2. Inserting and Removing the SD/SDHC Memory Card (Optional Accessory) The digital camera comes with 32 MB of internal memory (approx. 27 MB for image storage), allowing you to format an SD/SDHC ... card with its front side of the SD/SDHC memory card (printed arrow) facing the rear side of the camera, and then insert the card as far as it can go. 3. Close the battery/SD/SDHC memory card ...SD/SDHC memory card) to "LOCK". J Hold the SD/SDHC memory card with this digital camera before using an SD/SDHC memory card so that you must unlock the card.
Owners Manual
Page 21
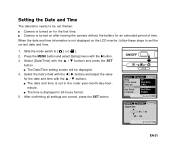
... the MENU button and select [Setup] menu with the S / T buttons and press the SET button. The Date/Time setting screen will be set if/when: Camera is not displayed on the LCD monitor, follow these steps to set in 24-hours format. 5. Setting the Date and Time The date/time needs... 20 : 00 SET:Enter EN-21 The date and time is displayed in the order year-month-day-hourminute. Select [Date/Time] with the Xbutton. 3. Camera is turned on for the first time. Slide the mode switch to be displayed. 4. SET:Adj. When the date and time information is turned on...
... the MENU button and select [Setup] menu with the S / T buttons and press the SET button. The Date/Time setting screen will be set if/when: Camera is not displayed on the LCD monitor, follow these steps to set in 24-hours format. 5. Setting the Date and Time The date/time needs... 20 : 00 SET:Enter EN-21 The date and time is displayed in the order year-month-day-hourminute. Select [Date/Time] with the Xbutton. 3. Camera is turned on for the first time. Slide the mode switch to be displayed. 4. SET:Adj. When the date and time information is turned on...

Owners Manual
Page 22
..., and press the SET button. Format EN-22 SET:Enter J To format the internal memory, do not insert an SD/SDHC memory card into the camera. J Formatting is an irreversible action and data cannot be properly formatted. Formatting the SD/SDHC Memory Card or Internal Memory This utility formats the internal...
..., and press the SET button. Format EN-22 SET:Enter J To format the internal memory, do not insert an SD/SDHC memory card into the camera. J Formatting is an irreversible action and data cannot be properly formatted. Formatting the SD/SDHC Memory Card or Internal Memory This utility formats the internal...

Owners Manual
Page 23
... SET button. 4. Lower resolution/quality images take up a lot of images that these steps below: 1. J [Capture] menu is recommended that you get to know the camera, it is displayed. 3. To exit from the menu, press the MENU button. Select [Size] with the S / T buttons, and press the SET button. 6. High resolution and...
... SET button. 4. Lower resolution/quality images take up a lot of images that these steps below: 1. J [Capture] menu is recommended that you get to know the camera, it is displayed. 3. To exit from the menu, press the MENU button. Select [Size] with the S / T buttons, and press the SET button. 6. High resolution and...
Owners Manual
Page 25
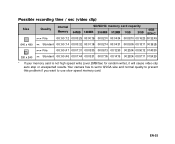
... your memory card is not high speed write (over 2MB/Sec for random write), it will cause video clip auto stop or unexpected results. Your camera has to set to QVGA size and normal quality to prevent this problem if you want to use slow speed memory card. EN-25
... your memory card is not high speed write (over 2MB/Sec for random write), it will cause video clip auto stop or unexpected results. Your camera has to set to QVGA size and normal quality to prevent this problem if you want to use slow speed memory card. EN-25
Owners Manual
Page 26
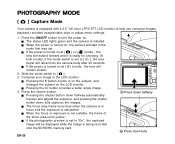
...monitor. Compose your image in focus and the exposure is calculated. J The focus area frame turns blue when the camera is in the LCD monitor. PHOTOGRAPHY MODE [ ] Capture Mode Your camera is equipped with a 2.5" full color LTPS-TFT LCD monitor to [ ], the lens barrel will retract into the...images. At both modes, if the mode switch is set to "On", the captured image will be displayed while the image is turned on, the camera will remain closed. 2. J Pressing the button provides a wider angle image. 4. J Pressing the shutter button down halfway automatically focuses and adjusts the ...
...monitor. Compose your image in focus and the exposure is calculated. J The focus area frame turns blue when the camera is in the LCD monitor. PHOTOGRAPHY MODE [ ] Capture Mode Your camera is equipped with a 2.5" full color LTPS-TFT LCD monitor to [ ], the lens barrel will retract into the...images. At both modes, if the mode switch is set to "On", the captured image will be displayed while the image is turned on, the camera will remain closed. 2. J Pressing the button provides a wider angle image. 4. J Pressing the shutter button down halfway automatically focuses and adjusts the ...
Owners Manual
Page 28
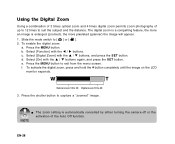
...S / T buttons again, and press the SET button. Optical zoom 1X to 3X Digital zoom 1X to exit from the menu screen. J The zoom setting is enlarged (zoomed), the more an image is automatically cancelled by either turning the camera off or the activation of up to 12 times to suit the subject... and the distance. c. e. To activate the digital zoom, press and hold the button completely until the image on the LCD monitor expands. ...
...S / T buttons again, and press the SET button. Optical zoom 1X to 3X Digital zoom 1X to exit from the menu screen. J The zoom setting is enlarged (zoomed), the more an image is automatically cancelled by either turning the camera off or the activation of up to 12 times to suit the subject... and the distance. c. e. To activate the digital zoom, press and hold the button completely until the image on the LCD monitor expands. ...
Owners Manual
Page 29
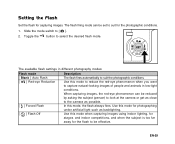
...the red-eye phenomenon can be set to suit for the flash to be reduced by asking the subject (person) to look at the camera or get as close to suit the photographic conditions. Use this mode when capturing images using indoor lighting, for stages and indoor competitions,... photography modes: Flash mode [ Blank ] Auto Flash [ ] Red-eye Reduction [ ] Forced Flash [ ] Flash Off Description The flash fires automatically to the camera as backlighting. Slide the mode switch to select the desired flash mode. In this mode for capturing images. Use this mode, the flash always fires.
...the red-eye phenomenon can be set to suit for the flash to be reduced by asking the subject (person) to look at the camera or get as close to suit the photographic conditions. Use this mode when capturing images using indoor lighting, for stages and indoor competitions,... photography modes: Flash mode [ Blank ] Auto Flash [ ] Red-eye Reduction [ ] Forced Flash [ ] Flash Off Description The flash fires automatically to the camera as backlighting. Slide the mode switch to select the desired flash mode. In this mode for capturing images. Use this mode, the flash always fires.


