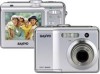

VPC-S500 Owners Manual English
Page 2
...„ Product design and specifications are trademarks. „ Other names and products may be different from the actual design of your digital camera. „ The manufacturer assumes no liability for the product. „ The product and accessories that different retailers often specify slightly ...different product inclusions and accessories to our website or contact your digital camera may differ from those described in this user manual. „ For user manual and driver updates, refer to suit their...
...„ Product design and specifications are trademarks. „ Other names and products may be different from the actual design of your digital camera. „ The manufacturer assumes no liability for the product. „ The product and accessories that different retailers often specify slightly ...different product inclusions and accessories to our website or contact your digital camera may differ from those described in this user manual. „ For user manual and driver updates, refer to suit their...
VPC-S500 Owners Manual English
Page 3
...fire or electric shock. If the battery is accidentally swallowed, immediately consult a physician. EN-3 Continued use in traffic accident. This might cause the camera to fall or tilt over or result in this state might cause you are walking, driving or riding a motorcycle. Do not use the... cause fire or electric shock. Keep the batteries out of the reach of purchase. Warnings If foreign objects or water have entered the camera, turn the power OFF and remove the batteries. SAFETY INSTRUCTIONS Read and understand all Warnings and Cautions before using this product.
...fire or electric shock. If the battery is accidentally swallowed, immediately consult a physician. EN-3 Continued use in traffic accident. This might cause the camera to fall or tilt over or result in this state might cause you are walking, driving or riding a motorcycle. Do not use the... cause fire or electric shock. Keep the batteries out of the reach of purchase. Warnings If foreign objects or water have entered the camera, turn the power OFF and remove the batteries. SAFETY INSTRUCTIONS Read and understand all Warnings and Cautions before using this product.

VPC-S500 Owners Manual English
Page 4
.... This might cause heat to do this might cause fire and injury, or damage to the surrounding areas due to impact. Do not leave the camera in places where the temperature may rise significantly, such as inside , resulting in fire. Failure to build up and deform the case, resulting in .... This might cause damage to leak. This might damage the glass on the screen or cause the internal fluid to the camera. Do not wrap the camera or place it or use . A camera is a precision instrument. This might cause burns. Do not use . Do not remove the battery immediately after long period ...
.... This might cause heat to do this might cause fire and injury, or damage to the surrounding areas due to impact. Do not leave the camera in places where the temperature may rise significantly, such as inside , resulting in fire. Failure to build up and deform the case, resulting in .... This might cause damage to leak. This might damage the glass on the screen or cause the internal fluid to the camera. Do not wrap the camera or place it or use . A camera is a precision instrument. This might cause burns. Do not use . Do not remove the battery immediately after long period ...
VPC-S500 Owners Manual English
Page 6
... areas of the world. Your SANYO product is designed and manufactured with Canadian ICES-003 FOR EU USERS Note: „This symbol mark and recycle system apply to EU countries and do not apply to questions or problems concerning camera operation in the section "TROUBLESHOOTING GUIDE... or special points to pay attention to conserve the environment we live in! EN-6 FOR CANADIAN USERS „ This Class B digital apparatus complies with high quality materials and components which can be disposed of separately from your local community waste collection/recycling centre. Please...
... areas of the world. Your SANYO product is designed and manufactured with Canadian ICES-003 FOR EU USERS Note: „This symbol mark and recycle system apply to EU countries and do not apply to questions or problems concerning camera operation in the section "TROUBLESHOOTING GUIDE... or special points to pay attention to conserve the environment we live in! EN-6 FOR CANADIAN USERS „ This Class B digital apparatus complies with high quality materials and components which can be disposed of separately from your local community waste collection/recycling centre. Please...
VPC-S500 Owners Manual English
Page 8
...continuously or for an extended period of time. Notes on Battery Usage When you fully charge the batteries and discharge them from the camera to the instructions. This is replaced by an incorrect type. „ Dispose of time or using the batteries for an extended period...can be using the flash continuously. Therefore, to maximize their performance and lifetime, we recommend that can shorten the battery life and reduce camera performance. This low temperature will also influence Alkaline battery performance, therefore Ni-MH rechargeable battery is highly recommended. „ If you ...
...continuously or for an extended period of time. Notes on Battery Usage When you fully charge the batteries and discharge them from the camera to the instructions. This is replaced by an incorrect type. „ Dispose of time or using the batteries for an extended period...can be using the flash continuously. Therefore, to maximize their performance and lifetime, we recommend that can shorten the battery life and reduce camera performance. This low temperature will also influence Alkaline battery performance, therefore Ni-MH rechargeable battery is highly recommended. „ If you ...
VPC-S500 Owners Manual English
Page 9
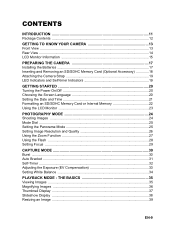
...37 Slideshow Display ...38 Resizing an Image ...39 EN-9 CONTENTS INTRODUCTION 11 Package Contents ...12 GETTING TO KNOW YOUR CAMERA 13 Front View ...13 Rear View ...14 LCD Monitor Information 15 PREPARING THE CAMERA 17 Installing the Batteries 17 Inserting and Removing an SD/SDHC Memory Card (Optional Accessory 18 Attaching the... Camera Strap 19 LED Indicators and Self-timer Indicators 19 GETTING STARTED 20 Turning the Power On/Off 20 Choosing the Screen Language 20 Setting...
...37 Slideshow Display ...38 Resizing an Image ...39 EN-9 CONTENTS INTRODUCTION 11 Package Contents ...12 GETTING TO KNOW YOUR CAMERA 13 Front View ...13 Rear View ...14 LCD Monitor Information 15 PREPARING THE CAMERA 17 Installing the Batteries 17 Inserting and Removing an SD/SDHC Memory Card (Optional Accessory 18 Attaching the... Camera Strap 19 LED Indicators and Self-timer Indicators 19 GETTING STARTED 20 Turning the Power On/Off 20 Choosing the Screen Language 20 Setting...
VPC-S500 Owners Manual English
Page 10
...42 Protecting Images/Movie Clips 43 Setting the DPOF ...44 TRANSFERRING RECORDED IMAGES AND VIDEOS TO YOUR COMPUTER 46 Connect the digital camera to your computer 47 Download images or movie clips 48 EDITING SOFTWARE INSTALLATION 49 Installing Photo Explorer 49 Installing Photo Express ...50 Installing Cool 360 ...51 MENU OPTIONS 52 Camera Menu ...52 Movie Menu ...55 Playback Menu ...56 Setup Menu ...58 SPECIFICATIONS 60 TROUBLESHOOTING GUIDE 61 POSSIBLE NUMBER OF RECORDABLE IMAGES...
...42 Protecting Images/Movie Clips 43 Setting the DPOF ...44 TRANSFERRING RECORDED IMAGES AND VIDEOS TO YOUR COMPUTER 46 Connect the digital camera to your computer 47 Download images or movie clips 48 EDITING SOFTWARE INSTALLATION 49 Installing Photo Explorer 49 Installing Photo Express ...50 Installing Cool 360 ...51 MENU OPTIONS 52 Camera Menu ...52 Movie Menu ...55 Playback Menu ...56 Setup Menu ...58 SPECIFICATIONS 60 TROUBLESHOOTING GUIDE 61 POSSIBLE NUMBER OF RECORDABLE IMAGES...

VPC-S500 Owners Manual English
Page 11
...megapixels for high quality of images. „ Auto flash An auto flash sensor automatically detects the shooting (lighting) conditions and determines whether the flash should be captured without using an SD/SDHC memory card. „ Support for SD/SDHC memory card for purchasing the new digital still camera... Still images or movie clips that supports PictBridge and perform image selection and printing using the camera monitor screen and controls. Equipped with a 5.0 Megapixels CCD sensor, your computer by using the provided editing software. „ PictBridge support You can connect the...
...megapixels for high quality of images. „ Auto flash An auto flash sensor automatically detects the shooting (lighting) conditions and determines whether the flash should be captured without using an SD/SDHC memory card. „ Support for SD/SDHC memory card for purchasing the new digital still camera... Still images or movie clips that supports PictBridge and perform image selection and printing using the camera monitor screen and controls. Equipped with a 5.0 Megapixels CCD sensor, your computer by using the provided editing software. „ PictBridge support You can connect the...
VPC-S500 Owners Manual English
Page 12
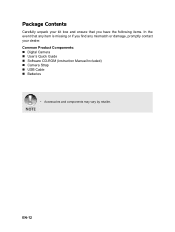
Common Product Components: „ Digital Camera „ User's Quick Guide „ Software CD-ROM (Instruction Manual Included) „ Camera Strap „ USB Cable „ Batteries • Accessories and components may vary by retailer. Package Contents Carefully unpack your kit box and ensure that you have the following items. In the event that any item is missing or if you find any mismatch or damage, promptly contact your dealer. EN-12
Common Product Components: „ Digital Camera „ User's Quick Guide „ Software CD-ROM (Instruction Manual Included) „ Camera Strap „ USB Cable „ Batteries • Accessories and components may vary by retailer. Package Contents Carefully unpack your kit box and ensure that you have the following items. In the event that any item is missing or if you find any mismatch or damage, promptly contact your dealer. EN-12

VPC-S500 Owners Manual English
Page 13
Mode dial 3. Flash 5. Shutter release button 2. Lens 8. Self-timer LED 6. Power switch 4. Microphone EN-13 GETTING TO KNOW YOUR CAMERA Front View 1 2 3 4 5 6 8 7 1. PC / Video terminal 7.
Mode dial 3. Flash 5. Shutter release button 2. Lens 8. Self-timer LED 6. Power switch 4. Microphone EN-13 GETTING TO KNOW YOUR CAMERA Front View 1 2 3 4 5 6 8 7 1. PC / Video terminal 7.
VPC-S500 Owners Manual English
Page 15
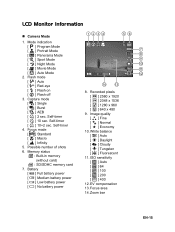
... 11. Zoom bar EN-15 Mode indication [ ] Program Mode [ ] Portrait Mode [ ] Panorama Mode [ ] Sport Mode [ ] Night Mode [ ] Movie Mode [ ] Auto Mode 2. LCD Monitor Information „ Camera Mode 1. Focus area 14. Memory status : Built-in memory (without card) : SD/SDHC memory card 7. Image quality [ ] Fine [ ] Normal [ ] Economy 10. Flash mode [ ] Auto [ ] Red...
... 11. Zoom bar EN-15 Mode indication [ ] Program Mode [ ] Portrait Mode [ ] Panorama Mode [ ] Sport Mode [ ] Night Mode [ ] Movie Mode [ ] Auto Mode 2. LCD Monitor Information „ Camera Mode 1. Focus area 14. Memory status : Built-in memory (without card) : SD/SDHC memory card 7. Image quality [ ] Fine [ ] Normal [ ] Economy 10. Flash mode [ ] Auto [ ] Red...
VPC-S500 Owners Manual English
Page 17
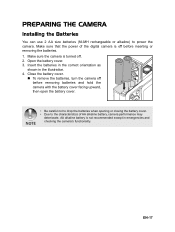
...power of the digital camera is off before removing batteries and hold the camera with the battery cover facing upward, then open the battery cover. • Be careful not to drop the batteries when opening or closing the battery cover. • Due to power the camera. Open the ... correct orientation as shown in emergencies and checking the camera's functionality. Close the battery cover. „ To remove the batteries, turn the camera off . 2. Make sure the camera is not recommended except in the illustration. 4. PREPARING THE CAMERA Installing the Batteries You can use 2 AA size ...
...power of the digital camera is off before removing batteries and hold the camera with the battery cover facing upward, then open the battery cover. • Be careful not to drop the batteries when opening or closing the battery cover. • Due to power the camera. Open the ... correct orientation as shown in emergencies and checking the camera's functionality. Close the battery cover. „ To remove the batteries, turn the camera off . 2. Make sure the camera is not recommended except in the illustration. 4. PREPARING THE CAMERA Installing the Batteries You can use 2 AA size ...

VPC-S500 Owners Manual English
Page 18
...memory card, you to store captured still images or video clips in the illustration. 4. Inserting and Removing an SD/SDHC Memory Card (Optional Accessory) The digital camera comes with 16MB of the memory card and it will eject. • Be sure to format an SD/SDHC memory card with this... digital camera before inserting or removing a memory card. 2. Insert an SD/SDHC memory card in the correct orientation as shown in the digital camera. EN-18 Moreover, you can also expand the memory capacity by using an optional SD...
...memory card, you to store captured still images or video clips in the illustration. 4. Inserting and Removing an SD/SDHC Memory Card (Optional Accessory) The digital camera comes with 16MB of the memory card and it will eject. • Be sure to format an SD/SDHC memory card with this... digital camera before inserting or removing a memory card. 2. Insert an SD/SDHC memory card in the correct orientation as shown in the digital camera. EN-18 Moreover, you can also expand the memory capacity by using an optional SD...
VPC-S500 Owners Manual English
Page 19
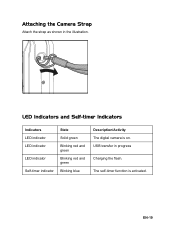
The self-timer function is on. Attaching the Camera Strap Attach the strap as shown in progress Charging the flash. USB transfer in the illustration. LED Indicators and Self-timer Indicators Indicators LED indicator LED indicator LED indicator Self-timer indicator State Solid green Blinking red and green Blinking red and green Blinking blue Description/Activity The digital camera is activated. EN-19
The self-timer function is on. Attaching the Camera Strap Attach the strap as shown in progress Charging the flash. USB transfer in the illustration. LED Indicators and Self-timer Indicators Indicators LED indicator LED indicator LED indicator Self-timer indicator State Solid green Blinking red and green Blinking red and green Blinking blue Description/Activity The digital camera is activated. EN-19
VPC-S500 Owners Manual English
Page 20
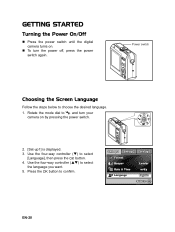
GETTING STARTED Turning the Power On/Off „ Press the power switch until the digital camera turns on by pressing the power switch. 2. [Set-up1] is displayed. 3. Use the four-way controller (ST) to select [Language], then press the button. 4. Set-...-20 Use the four-way controller (T) to select the language you want. 5. Rotate the mode dial to confirm. Press the button to and turn your camera on . „ To turn the power off, press the power switch again. Power switch Choosing the Screen Language Follow the steps below to choose the...
GETTING STARTED Turning the Power On/Off „ Press the power switch until the digital camera turns on by pressing the power switch. 2. [Set-up1] is displayed. 3. Use the four-way controller (ST) to select [Language], then press the button. 4. Set-...-20 Use the four-way controller (T) to select the language you want. 5. Rotate the mode dial to confirm. Press the button to and turn your camera on . „ To turn the power off, press the power switch again. Power switch Choosing the Screen Language Follow the steps below to choose the...

VPC-S500 Owners Manual English
Page 21
... & Time m/d/y Language English Select : 4. Use the four-way controller (T) to select [Date & Time] and the four-way controller (WX) to and turn your camera. Press the button after all fields are set the date display style, current date and time. 1. Date & Time 01 / 01 / 2007 Set : 00 : 00... Select : • The date illustration shown is for the purpose of explanation and may differ from the actual setting of your camera on by pressing the power switch. 2. [Set-up1] is displayed in 24-hour format. 5. EN-21 Setting the Date and Time Follow the steps...
... & Time m/d/y Language English Select : 4. Use the four-way controller (T) to select [Date & Time] and the four-way controller (WX) to and turn your camera. Press the button after all fields are set the date display style, current date and time. 1. Date & Time 01 / 01 / 2007 Set : 00 : 00... Select : • The date illustration shown is for the purpose of explanation and may differ from the actual setting of your camera on by pressing the power switch. 2. [Set-up1] is displayed in 24-hour format. 5. EN-21 Setting the Date and Time Follow the steps...
VPC-S500 Owners Manual English
Page 22
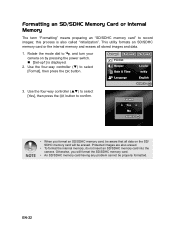
... erases all data on by pressing the power switch. „ [Set-up1] is also called "initialization". Use the four-way controller (T) to and turn your camera on the SD/ SDHC memory card will format the SD/SDHC memory card. • An SD/SDHC memory card having any problem cannot be aware... you will be erased. Protected images are also erased. • To format the internal memory, do not insert an SD/SDHC memory card into the camera. this process is displayed. 2. EN-22
... erases all data on by pressing the power switch. „ [Set-up1] is also called "initialization". Use the four-way controller (T) to and turn your camera on the SD/ SDHC memory card will format the SD/SDHC memory card. • An SD/SDHC memory card having any problem cannot be aware... you will be erased. Protected images are also erased. • To format the internal memory, do not insert an SD/SDHC memory card into the camera. this process is displayed. 2. EN-22

VPC-S500 Owners Manual English
Page 23
The mode icons, text and numbers displayed on the monitor may decelerate the shutter speed to ensure your camera may vary according to turn on the LCD monitor. 4. Press the shutter release button. • The LCD monitor darkens in strong sunlight or bright light. ... the power. 3. Compose your images from being blurred while pressing the shutter release button, always hold it carefully. EN-23 Using the LCD Monitor Your camera is equipped with a 2.4" full color TFT LCD monitor to , , , , , or . 2. Press the power switch to the current settings...
The mode icons, text and numbers displayed on the monitor may decelerate the shutter speed to ensure your camera may vary according to turn on the LCD monitor. 4. Press the shutter release button. • The LCD monitor darkens in strong sunlight or bright light. ... the power. 3. Compose your images from being blurred while pressing the shutter release button, always hold it carefully. EN-23 Using the LCD Monitor Your camera is equipped with a 2.4" full color TFT LCD monitor to , , , , , or . 2. Press the power switch to the current settings...
VPC-S500 Owners Manual English
Page 24
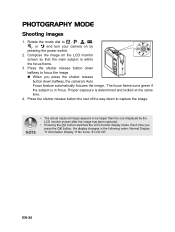
PHOTOGRAPHY MODE Shooting Images 1. Each time you press the shutter release button down halfway, the camera's Auto Focus feature automatically focuses the image. The focus frame turns green if the subject is determined and locked at the same time. 4. Proper exposure ... the button switches the LCD monitor display mode. Press the shutter release button the rest of the way down halfway to , , , , , or and turn your camera on the LCD monitor screen so that the main subject is within the focus frame. 3. Rotate the mode dial to focus the image. „ When...
PHOTOGRAPHY MODE Shooting Images 1. Each time you press the shutter release button down halfway, the camera's Auto Focus feature automatically focuses the image. The focus frame turns green if the subject is determined and locked at the same time. 4. Proper exposure ... the button switches the LCD monitor display mode. Press the shutter release button the rest of the way down halfway to , , , , , or and turn your camera on the LCD monitor screen so that the main subject is within the focus frame. 3. Rotate the mode dial to focus the image. „ When...
VPC-S500 Owners Manual English
Page 25
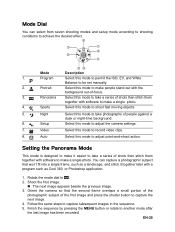
... this mode to take a series of shots then stitch them together with software to another mode after the last image has been recorded. Orient the camera so that won't fit into a single frame, such as Cool 360 or Photoshop application. 1. Setup Select this mode to adjust the... camera settings. 7. Video Select this mode to shoot fast moving objects. 5. Shoot the first image. „ The next image appears beside the previous image. 3. Follow the ...
... this mode to take a series of shots then stitch them together with software to another mode after the last image has been recorded. Orient the camera so that won't fit into a single frame, such as Cool 360 or Photoshop application. 1. Setup Select this mode to adjust the... camera settings. 7. Video Select this mode to shoot fast moving objects. 5. Shoot the first image. „ The next image appears beside the previous image. 3. Follow the ...


