
Instruction Manual
Page 3
.... © Copyright 2009 Federal Communications Commission (FCC) Compliance This equipment has been tested and found to comply with the instructions, may void your new digital camera. Copyright This manual contains proprietary information protected by the manufacturer may cause harmful interference to which can radiate radio frequency energy and, if not installed...
.... © Copyright 2009 Federal Communications Commission (FCC) Compliance This equipment has been tested and found to comply with the instructions, may void your new digital camera. Copyright This manual contains proprietary information protected by the manufacturer may cause harmful interference to which can radiate radio frequency energy and, if not installed...
Instruction Manual
Page 4
...possibly start a fire. • Download all pictures and remove the battery from cold to warm temperatures. • Do not touch the camera lens. • Do not expose the lens to direct sunlight for long periods. Operation is an abbreviated term referring to clean the product.... Battery Information • Turn off the camera before installing or removing the battery. • Use only the type of battery(SANYO Li-ion battery, Type NP40, 3.7V, 720mAH). English ii Preface Declaration of Conformity This device ...
...possibly start a fire. • Download all pictures and remove the battery from cold to warm temperatures. • Do not touch the camera lens. • Do not expose the lens to direct sunlight for long periods. Operation is an abbreviated term referring to clean the product.... Battery Information • Turn off the camera before installing or removing the battery. • Use only the type of battery(SANYO Li-ion battery, Type NP40, 3.7V, 720mAH). English ii Preface Declaration of Conformity This device ...

Instruction Manual
Page 5
...Read and understand all Warnings and Cautions before using this product. WARNING Do not disassemble, change or repair the camera. Do not use the camera in traffic accident. Do not use the camera while you to fall over , causing injury. Keep the battery out of the reach of purchase. This ...might cause you are walking, driving or riding a vehicle. This might cause poisoning. Do not place the camera on the beach, or near water. For repair or internal inspection, ask the store of children. Take special care during rain, snow, on ...
...Read and understand all Warnings and Cautions before using this product. WARNING Do not disassemble, change or repair the camera. Do not use the camera in traffic accident. Do not use the camera while you to fall over , causing injury. Keep the battery out of the reach of purchase. This ...might cause you are walking, driving or riding a vehicle. This might cause poisoning. Do not place the camera on the beach, or near water. For repair or internal inspection, ask the store of children. Take special care during rain, snow, on ...
Instruction Manual
Page 6
...OR ELECTRIC SHOCK, DO NOT EXPOSE THIS APPLIANCE TO RAIN OR MOISTURE Safety Instructions Do not use . Inserting the battery with fresh water. A camera is a precision instrument. This might damage cords and cables, resulting in humid, steamy, smoky, or dusty places. The battery becomes hot ...during use excessive force when handling the camera. Before you move the camera, disconnect cords and cables. If the internal fluid has entered your body or clothes, rinse with its polarities inverted might ...
...OR ELECTRIC SHOCK, DO NOT EXPOSE THIS APPLIANCE TO RAIN OR MOISTURE Safety Instructions Do not use . Inserting the battery with fresh water. A camera is a precision instrument. This might damage cords and cables, resulting in humid, steamy, smoky, or dusty places. The battery becomes hot ...during use excessive force when handling the camera. Before you move the camera, disconnect cords and cables. If the internal fluid has entered your body or clothes, rinse with its polarities inverted might ...
Instruction Manual
Page 8
...to questions or problems concerning camera operation in ! The symbol mark means that the battery or accumulator contains a heavy metal at a certain concentration. Please, help us to conserve the environment we live in the sections Safety Instructions Manufacturer and Address SANYO Electric Co., Ltd. 5-5, ...and electronic equipment, batteries and accumulators, at their end-of separately from your local community waste collection/recycling centre. Your SANYO product is printed beneath the symbol mark, this manual Points giving some extended instructions or special points to pay attention to....
...to questions or problems concerning camera operation in ! The symbol mark means that the battery or accumulator contains a heavy metal at a certain concentration. Please, help us to conserve the environment we live in the sections Safety Instructions Manufacturer and Address SANYO Electric Co., Ltd. 5-5, ...and electronic equipment, batteries and accumulators, at their end-of separately from your local community waste collection/recycling centre. Your SANYO product is printed beneath the symbol mark, this manual Points giving some extended instructions or special points to pay attention to....
Instruction Manual
Page 10
... FIRST Notice: • • • • Product design and specifications are for the purpose of explanation and may differ from the actual design of your camera may be different from those described in this manual. Safety Instructions This is a general reference guide for precise product definition and included accessories. The illustrations... the fact that come with accessories such as batteries, memory cards, cables, pouches, and language support. Products very often vary between retailers especially with your camera.
... FIRST Notice: • • • • Product design and specifications are for the purpose of explanation and may differ from the actual design of your camera may be different from those described in this manual. Safety Instructions This is a general reference guide for precise product definition and included accessories. The illustrations... the fact that come with accessories such as batteries, memory cards, cables, pouches, and language support. Products very often vary between retailers especially with your camera.

Instruction Manual
Page 11
...Contents Preface i About this Manual i Copyright ...i Federal Communications Commission (FCC) Compliance i Declaration of Conformity ii Trademark Recognition ii Safety and Handling Precautions ii Camera Information ...ii Battery Information ...ii Safety Instructions iii WARNING ...iii CAUTION ...iv FOR AMERICAN USERS v FOR CANADIAN USERS v FOR EU USERS ...vi Symbols used ... of Conformity vii Canadian ICES-003 Information vii TRADEMARK INFORMATION vii READ THIS FIRST ...viii Introduction 1 System Requirements 1 Package Contents 1 Main Features 1 Camera Views 2 Front View ...2
...Contents Preface i About this Manual i Copyright ...i Federal Communications Commission (FCC) Compliance i Declaration of Conformity ii Trademark Recognition ii Safety and Handling Precautions ii Camera Information ...ii Battery Information ...ii Safety Instructions iii WARNING ...iii CAUTION ...iv FOR AMERICAN USERS v FOR CANADIAN USERS v FOR EU USERS ...vi Symbols used ... of Conformity vii Canadian ICES-003 Information vii TRADEMARK INFORMATION vii READ THIS FIRST ...viii Introduction 1 System Requirements 1 Package Contents 1 Main Features 1 Camera Views 2 Front View ...2
Instruction Manual
Page 12
... 5 Navigation Buttons ...5 The Scene Button ...8 Function Buttons ...9 LCD screen 10 Capture/Video Mode Display 10 Camera Setup 16 Attaching the Wrist Strap 16 Inserting the Battery 16 Inserting an SD/SDHC Memory Card 17 Charging the Battery 18 Charging the Battery ...
... 5 Navigation Buttons ...5 The Scene Button ...8 Function Buttons ...9 LCD screen 10 Capture/Video Mode Display 10 Camera Setup 16 Attaching the Wrist Strap 16 Inserting the Battery 16 Inserting an SD/SDHC Memory Card 17 Charging the Battery 18 Charging the Battery ...
Instruction Manual
Page 14
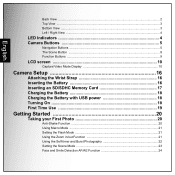
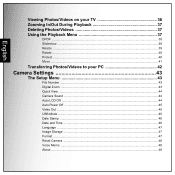
English Viewing Photos/Videos on your TV 36 Zooming In/Out During Playback 37 Deleting Photos/Videos 37 Using the Playback Menu 37 DPOF ...38 Slideshow ...39 Resize ...39 Rotate ...40 Protect ...40 Move ...41 Transferring Photos/Videos to your PC 42 Camera Settings 43 The Setup Menu 43 File Number ...43 Digital Zoom ...43 Quick View ...44 Camera Sound ...44 Auto LCD Off ...44 Auto Power Off ...45 Video Out ...45 USB Mode ...45 Date Stamp ...46 Date and Time ...46 Language ...47 Image Storage ...47 Format ...47 Reset Camera ...48 Voice Memo ...48 About ...48
English Viewing Photos/Videos on your TV 36 Zooming In/Out During Playback 37 Deleting Photos/Videos 37 Using the Playback Menu 37 DPOF ...38 Slideshow ...39 Resize ...39 Rotate ...40 Protect ...40 Move ...41 Transferring Photos/Videos to your PC 42 Camera Settings 43 The Setup Menu 43 File Number ...43 Digital Zoom ...43 Quick View ...44 Camera Sound ...44 Auto LCD Off ...44 Auto Power Off ...45 Video Out ...45 USB Mode ...45 Date Stamp ...46 Date and Time ...46 Language ...47 Image Storage ...47 Format ...47 Reset Camera ...48 Voice Memo ...48 About ...48

Instruction Manual
Page 17
...card from 32MB to 16GB. • Sleek and slim design • Easy-to-use your camera, and is intended for your camera package. System Requirements In order to get the most out of your camera, your computer must meet the following system requirements: • OS: Windows 2000/XP/Vista &#... Memory: 128MB or above • HDD space: 40 MB or above • USB port Package Contents Check the contents of your new digital camera. English Introduction 1 Introduction Congratulations on your TV • USB port to transfer photos and movies to your PC System Requirements This manual provides step...
...card from 32MB to 16GB. • Sleek and slim design • Easy-to-use your camera, and is intended for your camera package. System Requirements In order to get the most out of your camera, your computer must meet the following system requirements: • OS: Windows 2000/XP/Vista &#... Memory: 128MB or above • HDD space: 40 MB or above • USB port Package Contents Check the contents of your new digital camera. English Introduction 1 Introduction Congratulations on your TV • USB port to transfer photos and movies to your PC System Requirements This manual provides step...

Instruction Manual
Page 18
English 2 Introduction Camera Views Front View Wrist strap loop Back View LCD screen Camera Views Flash Self-timer LED Zoom Lens Microphone Zoom button Playback button Menu button 4-way navigation buttons OK button Scene button
English 2 Introduction Camera Views Front View Wrist strap loop Back View LCD screen Camera Views Flash Self-timer LED Zoom Lens Microphone Zoom button Playback button Menu button 4-way navigation buttons OK button Scene button

Instruction Manual
Page 19
English Top View Zoom Lens Power button 3X OPTICAL ZOOM ON / OFF Bottom View Introduction 3 Shutter button Tripod mount Camera Views
English Top View Zoom Lens Power button 3X OPTICAL ZOOM ON / OFF Bottom View Introduction 3 Shutter button Tripod mount Camera Views
Instruction Manual
Page 20
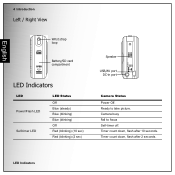
Timer count down , flash after 10 seconds. LED Indicators Ready to focus Self-timer off. Camera busy Fail to take picture. Timer count down , flash after 2 seconds. English 4 Introduction Left / Right View Wrist strap loop Battery/SD card compartment LED Indicators LED Power/Flash LED Self-timer LED LED Status Off Blue (steady) Blue (blinking) Blue (blinking) Off Red (blinking) (10 sec) Red (blinking) (2 sec) Speaker USB/AV port DC-in port Camera Status Power Off.
Timer count down , flash after 10 seconds. LED Indicators Ready to focus Self-timer off. Camera busy Fail to take picture. Timer count down , flash after 2 seconds. English 4 Introduction Left / Right View Wrist strap loop Battery/SD card compartment LED Indicators LED Power/Flash LED Self-timer LED LED Status Off Blue (steady) Blue (blinking) Blue (blinking) Off Red (blinking) (10 sec) Red (blinking) (2 sec) Speaker USB/AV port DC-in port Camera Status Power Off.
Instruction Manual
Page 21
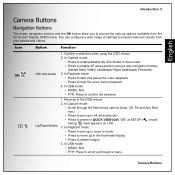
... move up in QUICK VIEW (QV) "ON" at SETUP ( ) mode during mark appears on LCD. 3. In Capture mode: • Scroll through a menu Camera Buttons Confirm a selection when using 4-way navigation buttons (except Auto/ Video/ Landscape/ Night Landscape/ Fireworks) 3. In USB mode: • MSDC: N/A •... delete images 4. In Capture mode: • Press to enable/disable the Anti-Shake in the OSD menus 2. English Introduction 5 Camera Buttons Navigation Buttons The 4-way navigation buttons and the OK button allow you to access the various options available from your photos and ...
... move up in QUICK VIEW (QV) "ON" at SETUP ( ) mode during mark appears on LCD. 3. In Capture mode: • Scroll through a menu Camera Buttons Confirm a selection when using 4-way navigation buttons (except Auto/ Video/ Landscape/ Night Landscape/ Fireworks) 3. In USB mode: • MSDC: N/A •... delete images 4. In Capture mode: • Press to enable/disable the Anti-Shake in the OSD menus 2. English Introduction 5 Camera Buttons Navigation Buttons The 4-way navigation buttons and the OK button allow you to access the various options available from your photos and ...
Instruction Manual
Page 22
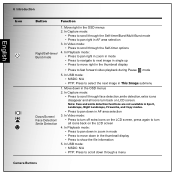
... forward video playback during Pause mode 5. 6 Introduction English Icon Button Function Right/Self-timer/ Burst mode 1. In Capture mode: • Press to scroll through a menu Camera Buttons Note: Face and smile detection functions are not available in Sport, Landscape, Night Landscape, Fireworks, and Copy modes. • Press to scroll down in...
... forward video playback during Pause mode 5. 6 Introduction English Icon Button Function Right/Self-timer/ Burst mode 1. In Capture mode: • Press to scroll through a menu Camera Buttons Note: Face and smile detection functions are not available in Sport, Landscape, Night Landscape, Fireworks, and Copy modes. • Press to scroll down in...
Instruction Manual
Page 23
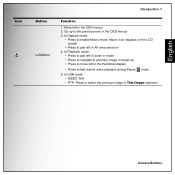
... area selection 4. In Capture mode: • Press to pan left in the OSD menus 3. Go up • Press to pan left in This Image submenu Camera Buttons Macro icon displays on the LCD screen • Press to enable Macro mode.
... area selection 4. In Capture mode: • Press to pan left in the OSD menus 3. Go up • Press to pan left in This Image submenu Camera Buttons Macro icon displays on the LCD screen • Press to enable Macro mode.

Instruction Manual
Page 24
English 8 Introduction The Scene Button The camera is equipped with a convenient SCENE button that takes you can scroll between different modes and choose different scene options. Portrait Scroll to the Scene Menu ... to Snow mode. Night Portrait Scroll to select. Use the Up/Down navigation buttons to scroll and use the OK button to Night Portrait mode. Camera Buttons Use the SCENE button to: Mode Type Icon Function Auto Scroll to Party mode. Party Scroll to Auto mode.
English 8 Introduction The Scene Button The camera is equipped with a convenient SCENE button that takes you can scroll between different modes and choose different scene options. Portrait Scroll to the Scene Menu ... to Snow mode. Night Portrait Scroll to select. Use the Up/Down navigation buttons to scroll and use the OK button to Night Portrait mode. Camera Buttons Use the SCENE button to: Mode Type Icon Function Auto Scroll to Party mode. Party Scroll to Auto mode.

Instruction Manual
Page 25
English Function Buttons Icon MENU Button Menu Playback T / Zoom in W / Zoom out Introduction 9 Function Press to display the Menu options Press to review photos/videos clips saved in the internal memory or on the memory card In Capture mode: • Press to zoom in on subject to be taken In Playback mode: • Press to zoom in on saved photos In Capture mode: • Press to zoom out from the subject to be taken In Playback mode: • Press to zoom out of saved photos • Press to view thumbnails of all current saved media Camera Buttons
English Function Buttons Icon MENU Button Menu Playback T / Zoom in W / Zoom out Introduction 9 Function Press to display the Menu options Press to review photos/videos clips saved in the internal memory or on the memory card In Capture mode: • Press to zoom in on subject to be taken In Playback mode: • Press to zoom in on saved photos In Capture mode: • Press to zoom out from the subject to be taken In Playback mode: • Press to zoom out of saved photos • Press to view thumbnails of all current saved media Camera Buttons

Instruction Manual
Page 26
... are shown while other icons are hidden). Press the Down / Screen / Face Detection / Smile Detection button to switch between a full display (all important information regarding camera settings as well as the visual image for your photo or video. Use the SCENE button to switch between screen modes. Capture/Video Mode Display...
... are shown while other icons are hidden). Press the Down / Screen / Face Detection / Smile Detection button to switch between a full display (all important information regarding camera settings as well as the visual image for your photo or video. Use the SCENE button to switch between screen modes. Capture/Video Mode Display...

Instruction Manual
Page 31
Introduction 15 LCD screen English 20 Saturation High Normal Low 21 White Balance Auto Sunny Tungsten Fluorescent Cloudy 22 Camera Steady Warning - 23 AE Metering Matrix Spot Average 24 Anti-Shake -
Introduction 15 LCD screen English 20 Saturation High Normal Low 21 White Balance Auto Sunny Tungsten Fluorescent Cloudy 22 Camera Steady Warning - 23 AE Metering Matrix Spot Average 24 Anti-Shake -


