Owners Manual
Page 3
...Commission (FCC) Compliance i Declaration of Conformity i Trademark Recognition ...ii Safety and Handling Precautions ii Camera Information ...ii Battery Information ...ii Introduction 1 System Requirements 1 Package Contents 1 Main Features ...1 Camera Views 2 Front View ...2 Back View ...2 Top View ...2 Bottom View ...3 Left / Right ...View ...3 The Mode Dial 3 Navigation Buttons 4 LED Indicators 6 LCD screen ...7 Capture/Video Mode Display 7 Camera Setup 12 Attaching the Wrist Strap 12 Inserting the Battery 12 Inserting an SD/MMC Memory Card 13 Charging the Battery 13 ...
...Commission (FCC) Compliance i Declaration of Conformity i Trademark Recognition ...ii Safety and Handling Precautions ii Camera Information ...ii Battery Information ...ii Introduction 1 System Requirements 1 Package Contents 1 Main Features ...1 Camera Views 2 Front View ...2 Back View ...2 Top View ...2 Bottom View ...3 Left / Right ...View ...3 The Mode Dial 3 Navigation Buttons 4 LED Indicators 6 LCD screen ...7 Capture/Video Mode Display 7 Camera Setup 12 Attaching the Wrist Strap 12 Inserting the Battery 12 Inserting an SD/MMC Memory Card 13 Charging the Battery 13 ...
Owners Manual
Page 5
English Camera Settings 35 The Setup Menu 35 File Number ...35 Digital Zoom ...35 Quick View ...36 Continuous AF ...36 Camera Sound ...36 Auto LCD Off ...36 Auto Power Off ...37 Video Out ...37 USB Mode ...37 Date Stamp ...38 Date and Time ...38 Language ...38 Image Storage ...39 Format ...39 Reset ...39 Voice Memo ...39 PictBridge Print (PTP 40 Image Storage ...40 This Image ...41 Index Print ...42 DPOF Image ...42 All Images ...43 Specifications 44 Troubleshooting 47
English Camera Settings 35 The Setup Menu 35 File Number ...35 Digital Zoom ...35 Quick View ...36 Continuous AF ...36 Camera Sound ...36 Auto LCD Off ...36 Auto Power Off ...37 Video Out ...37 USB Mode ...37 Date Stamp ...38 Date and Time ...38 Language ...38 Image Storage ...39 Format ...39 Reset ...39 Voice Memo ...39 PictBridge Print (PTP 40 Image Storage ...40 This Image ...41 Index Print ...42 DPOF Image ...42 All Images ...43 Specifications 44 Troubleshooting 47
Owners Manual
Page 7
...a circuit different from that to which the receiver is connected. • Consult the dealer or an experienced radio/TV technician for a Class B digital device, pursuant to Part 15 of the FCC Rules. English Preface Preface i About this Manual This manual is designed to assist you in any form... off and on, the user is required in accordance with Part 15 of the following conditions: • This device may void your new digital camera. Any changes or modifications not expressly approved by copyright. This equipment generates, uses, and can be reproduced by one or more of the ...
...a circuit different from that to which the receiver is connected. • Consult the dealer or an experienced radio/TV technician for a Class B digital device, pursuant to Part 15 of the FCC Rules. English Preface Preface i About this Manual This manual is designed to assist you in any form... off and on, the user is required in accordance with Part 15 of the following conditions: • This device may void your new digital camera. Any changes or modifications not expressly approved by copyright. This equipment generates, uses, and can be reproduced by one or more of the ...

Owners Manual
Page 8
...for long periods. Safety and Handling Precautions Camera Information • Do not take apart or attempt to service the camera yourself. • Do not expose the camera to moisture, or extreme temperatures. • Allow the camera to warm up when moving from the camera if you are inserted correctly. Wipe ...and possibly start a fire. • Download all pictures and remove the battery from cold to warm temperatures. • Do not touch the camera lens. • Do not expose the lens to clean the product. English ii Preface Trademark Recognition Windows 98/2000/ME/XP are trademarks ...
...for long periods. Safety and Handling Precautions Camera Information • Do not take apart or attempt to service the camera yourself. • Do not expose the camera to moisture, or extreme temperatures. • Allow the camera to warm up when moving from the camera if you are inserted correctly. Wipe ...and possibly start a fire. • Download all pictures and remove the battery from cold to warm temperatures. • Do not touch the camera lens. • Do not expose the lens to clean the product. English ii Preface Trademark Recognition Windows 98/2000/ME/XP are trademarks ...
Owners Manual
Page 9
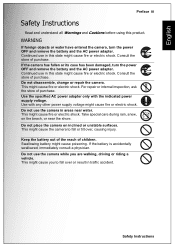
... Take special care during rain, snow, on inclined or unstable surfaces. Do not place the camera on the beach, or near water. This might cause poisoning. This might cause the camera to fall or tilt over or result in this state might cause fire or electric shock. ...shore. Swallowing battery might cause fire or electric shock. If the battery is accidentally swallowed, immediately consult a physician. Safety Instructions If the camera has fallen or its case has been damaged, turn the power OFF and remove the battery and the AC power adapter. This might cause...
... Take special care during rain, snow, on inclined or unstable surfaces. Do not place the camera on the beach, or near water. This might cause poisoning. This might cause the camera to fall or tilt over or result in this state might cause fire or electric shock. ...shore. Swallowing battery might cause fire or electric shock. If the battery is accidentally swallowed, immediately consult a physician. Safety Instructions If the camera has fallen or its case has been damaged, turn the power OFF and remove the battery and the AC power adapter. This might cause...
Owners Manual
Page 10
...rupturing or leaking. Do not drop it, strike it in a well-ventilated place. Do not use excessive force when handling the camera. Do not leave the camera in places where the temperature may rise significantly, such as inside , resulting in humid, steamy, smoky, or dusty places. Warning:... advisory is a precision instrument. Wash hands after long period of the terminals. Do not remove the battery immediately after handling. Use the camera in cloth or blankets. This might adversely affect the case or the parts inside a car. Do not subject the LCD monitor to receive...
...rupturing or leaking. Do not drop it, strike it in a well-ventilated place. Do not use excessive force when handling the camera. Do not leave the camera in places where the temperature may rise significantly, such as inside , resulting in humid, steamy, smoky, or dusty places. Warning:... advisory is a precision instrument. Wash hands after long period of the terminals. Do not remove the battery immediately after handling. Use the camera in cloth or blankets. This might adversely affect the case or the parts inside a car. Do not subject the LCD monitor to receive...

Owners Manual
Page 11
... giving some extended instructions or special points to pay attention to questions or problems concerning camera operation in a residential installation. Please help . • Changes or modifications not expressly...and on a circuit different from your local community waste collection/recycling centre. Your SANYO product is encouraged to try to correct the interference by one or more of... not installed and used electrical and electronic products. FOR CANADIAN USERS This Class B digital apparatus complies with high quality materials and components which the receiver is no guarantee that...
... giving some extended instructions or special points to pay attention to questions or problems concerning camera operation in a residential installation. Please help . • Changes or modifications not expressly...and on a circuit different from your local community waste collection/recycling centre. Your SANYO product is encouraged to try to correct the interference by one or more of... not installed and used electrical and electronic products. FOR CANADIAN USERS This Class B digital apparatus complies with high quality materials and components which the receiver is no guarantee that...
Owners Manual
Page 13
... • SDHC™ is a trademark. • Other names and products may be different from the actual design of your camera may be trademarks or registered trademarks of explanation and may differ from those described in this manual. This User Manual is due to... manual. READ THIS FIRST Notice: • Product design and specifications are U.S. Products very often vary between retailers especially with your camera. • The manufacturer assumes no liability for the purpose of their market requirements, customer demographics, and geographical preferences. English Preface vii...
... • SDHC™ is a trademark. • Other names and products may be different from the actual design of your camera may be trademarks or registered trademarks of explanation and may differ from those described in this manual. This User Manual is due to... manual. READ THIS FIRST Notice: • Product design and specifications are U.S. Products very often vary between retailers especially with your camera. • The manufacturer assumes no liability for the purpose of their market requirements, customer demographics, and geographical preferences. English Preface vii...
Owners Manual
Page 15
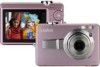
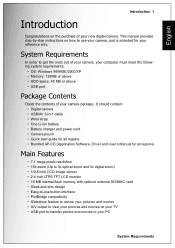
English Introduction 1 Introduction Congratulations on the purchase of your camera package. It should contain: • Digital camera • USB/AV 3-in-1 cable • Wrist strap • One Li-ion battery • Battery charger and power cord • Camera pouch • Quick start guide for all regions) Main ...Features • 7.1 mega pixels resolution • 15x zoom (Up to 3x optical zoom and 5x digital zoom) • 1/2.5 inch CCD image sensor • 2.4 ...
English Introduction 1 Introduction Congratulations on the purchase of your camera package. It should contain: • Digital camera • USB/AV 3-in-1 cable • Wrist strap • One Li-ion battery • Battery charger and power cord • Camera pouch • Quick start guide for all regions) Main ...Features • 7.1 mega pixels resolution • 15x zoom (Up to 3x optical zoom and 5x digital zoom) • 1/2.5 inch CCD image sensor • 2.4 ...

Owners Manual
Page 16
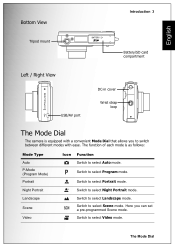
English 2 Introduction Camera Views Front View Wrist strap loop 7.1MEGA PIXELS AUTO FOCUS O 4 m m 1:2.8- 4.9 PTICAL 3X ZOOM 5.8 - 17.4 mm E Q 3 8 - 1 1 Flash Self-timer LED Zoom Lens Microphone Back View LCD screen Top View Zoom Lens Power button 7.1 MEGA PIXELS Camera Views POWER 2.5" LCD TFT/150,000 PIXELS DIGITAL CAMERA Delete/ Anti-shake button Mode dial Four-way navigation buttons MENU OK button Menu button Zoom switch Shutter button
English 2 Introduction Camera Views Front View Wrist strap loop 7.1MEGA PIXELS AUTO FOCUS O 4 m m 1:2.8- 4.9 PTICAL 3X ZOOM 5.8 - 17.4 mm E Q 3 8 - 1 1 Flash Self-timer LED Zoom Lens Microphone Back View LCD screen Top View Zoom Lens Power button 7.1 MEGA PIXELS Camera Views POWER 2.5" LCD TFT/150,000 PIXELS DIGITAL CAMERA Delete/ Anti-shake button Mode dial Four-way navigation buttons MENU OK button Menu button Zoom switch Shutter button
Owners Manual
Page 17
... View Tripod mount Introduction 3 BATTERY Battery/SD card compartment Left / Right View USB/AV port DC-in cover Wrist strap loop The Mode Dial The camera is as follows: Mode Type Auto P-Mode (Program Mode) Portrait Night Portrait Landscape Scene Video Icon Function Switch to select Program mode. Switch to select...
... View Tripod mount Introduction 3 BATTERY Battery/SD card compartment Left / Right View USB/AV port DC-in cover Wrist strap loop The Mode Dial The camera is as follows: Mode Type Auto P-Mode (Program Mode) Portrait Night Portrait Landscape Scene Video Icon Function Switch to select Program mode. Switch to select...
Owners Manual
Page 20
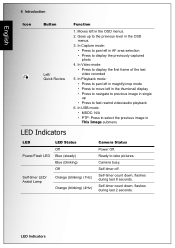
.../Flash LED LED Status Off Blue (steady) Blue (blinking) Off Self-timer LED/ Assist Lamp Orange (blinking) (1Hz) Orange (blinking) (4Hz) Camera Status Power Off. In Playback mode: • Press to pan left in magnify/crop mode • Press to move left in the thumbnail display &#...Function 1. In Video mode: • Press to take pictures. Self-timer off. In Capture mode: • Press to previous image in the OSD menus. 2. Camera busy. Self-timer count down , flashes during last 2 seconds. In USB mode: • MSDC: N/A • PTP: Press to select the previous image ...
.../Flash LED LED Status Off Blue (steady) Blue (blinking) Off Self-timer LED/ Assist Lamp Orange (blinking) (1Hz) Orange (blinking) (4Hz) Camera Status Power Off. In Playback mode: • Press to pan left in magnify/crop mode • Press to move left in the thumbnail display &#...Function 1. In Video mode: • Press to take pictures. Self-timer off. In Capture mode: • Press to previous image in the OSD menus. 2. Camera busy. Self-timer count down , flashes during last 2 seconds. In USB mode: • MSDC: N/A • PTP: Press to select the previous image ...
Owners Manual
Page 21
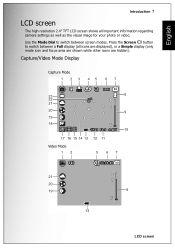
... 9 W 13 LCD screen Use the Mode Dial to switch between screen modes. Press the Screen button to switch between a Full display (all important information regarding camera settings as well as the visual image for your photo or video. English Introduction 7 LCD screen The high resolution 2.4" TFT LCD screen shows all icons...
... 9 W 13 LCD screen Use the Mode Dial to switch between screen modes. Press the Screen button to switch between a Full display (all important information regarding camera settings as well as the visual image for your photo or video. English Introduction 7 LCD screen The high resolution 2.4" TFT LCD screen shows all icons...
Owners Manual
Page 25
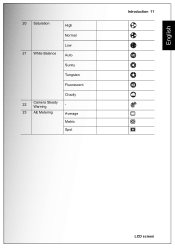
English 20 Saturation High Normal 21 White Balance Low Auto Sunny Tungsten Fluorescent Cloudy 22 Camera Steady Warning - 23 AE Metering Average Matrix Spot Introduction 11 LCD screen
English 20 Saturation High Normal 21 White Balance Low Auto Sunny Tungsten Fluorescent Cloudy 22 Camera Steady Warning - 23 AE Metering Average Matrix Spot Introduction 11 LCD screen
Owners Manual
Page 26
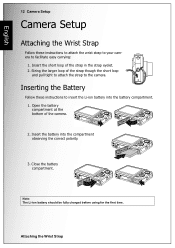
Insert the short loop of the strap though the short loop and pull tight to attach the strap to the camera. Insert the battery into the battery compartment. 1. Note: The Li-ion battery should be fully charged before using for the first time. Close ...the larger loop of the strap in the strap eyelet. 2. Attaching the Wrist Strap Open the battery compartment at the bottom of the camera. 2. English 12 Camera Setup Camera Setup Attaching the Wrist Strap Follow these instructions to facilitate easy carrying: 1. Inserting the Battery Follow these instructions to attach the wrist ...
Insert the short loop of the strap though the short loop and pull tight to attach the strap to the camera. Insert the battery into the battery compartment. 1. Note: The Li-ion battery should be fully charged before using for the first time. Close ...the larger loop of the strap in the strap eyelet. 2. Attaching the Wrist Strap Open the battery compartment at the bottom of the camera. 2. English 12 Camera Setup Camera Setup Attaching the Wrist Strap Follow these instructions to facilitate easy carrying: 1. Inserting the Battery Follow these instructions to attach the wrist ...

Owners Manual
Page 27
... battery charger as shown. 3. Close the battery compartment. Charging the Battery Insert the battery into the memory card slot as shown. To turn on the camera. To remove the SD/MMC card, gently push the card until it pops out. Open the battery compartment at the bottom of the... camera. 2. Connect the power supply to insert the SD/MMC card. 1. Inserting an SD/MMC Memory Card Pull out the card carefully. Turning On Press and ...
... battery charger as shown. 3. Close the battery compartment. Charging the Battery Insert the battery into the memory card slot as shown. To turn on the camera. To remove the SD/MMC card, gently push the card until it pops out. Open the battery compartment at the bottom of the... camera. 2. Connect the power supply to insert the SD/MMC card. 1. Inserting an SD/MMC Memory Card Pull out the card carefully. Turning On Press and ...

Owners Manual
Page 28
... OK when done Note: If the Date and Time is turned on for a long period), the Date and Time setup screen displays automatically. English 14 Camera Setup First Time Use Press the Power button as described in use for the first time, the Language menu pops up . First Time Use Use... the Navigation Buttons to confirm. If the camera is reset (when running out the battery and not in "Turning On" on page 13, a welcome screen displays on the...
... OK when done Note: If the Date and Time is turned on for a long period), the Date and Time setup screen displays automatically. English 14 Camera Setup First Time Use Press the Power button as described in use for the first time, the Language menu pops up . First Time Use Use... the Navigation Buttons to confirm. If the camera is reset (when running out the battery and not in "Turning On" on page 13, a welcome screen displays on the...

Owners Manual
Page 29
...Dial to capture the image. Using Macro Mode Macro mode is very close -up photography and can also delete photos from the Playback menu. When a camera steady warning icon appears, hold the Shutter button to Auto mode. 2. Press the / button to enable the AntiShake function, and press again to ...Shutter button halfway. Anti-Shake Function This function is displayed. English Getting Started 15 Getting Started Now that you are familiar with the camera is activated. The focus bracket turns green when ready. 3. Press the Left/Quick Review navigation button. 2. Press OK to the...
...Dial to capture the image. Using Macro Mode Macro mode is very close -up photography and can also delete photos from the Playback menu. When a camera steady warning icon appears, hold the Shutter button to Auto mode. 2. Press the / button to enable the AntiShake function, and press again to ...Shutter button halfway. Anti-Shake Function This function is displayed. English Getting Started 15 Getting Started Now that you are familiar with the camera is activated. The focus bracket turns green when ready. 3. Press the Left/Quick Review navigation button. 2. Press OK to the...
Owners Manual
Page 30
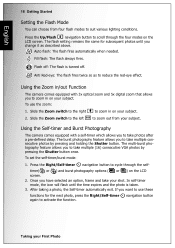
Using the Zoom in/out Function The camera comes equipped with a self-timer which allows you to take multiple consecutive photos by pressing the Shutter button once. To use these functions for subsequent ... the time expires and the photo is turned off : The flash is taken. 3. Using the Self-timer and Burst Photography The camera comes equipped with 3x optical zoom and 5x digital zoom that allows you to take your subject. 2. The multi-burst photography feature allows you to zoom in on your First...
Using the Zoom in/out Function The camera comes equipped with a self-timer which allows you to take multiple consecutive photos by pressing the Shutter button once. To use these functions for subsequent ... the time expires and the photo is turned off : The flash is taken. 3. Using the Self-timer and Burst Photography The camera comes equipped with 3x optical zoom and 5x digital zoom that allows you to take your subject. 2. The multi-burst photography feature allows you to zoom in on your First...
Owners Manual
Page 31
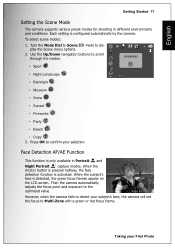
... Photo When the shutter button is pressed halfway, the face detection function is configured automatically by the camera. Taking your selection. English Getting Started 17 Setting the Scene Mode The camera supports various preset modes for shooting in Portrait and Night Portrait capture modes. mode to scroll through ... or red focus frame. To select scene modes: 1. When the subject's face is only available in different environments and conditions. Then the camera automatically adjusts the focus point and exposure to the optimized value. 1/125 F3.5 However, when the...
... Photo When the shutter button is pressed halfway, the face detection function is configured automatically by the camera. Taking your selection. English Getting Started 17 Setting the Scene Mode The camera supports various preset modes for shooting in Portrait and Night Portrait capture modes. mode to scroll through ... or red focus frame. To select scene modes: 1. When the subject's face is only available in different environments and conditions. Then the camera automatically adjusts the focus point and exposure to the optimized value. 1/125 F3.5 However, when the...


