
VPC-E2BL Owners Manual English
Page 1
Keep this manual in a safe place for later reference. Please read and understand the separate booklet "SAFETY MANUAL". Make sure to safely operate the VPC-E2. INSTRUCTION MANUAL VPC-E2 Digital Movie Camera Important note This manual explains how to read these instructions carefully before using the camera.
Keep this manual in a safe place for later reference. Please read and understand the separate booklet "SAFETY MANUAL". Make sure to safely operate the VPC-E2. INSTRUCTION MANUAL VPC-E2 Digital Movie Camera Important note This manual explains how to read these instructions carefully before using the camera.

VPC-E2BL Owners Manual English
Page 3
CAUTION Points that require special attention. (page xx) Refer to . English ii You may find the answers to questions or problems concerning camera operation in this manual HINT Points giving some extended instructions or special points to pay attention to the page indicated for detailed information. FOR CANADIAN USERS i This Class B digital apparatus complies with Canadian ICES-003. Symbols used in the sections "COMMONLY ASKED QUESTIONS" (page 165) and "TROUBLESHOOTING" (page 172).
CAUTION Points that require special attention. (page xx) Refer to . English ii You may find the answers to questions or problems concerning camera operation in this manual HINT Points giving some extended instructions or special points to pay attention to the page indicated for detailed information. FOR CANADIAN USERS i This Class B digital apparatus complies with Canadian ICES-003. Symbols used in the sections "COMMONLY ASKED QUESTIONS" (page 165) and "TROUBLESHOOTING" (page 172).
VPC-E2BL Owners Manual English
Page 4
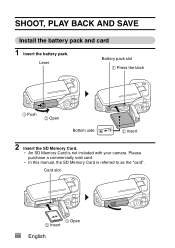
h In this manual, the SD Memory Card is not included with your camera. Please purchase a commercially sold card. h An SD Memory Card is referred to as the "card". Lever Battery pack slot 1 Press the latch 1 Push 2 Open Bottom side 2 Insert 2 Insert the SD Memory Card. Card slot 1 Open 2 Insert iii English SHOOT, PLAY BACK AND SAVE Install the battery pack and card 1 Insert the battery pack.
h In this manual, the SD Memory Card is not included with your camera. Please purchase a commercially sold card. h An SD Memory Card is referred to as the "card". Lever Battery pack slot 1 Press the latch 1 Push 2 Open Bottom side 2 Insert 2 Insert the SD Memory Card. Card slot 1 Open 2 Insert iii English SHOOT, PLAY BACK AND SAVE Install the battery pack and card 1 Insert the battery pack.

VPC-E2BL Owners Manual English
Page 5
... on . English iv h The camera turns on . [ ] button 01:17:32 2 Press the [ ] button. h Recording begins. h To stop recording, press the [ ] button ...unit, and press the ON/OFF button 668 for at least 1 second. in case of photographing or recording failure due to go i Sanyo declines any claim for compensation for at least 1 second. Shooting kVideo clip recording 1 Open the monitor unit, and press the ON/...to cancel it. Before capturing those important shots, be sure to first take a test shot to confirm that your camera is captured. h A still image is set up and ready to a chance...
... on . English iv h The camera turns on . [ ] button 01:17:32 2 Press the [ ] button. h Recording begins. h To stop recording, press the [ ] button ...unit, and press the ON/OFF button 668 for at least 1 second. in case of photographing or recording failure due to go i Sanyo declines any claim for compensation for at least 1 second. Shooting kVideo clip recording 1 Open the monitor unit, and press the ON/...to cancel it. Before capturing those important shots, be sure to first take a test shot to confirm that your camera is captured. h A still image is set up and ready to a chance...

VPC-E2BL Owners Manual English
Page 6
... [G] or [H] button. h Playback of the screen. 2 Press the SET button. h The display switches to turn the camera off. h Press the REC/PLAY button. SAVE Arrow buttons PLAY Video clip pattern When you wish to play back. v English h Press the [G] or [H] button to the Playback Screen. Press... the ON/OFF button for at least 1 second to the Playback Screen. h The display switches to display the video clip you are indicated by a video clip pattern along the left and right sides of the selected video clip begins. h Video clips are finished using the camera...
... [G] or [H] button. h Playback of the screen. 2 Press the SET button. h The display switches to turn the camera off. h Press the REC/PLAY button. SAVE Arrow buttons PLAY Video clip pattern When you wish to play back. v English h Press the [G] or [H] button to the Playback Screen. Press... the ON/OFF button for at least 1 second to the Playback Screen. h The display switches to display the video clip you are indicated by a video clip pattern along the left and right sides of the selected video clip begins. h Video clips are finished using the camera...

VPC-E2BL Owners Manual English
Page 7
Burn your recorded video clips onto a DVD (Windows XP) Introduced here is complete, the product registration window will appear, but click on the Exit button to close the window. h ... DVD) in this number) h When the installation is the procedure to use the supplied DVD-ROM (Xacti Software DVD) to burn movies captured with your camera to install. English vi
Burn your recorded video clips onto a DVD (Windows XP) Introduced here is complete, the product registration window will appear, but click on the Exit button to close the window. h ... DVD) in this number) h When the installation is the procedure to use the supplied DVD-ROM (Xacti Software DVD) to burn movies captured with your camera to install. English vi

VPC-E2BL Owners Manual English
Page 8
.... h When the installation window closes, a dialog box to connect to the computer. 1 Turn on the camera h The USB Connection Screen appears on the camera (page 30). SHOOT, PLAY BACK AND SAVE 3 In the installation window, click on the [OK] button. Check the [No thanks !] option ... To USB/AV terminal on the computer, and use the supplied dedicated USB interface cable to connect your camera to the computer Connect your computer's DVD drive. Copy data from your camera to a computer, and copy the desired data to the website introducing Kodak's online service appears. h ...
.... h When the installation window closes, a dialog box to connect to the computer. 1 Turn on the camera h The USB Connection Screen appears on the camera (page 30). SHOOT, PLAY BACK AND SAVE 3 In the installation window, click on the [OK] button. Check the [No thanks !] option ... To USB/AV terminal on the computer, and use the supplied dedicated USB interface cable to connect your camera to the computer Connect your computer's DVD drive. Copy data from your camera to a computer, and copy the desired data to the website introducing Kodak's online service appears. h ...

VPC-E2BL Owners Manual English
Page 9
h The screen to a computer. English viii 3 Select "COMPUTER", and press the SET button. USB CONNECTION CARD READER MTP SCREEN CAPTURE PC CAMERA CANCEL OK 4 Select "CARD READER", and press the SET button. 5 Copy data from your camera to select the computer connection mode appears.
h The screen to a computer. English viii 3 Select "COMPUTER", and press the SET button. USB CONNECTION CARD READER MTP SCREEN CAPTURE PC CAMERA CANCEL OK 4 Select "CARD READER", and press the SET button. 5 Copy data from your camera to select the computer connection mode appears.

VPC-E2BL Owners Manual English
Page 15
Read the following explanations to your computer and create your camera's digital movie feature. English xiv How was that? The convenient accessories not only let you immediately view images captured with the camera, but you can also upload images to find out how you can fully enjoy your original DVDs.
Read the following explanations to your computer and create your camera's digital movie feature. English xiv How was that? The convenient accessories not only let you immediately view images captured with the camera, but you can also upload images to find out how you can fully enjoy your original DVDs.

VPC-E2BL Owners Manual English
Page 16
...cover with JIS IPX8 (formerly JIS protection grade 8) waterproof standard and can be used in the seal. xv English NOTE k Before using the camera i When closing the battery/card compartment cover, make sure that the camera accessories are not waterproof. i Please note that no foreign object such ...that the battery/card compartment cover is immersed in water for at a depth greater than 40 ºC (104ºF). Concerning your camera's waterproof feature This camera complies with wet hands. After 60 minutes of use in water, allow it is not covered by the warranty. i Do not ...
...cover with JIS IPX8 (formerly JIS protection grade 8) waterproof standard and can be used in the seal. xv English NOTE k Before using the camera i When closing the battery/card compartment cover, make sure that the camera accessories are not waterproof. i Please note that no foreign object such ...that the battery/card compartment cover is immersed in water for at a depth greater than 40 ºC (104ºF). Concerning your camera's waterproof feature This camera complies with wet hands. After 60 minutes of use in water, allow it is not covered by the warranty. i Do not ...

VPC-E2BL Owners Manual English
Page 17
...replacing the seals, please consult your dealer. * Please note that the waterproof seals be replaced every year with your camera i Do not leave the camera unwashed after it has been immersed in this camera. English xvi It is recommended that there is protected against the effects of... water is "JIS IPX8" (formerly "JIS protection grade 8")? i Do not leave the camera in water, use a dry cloth to severe jolts, as doing so may cause deterioration of the camera's waterproof capability. i Waterproof seals are used in an environment colder than 0 °C (32°F) or warmer than...
...replacing the seals, please consult your dealer. * Please note that the waterproof seals be replaced every year with your camera i Do not leave the camera unwashed after it has been immersed in this camera. English xvi It is recommended that there is protected against the effects of... water is "JIS IPX8" (formerly "JIS protection grade 8")? i Do not leave the camera in water, use a dry cloth to severe jolts, as doing so may cause deterioration of the camera's waterproof capability. i Waterproof seals are used in an environment colder than 0 °C (32°F) or warmer than...

VPC-E2BL Owners Manual English
Page 18
... the accessories 13 Media cards that can be used with this camera 15 What "card" means in this manual 15 SPECIAL FEATURES 16 Waterproof capability 16 Movable monitor for any shooting angle 17 Capture still shots while recording a video clip 18 Lots of accessories for optimal use of your captured ... Install the card 28 Warning concerning battery pack temperature 29 TURNING THE CAMERA ON AND OFF 30 Turning on the camera 30 Turning on the camera when the power save (sleep) function is active 30 Turning off the camera 31 DATE AND TIME SETTING 32 SWITCHING BETWEEN THE SHOOTING MODE AND ...
... the accessories 13 Media cards that can be used with this camera 15 What "card" means in this manual 15 SPECIAL FEATURES 16 Waterproof capability 16 Movable monitor for any shooting angle 17 Capture still shots while recording a video clip 18 Lots of accessories for optimal use of your captured ... Install the card 28 Warning concerning battery pack temperature 29 TURNING THE CAMERA ON AND OFF 30 Turning on the camera 30 Turning on the camera when the power save (sleep) function is active 30 Turning off the camera 31 DATE AND TIME SETTING 32 SWITCHING BETWEEN THE SHOOTING MODE AND ...

VPC-E2BL Owners Manual English
Page 19
...setting 57 Hints for taking pictures 58 VIDEO CLIP RECORDING 59 SHOOTING SINGLE SHOTS 60 Using the flash 62 SHOOT A STILL IMAGE WHILE RECORDING A VIDEO CLIP ..........64 MACRO-PHOTOGRAPHY (ZOOM 66 AFTER USING THE CAMERA IN WATER 67 PLAYBACK PLAYING BACK VIDEO CLIPS AND STILL IMAGES 69 How to... save one frame from a video clip as a still image 71 SLIDESHOW PLAYBACK 72 PLAYBACK VOLUME...
...setting 57 Hints for taking pictures 58 VIDEO CLIP RECORDING 59 SHOOTING SINGLE SHOTS 60 Using the flash 62 SHOOT A STILL IMAGE WHILE RECORDING A VIDEO CLIP ..........64 MACRO-PHOTOGRAPHY (ZOOM 66 AFTER USING THE CAMERA IN WATER 67 PLAYBACK PLAYING BACK VIDEO CLIPS AND STILL IMAGES 69 How to... save one frame from a video clip as a still image 71 SLIDESHOW PLAYBACK 72 PLAYBACK VOLUME...

VPC-E2BL Owners Manual English
Page 20
...SCENE SELECT 85 FILTERS 87 FLASH OPERATION 88 SELF-TIMER 89 MOTION COMPENSATION (IMAGE STABILIZER 91 Compensate for camera shake during video clip recording .......... 91 Compensate for camera shake during still image shooting .......... 91 FOCUS RANGE 94 How to use the manual focus 95 FOCUS ...MODE 96 LIGHT-MEASURING MODE SETTING 97 ISO SENSITIVITY 98 WHITE BALANCE 99 FACE CHASER 100 HIGH SENSITIVITY MODE 101 DIGITAL ...
...SCENE SELECT 85 FILTERS 87 FLASH OPERATION 88 SELF-TIMER 89 MOTION COMPENSATION (IMAGE STABILIZER 91 Compensate for camera shake during video clip recording .......... 91 Compensate for camera shake during still image shooting .......... 91 FOCUS RANGE 94 How to use the manual focus 95 FOCUS ...MODE 96 LIGHT-MEASURING MODE SETTING 97 ISO SENSITIVITY 98 WHITE BALANCE 99 FACE CHASER 100 HIGH SENSITIVITY MODE 101 DIGITAL ...

VPC-E2BL Owners Manual English
Page 21
... CARD MEMORY AND INTERNAL MEMORY .....148 RESETTING THE CAMERA SETTINGS 150 CHECKING THE REMAINING CARD MEMORY 151 Checking the remaining number of a video clip 112 Procedure to join video clips 113 Video clip cutting (extracting 114 Joining video clips 117 PRINTING INSTRUCTIONS 120 Display the Printing Instructions... REDUCE STILL IMAGE SIZE (RESIZE 109 CORRECTING THE RED-EYE EFFECT AND IMAGE BLUR 110 EDITING VIDEO CLIPS 112 Procedure to cut (extract) a portion of images and video recording time 151 For audio recordings 151 CHECKING THE REMAINING BATTERY PACK CHARGE 153 English 4
... CARD MEMORY AND INTERNAL MEMORY .....148 RESETTING THE CAMERA SETTINGS 150 CHECKING THE REMAINING CARD MEMORY 151 Checking the remaining number of a video clip 112 Procedure to join video clips 113 Video clip cutting (extracting 114 Joining video clips 117 PRINTING INSTRUCTIONS 120 Display the Printing Instructions... REDUCE STILL IMAGE SIZE (RESIZE 109 CORRECTING THE RED-EYE EFFECT AND IMAGE BLUR 110 EDITING VIDEO CLIPS 112 Procedure to cut (extract) a portion of images and video recording time 151 For audio recordings 151 CHECKING THE REMAINING BATTERY PACK CHARGE 153 English 4
VPC-E2BL Owners Manual English
Page 22
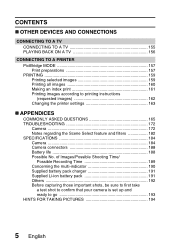
... pack 191 Others 192 Before capturing those important shots, be sure to first take a test shot to confirm that your camera is set up and ready to printing instructions (requested images 162 Changing the printer settings 163 „ APPENDICES COMMONLY ASKED QUESTIONS... 165 TROUBLESHOOTING 172 Camera 172 Notes regarding the Scene Select feature and filters 182 SPECIFICATIONS 184 Camera 184 Camera connectors 188 Battery life 188 Possible No. CONTENTS „ OTHER DEVICES AND CONNECTIONS CONNECTING TO...
... pack 191 Others 192 Before capturing those important shots, be sure to first take a test shot to confirm that your camera is set up and ready to printing instructions (requested images 162 Changing the printer settings 163 „ APPENDICES COMMONLY ASKED QUESTIONS... 165 TROUBLESHOOTING 172 Camera 172 Notes regarding the Scene Select feature and filters 182 SPECIFICATIONS 184 Camera 184 Camera connectors 188 Battery life 188 Possible No. CONTENTS „ OTHER DEVICES AND CONNECTIONS CONNECTING TO...

VPC-E2BL Owners Manual English
Page 23
...BY OPERATION Your camera has an abundance of your purposes in on the subject • "MACRO- From creating precisely the photo you want, to a narrow range • "FOCUS MODE" on page 96 Reduce noise when recording • "NOISE-REDUCTION FUNCTION" on page 137 Reduce video clip flicker •...; "FLICKER-REDUCTION" on page 139 Set the camera's color/contrast characteristics • "ADJUST THE IMAGE QUALITY" on page 79 Log the date and time of convenient ...
...BY OPERATION Your camera has an abundance of your purposes in on the subject • "MACRO- From creating precisely the photo you want, to a narrow range • "FOCUS MODE" on page 96 Reduce noise when recording • "NOISE-REDUCTION FUNCTION" on page 137 Reduce video clip flicker •...; "FLICKER-REDUCTION" on page 139 Set the camera's color/contrast characteristics • "ADJUST THE IMAGE QUALITY" on page 79 Log the date and time of convenient ...

VPC-E2BL Owners Manual English
Page 24
... Capture fast-moving subjects • "SCENE SELECT" (sports mode) on page 85 Suppress camera shake effect • "Compensate for camera shake during video clip recording" on page 91 • "Compensate for camera shake during still image shooting" on page 91 Shoot in dark conditions • "EXPOSURE ...• "FLASH OPERATION" on page 88 • "SCENE SELECT" (night view portrait mode/fireworks mode/lamp mode) on page 85 Increase the camera's sensitivity • "ISO SENSITIVITY" on page 98 • "HIGH SENSITIVITY MODE" on page 101 Photographing people • "SCENE SELECT" (portrait ...
... Capture fast-moving subjects • "SCENE SELECT" (sports mode) on page 85 Suppress camera shake effect • "Compensate for camera shake during video clip recording" on page 91 • "Compensate for camera shake during still image shooting" on page 91 Shoot in dark conditions • "EXPOSURE ...• "FLASH OPERATION" on page 88 • "SCENE SELECT" (night view portrait mode/fireworks mode/lamp mode) on page 85 Increase the camera's sensitivity • "ISO SENSITIVITY" on page 98 • "HIGH SENSITIVITY MODE" on page 101 Photographing people • "SCENE SELECT" (portrait ...

VPC-E2BL Owners Manual English
Page 27
... with Windows Vista • "SETTING THE CONNECTION MODE" on page 9 in the Xacti Software DVD INSTRUCTION MANUAL Playback • "About video clip files recorded with this camera" on page 8 in the Xacti Software DVD INSTRUCTION MANUAL • "INSTALLING THE APPLICATION SOFTWARE" on page 15 in the Xacti Software... DVD INSTRUCTION MANUAL Using as a webcam • "USING AS A PC CAMERA" on page 14 in the Xacti Software DVD INSTRUCTION MANUAL Record an image of the computer screen • "SCREEN CAPTURE" on page 20 in ...
... with Windows Vista • "SETTING THE CONNECTION MODE" on page 9 in the Xacti Software DVD INSTRUCTION MANUAL Playback • "About video clip files recorded with this camera" on page 8 in the Xacti Software DVD INSTRUCTION MANUAL • "INSTALLING THE APPLICATION SOFTWARE" on page 15 in the Xacti Software... DVD INSTRUCTION MANUAL Using as a webcam • "USING AS A PC CAMERA" on page 14 in the Xacti Software DVD INSTRUCTION MANUAL Record an image of the computer screen • "SCREEN CAPTURE" on page 20 in ...

VPC-E2BL Owners Manual English
Page 29
i QUICK GUIDE i SAFETY MANUAL (safety precautions booklet) Please read this booklet carefully before using the camera. English 12
i QUICK GUIDE i SAFETY MANUAL (safety precautions booklet) Please read this booklet carefully before using the camera. English 12


