Owners Manual
Page 2
... a proper image position (up display or between presentations. ◆ Lamp Control The brightness of the projection lamp can be selected (see pages 22, 29). ◆ Simple Computer System Setting The Multi-scan system of the projector conforms to almost all computer output signals quickly (see page 26).... ◆ 16 : 9 Wide Screen The wide LCD panels with 1280 x 720 ...
... a proper image position (up display or between presentations. ◆ Lamp Control The brightness of the projection lamp can be selected (see pages 22, 29). ◆ Simple Computer System Setting The Multi-scan system of the projector conforms to almost all computer output signals quickly (see page 26).... ◆ 16 : 9 Wide Screen The wide LCD panels with 1280 x 720 ...
Owners Manual
Page 3
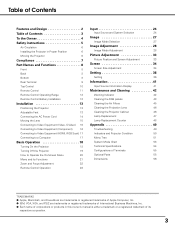
... Terminal 9 Top Control 10 Remote Control 11 Remote Control Operating Range 12 Remote Control Battery Installation 12 Installation 13 Positioning the Projector 13 Adjustable Feet 13 Connecting the AC Power Cord 14 Moving the Lens 15 Connecting to Video Equipment (Video, S-Video) ...43 Cleaning the Air Filters 45 Cleaning the Projection Lens 46 Cleaning the Projector Cabinet 46 Lamp Replacement 47 Lamp Replacement Counter 48 Appendix 49 Troubleshooting 49 Indicators and Projector Condition 50 Menu Tree 51 System Mode Chart 53 Technical Specifications 54 ...
... Terminal 9 Top Control 10 Remote Control 11 Remote Control Operating Range 12 Remote Control Battery Installation 12 Installation 13 Positioning the Projector 13 Adjustable Feet 13 Connecting the AC Power Cord 14 Moving the Lens 15 Connecting to Video Equipment (Video, S-Video) ...43 Cleaning the Air Filters 45 Cleaning the Projection Lens 46 Cleaning the Projector Cabinet 46 Lamp Replacement 47 Lamp Replacement Counter 48 Appendix 49 Troubleshooting 49 Indicators and Projector Condition 50 Menu Tree 51 System Mode Chart 53 Technical Specifications 54 ...
Owners Manual
Page 4
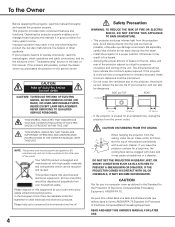
.../recycling centre. THIS SYMBOL INDICATES THAT THERE ARE IMPORTANT OPERATING AND MAINTENANCE INSTRUCTIONS IN THE OWNER'S MANUAL WITH THIS UNIT. Your SANYO product is critical for Protection of the world. In the European Union there are applied to EU countries only and not to ... The dimensions shown here indicate the minimum space required. IF THE PROJECTOR COMES IN CONTACT WITH OIL OR CHEMICALS, IT MAY BECOME DETERIORATED. NO USER-SERVICEABLE PARTS INSIDE EXCEPT LAMP REPLACEMENT. If you purchased the projector or the service center. Otherwise it may result in not only ...
.../recycling centre. THIS SYMBOL INDICATES THAT THERE ARE IMPORTANT OPERATING AND MAINTENANCE INSTRUCTIONS IN THE OWNER'S MANUAL WITH THIS UNIT. Your SANYO product is critical for Protection of the world. In the European Union there are applied to EU countries only and not to ... The dimensions shown here indicate the minimum space required. IF THE PROJECTOR COMES IN CONTACT WITH OIL OR CHEMICALS, IT MAY BECOME DETERIORATED. NO USER-SERVICEABLE PARTS INSIDE EXCEPT LAMP REPLACEMENT. If you purchased the projector or the service center. Otherwise it may result in not only ...
Owners Manual
Page 6
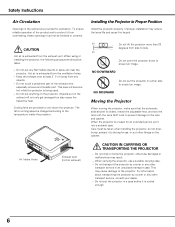
.... NO DOWNWARD Do not put anything on either side to project an image. When carrying the projector, use a suitable carrying case. - This may reduce the lamp life and cause fire hazard. 20˚ Do not tilt the projector more than 20 degrees from side to side. 20˚ Do not point the... projector down the projector. Do not touch a peripheral part of the product and to protect it from the ...
.... NO DOWNWARD Do not put anything on either side to project an image. When carrying the projector, use a suitable carrying case. - This may reduce the lamp life and cause fire hazard. 20˚ Do not tilt the projector more than 20 degrees from side to side. 20˚ Do not point the... projector down the projector. Do not touch a peripheral part of the product and to protect it from the ...
Owners Manual
Page 8
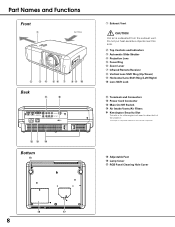
... !4 Air Intake Vents/Air Filters ✽ Kensington Security Slot This slot is for a Kensington lock used to deter theft of ACCO Brands Corporation. !5 Adjustable Feet !6 Lamp Cover !7 RGB Panel Cleaning Hole Cover !6 !7 8 Part Names and Functions Front q Air flow w e r t y u i o !0 Back !1 ✽ S-VIDEO COMPONENT 1 HDMI 1 HDMI 2 COMPUTER COMPONENT 2 VIDEO Y Pb/Cb Pr...
... !4 Air Intake Vents/Air Filters ✽ Kensington Security Slot This slot is for a Kensington lock used to deter theft of ACCO Brands Corporation. !5 Adjustable Feet !6 Lamp Cover !7 RGB Panel Cleaning Hole Cover !6 !7 8 Part Names and Functions Front q Air flow w e r t y u i o !0 Back !1 ✽ S-VIDEO COMPONENT 1 HDMI 1 HDMI 2 COMPUTER COMPONENT 2 VIDEO Y Pb/Cb Pr...
Owners Manual
Page 10
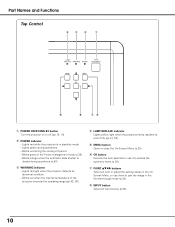
...). Part Names and Functions Top Control rew q t y ui q POWER ON/STAND-BY button Turn the projector on or off period. - r LAMP REPLACE indicator Lights yellow light when the projection lamp reaches its end of the projector exceeds the operating range (pp.42, 50). i INPUT button Select an input source (p.24). 10 w POWER...the setting values in the OnScreen Menu, or use it to pan the image in the Normal through mode (p.35). Lights red while the projector is closed during the cooling-off (pp.18, 19). t MENU button Open or close the On-Screen Menu (p.20). Lights red light ...
...). Part Names and Functions Top Control rew q t y ui q POWER ON/STAND-BY button Turn the projector on or off period. - r LAMP REPLACE indicator Lights yellow light when the projection lamp reaches its end of the projector exceeds the operating range (pp.42, 50). i INPUT button Select an input source (p.24). 10 w POWER...the setting values in the OnScreen Menu, or use it to pan the image in the Normal through mode (p.35). Lights red while the projector is closed during the cooling-off (pp.18, 19). t MENU button Open or close the On-Screen Menu (p.20). Lights red light ...
Owners Manual
Page 11
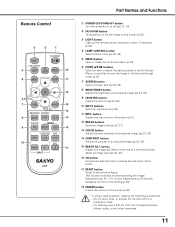
... button Adjust the brightness of a projected image (pp.23, 28). !5 IMAGE ADJ. For cleaning, use them to moisture or heat. - r LAMP CONTROL button Select a lamp mode (pp.22, 29). u SCREEN button Select a screen size (pp.23, 34). button Display the input source information (p.41). !2 IMAGE ...thinner, splay, or any other chemicals. 11 S-VIDEO PC !1 INPUT CXVT Part Names and Functions q POWER ON/STAND-BY button Turn the projector on the screen (p.23). This function is limited to the previous figure. To ensure safe operation, observe the following precautions: - COLOR !3 LENS...
... button Adjust the brightness of a projected image (pp.23, 28). !5 IMAGE ADJ. For cleaning, use them to moisture or heat. - r LAMP CONTROL button Select a lamp mode (pp.22, 29). u SCREEN button Select a screen size (pp.23, 34). button Display the input source information (p.41). !2 IMAGE ...thinner, splay, or any other chemicals. 11 S-VIDEO PC !1 INPUT CXVT Part Names and Functions q POWER ON/STAND-BY button Turn the projector on the screen (p.23). This function is limited to the previous figure. To ensure safe operation, observe the following precautions: - COLOR !3 LENS...
Owners Manual
Page 19
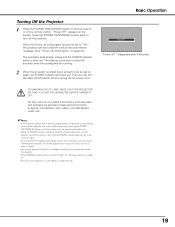
...seconds while the cooling fans are running speed of cooling fans is cooled enough. 19 Basic Operation "Power off ?" TO MAINTAIN LIFE OF LAMP, ONCE YOU TURN PROJECTOR ON, WAIT AT LEAST FIVE (5) MINUTES BEFORE TURNING IT OFF. Wait until the POWER indicator becomes red to blink red. appears on...See "Power off and unplug the AC power cord. Continuous use . • While the POWER indicator is blinking, the lamp is set to be turned off the projector. Turning Off the Projector 1 Press the POWER ON/STAND-BY button on the top control or on the screen. "Power off ?" Press the ...
...seconds while the cooling fans are running speed of cooling fans is cooled enough. 19 Basic Operation "Power off ?" TO MAINTAIN LIFE OF LAMP, ONCE YOU TURN PROJECTOR ON, WAIT AT LEAST FIVE (5) MINUTES BEFORE TURNING IT OFF. Wait until the POWER indicator becomes red to blink red. appears on...See "Power off and unplug the AC power cord. Continuous use . • While the POWER indicator is blinking, the lamp is set to be turned off the projector. Turning Off the Projector 1 Press the POWER ON/STAND-BY button on the top control or on the screen. "Power off ?" Press the ...
Owners Manual
Page 20
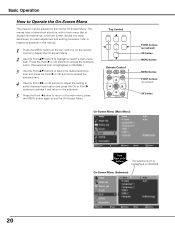
... divided into submenus, which are further divided into other submenus. Top Control Remote Control LAMP NO SHOW FREEZE MENU RESET OK SCREEN IMAGE IMAGE ADJ. press the MENU button again to Operate the On-Screen Menu The projector can be adjusted or set via the On-Screen Menu. Basic Operation How to...
... divided into submenus, which are further divided into other submenus. Top Control Remote Control LAMP NO SHOW FREEZE MENU RESET OK SCREEN IMAGE IMAGE ADJ. press the MENU button again to Operate the On-Screen Menu The projector can be adjusted or set via the On-Screen Menu. Basic Operation How to...
Owners Manual
Page 28
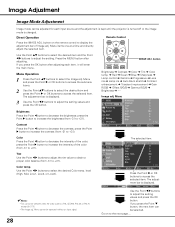
... directly adjust the selected item. Press the MENU button after adjusting each input source and the adjustment is kept until the projector is turned off or the image mode is displayed. ✔Notes: • Tint cannot be operated without an input ...10140; Color ➜ Tint ➜ Color temp. ➜ Red ➜ Green ➜ Blue ➜ Sharpness ➜ Lamp control ➜ Gamma ➜ Progressive ➜ Lens iris ➜ Lamp iris ➜ Auto black stretch➜ Contrast enhancement ➜ Transient improvement ➜ Gain R/G/B ➜ Offset R/G/B ➜ ...
... directly adjust the selected item. Press the MENU button after adjusting each input source and the adjustment is kept until the projector is turned off or the image mode is displayed. ✔Notes: • Tint cannot be operated without an input ...10140; Color ➜ Tint ➜ Color temp. ➜ Red ➜ Green ➜ Blue ➜ Sharpness ➜ Lamp control ➜ Gamma ➜ Progressive ➜ Lens iris ➜ Lamp iris ➜ Auto black stretch➜ Contrast enhancement ➜ Transient improvement ➜ Gain R/G/B ➜ Offset R/G/B ➜ ...
Owners Manual
Page 29
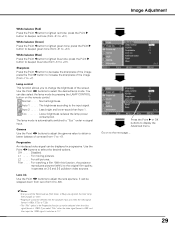
...be displayed in the Progressive function cannot be stopped down from zero (from -31 to +31). The lamp mode is 1080i. L1 . . . . . L2 . . . . . With this function, the projector reproduces pictures faithful to display the Advanced menu. Press the Point 8 or OK buttons to the original film...; White balance (Blue) Press the Point 7 button to change the brightness of the screen. Lamp control This function allows you select "Film" when the video signal format is 480p, 575p, or 720p. • The "Film" option in progressive. The brightness according to -63). ✔Notes...
...be displayed in the Progressive function cannot be stopped down from zero (from -31 to +31). The lamp mode is 1080i. L1 . . . . . L2 . . . . . With this function, the projector reproduces pictures faithful to display the Advanced menu. Press the Point 8 or OK buttons to the original film...; White balance (Blue) Press the Point 7 button to change the brightness of the screen. Lamp control This function allows you select "Film" when the video signal format is 480p, 575p, or 720p. • The "Film" option in progressive. The brightness according to -63). ✔Notes...
Owners Manual
Page 38
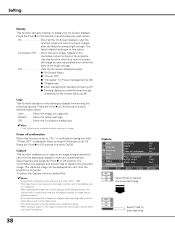
... -up display from a computer can be captured up display or interval of the countdown when turning on the projector. Show the Image you to capture an image being projected to project images after the lamp becomes bright enough. Default . . . User . . . . . Off Show the Countdown display only. ...✔Note: • "User" option cannot be displayed the next time the projector is turned on the starting -up to XGA (1024 x ...
... -up display from a computer can be captured up display or interval of the countdown when turning on the projector. Show the Image you to capture an image being projected to project images after the lamp becomes bright enough. Default . . . User . . . . . Off Show the Countdown display only. ...✔Note: • "User" option cannot be displayed the next time the projector is turned on the starting -up to XGA (1024 x ...
Owners Manual
Page 39
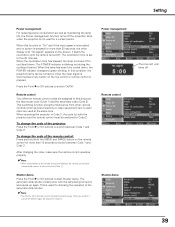
... cannot be turned on when the input signal is turned off 39 When the countdown time has elapsed, the lamp is reconnected or any button on and opens up again. When operating the projector in Code 2, the code for a certain period. This is used at the same time. To change the ...code of the remote control: Press and hold both the projector and the remote control must be selected again for more than 30 seconds, the timer display with the lamp being turned on the top control or remote control is pressed for about five seconds. This...
... cannot be turned on when the input signal is turned off 39 When the countdown time has elapsed, the lamp is reconnected or any button on and opens up again. When operating the projector in Code 2, the code for a certain period. This is used at the same time. To change the ...code of the remote control: Press and hold both the projector and the remote control must be selected again for more than 30 seconds, the timer display with the lamp being turned on the top control or remote control is pressed for about five seconds. This...
Owners Manual
Page 40
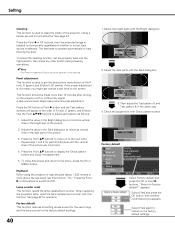
... the adjustment. 5. Panel adjustment This function is selected. A dark environment helps make more above the sea level), set the projector back into the right position, then press any signal. To close this function. Then adjust the Test pattern G and Test...and B (blue) LCD panels. When replacing the projection lamp, reset the lamp replacement counter with this screen and return to minimize vertical lines in the same way. 4. Highland When using the projector in the order of the picture. 3. Lamp counter reset This function resets the lamp replacement counter. This...
... the adjustment. 5. Panel adjustment This function is selected. A dark environment helps make more above the sea level), set the projector back into the right position, then press any signal. To close this function. Then adjust the Test pattern G and Test...and B (blue) LCD panels. When replacing the projection lamp, reset the lamp replacement counter with this screen and return to minimize vertical lines in the same way. 4. Highland When using the projector in the order of the picture. 3. Lamp counter reset This function resets the lamp replacement counter. This...
Owners Manual
Page 41
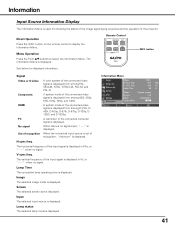
... "Unknown" is displayed in Hz, or "- - - -" when no signal input, "- - - -" is displayed. V-sync freq. Lamp status The selected lamp mode is displayed. The Information Menu is displayed. button Signal Video or S-video Component HDMI PC No signal Out of recognition A color system... operation of the connected video signal is displayed. A system mode of the projector. Information Input Source Information Display The Information Menu is displayed from among 480i, 480p, 575i, 575p, 720p, and 1080i. Remote Control COMPONENT HDMI VIDEO C1/C2 H1/H2 INFO. ...
... "Unknown" is displayed in Hz, or "- - - -" when no signal input, "- - - -" is displayed. V-sync freq. Lamp status The selected lamp mode is displayed. The Information Menu is displayed. button Signal Video or S-video Component HDMI PC No signal Out of recognition A color system... operation of the connected video signal is displayed. A system mode of the projector. Information Input Source Information Display The Information Menu is displayed from among 480i, 480p, 575i, 575p, 720p, and 1080i. Remote Control COMPONENT HDMI VIDEO C1/C2 H1/H2 INFO. ...
Owners Manual
Page 47
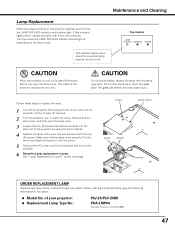
... power cord. The glass can become very hot. of your dealer. Do not drop the lamp or touch the glass bulb! Screw Lamp Cover Lamp Handle Screws ORDER REPLACEMENT LAMP Replacement lamp can be ordered through your projector: ● Replacement Lamp Type No.: PLV-Z5/PLV-Z5BK POA-LMP94 (Service Parts No. 610 323 5998) 47 Follow these steps to...
... power cord. The glass can become very hot. of your dealer. Do not drop the lamp or touch the glass bulb! Screw Lamp Cover Lamp Handle Screws ORDER REPLACEMENT LAMP Replacement lamp can be ordered through your projector: ● Replacement Lamp Type No.: PLV-Z5/PLV-Z5BK POA-LMP94 (Service Parts No. 610 323 5998) 47 Follow these steps to...
Owners Manual
Page 48
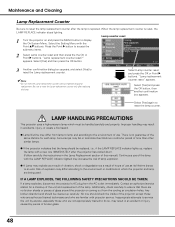
... from the cooling air circulation holes. Select [Yes] again to access the submenu items. 2 Select Lamp counter reset and then press the the OK or Point 8 buttons. LAMP HANDLING PRECAUTIONS This projector uses a high-pressure lamp which the projector and lamp are no guarantee of the same lifetime for a checkup of the unit and replacement of...
... from the cooling air circulation holes. Select [Yes] again to access the submenu items. 2 Select Lamp counter reset and then press the the OK or Point 8 buttons. LAMP HANDLING PRECAUTIONS This projector uses a high-pressure lamp which the projector and lamp are no guarantee of the same lifetime for a checkup of the unit and replacement of...
Owners Manual
Page 49
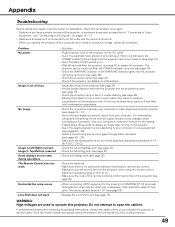
... contact the dealer where you are not too far from your computer or video equipment and the projector (see page 39). - Check the projection lamp (see page 38). - Check the projection lens to a projector. See if the selected system is 16.4' (5 m). - Check the Mounting item (see page ...46). - Make sure you purchased the projector or service center. Image is out of the projector (see pages 16 - 17)....
... contact the dealer where you are not too far from your computer or video equipment and the projector (see page 39). - Check the projection lamp (see page 38). - Check the projection lens to a projector. See if the selected system is 16.4' (5 m). - Check the Mounting item (see page ...46). - Make sure you purchased the projector or service center. Image is out of the projector (see pages 16 - 17)....

Owners Manual
Page 50
...; off again, unplug the AC power cord and contact the dealer or service center for projector's condition. See pages 47 - 48. 50 Indicators POWER LAMP red/green/ WARNING REPLACE orange red yellow Projector Condition The Main On/Off switch is off or the AC power cord is unplugged. &#...10045; The projection lamp is being cooled down enough and the ✽ temperature returns to normal. When the projector is abnormally high. Check and clean the air filters. The temperature inside temperature ✽ returns...
...; off again, unplug the AC power cord and contact the dealer or service center for projector's condition. See pages 47 - 48. 50 Indicators POWER LAMP red/green/ WARNING REPLACE orange red yellow Projector Condition The Main On/Off switch is off or the AC power cord is unplugged. &#...10045; The projection lamp is being cooled down enough and the ✽ temperature returns to normal. When the projector is abnormally high. Check and clean the air filters. The temperature inside temperature ✽ returns...
Owners Manual
Page 54
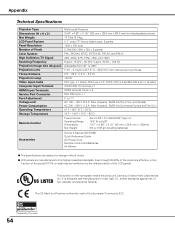
Appendix Technical Specifications Projector Type Dimensions (W x H x D) Net Weight LCD Panel System Panel Resolution Number of Pixels Color System High Definition TV Signal Scanning Frequency Projection Image size (Diagonal) Projection Lens Throw Distance Projection Lamp Video Input Jacks Computer Input ...Projector 15.04" x 4.99" x 11.98" (382 mm x 126.8 mm x 304.3 mm) (not including raised portions) 10.2 lbs (5.0 kg) 0.7" wide TFT Active Matrix type, 3 panels 1280 x 720 dots 2,764,800 (1280 x 720 x 3 panels) PAL, SECAM, NTSC, NTSC4.43, PAL-M, and PAL-N 480i, 480p, 575i, 575p, 720p...
Appendix Technical Specifications Projector Type Dimensions (W x H x D) Net Weight LCD Panel System Panel Resolution Number of Pixels Color System High Definition TV Signal Scanning Frequency Projection Image size (Diagonal) Projection Lens Throw Distance Projection Lamp Video Input Jacks Computer Input ...Projector 15.04" x 4.99" x 11.98" (382 mm x 126.8 mm x 304.3 mm) (not including raised portions) 10.2 lbs (5.0 kg) 0.7" wide TFT Active Matrix type, 3 panels 1280 x 720 dots 2,764,800 (1280 x 720 x 3 panels) PAL, SECAM, NTSC, NTSC4.43, PAL-M, and PAL-N 480i, 480p, 575i, 575p, 720p...


