Owners Manual
Page 3
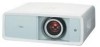
...Terminal 9 Top Control 10 Remote Control 11 Remote Control Operating Range 12 Remote Control Battery Installation 12 Installation 13 Positioning the Projector 13 Adjustable Feet 13 Moving the Lens 14 Connecting to Video Equipment (Video, S-Video) 15 Connecting to Video Equipment (... the Filter Counter 48 Cleaning the Projection Lens 48 Cleaning the Projector Cabinet 48 Lamp Replacement 49 Resetting the Lamp Replacement Counter 50 Appendix 51 Troubleshooting 51 Indicators and Projector Condition 53 Menu Tree 54 System Mode Chart 56 Technical Specifications ...
...Terminal 9 Top Control 10 Remote Control 11 Remote Control Operating Range 12 Remote Control Battery Installation 12 Installation 13 Positioning the Projector 13 Adjustable Feet 13 Moving the Lens 14 Connecting to Video Equipment (Video, S-Video) 15 Connecting to Video Equipment (... the Filter Counter 48 Cleaning the Projection Lens 48 Cleaning the Projector Cabinet 48 Lamp Replacement 49 Resetting the Lamp Replacement Counter 50 Appendix 51 Troubleshooting 51 Indicators and Projector Condition 53 Menu Tree 54 System Mode Chart 56 Technical Specifications ...
Owners Manual
Page 4
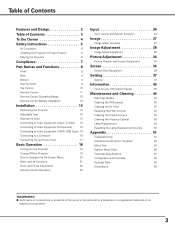
...CAUTION: TO REDUCE THE RISK OF ELECTRIC SHOCK, DO NOT REMOVE COVER (OR BACK). REFER SERVICING TO QUALIFIED SERVICE PERSONNEL. Your SANYO product is critical for the Protection of Electronic Computer/Data Processing Equipment, ANSI/NFPA 75. This symbol means that children do not... with a vacuum cleaner. Allowing the proper amount of space on the projector. If the projector is to operate improperly, read this manual thoroughly and operate the projector properly. NO USER-SERVICEABLE PARTS INSIDE EXCEPT LAMP REPLACEMENT. In the European Union there are applied to EU countries only and...
...CAUTION: TO REDUCE THE RISK OF ELECTRIC SHOCK, DO NOT REMOVE COVER (OR BACK). REFER SERVICING TO QUALIFIED SERVICE PERSONNEL. Your SANYO product is critical for the Protection of Electronic Computer/Data Processing Equipment, ANSI/NFPA 75. This symbol means that children do not... with a vacuum cleaner. Allowing the proper amount of space on the projector. If the projector is to operate improperly, read this manual thoroughly and operate the projector properly. NO USER-SERVICEABLE PARTS INSIDE EXCEPT LAMP REPLACEMENT. In the European Union there are applied to EU countries only and...
Owners Manual
Page 10
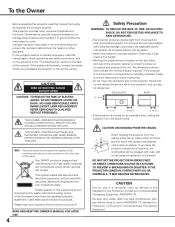
... ed7 8 buttons Select an item or adjust the setting values in the Power management mode (p.41). - e LAMP REPLACE indicator Lights yellow light when the projection lamp reaches its end of the projector exceeds the operating range (pp.44, 53). Blinks red during operations. - w WARNING indicator - r MENU... button Open or close the On-Screen Menu (p.20). 10 Lights red while the projector is closed during operations ...
... ed7 8 buttons Select an item or adjust the setting values in the Power management mode (p.41). - e LAMP REPLACE indicator Lights yellow light when the projection lamp reaches its end of the projector exceeds the operating range (pp.44, 53). Blinks red during operations. - w WARNING indicator - r MENU... button Open or close the On-Screen Menu (p.20). 10 Lights red while the projector is closed during operations ...
Owners Manual
Page 41
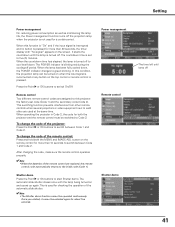
...switched to switch On/Off. Shutter demo Press the Point 8 or OK buttons to each other are replaced, the remote control code automatically returns to cool itself down , the POWER indicator changes to this projector: the factory-set to switch between Code 1 and Code 2. This is turned off 41 Power ..."No signal" appears on the remote control for a certain period. The countdown time is pressed for about five seconds. It starts the countdown until lamp off to the initial code (Code 1). In this function is "On" and if the input signal is interrupted and no button is set code ...
...switched to switch On/Off. Shutter demo Press the Point 8 or OK buttons to each other are replaced, the remote control code automatically returns to cool itself down , the POWER indicator changes to this projector: the factory-set to switch between Code 1 and Code 2. This is turned off 41 Power ..."No signal" appears on the remote control for a certain period. The countdown time is pressed for about five seconds. It starts the countdown until lamp off to the initial code (Code 1). In this function is "On" and if the input signal is interrupted and no button is set code ...
Owners Manual
Page 42
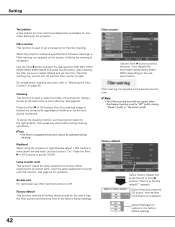
... 8 button to the factory default settings. Press the Point 8 or OK buttons, then the projected image is blacked out temporarily regardless of the projector. When replacing the projection lamp, reset the lamp replacement counter with this function "On." See page 50 for operation. Select [Yes] and press the OK button, then another confirmation box appears...
... 8 button to the factory default settings. Press the Point 8 or OK buttons, then the projected image is blacked out temporarily regardless of the projector. When replacing the projection lamp, reset the lamp replacement counter with this function "On." See page 50 for operation. Select [Yes] and press the OK button, then another confirmation box appears...
Owners Manual
Page 48
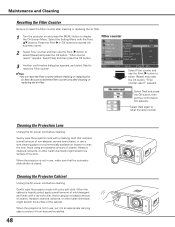
...Resetting the Filter Counter Be sure to reset the Filter counter after cleaning or replacing the air filter. 1 Turn the projector on and press the MENU button to reset the Filter counter only after cleaning or replacing the air filter. "Filter counter reset?" Select [Yes] and press the ...the cabinet is heavily soiled, apply a small amount of cleaner. Filter counter 3 Another confirmation dialog box appears, and select [Yes] to reset the lamp counter. Press the Point 8 or OK buttons to access the submenu items. 2 Select Filter counter and then use the Point 8 button to select...
...Resetting the Filter Counter Be sure to reset the Filter counter after cleaning or replacing the air filter. 1 Turn the projector on and press the MENU button to reset the Filter counter only after cleaning or replacing the air filter. "Filter counter reset?" Select [Yes] and press the ...the cabinet is heavily soiled, apply a small amount of cleaner. Filter counter 3 Another confirmation dialog box appears, and select [Yes] to reset the lamp counter. Press the Point 8 or OK buttons to access the submenu items. 2 Select Filter counter and then use the Point 8 button to select...

Owners Manual
Page 49
... glass can become very hot. Screw Lamp Cover Handle Screws Lamp ORDER REPLACEMENT LAMP Replacement lamp can be ordered through your projector: ● Replacement Lamp Type No.: PLV-Z2000 POA-LMP114 (Service Parts No. 610 336 5404) 49 of your dealer. Make sure that secure the lamp. Lamp Replacement When the projection lamp of this indicator lights yellow, replace the lamp with a new one and secure it...
... glass can become very hot. Screw Lamp Cover Handle Screws Lamp ORDER REPLACEMENT LAMP Replacement lamp can be ordered through your projector: ● Replacement Lamp Type No.: PLV-Z2000 POA-LMP114 (Service Parts No. 610 336 5404) 49 of your dealer. Make sure that secure the lamp. Lamp Replacement When the projection lamp of this indicator lights yellow, replace the lamp with a new one and secure it...
Owners Manual
Page 50
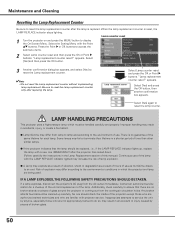
... found should be cleaned up , replace the lamp with the LAMP REPLACE indicator lighted may increase the risk of lamp explosion. ● A Lamp may result in a shorter period of time than other similar lamps. ● If the projector indicates that there are familiar with the Point ed buttons. When the lamp replacement counter is replaced. Some lamps may differ from the AC...
... found should be cleaned up , replace the lamp with the LAMP REPLACE indicator lighted may increase the risk of lamp explosion. ● A Lamp may result in a shorter period of time than other similar lamps. ● If the projector indicates that there are familiar with the Point ed buttons. When the lamp replacement counter is replaced. Some lamps may differ from the AC...
Owners Manual
Page 51
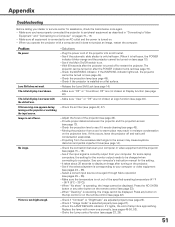
...indicator blinks orange and the projector cannot be displayed. The projector can be displayed. Press any other button on the projection lens. Check if "Contrast" or "Brightness" are not chosen at Display function (see page 19). - Check the LAMP REPLACE indicator. If it is ...operating, the image cannot be turned on pages 15 - 16. - Make sure you operate the projector with a new one . Select a correct input source once again through Menu operation...
...indicator blinks orange and the projector cannot be displayed. The projector can be displayed. Press any other button on the projection lens. Check if "Contrast" or "Brightness" are not chosen at Display function (see page 19). - Check the LAMP REPLACE indicator. If it is ...operating, the image cannot be turned on pages 15 - 16. - Make sure you operate the projector with a new one . Select a correct input source once again through Menu operation...
Owners Manual
Page 53
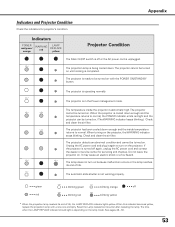
... and checkup. Check and clean the air filter. Reset the Lamp replacement counter after replacing the lamp. Do not leave the projector on . When this indicator becomes yellow, replace the projection lamp with the POWER ON/STAND-BY button. ✽ The projector is operating normally. ✽ The projector is off again, unplug the AC power cord and contact the...
... and checkup. Check and clean the air filter. Reset the Lamp replacement counter after replacing the lamp. Do not leave the projector on . When this indicator becomes yellow, replace the projection lamp with the POWER ON/STAND-BY button. ✽ The projector is operating normally. ✽ The projector is off again, unplug the AC power cord and contact the...


