
Owners Manual
Page 2
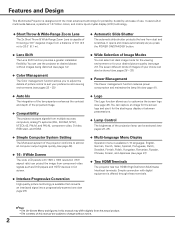
...The Power management function reduces power consumption and maintains the lamp life (see page 41). ◆ Auto Iris The integration of the lamp aperture enhances the contrast and depth of the projected image. ◆ Compatibility The projector accepts signals from dust and scratches. It opens and ..., Swedish, Finnish, Polish, Hungarian, Romanian, Russian, Chinese, Korean, and Japanese (see page 26). ◆ 16 : 9 Wide Screen The wide LCD panels with 1920 x 1080 resolution (16:9 aspect ratio) can project the image from component video signals such as you press the POWER ON/STAND-BY...
...The Power management function reduces power consumption and maintains the lamp life (see page 41). ◆ Auto Iris The integration of the lamp aperture enhances the contrast and depth of the projected image. ◆ Compatibility The projector accepts signals from dust and scratches. It opens and ..., Swedish, Finnish, Polish, Hungarian, Romanian, Russian, Chinese, Korean, and Japanese (see page 26). ◆ 16 : 9 Wide Screen The wide LCD panels with 1920 x 1080 resolution (16:9 aspect ratio) can project the image from component video signals such as you press the POWER ON/STAND-BY...
Owners Manual
Page 3
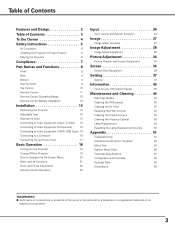
...Terminal 9 Top Control 10 Remote Control 11 Remote Control Operating Range 12 Remote Control Battery Installation 12 Installation 13 Positioning the Projector 13 Adjustable Feet 13 Moving the Lens 14 Connecting to Video Equipment (Video, S-Video) 15 Connecting to Video Equipment (Component...the Filter Counter 48 Cleaning the Projection Lens 48 Cleaning the Projector Cabinet 48 Lamp Replacement 49 Resetting the Lamp Replacement Counter 50 Appendix 51 Troubleshooting 51 Indicators and Projector Condition 53 Menu Tree 54 System Mode Chart 56 Technical ...
...Terminal 9 Top Control 10 Remote Control 11 Remote Control Operating Range 12 Remote Control Battery Installation 12 Installation 13 Positioning the Projector 13 Adjustable Feet 13 Moving the Lens 14 Connecting to Video Equipment (Video, S-Video) 15 Connecting to Video Equipment (Component...the Filter Counter 48 Cleaning the Projection Lens 48 Cleaning the Projector Cabinet 48 Lamp Replacement 49 Resetting the Lamp Replacement Counter 50 Appendix 51 Troubleshooting 51 Indicators and Projector Condition 53 Menu Tree 54 System Mode Chart 56 Technical ...
Owners Manual
Page 4
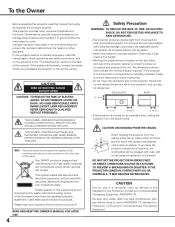
...This symbol means that children do not stare directly into the beam. - CAUTION Not for Protection of your household waste. Your SANYO product is to prevent A Breakdown or disaster. In the European Union there are applied to EU countries only and not to...improperly, read this manual thoroughly and operate the projector properly. Allowing the proper amount of space on the projector. Operating the projector properly enables you purchased the projector or the service center. NO USER-SERVICEABLE PARTS INSIDE EXCEPT LAMP REPLACEMENT. THIS SYMBOL INDICATES THAT THERE ARE ...
...This symbol means that children do not stare directly into the beam. - CAUTION Not for Protection of your household waste. Your SANYO product is to prevent A Breakdown or disaster. In the European Union there are applied to EU countries only and not to...improperly, read this manual thoroughly and operate the projector properly. Allowing the proper amount of space on the projector. Operating the projector properly enables you purchased the projector or the service center. NO USER-SERVICEABLE PARTS INSIDE EXCEPT LAMP REPLACEMENT. THIS SYMBOL INDICATES THAT THERE ARE ...

Owners Manual
Page 6
...flammable objects or spray can near the projector. Do not put the projector on the projector. Cooling fans are provided for an extended period, put it into a suitable case. Do not drop or bump the projector, otherwise damages or malfunctions may reduce the lamp life and cause fire hazard. 20˚...; Do not tilt the projector more than 20...
...flammable objects or spray can near the projector. Do not put the projector on the projector. Cooling fans are provided for an extended period, put it into a suitable case. Do not drop or bump the projector, otherwise damages or malfunctions may reduce the lamp life and cause fire hazard. 20˚...; Do not tilt the projector more than 20...

Owners Manual
Page 8
... (Up/Down) o Horizontal Lens Shift Ring (Left/Right) !0 Lens Shift Lock !1 Terminals and Connectors !2 Main On/Off Switch !3 Power Cord Connector !4 Air Intake Vent !5 Lamp Cover ✽ Kensington Security Slot This slot is for a Kensington lock used to deter theft of ACCO Brands Corporation. !6 Adjustable Feet !7 RGB Panel Cleaning Hole... objects near this side. Part Names and Functions Front q w Air flow Back !2 e r ty u i o !0 !1 !3 !4 !5 Bottom !6 q Exhaust Vent CAUTION Hot air is a registered trademark of the projector. *Kensington is exhausted from the exhaust vent.
... (Up/Down) o Horizontal Lens Shift Ring (Left/Right) !0 Lens Shift Lock !1 Terminals and Connectors !2 Main On/Off Switch !3 Power Cord Connector !4 Air Intake Vent !5 Lamp Cover ✽ Kensington Security Slot This slot is for a Kensington lock used to deter theft of ACCO Brands Corporation. !6 Adjustable Feet !7 RGB Panel Cleaning Hole... objects near this side. Part Names and Functions Front q w Air flow Back !2 e r ty u i o !0 !1 !3 !4 !5 Bottom !6 q Exhaust Vent CAUTION Hot air is a registered trademark of the projector. *Kensington is exhausted from the exhaust vent.
Owners Manual
Page 10
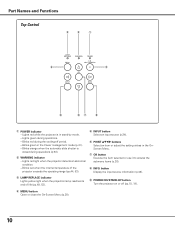
...mode. - button Display the input source information (p.43). Blinks green in the OnScreen Menu. i INFO. o POWER ON/STAND-BY button Turn the projector on or off period. - Lights green during the cooling-off (pp.18, 19). w WARNING indicator - Blinks red when the internal temperature of ... the setting values in the Power management mode (p.41). - e LAMP REPLACE indicator Lights yellow light when the projection lamp reaches its end of the projector exceeds the operating range (pp.44, 53). Lights red while the projector is closed during operations (p.53). r MENU button Open or close ...
...mode. - button Display the input source information (p.43). Blinks green in the OnScreen Menu. i INFO. o POWER ON/STAND-BY button Turn the projector on or off period. - Lights green during the cooling-off (pp.18, 19). w WARNING indicator - Blinks red when the internal temperature of ... the setting values in the Power management mode (p.41). - e LAMP REPLACE indicator Lights yellow light when the projection lamp reaches its end of the projector exceeds the operating range (pp.44, 53). Lights red while the projector is closed during operations (p.53). r MENU button Open or close ...
Owners Manual
Page 11
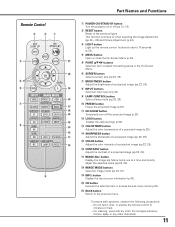
This function is limited to the previous figure. o LAMP CONTROL button !8 Select a lamp mode (pp.23, 29). !0 FREEZE button !7 Freeze the projected image (p.23). !6 !1 NO SHOW button !5 Temporarily turn off (pp.18, 19). To ensure safe operation, observe ... the On-Screen Menu. @0 y SCREEN button Select a screen size (pp.22, 35). Remote Control e w q r t y u i o Part Names and Functions q POWER ON/STAND-BY button Turn the projector on or off the projected image (p.23). !2 LOGO button !4 Display the captured logo (p.23). !3 !3 COLOR TEMP.
This function is limited to the previous figure. o LAMP CONTROL button !8 Select a lamp mode (pp.23, 29). !0 FREEZE button !7 Freeze the projected image (p.23). !6 !1 NO SHOW button !5 Temporarily turn off (pp.18, 19). To ensure safe operation, observe ... the On-Screen Menu. @0 y SCREEN button Select a screen size (pp.22, 35). Remote Control e w q r t y u i o Part Names and Functions q POWER ON/STAND-BY button Turn the projector on or off the projected image (p.23). !2 LOGO button !4 Display the captured logo (p.23). !3 !3 COLOR TEMP.
Owners Manual
Page 18
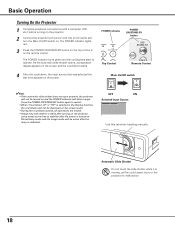
... Main On/Off switch ✔Note: • If the automatic slide shutter does not open properly, the projector will not be active after the power is stabilized. Stored lamp mode and the image mode will blink orange. Press the POWER ON/STAND-BY button again to stabilize after ...period, all operations are invalid. • Image may look dark for a while after turning on and the POWER indicator will be turned on the projector. As the automatic slide shutter opens, a preparation display appears on the screen and the countdown starts. 4 After the countdown, the input source that...
... Main On/Off switch ✔Note: • If the automatic slide shutter does not open properly, the projector will not be active after the power is stabilized. Stored lamp mode and the image mode will blink orange. Press the POWER ON/STAND-BY button again to stabilize after ...period, all operations are invalid. • Image may look dark for a while after turning on and the POWER indicator will be turned on the projector. As the automatic slide shutter opens, a preparation display appears on the screen and the countdown starts. 4 After the countdown, the input source that...

Owners Manual
Page 19
...UNPLUG AC POWER CORD WHILE COOLING FANS ARE RUNNING OR BEFORE POWER INDICATOR STOPS BLINKING. OTHERWISE IT WILL RESULT IN SHORTENING LAMP LIFE. Basic Operation Turning Off the Projector 1 Press the POWER ON/STAND-BY button on the top control or on again, the POWER indicator stops blinking. appears... on the remote control. disappears after use. • While the POWER indicator is blinking, the lamp is being cooled down enough to turn off ?" TO MAINTAIN LIFE OF LAMP, ONCE YOU TURN PROJECTOR ON, WAIT AT LEAST FIVE (5) MINUTES BEFORE TURNING IT OFF. Press the POWER ON/STAND-BY...
...UNPLUG AC POWER CORD WHILE COOLING FANS ARE RUNNING OR BEFORE POWER INDICATOR STOPS BLINKING. OTHERWISE IT WILL RESULT IN SHORTENING LAMP LIFE. Basic Operation Turning Off the Projector 1 Press the POWER ON/STAND-BY button on the top control or on again, the POWER indicator stops blinking. appears... on the remote control. disappears after use. • While the POWER indicator is blinking, the lamp is being cooled down enough to turn off ?" TO MAINTAIN LIFE OF LAMP, ONCE YOU TURN PROJECTOR ON, WAIT AT LEAST FIVE (5) MINUTES BEFORE TURNING IT OFF. Press the POWER ON/STAND-BY...
Owners Manual
Page 28
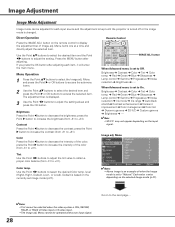
...page.... Brightness ➜ Contrast ➜ Color ➜ Tint ➜ Color temp. ➜ Red ➜ Green ➜ Blue ➜ Sharpness ➜ Lamp control ➜ Gamma ➜ Progressive ➜ Noise reduction ➜ Iris mode ➜ Iris range ➜ Auto black stretch➜ Contrast enhancement ➜ Transient...setting values and press the OK button. Press the MENU button after adjusting each input source and the adjustment is kept until the projector is turned off or the image mode is PAL, SECAM, PAL-M, or PAL-N in Video input or S-video input. &#...
...page.... Brightness ➜ Contrast ➜ Color ➜ Tint ➜ Color temp. ➜ Red ➜ Green ➜ Blue ➜ Sharpness ➜ Lamp control ➜ Gamma ➜ Progressive ➜ Noise reduction ➜ Iris mode ➜ Iris range ➜ Auto black stretch➜ Contrast enhancement ➜ Transient...setting values and press the OK button. Press the MENU button after adjusting each input source and the adjustment is kept until the projector is turned off or the image mode is PAL, SECAM, PAL-M, or PAL-N in Video input or S-video input. &#...
Owners Manual
Page 29
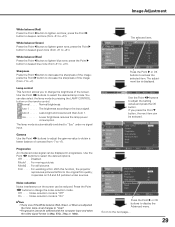
... video signal can be selected with the computer input and when the video signal format is 480p, 575p, 720p, or 1080p. Disabled. With this function, the projector reproduces pictures faithful to display the Advanced menu. If you to +7). Press the Point 8 or OK buttons to the ...Point 7 button to change the brightness of the White balance (Red, Green, or Blue) are adjusted, the Color temp. Eco Lower brightness reduces the lamp power consumption. The selected item. White balance (Green) Press the Point 7 button to lighten red tone; Film . . . . Noise reduction mode is...
... video signal can be selected with the computer input and when the video signal format is 480p, 575p, 720p, or 1080p. Disabled. With this function, the projector reproduces pictures faithful to display the Advanced menu. If you to +7). Press the Point 8 or OK buttons to the ...Point 7 button to change the brightness of the White balance (Red, Green, or Blue) are adjusted, the Color temp. Eco Lower brightness reduces the lamp power consumption. The selected item. White balance (Green) Press the Point 7 button to lighten red tone; Film . . . . Noise reduction mode is...

Owners Manual
Page 40
... if it for Power management (p.41) ● "Please wait ..." ● Color management operation screen (p.32) Logo This function decides on the projector. Use this function when you cancel the capturing. 40 Capture Select [Yes] to the Capture item. • The Capture function cannot be displayed.... Setting Display This function decides whether to switch On/Off. Press the Point 8 or OK buttons to project images after the lamp becomes bright enough. The factory default setting is cleared even if you want to switch between each option. User Show the Image ...
... if it for Power management (p.41) ● "Please wait ..." ● Color management operation screen (p.32) Logo This function decides on the projector. Use this function when you cancel the capturing. 40 Capture Select [Yes] to the Capture item. • The Capture function cannot be displayed.... Setting Display This function decides whether to switch On/Off. Press the Point 8 or OK buttons to project images after the lamp becomes bright enough. The factory default setting is cleared even if you want to switch between each option. User Show the Image ...
Owners Manual
Page 41
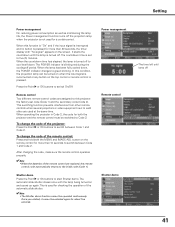
... This is reconnected or any button on the screen. When the lamp has been fully cooled down . Power management Remote control Shutter demo The time left until the lamp is turned off the projection lamp when the projector is set code (Code 1) and the secondary code (Code 2).... 8 or OK buttons to start Shutter demo. When the countdown time has elapsed, the lamp is pressed. This switching function prevents interference from other remote controls when several projectors or video equipment next to each other are replaced, the remote control code automatically returns to...
... This is reconnected or any button on the screen. When the lamp has been fully cooled down . Power management Remote control Shutter demo The time left until the lamp is turned off the projection lamp when the projector is set code (Code 1) and the secondary code (Code 2).... 8 or OK buttons to start Shutter demo. When the countdown time has elapsed, the lamp is pressed. This switching function prevents interference from other remote controls when several projectors or video equipment next to each other are replaced, the remote control code automatically returns to...
Owners Manual
Page 42
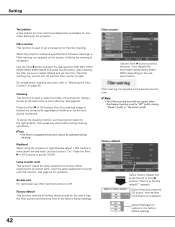
.... See page 46. Service port For techinician use when setting up the projector. Setting Test pattern A test pattern for zoom and focus adjustment is available for use ONLY. When replacing the projection lamp, reset the lamp replacement counter with this function "On." See page 50 for the user's...logo, the filter counter and the lamp time to the factory default settings. 42 Filter counter Use the Point 8 button to select the desired timer [Off/ 50H/ 100H/ 200H/ 300H/ 400H/ 500H] and press the OK button. Highland When using the projector in high altitudes (about resetting the...
.... See page 46. Service port For techinician use when setting up the projector. Setting Test pattern A test pattern for zoom and focus adjustment is available for use ONLY. When replacing the projection lamp, reset the lamp replacement counter with this function "On." See page 50 for the user's...logo, the filter counter and the lamp time to the factory default settings. 42 Filter counter Use the Point 8 button to select the desired timer [Off/ 50H/ 100H/ 200H/ 300H/ 400H/ 500H] and press the OK button. Highland When using the projector in high altitudes (about resetting the...

Owners Manual
Page 43
... of the connected video signal is displayed from among D-VGA, DWXGA, D-480i, D-480p, D-575i, D-575p, D-720p, D-1080i, and D-1080p. A system mode of the color in HDMI input signal is displayed. A resolution of recognition, "Unknown" is displayed. When the connected input ...sync freq. button 43 Screen The selected screen size is displayed. Lamp time The cumulative lamp operating time is displayed. Top Control Remote Control Information Menu INFO. The horizontal frequency of the projector. Direct Operation Press the INFO. Signal Video or S-video Component ...
... of the connected video signal is displayed from among D-VGA, DWXGA, D-480i, D-480p, D-575i, D-575p, D-720p, D-1080i, and D-1080p. A system mode of the color in HDMI input signal is displayed. A resolution of recognition, "Unknown" is displayed. When the connected input ...sync freq. button 43 Screen The selected screen size is displayed. Lamp time The cumulative lamp operating time is displayed. Top Control Remote Control Information Menu INFO. The horizontal frequency of the projector. Direct Operation Press the INFO. Signal Video or S-video Component ...
Owners Manual
Page 48
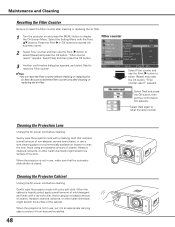
...appears. Gently wipe the projection lens with a dry soft cloth. Cleaning the Projection Lens Unplug the AC power cord before cleaning. When the projector is heavily soiled, apply a small amount of cleaner. Press the Point 8 or OK buttons to access the submenu items. 2 Select ...Filter counter without cleaning or replacing the air filter. Filter counter 3 Another confirmation dialog box appears, and select [Yes] to reset the lamp counter. appears. Avoid using an excessive amount of mild detergent and finish with a cleaning cloth that the automatic slide shutter is closed....
...appears. Gently wipe the projection lens with a dry soft cloth. Cleaning the Projection Lens Unplug the AC power cord before cleaning. When the projector is heavily soiled, apply a small amount of cleaner. Press the Point 8 or OK buttons to access the submenu items. 2 Select ...Filter counter without cleaning or replacing the air filter. Filter counter 3 Another confirmation dialog box appears, and select [Yes] to reset the lamp counter. appears. Avoid using an excessive amount of mild detergent and finish with a cleaning cloth that the automatic slide shutter is closed....

Owners Manual
Page 49
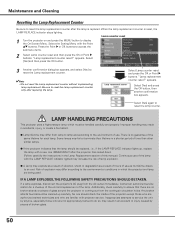
..., replace the lamp with the same type lamp. Screw Lamp Cover Handle Screws Lamp ORDER REPLACEMENT LAMP Replacement lamp can be ordered through your projector: ● Replacement Lamp Type No.: PLV-Z2000 POA-LMP114 (Service Parts No. 610 336 5404) 49 When ordering a projection lamp, give the following information to the projector and turn on the lamp mode. Put the lamp cover back and...
..., replace the lamp with the same type lamp. Screw Lamp Cover Handle Screws Lamp ORDER REPLACEMENT LAMP Replacement lamp can be ordered through your projector: ● Replacement Lamp Type No.: PLV-Z2000 POA-LMP114 (Service Parts No. 610 336 5404) 49 When ordering a projection lamp, give the following information to the projector and turn on the lamp mode. Put the lamp cover back and...
Owners Manual
Page 50
... a result of vibration, shock or degradation as its lifetime draws to the environment or conditions in the Lamp Replacement section of this manual.) Continuous use . LAMP HANDLING PRECAUTIONS This projector uses a high-pressure lamp which the projector and lamp are familiar with the Point ed buttons. Improper handling may result in an accident or injury caused...
... a result of vibration, shock or degradation as its lifetime draws to the environment or conditions in the Lamp Replacement section of this manual.) Continuous use . LAMP HANDLING PRECAUTIONS This projector uses a high-pressure lamp which the projector and lamp are familiar with the Point ed buttons. Improper handling may result in an accident or injury caused...
Owners Manual
Page 51
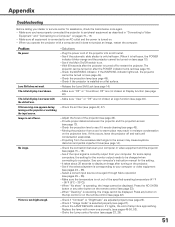
...chosen at Display function (see page 22). - Plug the power cord of the projector (see page 40). - Check if the projector is half-open . See if the input signal is on a flat surface. - Chekc the Lamp control function (see page 49). - Lens Shift does not work. Image is ...44). - Make sure the temperature is operating, the image cannot be turned on the projector or switching the input source. Filter warning icon appears during turning on (see page 28). - Check the projection lamp (see pages 23, 29). 51 Check the air filter (see page 48). - Replace...
...chosen at Display function (see page 22). - Plug the power cord of the projector (see page 40). - Check if the projector is half-open . See if the input signal is on a flat surface. - Chekc the Lamp control function (see page 49). - Lens Shift does not work. Image is ...44). - Make sure the temperature is operating, the image cannot be turned on the projector or switching the input source. Filter warning icon appears during turning on (see page 28). - Check the projection lamp (see pages 23, 29). 51 Check the air filter (see page 48). - Replace...
Owners Manual
Page 53
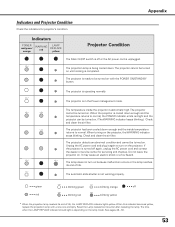
... being cooled down enough and the ✽ temperature returns to be turned on the projector. Appendix Indicators and Projector Condition Check the indicators for servicing and checkup. Reset the Lamp replacement counter after replacing the lamp. Unplug the AC power cord and plug it again to normal. Indicators POWER red/green/ orange WARNING red...
... being cooled down enough and the ✽ temperature returns to be turned on the projector. Appendix Indicators and Projector Condition Check the indicators for servicing and checkup. Reset the Lamp replacement counter after replacing the lamp. Unplug the AC power cord and plug it again to normal. Indicators POWER red/green/ orange WARNING red...


