Owners Manual
Page 2
... Connecting the AC Power Cord Features and Design Part Names and Functions Front Back Bottom Terminal Top Remote Control Remote Control Operating Range Remote Control Batteries Installation Installation Positioning the Projector Adjustable Feet Moving the Lens Connecting to Video Equipment (Video, S-Video) Connecting to Video Equipment (Component, DVI compatible with HDCP) Connecting to Video Equipment (RGB ...
... Connecting the AC Power Cord Features and Design Part Names and Functions Front Back Bottom Terminal Top Remote Control Remote Control Operating Range Remote Control Batteries Installation Installation Positioning the Projector Adjustable Feet Moving the Lens Connecting to Video Equipment (Video, S-Video) Connecting to Video Equipment (Component, DVI compatible with HDCP) Connecting to Video Equipment (RGB ...

Owners Manual
Page 8
... million colors, and matrix liquid crystal display (LCD) technology. You can also display the captured image whenever you wish to use the projector where you want to 1280 x 1024 resolution. G Computers IBM-compatible or Macintosh computer up to with the MY PICTURE (MY-P) button on the remote control. (See page 12, 39, 40.) N Lamp...
... million colors, and matrix liquid crystal display (LCD) technology. You can also display the captured image whenever you wish to use the projector where you want to 1280 x 1024 resolution. G Computers IBM-compatible or Macintosh computer up to with the MY PICTURE (MY-P) button on the remote control. (See page 12, 39, 40.) N Lamp...
Owners Manual
Page 12
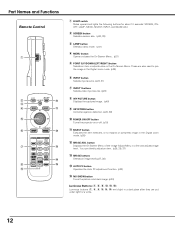
... i MY PICTURE button Displays the captured image. (p40) o KEYSTONE button Corrects keystone distortion. (p20, 39) !0 POWER ON-OFF button Turns the projector on or off. (p18) !1 SELECT button Executes the item selected, or to expand or compress image in the Digital zoom mode. (p38) !2... a line and adjusts image level. button Displays the On-Screen Menu of the Image Adjust Menu in the On-Screen Menu. Part Names and Functions Remote Control q LIGHT w !0 e r !1 t y !2 u !3 !4 i !5 o q LIGHT switch Slides upward and lights the following buttons for a while. 12 These are put ...
... i MY PICTURE button Displays the captured image. (p40) o KEYSTONE button Corrects keystone distortion. (p20, 39) !0 POWER ON-OFF button Turns the projector on or off. (p18) !1 SELECT button Executes the item selected, or to expand or compress image in the Digital zoom mode. (p38) !2... a line and adjusts image level. button Displays the On-Screen Menu of the Image Adjust Menu in the On-Screen Menu. Part Names and Functions Remote Control q LIGHT w !0 e r !1 t y !2 u !3 !4 i !5 o q LIGHT switch Slides upward and lights the following buttons for a while. 12 These are put ...
Owners Manual
Page 13
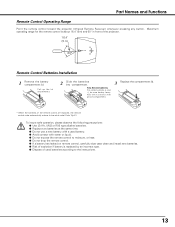
...) and 60° in compartment. 3 Replace the compartment lid. * When the batteries of the projector. 16.4' (5 m) 60° Remote Control Batteries Installation 1 Remove the battery compartment lid. Part Names and Functions Remote Control Operating Range Point the remote control toward the projector (Infrared Remote Receiver) whenever pressing any button. To insure safe operation, please observe the following precautions : G Use...
...) and 60° in compartment. 3 Replace the compartment lid. * When the batteries of the projector. 16.4' (5 m) 60° Remote Control Batteries Installation 1 Remove the battery compartment lid. Part Names and Functions Remote Control Operating Range Point the remote control toward the projector (Infrared Remote Receiver) whenever pressing any button. To insure safe operation, please observe the following precautions : G Use...
Owners Manual
Page 18
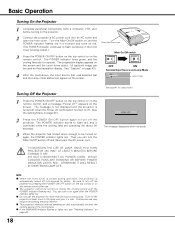
... preparation display. Main On/Off switch OFF ON Selected Input Source and Lamp Mode Lamp mode Turning Off the Projector 1 Press the POWER ON-OFF button on the top control or on the remote control. Open the front cover. NOTE G When the front cover is closed . ) 3 Press the POWER ON-OFF button... on again after the POWER indicator lights red. G Do not use may result in 24 hours and give it on the remote control after 4 seconds. Continuous use the projector for Lamp mode.) The message disappears after use. Turn the Main On/Off switch on, and the POWER indicator flashes red in 5...
... preparation display. Main On/Off switch OFF ON Selected Input Source and Lamp Mode Lamp mode Turning Off the Projector 1 Press the POWER ON-OFF button on the top control or on the remote control. Open the front cover. NOTE G When the front cover is closed . ) 3 Press the POWER ON-OFF button... on again after the POWER indicator lights red. G Do not use may result in 24 hours and give it on the remote control after 4 seconds. Continuous use the projector for Lamp mode.) The message disappears after use. Turn the Main On/Off switch on, and the POWER indicator flashes red in 5...

Owners Manual
Page 20
...width with the KEYSTONE M button or the Point Down button. My Picture Function Press the MY PICTURE (MY-P) button on the remote control or select the Keystone in the Setting Menu (p39). Basic Operation Keystone Adjustment If a projected picture has keystone distortion, correct the... image with KEYSTONE adjustment. 1 Press the KEYSTONE L/M button on the remote control to display a captured image. To restore to normal, press the MY PICTURE (MY-P) button again or press any other button. No ...
...width with the KEYSTONE M button or the Point Down button. My Picture Function Press the MY PICTURE (MY-P) button on the remote control or select the Keystone in the Setting Menu (p39). Basic Operation Keystone Adjustment If a projected picture has keystone distortion, correct the... image with KEYSTONE adjustment. 1 Press the KEYSTONE L/M button on the remote control to display a captured image. To restore to normal, press the MY PICTURE (MY-P) button again or press any other button. No ...

Owners Manual
Page 21
... item displayed in a line, pressing the MENU button takes you are selecting a sub-menu, press the MENU button twice. Basic Operation Remote Control SELECT button MENU button POINT button Top Control LAMP REPLACE MENU SELECT INPUT POINT button SELECT button MENU button On-Screen Menu (Main Menu) Point Right button On-Screen Menu.... (The selected icon turns yellow.) 3 Select an item by holding down the MENU button longer whatever you are selecting. 21 On-Screen Menu You can control and adjust this projector through the On-Screen Menu.
... item displayed in a line, pressing the MENU button takes you are selecting a sub-menu, press the MENU button twice. Basic Operation Remote Control SELECT button MENU button POINT button Top Control LAMP REPLACE MENU SELECT INPUT POINT button SELECT button MENU button On-Screen Menu (Main Menu) Point Right button On-Screen Menu.... (The selected icon turns yellow.) 3 Select an item by holding down the MENU button longer whatever you are selecting. 21 On-Screen Menu You can control and adjust this projector through the On-Screen Menu.

Owners Manual
Page 22
...Keystone, Blue back, Display, Background color, Menu position, Logo, Capture, Ceiling, Rear, Power management, Power off confirmation, Lamp mode, Remote control, Lamp counter reset, and Factory default. (p39-41) COMPUTER MENUS Input Menu: selects computer input source. (p31) PC System Menu...Language, Keystone, Blue back, Display, Background color, Menu position, Logo, Capture, Ceiling, Rear, Power management, Power off confirmation, Lamp mode, Remote control, Lamp counter reset, and Factory default. (p39-41) 22 Basic Operation Menus VIDEO MENUS Input Menu: selects video input source. (p23-25) ...
...Keystone, Blue back, Display, Background color, Menu position, Logo, Capture, Ceiling, Rear, Power management, Power off confirmation, Lamp mode, Remote control, Lamp counter reset, and Factory default. (p39-41) COMPUTER MENUS Input Menu: selects computer input source. (p31) PC System Menu...Language, Keystone, Blue back, Display, Background color, Menu position, Logo, Capture, Ceiling, Rear, Power management, Power off confirmation, Lamp mode, Remote control, Lamp counter reset, and Factory default. (p39-41) 22 Basic Operation Menus VIDEO MENUS Input Menu: selects video input source. (p23-25) ...

Owners Manual
Page 23
...S-VIDEO has priority over S-VIDEO. VIDEO When video input signal is connected to optimize its performance. Remote Control AUTO When selecting the AUTO button, the projector automatically detects incoming video signal, and adjusts itself to the S-VIDEO jack, select S-Video. Before using... these buttons, correct input source should be selected through the INPUT 1 buttons on the remote control or through menu operation as the projector automatically detects incoming video signal, and adjust itself to the VIDEO jack, select Video. S-VIDEO When video...
...S-VIDEO has priority over S-VIDEO. VIDEO When video input signal is connected to optimize its performance. Remote Control AUTO When selecting the AUTO button, the projector automatically detects incoming video signal, and adjusts itself to the S-VIDEO jack, select S-Video. Before using... these buttons, correct input source should be selected through the INPUT 1 buttons on the remote control or through menu operation as the projector automatically detects incoming video signal, and adjust itself to the VIDEO jack, select Video. S-VIDEO When video...

Owners Manual
Page 25
... and Scart-DVI Cable are options. Source Selection Menu pointer Closes the source selection menu. 25 INPUT button Input 2 Input 1 Top Control Remote Control MENU SELECT INPUT Menu Operation 1 Select the Input Menu with a Component-DVI Cable, select Component. Component When the input source is ...Up/Down button and then press the Point Right button. Before using these buttons, correct input source should be changed, this projector may not display the digital content protected by DVI (Digital Visual Interface) from video equipment connected to select and then press the...
... and Scart-DVI Cable are options. Source Selection Menu pointer Closes the source selection menu. 25 INPUT button Input 2 Input 1 Top Control Remote Control MENU SELECT INPUT Menu Operation 1 Select the Input Menu with a Component-DVI Cable, select Component. Component When the input source is ...Up/Down button and then press the Point Right button. Before using these buttons, correct input source should be changed, this projector may not display the digital content protected by DVI (Digital Visual Interface) from video equipment connected to select and then press the...

Owners Manual
Page 27
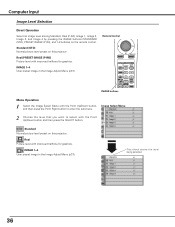
...(P-IM) button, either Cinema or Game is selected.) Standard (STD) Normal picture level preset on this projector. Cinema Picture level adjusted for playing a game. Remote Control IMAGE buttons Menu Operation 1 Select the Image Select Menu with fine tone. Video Input 27 Image Level Selection...pressing the IMAGE buttons (STANDARD (STD), PRESET IMAGE (P-IM), and 1-4 buttons) on the remote control. (Each time you want to enter the sub-menu. Standard Normal picture level preset on this projector. Game Picture level suitable for the picture with fine tone. IMAGE 1~4 User preset image in...
...(P-IM) button, either Cinema or Game is selected.) Standard (STD) Normal picture level preset on this projector. Cinema Picture level adjusted for playing a game. Remote Control IMAGE buttons Menu Operation 1 Select the Image Select Menu with fine tone. Video Input 27 Image Level Selection...pressing the IMAGE buttons (STANDARD (STD), PRESET IMAGE (P-IM), and 1-4 buttons) on the remote control. (Each time you want to enter the sub-menu. Standard Normal picture level preset on this projector. Game Picture level suitable for the picture with fine tone. IMAGE 1~4 User preset image in...

Owners Manual
Page 28
.... (From -31 to +31) Tint Press the Point Left/Right button to obtain proper color. (From -31 to adjust the next item. Go on the remote control. (p12) G Tint cannot be selected when the video system is PAL, SECAM, PAL-M, or PAL-N except for Color temperature level that you want to select...
.... (From -31 to +31) Tint Press the Point Left/Right button to obtain proper color. (From -31 to adjust the next item. Go on the remote control. (p12) G Tint cannot be selected when the video system is PAL, SECAM, PAL-M, or PAL-N except for Color temperature level that you want to select...

Owners Manual
Page 29
... and press the SELECT button. A confirmation box will appear and select [Yes]. Choose one of 4 image levels with the IMAGE ADJ. (IMAGE) button on the remote control. (p12) G Progressive cannot be converted to a progressive signal. Sharpness Press the Point Left button to soften the image and the Point Right button to sharpen...
... and press the SELECT button. A confirmation box will appear and select [Yes]. Choose one of 4 image levels with the IMAGE ADJ. (IMAGE) button on the remote control. (p12) G Progressive cannot be converted to a progressive signal. Sharpness Press the Point Left button to soften the image and the Point Right button to sharpen...
Owners Manual
Page 30
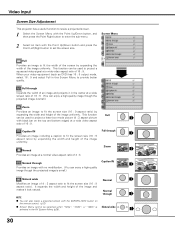
...at a wide screen ratio of 16 : 9. NOTE G You can be selected when "720p", "1035i", or "1080i" is stimulating! Video Input Screen Size Adjustment This projector has a useful function to resize a projected screen. 1 Select the Screen Menu with the Point Up/Down button, and then press the Point Right button to... of the image and makes it in this Screen Menu to enter the sub-menu. Screen Menu 2 Select an item with black bar on the remote control. (p12) G Screen Menu cannot be used to project a letter box mode picture (4 : 3 aspect picture with the Point Up/Down button and press the ...
...at a wide screen ratio of 16 : 9. NOTE G You can be selected when "720p", "1035i", or "1080i" is stimulating! Video Input Screen Size Adjustment This projector has a useful function to resize a projected screen. 1 Select the Screen Menu with the Point Up/Down button, and then press the Point Right button to... of the image and makes it in this Screen Menu to enter the sub-menu. Screen Menu 2 Select an item with black bar on the remote control. (p12) G Screen Menu cannot be used to project a letter box mode picture (4 : 3 aspect picture with the Point Up/Down button and press the ...

Owners Manual
Page 31
... Source Select Menu will appear. 3 Move the pointer to the source that you want to enter the submenu. INPUT button Input 2 Input 1 Top Control Remote Control SELECT INPUT Menu Operation 1 Select the Input Source Selection Menu with the Point Up/Down button and then press the Point Right button. Input Menu 2 ...
... Source Select Menu will appear. 3 Move the pointer to the source that you want to enter the submenu. INPUT button Input 2 Input 1 Top Control Remote Control SELECT INPUT Menu Operation 1 Select the Input Source Selection Menu with the Point Up/Down button and then press the Point Right button. Input Menu 2 ...
Owners Manual
Page 36
..., Real (P-IM), Image 1, Image 2, Image 3, and Image 4 by pressing the IMAGE buttons (STANDARD (STD), PRESET IMAGE (P-IM), and 1-4 buttons) on this projector. This check shows the level being selected. 36 Remote Control IMAGE buttons Menu Operation 1 Select the Image Select Menu with the Point Up/Down button and then press the SELECT button...
..., Real (P-IM), Image 1, Image 2, Image 3, and Image 4 by pressing the IMAGE buttons (STANDARD (STD), PRESET IMAGE (P-IM), and 1-4 buttons) on this projector. This check shows the level being selected. 36 Remote Control IMAGE buttons Menu Operation 1 Select the Image Select Menu with the Point Up/Down button and then press the SELECT button...

Owners Manual
Page 37
... items with the Point Up/Down button and press the SELECT button. Choose one of 4 image levels with the IMAGE ADJ. (IMAGE) button on the remote control. (p12) This arrow indicates that you want to select. (High, Mid, Low1, Low2, Low3) White balance (Red) Press the Point Left button to lighten red...
... items with the Point Up/Down button and press the SELECT button. Choose one of 4 image levels with the IMAGE ADJ. (IMAGE) button on the remote control. (p12) This arrow indicates that you want to select. (High, Mid, Low1, Low2, Low3) White balance (Red) Press the Point Left button to lighten red...

Owners Manual
Page 38
... "1035i (HDTV)", or "1080i (HDTV)" is larger than the screen size (1280 x 720), this projector enters "Digital zoom" mode automatically. The panning function can also resize a projected screen with the SCREEN (SCR) button on the remote control. (p12) G This Screen Menu cannot be selected when "480i", "575i", "480p", or "575p" ...the screen. Screen Menu 2 Select an item with the Point Up/Down button, and then press the Point Right button to the projector. Full Provides an image to pan the image. NOTE G You can work only when the original image is selected in its original size.
... "1035i (HDTV)", or "1080i (HDTV)" is larger than the screen size (1280 x 720), this projector enters "Digital zoom" mode automatically. The panning function can also resize a projected screen with the SCREEN (SCR) button on the remote control. (p12) G This Screen Menu cannot be selected when "480i", "575i", "480p", or "575p" ...the screen. Screen Menu 2 Select an item with the Point Up/Down button, and then press the Point Right button to the projector. Full Provides an image to pan the image. NOTE G You can work only when the original image is selected in its original size.
Owners Manual
Page 40
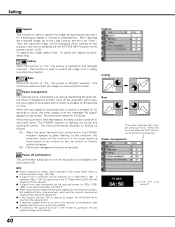
... and no button is pressed for 720p, 1035i, 1080i, and a signal compatible with HDCP. The next performance depends on the top control or remote control is pressed. Off ··· The Power management function is used to project the image to a rear projection screen. This ... capturing an image, select Standard in the PC Adjust Menu (p35), then the image cannot be turned off the projector is displayed with the message "No signal" appears on the remote control. (p12) To capture the image, select [Yes]. G When capturing the image that there are previous items. ...
... and no button is pressed for 720p, 1035i, 1080i, and a signal compatible with HDCP. The next performance depends on the top control or remote control is pressed. Off ··· The Power management function is used to project the image to a rear projection screen. This ... capturing an image, select Standard in the PC Adjust Menu (p35), then the image cannot be turned off the projector is displayed with the message "No signal" appears on the remote control. (p12) To capture the image, select [Yes]. G When capturing the image that there are previous items. ...
Owners Manual
Page 41
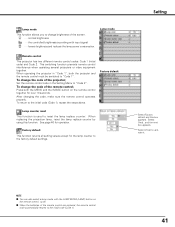
... function is used to "Code 2". Set the remote control code in "Code 1", both the MENU and the IMAGE button on the remote control. (p12) G When the batteries of the projector; Lamp mode Remote control This projector has two different remote control codes: Code 1 (initial code) and Code 2. Press both the projector and the remote control must be switched to the initial code (Code...
... function is used to "Code 2". Set the remote control code in "Code 1", both the MENU and the IMAGE button on the remote control. (p12) G When the batteries of the projector; Lamp mode Remote control This projector has two different remote control codes: Code 1 (initial code) and Code 2. Press both the projector and the remote control must be switched to the initial code (Code...


