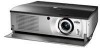
Owners Manual
Page 2
...Control Remote Control Batteries Installation Operating Range Installation Positioning the Projector Tilting the Projector Moving the Lens Connecting to Video Equipment Connecting to a Computer Basic Operation Turning On the Projector Turning Off the Projector Focus Adjustment Zoom Adjustment Keystone Adjustment No Show Function On... Size Adjustment (Menu Operation) 41 10 11 12 13 Setting 42 14 14 Setting 42 15 Appendix 44 15 15 Lamp Replacement 44 16 Lamp Replace Counter 45 17 Warning Temp. G IBM, VGA, XGA, and PS/2 are trademarks or registered trademarks of Microsoft...
...Control Remote Control Batteries Installation Operating Range Installation Positioning the Projector Tilting the Projector Moving the Lens Connecting to Video Equipment Connecting to a Computer Basic Operation Turning On the Projector Turning Off the Projector Focus Adjustment Zoom Adjustment Keystone Adjustment No Show Function On... Size Adjustment (Menu Operation) 41 10 11 12 13 Setting 42 14 14 Setting 42 15 Appendix 44 15 15 Lamp Replacement 44 16 Lamp Replace Counter 45 17 Warning Temp. G IBM, VGA, XGA, and PS/2 are trademarks or registered trademarks of Microsoft...
Owners Manual
Page 3
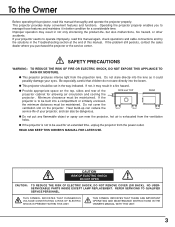
... TO REDUCE THE RISK OF FIRE OR ELECTRIC SHOCK, DO NOT EXPOSE THIS APPLIANCE TO RAIN OR MOISTURE. NO USERSERVICEABLE PARTS INSIDE EXCEPT LAMP REPLACEMENT. If the projector is not to operate improperly, read this manual. READ AND KEEP THIS OWNER'S MANUAL FOR LATER USE. Do not stare directly into ... 50cm 50cm REAR 50cm G Do not put any flammable object or spray can also be used for allowing air circulation and cooling the 20cm projector. Be especially careful that children do not stare directly into the lens as it in a fire hazard. CAUTION RISK OF ELECTRIC SHOCK DO ...
... TO REDUCE THE RISK OF FIRE OR ELECTRIC SHOCK, DO NOT EXPOSE THIS APPLIANCE TO RAIN OR MOISTURE. NO USERSERVICEABLE PARTS INSIDE EXCEPT LAMP REPLACEMENT. If the projector is not to operate improperly, read this manual. READ AND KEEP THIS OWNER'S MANUAL FOR LATER USE. Do not stare directly into ... 50cm 50cm REAR 50cm G Do not put any flammable object or spray can also be used for allowing air circulation and cooling the 20cm projector. Be especially careful that children do not stare directly into the lens as it in a fire hazard. CAUTION RISK OF ELECTRIC SHOCK DO ...
Owners Manual
Page 5
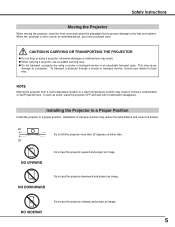
... either side. 20˚ NO UPWARD Do not put the projector sideway and project an image. NOTE Moving the projector from a cool temperature location to a warm temperature location may reduce the lamp lifetime and cause fire hazard. 20˚ Do not tilt the projector more than 20 degrees on the Projection lens. Installing the...
... either side. 20˚ NO UPWARD Do not put the projector sideway and project an image. NOTE Moving the projector from a cool temperature location to a warm temperature location may reduce the lamp lifetime and cause fire hazard. 20˚ Do not tilt the projector more than 20 degrees on the Projection lens. Installing the...
Owners Manual
Page 8
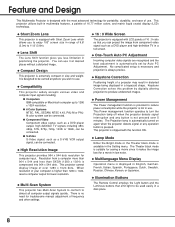
... signals including; When resolution of 16.77 million colors, and matrix liquid crystal display (LCD) technology. N 16 : 9 Wide Screen The projector is equipped with LCD panels of a projector may result in distorted image being displayed in English, German, French, Italian, Spanish, ...Portuguese, Dutch, Swedish, Russian, Chinese, Korean, or Japanese. This Power management function operates to turn the Projection lamp off when the projector ...
... signals including; When resolution of 16.77 million colors, and matrix liquid crystal display (LCD) technology. N 16 : 9 Wide Screen The projector is equipped with LCD panels of a projector may result in distorted image being displayed in English, German, French, Italian, Spanish, ...Portuguese, Dutch, Swedish, Russian, Chinese, Korean, or Japanese. This Power management function operates to turn the Projection lamp off when the projector ...

Owners Manual
Page 10
... should be taken. G Do not put any objects at least 3'(1m) away from the exhaust vents. This area will become hot while the projector is exhausted from any objects, especially heat-sensitive objects. Back POWER CORD CONNECTOR MAIN ON/OFF SWITCH TERMINALS AND CONNECTORS See the caution below. G...not touch this area (including the top cabinet), especially screws and metallic parts. Part Names and Functions Bottom ADJUSTABLE FEET AND FEET LOCK LATCHES LAMP COVER AIR INTAKE VENTS AND AIR FILTERS AIR INTAKE VENTS CAUTION Do not put any flammable objects near these vents.
... should be taken. G Do not put any objects at least 3'(1m) away from the exhaust vents. This area will become hot while the projector is exhausted from any objects, especially heat-sensitive objects. Back POWER CORD CONNECTOR MAIN ON/OFF SWITCH TERMINALS AND CONNECTORS See the caution below. G...not touch this area (including the top cabinet), especially screws and metallic parts. Part Names and Functions Bottom ADJUSTABLE FEET AND FEET LOCK LATCHES LAMP COVER AIR INTAKE VENTS AND AIR FILTERS AIR INTAKE VENTS CAUTION Do not put any flammable objects near these vents.

Owners Manual
Page 12
READY LAMP REPLACE ON-OFF LAMP LAMP INDICATOR Becomes dim when the projector is also used to pan the image in Digital zoom mode. (p41) 12 POWER ON-OFF BUTTON Used to turn the projector on or off. (p19) MENU SELECT INPUT INPUT BUTTON Used to select input source. (p24, 31) MENU BUTTON Used to... INDICATOR Turns yellow when the life of the projection lamp draws to execute the item selected. They are also used to expand the image in Power management mode. (p43) WARNING TEMP. And it is bright when the projector is ready to select an item or adjust value in stand-by mode....
READY LAMP REPLACE ON-OFF LAMP LAMP INDICATOR Becomes dim when the projector is also used to pan the image in Digital zoom mode. (p41) 12 POWER ON-OFF BUTTON Used to turn the projector on or off. (p19) MENU SELECT INPUT INPUT BUTTON Used to select input source. (p24, 31) MENU BUTTON Used to... INDICATOR Turns yellow when the life of the projection lamp draws to execute the item selected. They are also used to expand the image in Power management mode. (p43) WARNING TEMP. And it is bright when the projector is ready to select an item or adjust value in stand-by mode....
Owners Manual
Page 15
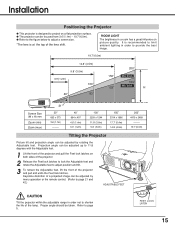
... adjusted by menu operation or the remote control. (Refer to page 21 and 42.) ADJUSTABLE FEET CAUTION Tilt the projector within the adjustable range in order not to shorten the life of the lamp. Zoom 169" 125" Min. Zoom H Screen Size (W x H) mm Zoom (min) Zoom (max) 31" 30" 663 x 373 3.6'(1.1m) ----- 40...
... adjusted by menu operation or the remote control. (Refer to page 21 and 42.) ADJUSTABLE FEET CAUTION Tilt the projector within the adjustable range in order not to shorten the life of the lamp. Zoom 169" 125" Min. Zoom H Screen Size (W x H) mm Zoom (min) Zoom (max) 31" 30" 663 x 373 3.6'(1.1m) ----- 40...

Owners Manual
Page 19
... The cooling fans operate for more than 24 hours continuously. However, do not close the front cover for the purpose of the lamp, once you turn off . indicator flashes red, the projector is selected last and the Lamp mode status icon appears on a screen after the count-down starts (for the... may result in the middle of either video or computer. (Refer to "Power management" on page 43. The LAMP indicator lights bright and the READY indicator turns off the projector. Turn the MAIN ON/OFF switch off ? Do not disconnect the AC Power Cord before the READY indicator lights ...
... The cooling fans operate for more than 24 hours continuously. However, do not close the front cover for the purpose of the lamp, once you turn off . indicator flashes red, the projector is selected last and the Lamp mode status icon appears on a screen after the count-down starts (for the... may result in the middle of either video or computer. (Refer to "Power management" on page 43. The LAMP indicator lights bright and the READY indicator turns off the projector. Turn the MAIN ON/OFF switch off ? Do not disconnect the AC Power Cord before the READY indicator lights ...
Owners Manual
Page 22
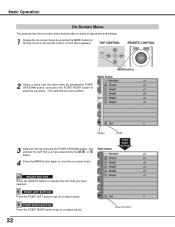
... that provides a variety of adjustment and settings. 1 Display the on-screen menu by the , , or button. Basic Operation WARNING TEMP. READY LAMP REPLACE ON-OFF LAMP On-Screen Menu The projector has the on-screen menu that you have selected by pressing the MENU button on or adjust values. POINT RIGHT BUTTON SELECT...
... that provides a variety of adjustment and settings. 1 Display the on-screen menu by the , , or button. Basic Operation WARNING TEMP. READY LAMP REPLACE ON-OFF LAMP On-Screen Menu The projector has the on-screen menu that you have selected by pressing the MENU button on or adjust values. POINT RIGHT BUTTON SELECT...

Owners Manual
Page 31
... that you want to enter the sub-menu. Video RGB Scart Input TOP CONTROL When RGB Scart 21-pin output is turned on the projector with the POINT UP/DOWN button, and then press the POINT RIGHT button to select with the POINT UP/DOWN button and press the ...and press the SELECT button. Close the source selection menu. *Select the RGB (Scart) only when connecting the projector with the INPUT button. To select computer input, select the RGB. READY INPUT BUTTON LAMP REPLACE You can receive 575i only. Select the Input Source Selection menu with an optionally supplied Scart-VGA...
... that you want to enter the sub-menu. Video RGB Scart Input TOP CONTROL When RGB Scart 21-pin output is turned on the projector with the POINT UP/DOWN button, and then press the POINT RIGHT button to select with the POINT UP/DOWN button and press the ...and press the SELECT button. Close the source selection menu. *Select the RGB (Scart) only when connecting the projector with the INPUT button. To select computer input, select the RGB. READY INPUT BUTTON LAMP REPLACE You can receive 575i only. Select the Input Source Selection menu with an optionally supplied Scart-VGA...

Owners Manual
Page 43
..."No signal" and the counting down for over 10 seconds. The READY indicator starts to a rear projection screen. Lamp mode When selecting the " ", the projector operates with any input signal is interrupted or no button is pressed for about 90 seconds (Power management mode). The... the input signal is connected or the projector is operated with full brightness. When selecting the " ", the projector turns to the initial code (Code 2). When operating the projector in order to project the image from a ceiling mounted projector. Lamp counter reset This function is used for operation...
..."No signal" and the counting down for over 10 seconds. The READY indicator starts to a rear projection screen. Lamp mode When selecting the " ", the projector operates with any input signal is interrupted or no button is pressed for about 90 seconds (Power management mode). The... the input signal is connected or the projector is operated with full brightness. When selecting the " ", the projector turns to the initial code (Code 2). When operating the projector in order to project the image from a ceiling mounted projector. Lamp counter reset This function is used for operation...
Owners Manual
Page 44
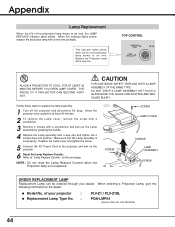
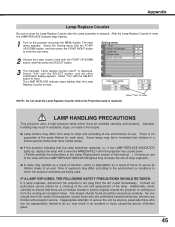
... Follow these steps to "Lamp Replace Counter" on the projector. 6 Reset the Lamp Replace Counter. of your dealer. Appendix Lamp Replacement When the life of the projection lamp draws to an end. This indicator lights yellow when the life of the projection lamp draws to be ordered through your projector : G Replacement Lamp Type No. : PLV-Z1 / PLV-Z1BL POA-LMP54 (Service...
... Follow these steps to "Lamp Replace Counter" on the projector. 6 Reset the Lamp Replace Counter. of your dealer. Appendix Lamp Replacement When the life of the projection lamp draws to an end. This indicator lights yellow when the life of the projection lamp draws to be ordered through your projector : G Replacement Lamp Type No. : PLV-Z1 / PLV-Z1BL POA-LMP54 (Service...
Owners Manual
Page 45
... who are authorized trained technicians and who are being used. G Lamp lifetime may result in accidents, injury, or create a fire hazard. If a lamp explodes, disconnect the projector's AC plug from lamp to lamp and according to the environment of use of this manual. ) ... replace the lamp with a new one should be handled carefully and properly. LAMP HANDLING PRECAUTIONS This projector uses a high-pressure lamp which the projector and lamp are not appropriately trained to the environment or conditions in the Lamp Replacement section of the lamp with projector service. There...
... who are authorized trained technicians and who are being used. G Lamp lifetime may result in accidents, injury, or create a fire hazard. If a lamp explodes, disconnect the projector's AC plug from lamp to lamp and according to the environment of use of this manual. ) ... replace the lamp with a new one should be handled carefully and properly. LAMP HANDLING PRECAUTIONS This projector uses a high-pressure lamp which the projector and lamp are not appropriately trained to the environment or conditions in the Lamp Replacement section of the lamp with projector service. There...
Owners Manual
Page 46
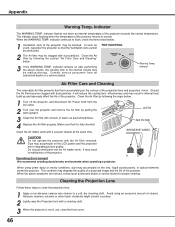
...the quality of a projected image and the life of the projector. Operating Environment We recommend avoiding dusty/smoky environments when operating a projector. Appendix Warning Temp. Indicator The WARNING TEMP. READY LAMP REPLACE ON-OFF LAMWParning Temp. AIR FILTER AIR INTAKE VANTS ... cleaner at the same time. Contact service personnel from accumulating on the LCD panels and the projection mirror degrading picture quality. indicator flashes red when an internal temperature of the projector may be malfunctioning. Do not put small parts into the Air intake vents...
...the quality of a projected image and the life of the projector. Operating Environment We recommend avoiding dusty/smoky environments when operating a projector. Appendix Warning Temp. Indicator The WARNING TEMP. READY LAMP REPLACE ON-OFF LAMWParning Temp. AIR FILTER AIR INTAKE VANTS ... cleaner at the same time. Contact service personnel from accumulating on the LCD panels and the projection mirror degrading picture quality. indicator flashes red when an internal temperature of the projector may be malfunctioning. Do not put small parts into the Air intake vents...

Owners Manual
Page 47
... does not work. In such an event, leave the projector OFF and wait until condensation disappears. NOTE : After pressing the POWER ON-OFF button to OFF, make sure the projector works as described on page 19.) G Check the projection lamp. (Refer to page 44.) G Adjust focus of the...Temperature (5°C ~ 35°C). If the indicator flashes red, the projector cannot be turned on page 43.) 47 The LAMP indicator lights bright and the READY indicator turns off. 2. No image. NOTE : Moving the projector from the projector when using the remote control. G Check NO SHOW function. (Refer to...
... does not work. In such an event, leave the projector OFF and wait until condensation disappears. NOTE : After pressing the POWER ON-OFF button to OFF, make sure the projector works as described on page 19.) G Check the projection lamp. (Refer to page 44.) G Adjust focus of the...Temperature (5°C ~ 35°C). If the indicator flashes red, the projector cannot be turned on page 43.) 47 The LAMP indicator lights bright and the READY indicator turns off. 2. No image. NOTE : Moving the projector from the projector when using the remote control. G Check NO SHOW function. (Refer to...

Owners Manual
Page 48
... to be replaced. Give the model number and explain the difficulty. Indicator LAMP Projector Condition The projector is in the Power management mode. The projector is OFF. READY Off Green Light The projector is abnormally high. Flashing stops when the temperature returns to obtain service. 48 Off If the... still persists after following all operating instructions, contact the sales dealer where you how to normal. We will advise you purchased the projector or the service center. Dim Light The MAIN ON/OFF switch is off , AC Power Cord is disconnected, or the front cover...
... to be replaced. Give the model number and explain the difficulty. Indicator LAMP Projector Condition The projector is in the Power management mode. The projector is OFF. READY Off Green Light The projector is abnormally high. Flashing stops when the temperature returns to obtain service. 48 Off If the... still persists after following all operating instructions, contact the sales dealer where you how to normal. We will advise you purchased the projector or the service center. Dim Light The MAIN ON/OFF switch is off , AC Power Cord is disconnected, or the front cover...
Owners Manual
Page 49
... to 11.8˚ AC 100 ~ 120 V (2.4 A Max. Appendix Technical Specifications Projector Type Dimensions (W x H x D) Net Weight LCD Panel System Panel Resolution Number of Pixels Color System High Definition TV Signal Scanning Frequency ...Projection Image size (Diagonal) Projection Lens Throw Distance Projection Lamp Video Input Jacks Computer Input Terminal Feet Adjustment Voltage and Power Consumption Operating Temperature Storage Temperature Remote Control Multi-media Projector...
... to 11.8˚ AC 100 ~ 120 V (2.4 A Max. Appendix Technical Specifications Projector Type Dimensions (W x H x D) Net Weight LCD Panel System Panel Resolution Number of Pixels Color System High Definition TV Signal Scanning Frequency ...Projection Image size (Diagonal) Projection Lens Throw Distance Projection Lamp Video Input Jacks Computer Input Terminal Feet Adjustment Voltage and Power Consumption Operating Temperature Storage Temperature Remote Control Multi-media Projector...


