Owners Manual
Page 2
...features, a palette of 16.77 million colors, and matrix liquid crystal display (LCD) technology. ◆ Compact Design This projector is designed with the most advanced technology for portability, durability, and ease of use of the projector (pp.21, 52-53). ◆ Helpful Maintenance Functions Lamp and filter ... digital zoom function allows you to customize the screen logo (pp.47-48). You can lock the operation on the top control or remote control (p.52). PIN code lock functions prevents unauthorized use . You do not have to carry computers or other equipment for Presentations - ...
...features, a palette of 16.77 million colors, and matrix liquid crystal display (LCD) technology. ◆ Compact Design This projector is designed with the most advanced technology for portability, durability, and ease of use of the projector (pp.21, 52-53). ◆ Helpful Maintenance Functions Lamp and filter ... digital zoom function allows you to customize the screen logo (pp.47-48). You can lock the operation on the top control or remote control (p.52). PIN code lock functions prevents unauthorized use . You do not have to carry computers or other equipment for Presentations - ...
Owners Manual
Page 3
... 4 Safety Instructions 5 Air Circulation 6 Moving the Projector 6 Installing the Projector in Proper Directions 7 Compliance 8 Part Names and Functions 9 Front 9 Back 9 Bottom 9 Rear Terminal / Side Terminal 10 Top Control 11 Remote Control 12 Laser Pointer Function 13 Pointer Function 13... Wireless Mouse Operation 14 Remote Control Code 14 Remote Control Battery Installation 15 Remote Control Operating Range 15 Adjustable Feet 15 Installation 16 Positioning the Projector 16 Connecting to a Computer 17 Connecting to ...
... 4 Safety Instructions 5 Air Circulation 6 Moving the Projector 6 Installing the Projector in Proper Directions 7 Compliance 8 Part Names and Functions 9 Front 9 Back 9 Bottom 9 Rear Terminal / Side Terminal 10 Top Control 11 Remote Control 12 Laser Pointer Function 13 Pointer Function 13... Wireless Mouse Operation 14 Remote Control Code 14 Remote Control Battery Installation 15 Remote Control Operating Range 15 Adjustable Feet 15 Installation 16 Positioning the Projector 16 Connecting to a Computer 17 Connecting to ...

Owners Manual
Page 9
... Functions Front qw e r t y u !7 Back !7 i o !0 !1 !2 Bottom !3 !4 ✽ !5 q USB Terminal w LAN Connection Terminal e Zoom Lever r Projection Lens t Focus Ring y Lens Cover (See page 60 for attaching.) u Infrared Remote Receiver i Top Controls and Indicators o Speaker !0 Air Intake Vent !1 Power Cord Connector !2 Terminals and Connectors !3 Lamp Cover !4 Air Intake Vents (back and bottom) !5 Filters !6 Adjustable...
... Functions Front qw e r t y u !7 Back !7 i o !0 !1 !2 Bottom !3 !4 ✽ !5 q USB Terminal w LAN Connection Terminal e Zoom Lever r Projection Lens t Focus Ring y Lens Cover (See page 60 for attaching.) u Infrared Remote Receiver i Top Controls and Indicators o Speaker !0 Air Intake Vent !1 Power Cord Connector !2 Terminals and Connectors !3 Lamp Cover !4 Air Intake Vents (back and bottom) !5 Filters !6 Adjustable...
Owners Manual
Page 10
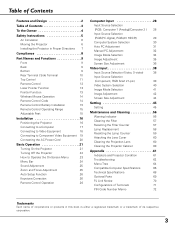
... input from a computer or video equipment connected to e or r to this jack. (When the audio output is switchable and can be used to service the projector. Part Names and Functions Rear Terminal / Side Terminal q w e r ty u !0 !1 (VARIABLE) USB SERVICE PORT COMPUTER IN 1 DVI-I COMPUTER IN 2 /... IN USB Rear Terminal Side Terminal o i q USB (Series B) In order to operate the computer with the remote control and use the PAGE ed buttons on the remote control during a presentation, connect the USB port of the computer to the USB terminal with optionally available USB memory.)...
... input from a computer or video equipment connected to e or r to this jack. (When the audio output is switchable and can be used to service the projector. Part Names and Functions Rear Terminal / Side Terminal q w e r ty u !0 !1 (VARIABLE) USB SERVICE PORT COMPUTER IN 1 DVI-I COMPUTER IN 2 /... IN USB Rear Terminal Side Terminal o i q USB (Series B) In order to operate the computer with the remote control and use the PAGE ed buttons on the remote control during a presentation, connect the USB port of the computer to the USB terminal with optionally available USB memory.)...
Owners Manual
Page 12
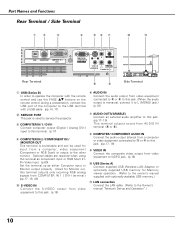
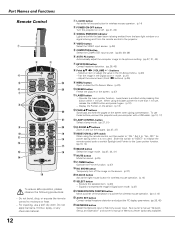
... (pp.26, 45) @4 NETWORK button Select the Network input or Memory viewer input. Execute the selected item. (p.23) - For cleaning, use these buttons, connect the projector and your computer with a USB cable. (pp.10, 17) !3 LAMP CONTROL button Select a lamp mode. (pp.27, 51) !4 D.ZOOM ed buttons Zoom in ...laser beam is being emitted from the laser light window or a signal is being sent from the remote control to "ON." See owner's manual "Network Set-up and Operation" and owner's manual of the projector or a pointer for more than 1 minute, release the LASER button and press it is emitted ...
... (pp.26, 45) @4 NETWORK button Select the Network input or Memory viewer input. Execute the selected item. (p.23) - For cleaning, use these buttons, connect the projector and your computer with a USB cable. (pp.10, 17) !3 LAMP CONTROL button Select a lamp mode. (pp.27, 51) !4 D.ZOOM ed buttons Zoom in ...laser beam is being emitted from the laser light window or a signal is being sent from the remote control to "ON." See owner's manual "Network Set-up and Operation" and owner's manual of the projector or a pointer for more than 1 minute, release the LASER button and press it is emitted ...
Owners Manual
Page 13
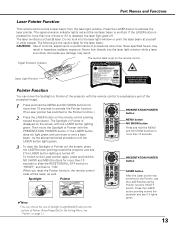
...POINTER button. The laser emitted is emitted. Never look into the laser light window while a laser is displayed on the remote control pointing toward the projector. When you reset the Pointer function, the remote control code will be reset, as the Pointer function ON-OFF switch. See "Pointer" on the... or if it lights green. 13 Then move the Spotlight or Pointer of the projector with the remote control to emphasize a part of procedures other people. Press the LASER button pointing toward the projector and see if it is the caution label for more than 10 seconds or slide...
...POINTER button. The laser emitted is emitted. Never look into the laser light window while a laser is displayed on the remote control pointing toward the projector. When you reset the Pointer function, the remote control code will be reset, as the Pointer function ON-OFF switch. See "Pointer" on the... or if it lights green. 13 Then move the Spotlight or Pointer of the projector with the remote control to emphasize a part of procedures other people. Press the LASER button pointing toward the projector and see if it is the caution label for more than 10 seconds or slide...
Owners Manual
Page 14
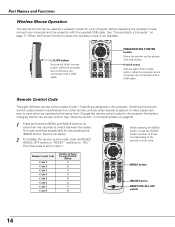
... used as left (click) mouse button while the projector and a computer are operated at the same time. Remote Control Code The eight different remote control codes (Code 1-Code 8) are assigned to each other remote controls when several projectors or video equipment next to this button. The code...number of Times Pressing IMAGE Button 1 2 3 4 5 6 7 8 MENU button IMAGE button RESET/ON/ALL-OFF switch 14 Change the remote control code for the projector first before changing that for one pressing the IMAGE button. Before operating the wireless mouse, connect your computer. See...
... used as left (click) mouse button while the projector and a computer are operated at the same time. Remote Control Code The eight different remote control codes (Code 1-Code 8) are assigned to each other remote controls when several projectors or video equipment next to this button. The code...number of Times Pressing IMAGE Button 1 2 3 4 5 6 7 8 MENU button IMAGE button RESET/ON/ALL-OFF switch 14 Change the remote control code for the projector first before changing that for one pressing the IMAGE button. Before operating the wireless mouse, connect your computer. See...
Owners Manual
Page 15
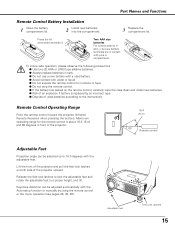
...and rotate the adjustable feet to the instructions. Remote Control Operating Range Point the remote control toward the projector (Infrared Remote Receiver) when pressing the buttons. Maximum operating range for the remote control is replaced by using the remote control or the menu operation (see pages 26,... (2) AAA or LR03 type alkaline batteries. ● Always replace batteries in compartment. Lift the front of the projector and pull the feet lock latches on the remote control, carefully wipe the case clean and install new batteries. ● Risk of an explosion if battery is about...
...and rotate the adjustable feet to the instructions. Remote Control Operating Range Point the remote control toward the projector (Infrared Remote Receiver) when pressing the buttons. Maximum operating range for the remote control is replaced by using the remote control or the menu operation (see pages 26,... (2) AAA or LR03 type alkaline batteries. ● Always replace batteries in compartment. Lift the front of the projector and pull the feet lock latches on the remote control, carefully wipe the case clean and install new batteries. ● Risk of an explosion if battery is about...
Owners Manual
Page 17
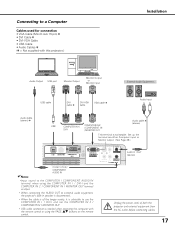
...✽ • DVI Cable ✽ • DVI-VGA Cable • USB Cable • Audio Cables ✽ (✽ = Not supplied with the remote control or using the COMPUTER IN 1 / DVI-I and the COMPUTER IN 2 / COMPONENT IN / MONITOR OUT terminal as either Computer input or Monitor output. ...COMPONENT IN /MONITOR OUT Audio cable ✽ (stereo) This terminal is switchable. ON ON • USB cable connection is of both the projector and external equipment from the AC outlet before connecting cables. 17 Unplug the power cords of the longer variety, it is advisable to external ...
...✽ • DVI Cable ✽ • DVI-VGA Cable • USB Cable • Audio Cables ✽ (✽ = Not supplied with the remote control or using the COMPUTER IN 1 / DVI-I and the COMPUTER IN 2 / COMPONENT IN / MONITOR OUT terminal as either Computer input or Monitor output. ...COMPONENT IN /MONITOR OUT Audio cable ✽ (stereo) This terminal is switchable. ON ON • USB cable connection is of both the projector and external equipment from the AC outlet before connecting cables. 17 Unplug the power cords of the longer variety, it is advisable to external ...
Owners Manual
Page 21
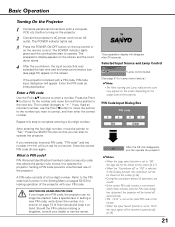
...number. Press the SELECT button so that was selected the last time and the lamp control status icon (see page 51) appear on the projector. 2 Connect the projector's AC power cord into an AC outlet. PIN (Personal Identification Number) code is PIN code? Setting a PIN code prevents unauthorized use the...page 51 for Lamp control status.) ✔Note: •The Filter warning and Lamp replacement icons may appear on the screen depending on the remote control. If you can start to enter a number. CAUTION ON HANDLING PIN CODE If you want to the number you forget your PIN ...
...number. Press the SELECT button so that was selected the last time and the lamp control status icon (see page 51) appear on the projector. 2 Connect the projector's AC power cord into an AC outlet. PIN (Personal Identification Number) code is PIN code? Setting a PIN code prevents unauthorized use the...page 51 for Lamp control status.) ✔Note: •The Filter warning and Lamp replacement icons may appear on the screen depending on the remote control. If you can start to enter a number. CAUTION ON HANDLING PIN CODE If you want to the number you forget your PIN ...
Owners Manual
Page 22
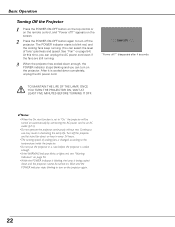
... cooled down enough, the POWER indicator stops blinking and you can select the level of cooling fans is changed according to turn on the remote control, and "Power off the projector. "Power off the projector and let stand for about an hour in every 24 hours. •The running . 3 When the... if the fans are still running speed of fans' quietness and speed. Wait until the POWER indicator stops blinking to the temperature inside the projector. •Do not put the projector in shortening the lamp life. appears on page 54.) At this time, you can turn off ?" Turn off ?"
... cooled down enough, the POWER indicator stops blinking and you can select the level of cooling fans is changed according to turn on the remote control, and "Power off the projector. "Power off the projector and let stand for about an hour in every 24 hours. •The running . 3 When the... if the fans are still running speed of fans' quietness and speed. Wait until the POWER indicator stops blinking to the temperature inside the projector. •Do not put the projector in shortening the lamp life. appears on page 54.) At this time, you can turn off ?" Turn off ?"

Owners Manual
Page 23
...button again. ✔Note: •The selected item is not active until the SELECT button is pressed. VOLUME + VOLU MENU button POINT buttons SELECT button Remote Control POINT buttons MENU button On-Screen Menu SELECT button Menu icon Menu bar Pointer (red frame) Pointer (red frame) Press the Point ed buttons... data Press the Point 7 8 buttons to the respective sections in the selected menu. 3 Press the SELECT button to Operate the On-Screen Menu The projector can be adjusted or set via the On-Screen Menu. For each adjustment and setting procedure, refer to adjust the value.
...button again. ✔Note: •The selected item is not active until the SELECT button is pressed. VOLUME + VOLU MENU button POINT buttons SELECT button Remote Control POINT buttons MENU button On-Screen Menu SELECT button Menu icon Menu bar Pointer (red frame) Pointer (red frame) Press the Point ed buttons... data Press the Point 7 8 buttons to the respective sections in the selected menu. 3 Press the SELECT button to Operate the On-Screen Menu The projector can be adjusted or set via the On-Screen Menu. For each adjustment and setting procedure, refer to adjust the value.

Owners Manual
Page 25
Mute Press the MUTE button on the remote control to temporarily turn down the volume. Basic Operation Top Control SELECT - button VOL+ button Menu Operation 1 Press the MENU button to switch the mute ... top control or on the screen for the AUDIO OUT jack. The volume dialog box appears on the remote control to turn off , "On" is also effective for a few seconds. VOLUME + VOLUME VOLUME+/buttons Remote Control VOL- When the sound is turned off the sound. The Mute function is displayed. Press the...
Mute Press the MUTE button on the remote control to temporarily turn down the volume. Basic Operation Top Control SELECT - button VOL+ button Menu Operation 1 Press the MENU button to switch the mute ... top control or on the screen for the AUDIO OUT jack. The volume dialog box appears on the remote control to turn off , "On" is also effective for a few seconds. VOLUME + VOLUME VOLUME+/buttons Remote Control VOL- When the sound is turned off the sound. The Mute function is displayed. Press the...
Owners Manual
Page 26
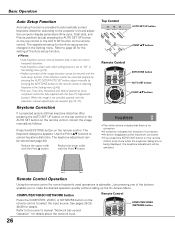
... Press the COMPUTER, VIDEO, or NETWORK button on the remote control to correct keystone distortion. Basic Operation Auto Setup Function Auto setup function is provided to automatically correct Keystone distortion according to the projector's tilt and adjust the computer display parameters (Fine sync,... Total dots, and Picture position) by pressing the KEYSTONE button on the remote control or selecting Keystone in the Setting menu (p.46). ...
... Press the COMPUTER, VIDEO, or NETWORK button on the remote control to correct keystone distortion. Basic Operation Auto Setup Function Auto setup function is provided to automatically correct Keystone distortion according to the projector's tilt and adjust the computer display parameters (Fine sync,... Total dots, and Picture position) by pressing the KEYSTONE button on the remote control or selecting Keystone in the Setting menu (p.46). ...
Owners Manual
Page 27
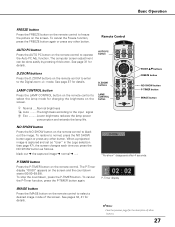
.... ✔Note: • See the previous page for changing the brightness on the screen. The P-Timer display "00:00" appears on the remote control to enter to the Digital zoom +/- To cancel the Freeze function, press the FREEZE button again or press any other button. When a projected... description of the screen. To stop the countdown, press the P-TIMER button. Basic Operation FREEZE button Press the FREEZE button on the remote control to freeze the picture on the screen. To restore to the input signal Eco ..........Lower brightness reduces the lamp power consumption and ...
.... ✔Note: • See the previous page for changing the brightness on the screen. The P-Timer display "00:00" appears on the remote control to enter to the Digital zoom +/- To cancel the Freeze function, press the FREEZE button again or press any other button. When a projected... description of the screen. To stop the countdown, press the P-TIMER button. Basic Operation FREEZE button Press the FREEZE button on the remote control to freeze the picture on the screen. To restore to the input signal Eco ..........Lower brightness reduces the lamp power consumption and ...

Owners Manual
Page 28
OFF MENU INPUT SELECT Computer 1 (Analog) Computer 1 (Digital) Computer 2 Video Remote Control Wired COMPUTER button Computer 1 (Analog) Computer 1 (Digital) Menu Operation 1 Press the MENU button to Computer 1 (Analog) and press the SELECT button. Input Menu Computer 2 ... pointer (red arrow) to either Computer 1 (Analog) or Computer 2 by pressing the INPUT button on the top control or press the COMPUTER button on the remote control. Move the pointer (red arrow) to RGB and then press the SELECT button. Move the pointer to RGB. Use the Point 7 8 buttons to move...
OFF MENU INPUT SELECT Computer 1 (Analog) Computer 1 (Digital) Computer 2 Video Remote Control Wired COMPUTER button Computer 1 (Analog) Computer 1 (Digital) Menu Operation 1 Press the MENU button to Computer 1 (Analog) and press the SELECT button. Input Menu Computer 2 ... pointer (red arrow) to either Computer 1 (Analog) or Computer 2 by pressing the INPUT button on the top control or press the COMPUTER button on the remote control. Move the pointer (red arrow) to RGB and then press the SELECT button. Move the pointer to RGB. Use the Point 7 8 buttons to move...

Owners Manual
Page 29
...that you want to display the On-Screen Menu. OFF MENU INPUT SELECT INPUT button Computer 1 (Analog) Computer 1 (Digital) Computer 2 Video Remote Control Wired COMPUTER button Computer 1 (Analog) Computer 1 (Digital) Menu Operation 1 Press the MENU button to select and press the SELECT button. ... Input Menu icon Computer 1 Move the pointer (red arrow) to "On1" or "On2", the input signal will be changed, this projector may not display the digital content protected by Digital Content Protection, LLC. Computer Input Input Source Selection (RGB(PC digital), RGB(AV HDCP))...
...that you want to display the On-Screen Menu. OFF MENU INPUT SELECT INPUT button Computer 1 (Analog) Computer 1 (Digital) Computer 2 Video Remote Control Wired COMPUTER button Computer 1 (Analog) Computer 1 (Digital) Menu Operation 1 Press the MENU button to select and press the SELECT button. ... Input Menu icon Computer 1 Move the pointer (red arrow) to "On1" or "On2", the input signal will be changed, this projector may not display the digital content protected by Digital Content Protection, LLC. Computer Input Input Source Selection (RGB(PC digital), RGB(AV HDCP))...

Owners Manual
Page 31
... Menu icon. 2 Use the Point ed buttons to move the red frame pointer to Auto PC Adj. See also "Store" on the remote control. appears while the Auto PC adjustment is provided to automatically adjust Fine sync, Total dots, Horizontal and Vertical positions to conform to display...System Menu (p.30), or when the signal is coming from the Auto PC Adjustment can be operated directly by selecting a Mode (1-5) in the projector. Remote Control AUTO PC button Menu Operation Auto PC Adj. 1 Press the MENU button to your computer. Direct Operation The Auto PC adjustment function can...
... Menu icon. 2 Use the Point ed buttons to move the red frame pointer to Auto PC Adj. See also "Store" on the remote control. appears while the Auto PC adjustment is provided to automatically adjust Fine sync, Total dots, Horizontal and Vertical positions to conform to display...System Menu (p.30), or when the signal is coming from the Auto PC Adjustment can be operated directly by selecting a Mode (1-5) in the projector. Remote Control AUTO PC button Menu Operation Auto PC Adj. 1 Press the MENU button to your computer. Direct Operation The Auto PC adjustment function can...

Owners Manual
Page 34
...For viewing with improved halftone for graphics. The selected image mode is provided in the Image Adjust Menu (see pages 35-36). 34 Remote Control IMAGE button IMAGE button Dynamic Standard Real Blackboard(Green) Image 1 Image 2 Image 3 Image 4 Image Select Menu icon Image Select...user preset image mode in each computer, component, and video input source. Standard Normal picture mode preset on the projector. Standard Normal picture mode preset on the projector. This is mainly effective on a green colored board, not truly effective on a blackboard. Blackboard(Green) For ...
...For viewing with improved halftone for graphics. The selected image mode is provided in the Image Adjust Menu (see pages 35-36). 34 Remote Control IMAGE button IMAGE button Dynamic Standard Real Blackboard(Green) Image 1 Image 2 Image 3 Image 4 Image Select Menu icon Image Select...user preset image mode in each computer, component, and video input source. Standard Normal picture mode preset on the projector. Standard Normal picture mode preset on the projector. This is mainly effective on a green colored board, not truly effective on a blackboard. Blackboard(Green) For ...

Owners Manual
Page 37
.... zoom -" appears. mode, press any button except the D.ZOOM ed buttons, SELECT, and Point buttons. To return to compress image size. Remote Control POINT buttons SELECT button D.ZOOM + button D.ZOOM - zoom +" appears. Press the SELECT button to the previous screen size, select a screen size from...be selected when Full screen or True is larger than the screen size. cannot be also expanded by pressing the D.ZOOM d button on the remote control. Press the SELECT button to pan the image. The On-Screen Menu disappears and "D. The projected image can work only when the image...
.... zoom -" appears. mode, press any button except the D.ZOOM ed buttons, SELECT, and Point buttons. To return to compress image size. Remote Control POINT buttons SELECT button D.ZOOM + button D.ZOOM - zoom +" appears. Press the SELECT button to the previous screen size, select a screen size from...be selected when Full screen or True is larger than the screen size. cannot be also expanded by pressing the D.ZOOM d button on the remote control. Press the SELECT button to pan the image. The On-Screen Menu disappears and "D. The projected image can work only when the image...


