Owners Manual
Page 2
... Wireless LAN network function. Features and Design This Multimedia Projector is designed with the most advanced technology for the starting-up and Operation." ◆ Memory Viewer Function (Optional Function) Insert the dedicated USB memory (optionally supplied: POA-USB02) into the projector to focus on the top control or remote control (p.52). PIN code lock functions prevents unauthorized use . ◆ Logo Function The Logo function allows you to change...
... Wireless LAN network function. Features and Design This Multimedia Projector is designed with the most advanced technology for the starting-up and Operation." ◆ Memory Viewer Function (Optional Function) Insert the dedicated USB memory (optionally supplied: POA-USB02) into the projector to focus on the top control or remote control (p.52). PIN code lock functions prevents unauthorized use . ◆ Logo Function The Logo function allows you to change...
Owners Manual
Page 3
...Video, S-video) 38 Input Source Selection (Component, RGB Scart 21-pin) 39 Video System Selection 40 Image Mode Selection 41 Image Adjustment 42 Screen Size Adjustment 44 Setting 45 Setting 45 Maintenance and Cleaning 56 Warning Indicator 56 Cleaning the Filter 57 Resetting the Filter Counter 57 Lamp Replacement 58 Resetting the Lamp Counter 59 Attaching the Lens Cover 60 Cleaning the Projection Lens 60 Cleaning the Projector Cabinet 60 Appendix 61 Indicators and Projector Condition 61 Troubleshooting 62 Menu Tree 64 Compatible Computer Specifications...
...Video, S-video) 38 Input Source Selection (Component, RGB Scart 21-pin) 39 Video System Selection 40 Image Mode Selection 41 Image Adjustment 42 Screen Size Adjustment 44 Setting 45 Setting 45 Maintenance and Cleaning 56 Warning Indicator 56 Cleaning the Filter 57 Resetting the Filter Counter 57 Lamp Replacement 58 Resetting the Lamp Counter 59 Attaching the Lens Cover 60 Cleaning the Projection Lens 60 Cleaning the Projector Cabinet 60 Appendix 61 Indicators and Projector Condition 61 Troubleshooting 62 Menu Tree 64 Compatible Computer Specifications...

Owners Manual
Page 4
... the Owner Before installing and operating this projector, read this manual again, check operations and cable connections and try the solutions in the "Troubleshooting" section in the back of the unit. CAUTION RISK OF ELECTRIC SHOCK DO NOT OPEN CAUTION: TO REDUCE THE RISK OF ELECTRIC SHOCK, DO NOT REMOVE COVER (OR BACK). THIS SYMBOL INDICATES THAT THERE ARE IMPORTANT OPERATING AND MAINTENANCE INSTRUCTIONS IN THE OWNER'S MANUAL...
... the Owner Before installing and operating this projector, read this manual again, check operations and cable connections and try the solutions in the "Troubleshooting" section in the back of the unit. CAUTION RISK OF ELECTRIC SHOCK DO NOT OPEN CAUTION: TO REDUCE THE RISK OF ELECTRIC SHOCK, DO NOT REMOVE COVER (OR BACK). THIS SYMBOL INDICATES THAT THERE ARE IMPORTANT OPERATING AND MAINTENANCE INSTRUCTIONS IN THE OWNER'S MANUAL...
Owners Manual
Page 8
... as follows: The wire which is coloured green-and-yellow must be connected to which is not suitable for help. Do not make any changes or modifications to insert the plug into the power outlet. Model Number(s) Trade Name Responsible party Address : PLC-XU87, PLC-XU84 : Sanyo : SANYO FISHER COMPANY : 21605 Plummer Street, Chatsworth, California 91311 U.S.A. If a replacement fuse cover is required, ensure it should be...
... as follows: The wire which is coloured green-and-yellow must be connected to which is not suitable for help. Do not make any changes or modifications to insert the plug into the power outlet. Model Number(s) Trade Name Responsible party Address : PLC-XU87, PLC-XU84 : Sanyo : SANYO FISHER COMPANY : 21605 Plummer Street, Chatsworth, California 91311 U.S.A. If a replacement fuse cover is required, ensure it should be...
Owners Manual
Page 10
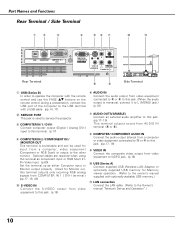
... 21Pin Video input. (p.69) Set the terminal up as either Computer input or Monitor output properly. (Used for Memory viewer operation. (Refer to the owner's manual supplied with a USB cable. (pp.14, 17) w SERVICE PORT This jack is monaural, connect it to L (MONO) jack.) (p.18) u AUDIO OUT(VARIABLE) Connect an external audio amplifier to the Owner's manual "Network Set-up and Operation".) 10 Optional cables are required when using this jack. (p.18) y AUDIO IN Connect the audio...
... 21Pin Video input. (p.69) Set the terminal up as either Computer input or Monitor output properly. (Used for Memory viewer operation. (Refer to the owner's manual supplied with a USB cable. (pp.14, 17) w SERVICE PORT This jack is monaural, connect it to L (MONO) jack.) (p.18) u AUDIO OUT(VARIABLE) Connect an external audio amplifier to the Owner's manual "Network Set-up and Operation".) 10 Optional cables are required when using this jack. (p.18) y AUDIO IN Connect the audio...
Owners Manual
Page 11
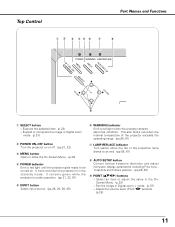
... blinks red when the internal temperature of the projector exceeds the operating range. (pp.56, 61) u LAMP REPLACE indicator Turn yellow when the life of the projection lamp draws to be turned on or off. (pp.21, 22) e MENU button Open or close the On-Screen Menu. (p.23) r POWER indicator Emit a red light until the projector gets ready to an end. (pp.58, 61) i AUTO SETUP button Correct vertical keystone distortion and adjust computer display parameters including Fine sync., Total dots and Picture...
... blinks red when the internal temperature of the projector exceeds the operating range. (pp.56, 61) u LAMP REPLACE indicator Turn yellow when the life of the projection lamp draws to be turned on or off. (pp.21, 22) e MENU button Open or close the On-Screen Menu. (p.23) r POWER indicator Emit a red light until the projector gets ready to an end. (pp.58, 61) i AUTO SETUP button Correct vertical keystone distortion and adjust computer display parameters including Fine sync., Total dots and Picture...
Owners Manual
Page 12
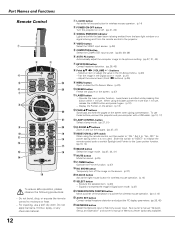
... to the projector. Pan the image in the On-Screen Menu. (p.23) - Set it again. (p.13) - Adjust the volume level. (Point 7 8 buttons) (p.25) o MENU button Open or close the On-Screen Menu. (p.23) !0 FREEZE button Freeze the picture on the screen when giving a presentation. For cleaning, use these buttons, connect the projector and your computer with a USB cable. (pp.10, 17) !3 LAMP CONTROL button Select a lamp mode. (pp.27, 51) !4 D.ZOOM ed buttons Zoom in Digital zoom mode. (p.37) @2 PRESENTATION POINTER button Move a pointer...
... to the projector. Pan the image in the On-Screen Menu. (p.23) - Set it again. (p.13) - Adjust the volume level. (Point 7 8 buttons) (p.25) o MENU button Open or close the On-Screen Menu. (p.23) !0 FREEZE button Freeze the picture on the screen when giving a presentation. For cleaning, use these buttons, connect the projector and your computer with a USB cable. (pp.10, 17) !3 LAMP CONTROL button Select a lamp mode. (pp.27, 51) !4 D.ZOOM ed buttons Zoom in Digital zoom mode. (p.37) @2 PRESENTATION POINTER button Move a pointer...
Owners Manual
Page 14
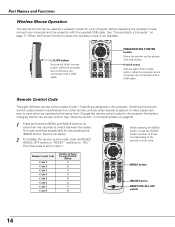
... the screen with the supplied USB cable. See "Connecting to "ON." The initial code is set to the remote control code. While pressing the MENU button, press the IMAGE button number of Times Pressing IMAGE Button 1 2 3 4 5 6 7 8 MENU button IMAGE button RESET/ON/ALL-OFF switch 14 Before operating the wireless mouse, connect your computer. PRESENTATION POINTER button Move the pointer on page 17. Change the remote control code for the projector first before changing that for more than five seconds to switch between the codes. Remote Control Code Code 1 Code 2 Code 3 Code...
... the screen with the supplied USB cable. See "Connecting to "ON." The initial code is set to the remote control code. While pressing the MENU button, press the IMAGE button number of Times Pressing IMAGE Button 1 2 3 4 5 6 7 8 MENU button IMAGE button RESET/ON/ALL-OFF switch 14 Before operating the wireless mouse, connect your computer. PRESENTATION POINTER button Move the pointer on page 17. Change the remote control code for the projector first before changing that for more than five seconds to switch between the codes. Remote Control Code Code 1 Code 2 Code 3 Code...
Owners Manual
Page 21
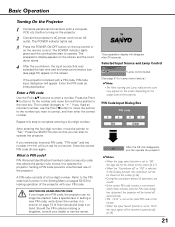
... screen. Repeat this manual and keep it to complete entering a four-digit number. CAUTION ON HANDLING PIN CODE If you can operate the projector. ✔Notes: •When the Logo select function is set to operate the projector. Selected Input Source and Lamp Control Lamp control status (See page 51 for Lamp control status.) ✔Note: •The Filter warning and Lamp replacement icons may appear on the screen depending on the remote control. The POWER indicator lights green and the cooling fans start...
... screen. Repeat this manual and keep it to complete entering a four-digit number. CAUTION ON HANDLING PIN CODE If you can operate the projector. ✔Notes: •When the Logo select function is set to operate the projector. Selected Input Source and Lamp Control Lamp control status (See page 51 for Lamp control status.) ✔Note: •The Filter warning and Lamp replacement icons may appear on the screen depending on the remote control. The POWER indicator lights green and the cooling fans start...
Owners Manual
Page 22
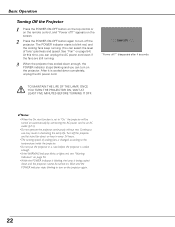
... fans is set to "On," the projector will be turned on. Basic Operation Turning Off the Projector 1 Press the POWER ON-OFF button on the top control or on the remote control, and "Power off ?" Turn off the projector. The POWER indicator starts to turn on page 54.) At this time, you can unplug the AC power cord even if the fans are still running speed of fans' quietness and speed. TO MAINTAIN THE LIFE...
... fans is set to "On," the projector will be turned on. Basic Operation Turning Off the Projector 1 Press the POWER ON-OFF button on the top control or on the remote control, and "Power off ?" Turn off the projector. The POWER indicator starts to turn on page 54.) At this time, you can unplug the AC power cord even if the fans are still running speed of fans' quietness and speed. TO MAINTAIN THE LIFE...
Owners Manual
Page 26
.../VIDEO/NETWORK button Press the COMPUTER, VIDEO, or NETWORK button on the remote control once more while the keystone dialog box is not provided properly with the Auto PC Adjustment function. The operational setup for the setting of the Auto setup function. ✔Notes: •Auto Keystone corrects vertical distortion only; When the image is being displayed, the keystone adjustment will be fully adjusted with this operation, manual adjustments are required (pp.32-33). OFF POWER MENU WARNING INPUT LAMP REPLACE AUTO SET UP...
.../VIDEO/NETWORK button Press the COMPUTER, VIDEO, or NETWORK button on the remote control once more while the keystone dialog box is not provided properly with the Auto PC Adjustment function. The operational setup for the setting of the Auto setup function. ✔Notes: •Auto Keystone corrects vertical distortion only; When the image is being displayed, the keystone adjustment will be fully adjusted with this operation, manual adjustments are required (pp.32-33). OFF POWER MENU WARNING INPUT LAMP REPLACE AUTO SET UP...
Owners Manual
Page 45
... Auto Keystone. ✔Notes: •Auto PC Adj. Auto setup Select Auto setup and this operation, manual adjustments are required (pp.32-33). The Setting dialog box appears. On . . . . . .Enables Auto PC Adjustment when pressing the AUTO SET button on the remote control or the AUTO SETUP button on the top control. Setting Menu icon Press the SELECT button at the same time. •Auto Keystone corrects vertical distortion only, not correct horizontal distortion. •The Auto Keystone cannot work when Ceiling...
... Auto Keystone. ✔Notes: •Auto PC Adj. Auto setup Select Auto setup and this operation, manual adjustments are required (pp.32-33). The Setting dialog box appears. On . . . . . .Enables Auto PC Adjustment when pressing the AUTO SET button on the remote control or the AUTO SETUP button on the top control. Setting Menu icon Press the SELECT button at the same time. •Auto Keystone corrects vertical distortion only, not correct horizontal distortion. •The Auto Keystone cannot work when Ceiling...
Owners Manual
Page 48
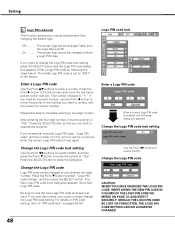
... PIN code After a correct Logo PIN code is set to operate the projector. Off The screen logo can be changed to note the new Logo PIN code and keep it at the factory. If you entered an incorrect Logo PIN code, "Logo PIN code" and the number will turn red for a moment. MEMO ON PAGE 72, AND KEEP IT SECURELY. Change the Logo PIN code lock setting Use the Point 7 8 buttons to switch On...
... PIN code After a correct Logo PIN code is set to operate the projector. Off The screen logo can be changed to note the new Logo PIN code and keep it at the factory. If you entered an incorrect Logo PIN code, "Logo PIN code" and the number will turn red for a moment. MEMO ON PAGE 72, AND KEEP IT SECURELY. Change the Logo PIN code lock setting Use the Point 7 8 buttons to switch On...
Owners Manual
Page 50
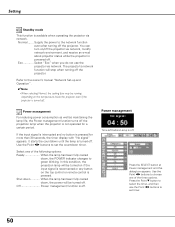
... starts the countdown until the lamp is not operated for more than 30 seconds, the timer display with "No signal" appears. Power management Time left before Lamp is available when operating the projector via network. Eco Select "Eco" when you do not use the Point 7 8 buttons to set timer. 50 Use the Point 7 8 buttons to set the countdown timer. Shut down When the lamp has been fully cooled down , the POWER indicator changes to the owner's manual "Network Set...
... starts the countdown until the lamp is not operated for more than 30 seconds, the timer display with "No signal" appears. Power management Time left before Lamp is available when operating the projector via network. Eco Select "Eco" when you do not use the Point 7 8 buttons to set timer. 50 Use the Point 7 8 buttons to set the countdown timer. Shut down When the lamp has been fully cooled down , the POWER indicator changes to the owner's manual "Network Set...
Owners Manual
Page 54
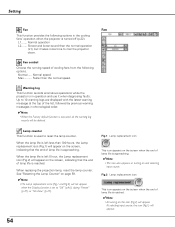
... projector down. Normal operation L2....... At selecting input source, the icon (Fig.1) will appear. Setting Fan Fan This function provides the following options. Fig.2 Lamp replacement icon This icon appears on the screen when the end of cooling fans from the following options in operation and use it takes more time to reset the lamp counter. Fan control Choose the running speed of lamp life is turned off (p.22). When replacing the projection lamp, reset the lamp counter. Lamp counter...
... projector down. Normal operation L2....... At selecting input source, the icon (Fig.1) will appear. Setting Fan Fan This function provides the following options. Fig.2 Lamp replacement icon This icon appears on the screen when the end of cooling fans from the following options in operation and use it takes more time to reset the lamp counter. Fan control Choose the running speed of lamp life is turned off (p.22). When replacing the projection lamp, reset the lamp counter. Lamp counter...
Owners Manual
Page 58
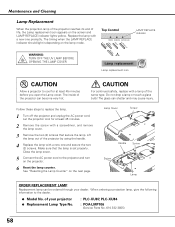
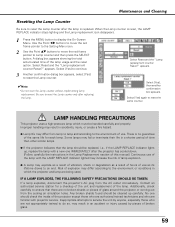
... "Resetting the Lamp Counter" on the screen and LAMP REPLACE indicator lights yellow. WARNING: TURN OFF THE UV LAMP BEFORE OPENING THE LAMP COVER Top Control ON - Lamp Cover Screw Handle Screw Screw Lamp ORDER REPLACEMENT LAMP Replacement lamp can be ordered through your projector ● Replacement Lamp Type No. : PLC-XU87, PLC-XU84 : POA-LMP106 (Service Parts No. 610 332 3855) 58 Do not drop a lamp or touch a glass bulb! Make sure that secure the lamp. CAUTION For continued safety, replace with a new one promptly. Maintenance and Cleaning Lamp Replacement When...
... "Resetting the Lamp Counter" on the screen and LAMP REPLACE indicator lights yellow. WARNING: TURN OFF THE UV LAMP BEFORE OPENING THE LAMP COVER Top Control ON - Lamp Cover Screw Handle Screw Screw Lamp ORDER REPLACEMENT LAMP Replacement lamp can be ordered through your projector ● Replacement Lamp Type No. : PLC-XU87, PLC-XU84 : POA-LMP106 (Service Parts No. 610 332 3855) 58 Do not drop a lamp or touch a glass bulb! Make sure that secure the lamp. CAUTION For continued safety, replace with a new one promptly. Maintenance and Cleaning Lamp Replacement When...
Owners Manual
Page 59
... is reset, the LAMP REPLACE indicator stops lighting and the Lamp replacement icon disappears. 1 Press the MENU button to service the unit by pieces of use as a result of hours of broken glass. 59 When the Lamp counter is no broken shards or pieces of the lamp usage and the reset option. Improper handling may result in which must be cleaned up , replace the lamp with the LAMP REPLACE indicator lighted may increase...
... is reset, the LAMP REPLACE indicator stops lighting and the Lamp replacement icon disappears. 1 Press the MENU button to service the unit by pieces of use as a result of hours of broken glass. 59 When the Lamp counter is no broken shards or pieces of the lamp usage and the reset option. Improper handling may result in which must be cleaned up , replace the lamp with the LAMP REPLACE indicator lighted may increase...
Owners Manual
Page 61
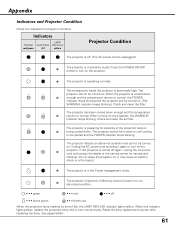
...-59. 61 The projector has been cooled down ✽ enough and the temperature returns to normal. The projector detects an abnormal condition and cannot be turned on the projector. ✽ The projector is operating normally. When this indicator lights yellow, replace the projection lamp with a new one promptly. When the projection lamp reaches its end of life, the LAMP REPLACE indicator lights yellow. Press the POWER ON-OFF button to turn on . (The WARNING indicator keeps blinking.) Check and clean the filter.
...-59. 61 The projector has been cooled down ✽ enough and the temperature returns to normal. The projector detects an abnormal condition and cannot be turned on the projector. ✽ The projector is operating normally. When this indicator lights yellow, replace the projection lamp with a new one promptly. When the projection lamp reaches its end of life, the LAMP REPLACE indicator lights yellow. Press the POWER ON-OFF button to turn on . (The WARNING indicator keeps blinking.) Check and clean the filter.
Owners Manual
Page 62
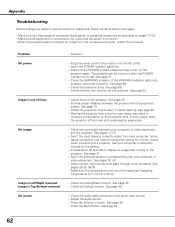
... Ceiling/Rear function. See page 60. - Select correct input source once again through menu operation. Make sure the temperature is turned on after turning on the projector again. In such cases, leave the projector off and wait until the POWER indicator stops blinking to display an image after the POWER indicator turns red. Moving the projector from audio input source. - Press the Mute button. Adjust focus of the projector into the AC outlet. - See page 58. - Check the audio cable connection...
... Ceiling/Rear function. See page 60. - Select correct input source once again through menu operation. Make sure the temperature is turned on after turning on the projector again. In such cases, leave the projector off and wait until the POWER indicator stops blinking to display an image after the POWER indicator turns red. Moving the projector from audio input source. - Press the Mute button. Adjust focus of the projector into the AC outlet. - See page 58. - Check the audio cable connection...

Owners Manual
Page 65
... Standby mode Eco/Normal Power management Off Ready Shut down Timer (1-30 Min.) Quit On start On/Off Lamp control Normal/Auto/Eco Pointer Spotlight/Pointer Quit Remote control Code 1-Code 8 Security Key lock Off Projector Remote control Quit PIN code lock PIN code lock entry Off/On1/On2 PIN code change Quit Quit Fan L1/L2 Fan control Normal/Max Warning log Lamp counter Hour(s) Reset Yes/No Quit Filter counter Hour(s) Off/100H/200H/300H Reset Yes/No Quit Factory default Yes/No Quit 65 Red Green Blue...
... Standby mode Eco/Normal Power management Off Ready Shut down Timer (1-30 Min.) Quit On start On/Off Lamp control Normal/Auto/Eco Pointer Spotlight/Pointer Quit Remote control Code 1-Code 8 Security Key lock Off Projector Remote control Quit PIN code lock PIN code lock entry Off/On1/On2 PIN code change Quit Quit Fan L1/L2 Fan control Normal/Max Warning log Lamp counter Hour(s) Reset Yes/No Quit Filter counter Hour(s) Off/100H/200H/300H Reset Yes/No Quit Factory default Yes/No Quit 65 Red Green Blue...


