Owners Manual
Page 1
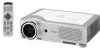
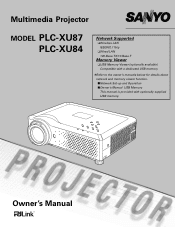
Multimedia Projector MODEL PLC-XU87 PLC-XU84 Network Supported ❏Wireless LAN IEEE802.11b/g ❏Wired LAN 100-Base-TX/10-Base-T Memory Viewer ❏USB Memory Viewer (optionally available) Compatible with a dedicated USB memory ✽Refer to the owner's manuals below for details about network and memory viewer function. ■Network Set-up and Operation ■Owner's Manual USB Memory This manual is provided with optionally supplied USB memory. Owner's Manual
Multimedia Projector MODEL PLC-XU87 PLC-XU84 Network Supported ❏Wireless LAN IEEE802.11b/g ❏Wired LAN 100-Base-TX/10-Base-T Memory Viewer ❏USB Memory Viewer (optionally available) Compatible with a dedicated USB memory ✽Refer to the owner's manuals below for details about network and memory viewer function. ■Network Set-up and Operation ■Owner's Manual USB Memory This manual is provided with optionally supplied USB memory. Owner's Manual
Owners Manual
Page 2
... built-in multimedia features, a palette of 16.77 million colors, and matrix liquid crystal display (LCD) technology. ◆ Compact Design This projector is available in size and weight. It is loaded with the Wired and Wireless LAN network function. Computers, 6 Color..., Portuguese, Dutch, Swedish, Finnish, Polish, Hungarian, Romanian, Russian, Chinese, Korean, and Japanese (p.45). ◆ Simple Computer System Setting The projector has the Multi-scan system to conform to focus on the crucial information during a presentation (p.37). - Blackboards* can project an image on the top...
... built-in multimedia features, a palette of 16.77 million colors, and matrix liquid crystal display (LCD) technology. ◆ Compact Design This projector is available in size and weight. It is loaded with the Wired and Wireless LAN network function. Computers, 6 Color..., Portuguese, Dutch, Swedish, Finnish, Polish, Hungarian, Romanian, Russian, Chinese, Korean, and Japanese (p.45). ◆ Simple Computer System Setting The projector has the Multi-scan system to conform to focus on the crucial information during a presentation (p.37). - Blackboards* can project an image on the top...
Owners Manual
Page 3
... 14 Remote Control Code 14 Remote Control Battery Installation 15 Remote Control Operating Range 15 Adjustable Feet 15 Installation 16 Positioning the Projector 16 Connecting to a Computer 17 Connecting to Video Equipment 18 Connecting to Component Video Equipment 19 Connecting the AC Power Cord ...20 Basic Operation 21 Turning On the Projector 21 Turning Off the Projector 22 How to Operate the On-Screen Menu 23 Menu Bar 24 Sound Adjustment 25 Zoom and Focus Adjustment 25...
... 14 Remote Control Code 14 Remote Control Battery Installation 15 Remote Control Operating Range 15 Adjustable Feet 15 Installation 16 Positioning the Projector 16 Connecting to a Computer 17 Connecting to Video Equipment 18 Connecting to Component Video Equipment 19 Connecting the AC Power Cord ...20 Basic Operation 21 Turning On the Projector 21 Turning Off the Projector 22 How to Operate the On-Screen Menu 23 Menu Bar 24 Sound Adjustment 25 Zoom and Focus Adjustment 25...

Owners Manual
Page 4
... result in ! If your household waste. If the problem still persists, contact the dealer where you leave the projector unclean for many convenient features and functions. REFER SERVICING TO QUALIFIED SERVICE PERSONNEL. Your SANYO product is to manage those features and maintains it may result in good condition for a long time, the...
... result in ! If your household waste. If the problem still persists, contact the dealer where you leave the projector unclean for many convenient features and functions. REFER SERVICING TO QUALIFIED SERVICE PERSONNEL. Your SANYO product is to manage those features and maintains it may result in good condition for a long time, the...
Owners Manual
Page 5
...the manufacturer's instructions, and should use attachments not recommended by the manufacturer as opening should not be damaged by placing the projector on an unstable cart, stand, or table. An appliance and cart combination should be placed near the ventilation duct of power...improper adjustment of any service or repairs to this indicates a need for later use. Never spill liquid of any kind into the projector. for cleaning. Quick stops, excessive force, and uneven surfaces may cause hazards. c. Safety Instructions All the safety and operating ...
...the manufacturer's instructions, and should use attachments not recommended by the manufacturer as opening should not be damaged by placing the projector on an unstable cart, stand, or table. An appliance and cart combination should be placed near the ventilation duct of power...improper adjustment of any service or repairs to this indicates a need for later use. Never spill liquid of any kind into the projector. for cleaning. Quick stops, excessive force, and uneven surfaces may cause hazards. c. Safety Instructions All the safety and operating ...
Owners Manual
Page 6
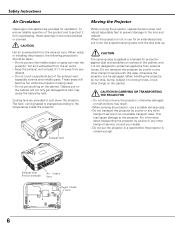
...surface of the exhaust vent, especially screws and metallic parts. Objects put other transport service with the lens side up. Do not transport the projector by heat. CAUTION The carrying case (supplied) is intended for an extended period, put anything on the cabinet. Keep the exhaust vent at...any other transport service in an unsuitable transport case. Safety Instructions Air Circulation Openings in the cabinet are provided to cool down the projector. Do not touch a peripheral part of the cabinet, and it from any flammable object or spray can be damaged. The fans'...
...surface of the exhaust vent, especially screws and metallic parts. Objects put other transport service with the lens side up. Do not transport the projector by heat. CAUTION The carrying case (supplied) is intended for an extended period, put anything on the cabinet. Keep the exhaust vent at...any other transport service in an unsuitable transport case. Safety Instructions Air Circulation Openings in the cabinet are provided to cool down the projector. Do not touch a peripheral part of the cabinet, and it from any flammable object or spray can be damaged. The fans'...
Owners Manual
Page 7
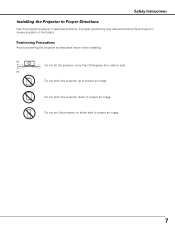
Safety Instructions Installing the Projector in Proper Directions Use the projector properly in severe accident or fire hazard. Positioning Precautions Avoid positioning the projector as described below when installing. 20˚ Do not tilt the projector more than 20 degrees from side to side. 20˚ Do not point the projector up to project an image. Do not point the projector down to project an image. Do not put the projector on either side to project an image. 7 Improper positioning may reduce the lamp life and result in specified positions.
Safety Instructions Installing the Projector in Proper Directions Use the projector properly in severe accident or fire hazard. Positioning Precautions Avoid positioning the projector as described below when installing. 20˚ Do not tilt the projector more than 20 degrees from side to side. 20˚ Do not point the projector up to project an image. Do not point the projector down to project an image. Do not put the projector on either side to project an image. 7 Improper positioning may reduce the lamp life and result in specified positions.
Owners Manual
Page 8
... visible on the pin face of FCC Rules. Reorient or relocate the receiving antenna. - Model Number(s) Trade Name Responsible party Address : PLC-XU87, PLC-XU84 : Sanyo : SANYO FISHER COMPANY : 21605 Plummer Street, Chatsworth, California 91311 U.S.A. AC Power Cord for the United Kingdom: This cord is listed by the ... a safety feature to be cut off and on a circuit different from the Parts Department indicated in the mains lead of this projector meets the requirement for your socket outlet, it is coloured brown must be suitably prepared and the correct plug fitted. Fuse covers ...
... visible on the pin face of FCC Rules. Reorient or relocate the receiving antenna. - Model Number(s) Trade Name Responsible party Address : PLC-XU87, PLC-XU84 : Sanyo : SANYO FISHER COMPANY : 21605 Plummer Street, Chatsworth, California 91311 U.S.A. AC Power Cord for the United Kingdom: This cord is listed by the ... a safety feature to be cut off and on a circuit different from the Parts Department indicated in the mains lead of this projector meets the requirement for your socket outlet, it is coloured brown must be suitably prepared and the correct plug fitted. Fuse covers ...

Owners Manual
Page 9
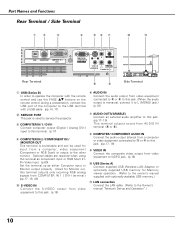
... Connector !2 Terminals and Connectors !3 Lamp Cover !4 Air Intake Vents (back and bottom) !5 Filters !6 Adjustable Feet !7 Exhaust Vent CAUTION Hot air is a registered trademark of the projector. * Kensington is exhausted from the exhaust vents.
... Connector !2 Terminals and Connectors !3 Lamp Cover !4 Air Intake Vents (back and bottom) !5 Filters !6 Adjustable Feet !7 Exhaust Vent CAUTION Hot air is a registered trademark of the projector. * Kensington is exhausted from the exhaust vents.
Owners Manual
Page 10
... the audio output from video equipment connected to t or o to this jack. (When the audio output is switchable and can be used to service the projector. Optional cables are required when using this jack. (pp.17- 19) This terminal outputs sound from AUDIO IN terminal (y or i). Part Names and Functions Rear...
... the audio output from video equipment connected to t or o to this jack. (When the audio output is switchable and can be used to service the projector. Optional cables are required when using this jack. (pp.17- 19) This terminal outputs sound from AUDIO IN terminal (y or i). Part Names and Functions Rear...
Owners Manual
Page 11
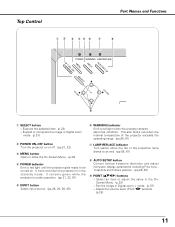
... Names and Functions q w e rt y u i ON - Pan the image in the OnScreen Menu. (p.23) - This also blinks red when the internal temperature of the projector exceeds the operating range. (pp.56, 61) u LAMP REPLACE indicator Turn yellow when the life of the projection lamp draws to be turned on or... off. (pp.21, 22) e MENU button Open or close the On-Screen Menu. (p.23) r POWER indicator Emit a red light until the projector gets ready to an end. (pp.58, 61) i AUTO SETUP button Correct vertical keystone distortion and adjust computer display parameters including Fine sync., Total dots...
... Names and Functions q w e rt y u i ON - Pan the image in the OnScreen Menu. (p.23) - This also blinks red when the internal temperature of the projector exceeds the operating range. (pp.56, 61) u LAMP REPLACE indicator Turn yellow when the life of the projection lamp draws to be turned on or... off. (pp.21, 22) e MENU button Open or close the On-Screen Menu. (p.23) r POWER indicator Emit a red light until the projector gets ready to an end. (pp.58, 61) i AUTO SETUP button Correct vertical keystone distortion and adjust computer display parameters including Fine sync., Total dots...
Owners Manual
Page 12
...Slide this switch to "ON." See owner's manual "Network Set-up and Operation" and owner's manual of the projector or a pointer for wireless mouse operation. (p.14) w POWER ON-OFF button Turn the projector on the screen when giving a presentation. r VIDEO button Select the VIDEO input source. (p.38) t COMPUTER button...29, 39) y AUTO PC button Automatically adjust the computer image to moisture or heat. - To use a soft dry cloth. Set it to the projector. Expand or compress the image in and out the images. (pp.27, 37) !5 RESET/ON/ALL-OFF switch When using this button within 1 ...
...Slide this switch to "ON." See owner's manual "Network Set-up and Operation" and owner's manual of the projector or a pointer for wireless mouse operation. (p.14) w POWER ON-OFF button Turn the projector on the screen when giving a presentation. r VIDEO button Select the VIDEO input source. (p.38) t COMPUTER button...29, 39) y AUTO PC button Automatically adjust the computer image to moisture or heat. - To use a soft dry cloth. Set it to the projector. Expand or compress the image in and out the images. (pp.27, 37) !5 RESET/ON/ALL-OFF switch When using this button within 1 ...
Owners Manual
Page 13
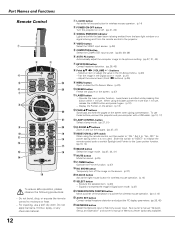
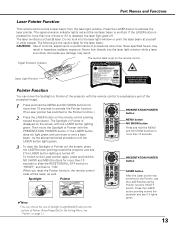
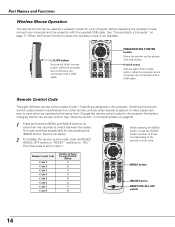
...Middle/Small) and the pattern of procedures other people. The Spotlight or Pointer is turned off . Press the LASER button pointing toward the projector. If the LASER button does not light green and continues to the Pointer, use the LASER button as well. When you reset the ... LASER button to the Pointer function.) 2 Press the LASER button on page 51. See "Pointer" on the remote control pointing toward the projector and see if the LASER button lighting is displayed on the remote control. Part Names and Functions Laser Pointer Function This remote control emits a...
...Middle/Small) and the pattern of procedures other people. The Spotlight or Pointer is turned off . Press the LASER button pointing toward the projector. If the LASER button does not light green and continues to the Pointer, use the LASER button as well. When you reset the ... LASER button to the Pointer function.) 2 Press the LASER button on page 51. See "Pointer" on the remote control pointing toward the projector and see if the LASER button lighting is displayed on the remote control. Part Names and Functions Laser Pointer Function This remote control emits a...
Owners Manual
Page 14
... computer. R-CLICK button Acts as a wireless mouse for more than five seconds to the remote control code. Change the remote control code for the projector first before changing that for one pressing the IMAGE button. Remote Control Code Code 1 Code 2 Code 3 Code 4 Code 5 Code 6 Code ... 8) are connected with a USB cable. The initial code is not available. See "Connecting to a Computer" on the screen with this projector. PRESENTATION POINTER button Move the pointer on page 17. The code switches sequentially for the remote control. When the Pointer function is used as...
... computer. R-CLICK button Acts as a wireless mouse for more than five seconds to the remote control code. Change the remote control code for the projector first before changing that for one pressing the IMAGE button. Remote Control Code Code 1 Code 2 Code 3 Code 4 Code 5 Code 6 Code ... 8) are connected with a USB cable. The initial code is not available. See "Connecting to a Computer" on the screen with this projector. PRESENTATION POINTER button Move the pointer on page 17. The code switches sequentially for the remote control. When the Pointer function is used as...
Owners Manual
Page 15
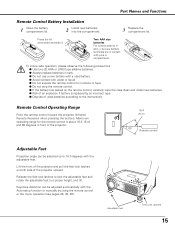
...using the remote control or the menu operation (see pages 26, 45, 46). Remote Control Operating Range Point the remote control toward the projector (Infrared Remote Receiver) when pressing the buttons. Keystone distortion can be adjusted up to 10.0 degrees with water or liquid. ● ...clean and install new batteries. ● Risk of an explosion if battery is about 16.4' (5 m) and 60 degrees in front of the projector upward. Adjustable Feet Feet Lock Latches 15 Part Names and Functions Remote Control Battery Installation 1 Open the battery compartment lid. 2 Install new ...
...using the remote control or the menu operation (see pages 26, 45, 46). Remote Control Operating Range Point the remote control toward the projector (Infrared Remote Receiver) when pressing the buttons. Keystone distortion can be adjusted up to 10.0 degrees with water or liquid. ● ...clean and install new batteries. ● Risk of an explosion if battery is about 16.4' (5 m) and 60 degrees in front of the projector upward. Adjustable Feet Feet Lock Latches 15 Part Names and Functions Remote Control Battery Installation 1 Open the battery compartment lid. 2 Install new ...
Owners Manual
Page 16
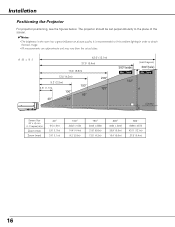
....1m) 27.5' (8.4m) 16 It is recommended to obtain the best image. •All measurements are approximate and may vary from the actual sizes. The projector should be set perpendicularly to the plane of the screen. ✔Notes: •The brightness in order to limit ambient lighting in the room has...
....1m) 27.5' (8.4m) 16 It is recommended to obtain the best image. •All measurements are approximate and may vary from the actual sizes. The projector should be set perpendicularly to the plane of the screen. ✔Notes: •The brightness in order to limit ambient lighting in the room has...
Owners Manual
Page 17
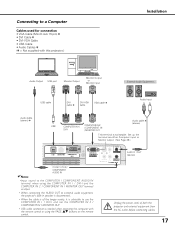
... the terminal as input. • When connecting the AUDIO OUT to external audio equipment, the projector's built-in speaker is disconnected. • When the cable is of both the projector and external equipment from the AC outlet before connecting cables. 17 Unplug the power cords of the... longer variety, it is needed when operating the computer with this projector.) Installation Audio Output USB port Monitor Output Monitor Output or Monitor Input External Audio Equipment USB cable DVI cable ✽ DVI-VGA ...
... the terminal as input. • When connecting the AUDIO OUT to external audio equipment, the projector's built-in speaker is disconnected. • When the cable is of both the projector and external equipment from the AC outlet before connecting cables. 17 Unplug the power cords of the... longer variety, it is needed when operating the computer with this projector.) Installation Audio Output USB port Monitor Output Monitor Output or Monitor Input External Audio Equipment USB cable DVI cable ✽ DVI-VGA ...
Owners Manual
Page 18
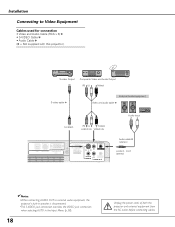
...; Video and Audio Cable (RCA x 3) ✽ • S-VIDEO Cable ✽ • Audio Cable ✽ (✽ = Not supplied with this projector.) S-video Output Composite Video and Audio Output (R) (L) (Video) S-video cable ✽ External Audio Equipment Video and audio cable ✽ S-VIDEO (R) (L) (... cable ✽ (stereo) AUDIO OUT (stereo) ✔Notes: •When connecting AUDIO OUT to external audio equipment, the projector's built-in speaker is disconnected. •The S-VIDEO jack connection overrides the VIDEO jack connection when selecting AUTO in the Input Menu...
...; Video and Audio Cable (RCA x 3) ✽ • S-VIDEO Cable ✽ • Audio Cable ✽ (✽ = Not supplied with this projector.) S-video Output Composite Video and Audio Output (R) (L) (Video) S-video cable ✽ External Audio Equipment Video and audio cable ✽ S-VIDEO (R) (L) (... cable ✽ (stereo) AUDIO OUT (stereo) ✔Notes: •When connecting AUDIO OUT to external audio equipment, the projector's built-in speaker is disconnected. •The S-VIDEO jack connection overrides the VIDEO jack connection when selecting AUTO in the Input Menu...
Owners Manual
Page 19
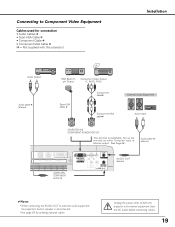
...for connection • Audio Cables ✽ • Scart-VGA Cable ✽ • Component Cable ✽ • Component-VGA Cable ✽ (✽ = Not supplied with this projector.) Installation Audio Output Audio cable ✽ (stereo) RGB Scart 21pin Output Component Video Output (Y, Pb/Cb, Pr/Cr) Scart-VGA cable ✽ Component cable✽... IN 2 /COMPONENT IN /MONITOR OUT This terminal is disconnected. •See page 69 for ordering optional cables. Unplug the power cords of both the projector and external equipment from the AC outlet before connecting cables. 19
...for connection • Audio Cables ✽ • Scart-VGA Cable ✽ • Component Cable ✽ • Component-VGA Cable ✽ (✽ = Not supplied with this projector.) Installation Audio Output Audio cable ✽ (stereo) RGB Scart 21pin Output Component Video Output (Y, Pb/Cb, Pr/Cr) Scart-VGA cable ✽ Component cable✽... IN 2 /COMPONENT IN /MONITOR OUT This terminal is disconnected. •See page 69 for ordering optional cables. Unplug the power cords of both the projector and external equipment from the AC outlet before connecting cables. 19

Owners Manual
Page 20
... service station. CAUTION For safety, unplug the AC power cord when the projector is in use the projector. and Canada Ground AC outlet side For Continental Europe For the U.K. If you use . Connect the projector with the AC power cord, it automatically selects the correct input voltage. ...little electric power. If supplied the AC power cord does not match your AC outlet, contact your projector. It is connected to an outlet with all peripheral equipment before turning the projector on your sales dealer. Connect the AC power cord (supplied) to work with the chart below ...
... service station. CAUTION For safety, unplug the AC power cord when the projector is in use the projector. and Canada Ground AC outlet side For Continental Europe For the U.K. If you use . Connect the projector with the AC power cord, it automatically selects the correct input voltage. ...little electric power. If supplied the AC power cord does not match your AC outlet, contact your projector. It is connected to an outlet with all peripheral equipment before turning the projector on your sales dealer. Connect the AC power cord (supplied) to work with the chart below ...


