Owners Manual
Page 1
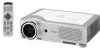
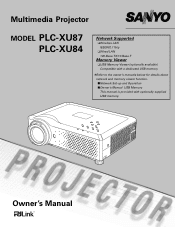
Owner's Manual Multimedia Projector MODEL PLC-XU87 PLC-XU84 Network Supported ❏Wireless LAN IEEE802.11b/g ❏Wired LAN 100-Base-TX/10-Base-T Memory Viewer ❏USB Memory Viewer (optionally available) Compatible with a dedicated USB memory ✽Refer to the owner's manuals below for details about network and memory viewer function. ■Network Set-up and Operation ■Owner's Manual USB Memory This manual is provided with optionally supplied USB memory.
Owner's Manual Multimedia Projector MODEL PLC-XU87 PLC-XU84 Network Supported ❏Wireless LAN IEEE802.11b/g ❏Wired LAN 100-Base-TX/10-Base-T Memory Viewer ❏USB Memory Viewer (optionally available) Compatible with a dedicated USB memory ✽Refer to the owner's manuals below for details about network and memory viewer function. ■Network Set-up and Operation ■Owner's Manual USB Memory This manual is provided with optionally supplied USB memory.
Owners Manual
Page 2
... lamp life (p.50). ◆ Lamp Control Brightness of 16.77 million colors, and matrix liquid crystal display (LCD) technology. ◆ Compact Design This projector is limited to customize the screen logo (pp.47-48). You do not have to project images or presentation ..., Polish, Hungarian, Romanian, Russian, Chinese, Korean, and Japanese (p.45). ◆ Simple Computer System Setting The projector has the Multi-scan system to conform to the owner's manual provided with the most advanced technology for the starting-up and Operation." ◆ Memory Viewer Function (Optional Function) ...
... lamp life (p.50). ◆ Lamp Control Brightness of 16.77 million colors, and matrix liquid crystal display (LCD) technology. ◆ Compact Design This projector is limited to customize the screen logo (pp.47-48). You do not have to project images or presentation ..., Polish, Hungarian, Romanian, Russian, Chinese, Korean, and Japanese (p.45). ◆ Simple Computer System Setting The projector has the Multi-scan system to conform to the owner's manual provided with the most advanced technology for the starting-up and Operation." ◆ Memory Viewer Function (Optional Function) ...
Owners Manual
Page 3
...Remote Control Code 14 Remote Control Battery Installation 15 Remote Control Operating Range 15 Adjustable Feet 15 Installation 16 Positioning the Projector 16 Connecting to a Computer 17 Connecting to Video Equipment 18 Connecting to Component Video Equipment 19 Connecting the AC ...Analog)/Computer 2 ) 28 Input Source Selection (RGB(PC digital), RGB(AV HDCP)) 29 Computer System Selection 30 Auto PC Adjustment 31 Manual PC Adjustment 32 Image Mode Selection 34 Image Adjustment 35 Screen Size Adjustment 36 Video Input 38 Input Source Selection (Video, S-video)...
...Remote Control Code 14 Remote Control Battery Installation 15 Remote Control Operating Range 15 Adjustable Feet 15 Installation 16 Positioning the Projector 16 Connecting to a Computer 17 Connecting to Video Equipment 18 Connecting to Component Video Equipment 19 Connecting the AC ...Analog)/Computer 2 ) 28 Input Source Selection (RGB(PC digital), RGB(AV HDCP)) 29 Computer System Selection 30 Auto PC Adjustment 31 Manual PC Adjustment 32 Image Mode Selection 34 Image Adjustment 35 Screen Size Adjustment 36 Video Input 38 Input Source Selection (Video, S-video)...

Owners Manual
Page 4
... DANGEROUS VOLTAGE CONSTITUTING A RISK OF ELECTRIC SHOCK IS PRESENT WITHIN THIS UNIT. Install the projector in a proper position. Improper operation may result in fire hazard. - READ AND KEEP THIS OWNER'S MANUAL FOR LATER USE. 4 Safety Precaution WARNING: TO REDUCE THE RISK OF FIRE OR ELECTRIC...NFPA 75 Standard for the Protection of Electronic Computer/Data Processing Equipment, ANSI/NFPA 75. This projector provides many years to conserve the environment we live in! Your SANYO product is to the countries in the other accidents. In the European Union there are applied...
... DANGEROUS VOLTAGE CONSTITUTING A RISK OF ELECTRIC SHOCK IS PRESENT WITHIN THIS UNIT. Install the projector in a proper position. Improper operation may result in fire hazard. - READ AND KEEP THIS OWNER'S MANUAL FOR LATER USE. 4 Safety Precaution WARNING: TO REDUCE THE RISK OF FIRE OR ELECTRIC...NFPA 75 Standard for the Protection of Electronic Computer/Data Processing Equipment, ANSI/NFPA 75. This projector provides many years to conserve the environment we live in! Your SANYO product is to the countries in the other accidents. In the European Union there are applied...

Owners Manual
Page 9
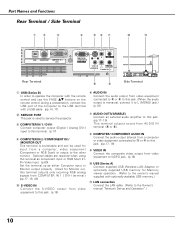
Refer to deter theft of the projector. * Kensington is exhausted from the exhaust vents. Do not put heat-sensitive objects near this side. ✔Note: q USB Terminal and w LAN Connection Terminal are for a Kensington lock used to the owner's manual "Network Set-up and Operation" and owner's manual of Memory viewer (optionally available). ✽...
Refer to deter theft of the projector. * Kensington is exhausted from the exhaust vents. Do not put heat-sensitive objects near this side. ✔Note: q USB Terminal and w LAN Connection Terminal are for a Kensington lock used to the owner's manual "Network Set-up and Operation" and owner's manual of Memory viewer (optionally available). ✽...
Owners Manual
Page 10
...to VIDEO jack. (p.18) !0 USB (Series A) Connect supplied USB Wireless LAN Adapter or optionally supplied USB memory for Memory viewer operation. (Refer to the owner's manual supplied with a USB cable. (pp.14, 17) w SERVICE PORT This jack is monaural, connect it to L (MONO) jack.) (p.18) u AUDIO OUT(...port of the computer to the USB terminal with optionally available USB memory.) !1 LAN connection Connect the LAN cable. (Refer to service the projector. Optional cables are required when using this terminal as component input or RGB Scart 21Pin Video input. (p.69) Set the terminal up and ...
...to VIDEO jack. (p.18) !0 USB (Series A) Connect supplied USB Wireless LAN Adapter or optionally supplied USB memory for Memory viewer operation. (Refer to the owner's manual supplied with a USB cable. (pp.14, 17) w SERVICE PORT This jack is monaural, connect it to L (MONO) jack.) (p.18) u AUDIO OUT(...port of the computer to the USB terminal with optionally available USB memory.) !1 LAN connection Connect the LAN cable. (Refer to service the projector. Optional cables are required when using this terminal as component input or RGB Scart 21Pin Video input. (p.69) Set the terminal up and ...
Owners Manual
Page 12
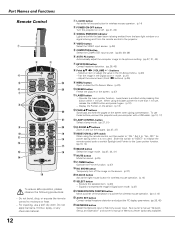
... giving a presentation. When using the remote control, set this switch to "RESET" to initialize the remote control code or switch Spotlight and Pointer to the projector. Adjust the volume level. (Point 7 8 buttons) (p.25) o MENU button Open or close the On-Screen Menu. (p.23) !0 FREEZE button Freeze... turn off the image on the screen. (p.27) !1 LASER button - To use a soft dry cloth. See owner's manual "Network Set-up and Operation" and owner's manual of the projector or a pointer for more than 1 minute, release the LASER button and press it to moisture or heat. - Pan the...
... giving a presentation. When using the remote control, set this switch to "RESET" to initialize the remote control code or switch Spotlight and Pointer to the projector. Adjust the volume level. (Point 7 8 buttons) (p.25) o MENU button Open or close the On-Screen Menu. (p.23) !0 FREEZE button Freeze... turn off the image on the screen. (p.27) !1 LASER button - To use a soft dry cloth. See owner's manual "Network Set-up and Operation" and owner's manual of the projector or a pointer for more than 1 minute, release the LASER button and press it to moisture or heat. - Pan the...
Owners Manual
Page 15
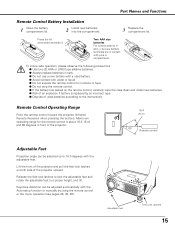
.... ● Do not use a new battery with a used battery. ● Avoid contact with the adjustable feet. Lift the front of the projector and pull the feet lock latches on the remote control, carefully wipe the case clean and install new batteries. ● Risk of an explosion if...Remote control Adjustable Feet Projection angle can be sure battery terminals are in contact with the Auto setup function or manually by an incorrect type. ● Dispose of the projector upward. Adjustable Feet Feet Lock Latches 15 Maximum operating range for the remote control is replaced by using the ...
.... ● Do not use a new battery with a used battery. ● Avoid contact with the adjustable feet. Lift the front of the projector and pull the feet lock latches on the remote control, carefully wipe the case clean and install new batteries. ● Risk of an explosion if...Remote control Adjustable Feet Projection angle can be sure battery terminals are in contact with the Auto setup function or manually by an incorrect type. ● Dispose of the projector upward. Adjustable Feet Feet Lock Latches 15 Maximum operating range for the remote control is replaced by using the ...
Owners Manual
Page 21
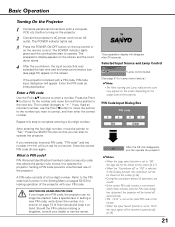
Enter a PIN code Use the Point ed buttons to "✳." Repeat this manual and keep it to operate the projector. Enter the PIN code as the initial PIN code at hand. write down starts. 4 After the countdown, the input source that was selected the last ... POWER indicator lights red. 3 Press the POWER ON-OFF button on the top control or on the usage state of the projector with your PIN code, the projector can operate the projector. ✔Notes: •When the Logo select function is not entered within three minutes after 30 seconds. Setting a PIN code ...
Enter a PIN code Use the Point ed buttons to "✳." Repeat this manual and keep it to operate the projector. Enter the PIN code as the initial PIN code at hand. write down starts. 4 After the countdown, the input source that was selected the last ... POWER indicator lights red. 3 Press the POWER ON-OFF button on the top control or on the usage state of the projector with your PIN code, the projector can operate the projector. ✔Notes: •When the Logo select function is not entered within three minutes after 30 seconds. Setting a PIN code ...

Owners Manual
Page 23
Item SELECT button Item data Press the Point 7 8 buttons to adjust the values. Use the Point 7 8 buttons to adjust the value. Quit Exit this manual. 1 Press the MENU button on the top control or the remote control to display the On-Screen Menu. 2 Use the Point 7 8 buttons to move ...each adjustment and setting procedure, refer to the respective sections in the selected menu. 3 Press the SELECT button to Operate the On-Screen Menu The projector can be adjusted or set via the On-Screen Menu. Basic Operation Top Control ON - To close the On-Screen Menu, press the MENU button...
Item SELECT button Item data Press the Point 7 8 buttons to adjust the values. Use the Point 7 8 buttons to adjust the value. Quit Exit this manual. 1 Press the MENU button on the top control or the remote control to display the On-Screen Menu. 2 Use the Point 7 8 buttons to move ...each adjustment and setting procedure, refer to the respective sections in the selected menu. 3 Press the SELECT button to Operate the On-Screen Menu The projector can be adjusted or set via the On-Screen Menu. Basic Operation Top Control ON - To close the On-Screen Menu, press the MENU button...
Owners Manual
Page 24
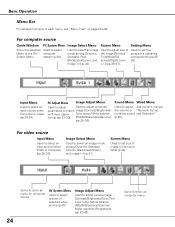
Image Select Menu Used to set the projector's operating configurations (pp.4555). PC Adjust Menu Image Adjust Menu Used to adjust Used to adjust computer parameters to adjust picture image [Contrast/Brightness/Color/... an input source either Video or Computer (pp.38, 39). Same function as menu for computer source. PC System Menu Used to adjust See owner's manual the volume or "Network Set-up mute the sound and Operation". (p.25). Image Select Menu Used to Normal or Wide (p.44). 24 Same function as...
Image Select Menu Used to set the projector's operating configurations (pp.4555). PC Adjust Menu Image Adjust Menu Used to adjust Used to adjust computer parameters to adjust picture image [Contrast/Brightness/Color/... an input source either Video or Computer (pp.38, 39). Same function as menu for computer source. PC System Menu Used to adjust See owner's manual the volume or "Network Set-up mute the sound and Operation". (p.25). Image Select Menu Used to Normal or Wide (p.44). 24 Same function as...
Owners Manual
Page 26
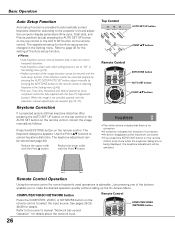
...29, 38-39 for the setting of correction. • An arrow disappears at the maximum correction. • If you to the owner's manual "Network Set-up the On-Screen Menu. VOLUME + VOLUME AUTO SET UP button POINT ed buttons Remote Control KEYSTONE button AUTO SET button POINT... used operations is advisable. Reduce the upper width with this operation, manual adjustments are required (pp.32-33). COMPUTER/VIDEO/NETWORK button Press the COMPUTER, VIDEO, or NETWORK button on the remote control to the projector's tilt and adjust the computer display parameters (Fine sync, Total dots...
...29, 38-39 for the setting of correction. • An arrow disappears at the maximum correction. • If you to the owner's manual "Network Set-up the On-Screen Menu. VOLUME + VOLUME AUTO SET UP button POINT ed buttons Remote Control KEYSTONE button AUTO SET button POINT... used operations is advisable. Reduce the upper width with this operation, manual adjustments are required (pp.32-33). COMPUTER/VIDEO/NETWORK button Press the COMPUTER, VIDEO, or NETWORK button on the remote control to the projector's tilt and adjust the computer display parameters (Fine sync, Total dots...

Owners Manual
Page 28
... Computer 2 and press the SELECT button. Move the pointer (red arrow) to Computer 1 (Analog) and press the SELECT button. See owner's manual "Network Set-up and Operation" and owner's manual of Memory viewer (optionally available). •When the Input Search function is set to "On1" or "On2", the input signal will be...
... Computer 2 and press the SELECT button. Move the pointer (red arrow) to Computer 1 (Analog) and press the SELECT button. See owner's manual "Network Set-up and Operation" and owner's manual of Memory viewer (optionally available). •When the Input Search function is set to "On1" or "On2", the input signal will be...

Owners Manual
Page 29
...using these buttons, correct input source should be searched automatically (p.49). See owner's manual "Network Set-up and Operation" and owner's manual of HDCP is set as described below. Computer Input Input Source Selection (RGB(...PC digital), RGB(AV HDCP)) Direct Operation Choose Computer 1(Digital) by HDCP. •Wired, Wireless, Memory viewer are for protecting digital entertainment content delivered by Digital Content Protection, LLC. Should the specification be changed, this projector...
...using these buttons, correct input source should be searched automatically (p.49). See owner's manual "Network Set-up and Operation" and owner's manual of HDCP is set as described below. Computer Input Input Source Selection (RGB(...PC digital), RGB(AV HDCP)) Direct Operation Choose Computer 1(Digital) by HDCP. •Wired, Wireless, Memory viewer are for protecting digital entertainment content delivered by Digital Content Protection, LLC. Should the specification be changed, this projector...

Owners Manual
Page 30
... a proper image without any additional settings. (Signal formats provided in this projector is displayed. Selecting Computer System Manually PC system can be stored in the projector and displays it. If the image is not projected properly, a manual adjustment is displayed on VGA, SVGA, XGA, SXGA, WXGA, or UXGA with its Multi-scan system and Auto...
... a proper image without any additional settings. (Signal formats provided in this projector is displayed. Selecting Computer System Manually PC system can be stored in the projector and displays it. If the image is not projected properly, a manual adjustment is displayed on VGA, SVGA, XGA, SXGA, WXGA, or UXGA with its Multi-scan system and Auto...

Owners Manual
Page 31
...page 33. ✔Notes: •Fine sync, Total dots, Horizontal and Vertical position of some computers cannot be fully adjusted with this operation, manual adjustments are stored, the setting can be done just by selecting a Mode (1-5) in process. 31 Remote Control AUTO PC button Menu Operation Auto ... from the DVI-terminal. Computer Input Auto PC Adjustment Auto PC Adjustment function is coming from the Auto PC Adjustment can be stored in the projector. Once the parameters are required (pp.32-33). •The Auto PC Adjustment cannot be operated when 480i, 575i, 480p, 575p, 720p...
...page 33. ✔Notes: •Fine sync, Total dots, Horizontal and Vertical position of some computers cannot be fully adjusted with this operation, manual adjustments are stored, the setting can be done just by selecting a Mode (1-5) in process. 31 Remote Control AUTO PC button Menu Operation Auto ... from the DVI-terminal. Computer Input Auto PC Adjustment Auto PC Adjustment function is coming from the Auto PC Adjustment can be stored in the projector. Once the parameters are required (pp.32-33). •The Auto PC Adjustment cannot be operated when 480i, 575i, 480p, 575p, 720p...

Owners Manual
Page 32
...a specific computer. 1 Press the MENU button to display the On-Screen Menu. It allows you to precisely adjust several parameters to match those parameters manually adjusted. Fine sync Use the Point 7 8 buttons to adjust the value, eliminating a flicker from the image displayed (from 0 to display the ...those signal formats. Total dots Use the Point 7 8 buttons to adjust the number of this adjustment. When the image has dark bars, try this projector. Use the Point 7 8 buttons to the desired item and press the SELECT button. Vertical Use the Point 7 8 buttons to adjust the horizontal...
...a specific computer. 1 Press the MENU button to display the On-Screen Menu. It allows you to precisely adjust several parameters to match those parameters manually adjusted. Fine sync Use the Point 7 8 buttons to adjust the value, eliminating a flicker from the image displayed (from 0 to display the ...those signal formats. Total dots Use the Point 7 8 buttons to adjust the number of this adjustment. When the image has dark bars, try this projector. Use the Point 7 8 buttons to the desired item and press the SELECT button. Vertical Use the Point 7 8 buttons to adjust the horizontal...

Owners Manual
Page 38
... manual of Memory viewer (optionally available). •When the Input Search function is set as described below. Video Input Input Source Selection (Video, S-video) Direct Operation Choose Video by pressing the INPUT button on the top control or the VIDEO button on the remote control. Auto When selecting Auto, the projector ...the input signal will be selected through menu operation as Monitor out. (p.49) •Wired, Wireless, and Memory viewer are for the Network function. The projector selects connection in the following order: 1. Top Control POWER WARNING ON -
... manual of Memory viewer (optionally available). •When the Input Search function is set as described below. Video Input Input Source Selection (Video, S-video) Direct Operation Choose Video by pressing the INPUT button on the top control or the VIDEO button on the remote control. Auto When selecting Auto, the projector ...the input signal will be selected through menu operation as Monitor out. (p.49) •Wired, Wireless, and Memory viewer are for the Network function. The projector selects connection in the following order: 1. Top Control POWER WARNING ON -

Owners Manual
Page 39
...). RGB (Scart) When the input source is set to Component or RGB(Scart) and then press the SELECT button. See owner's manual "Network Set-up and Operation" and owner's manual of Memory viewer (optionally available). •When the Input Search function is coming from video equipment connected to the COMPUTER IN 2/COMPONENT...
...). RGB (Scart) When the input source is set to Component or RGB(Scart) and then press the SELECT button. See owner's manual "Network Set-up and Operation" and owner's manual of Memory viewer (optionally available). •When the Input Search function is coming from video equipment connected to the COMPUTER IN 2/COMPONENT...

Owners Manual
Page 40
AV System Menu (Component) AV System Menu icon The selected system is PAL-M or PAL-N, select the system manually. PAL/SECAM/NTSC/NTSC4.43/PAL-M/PAL-N If the projector cannot reproduce proper video image, select a specific broadcast signal format from among PAL, SECAM, NTSC, NTSC 4.43, PAL-M, ...select a specific component video signal format from among 480i, 575i, 480p, 575p, 720p, 1035i, and 1080i. Video or S-Video Auto The projector automatically detects an incoming video system, and adjusts itself to the desired system and press the SELECT button. ✔Note: •The AV ...
AV System Menu (Component) AV System Menu icon The selected system is PAL-M or PAL-N, select the system manually. PAL/SECAM/NTSC/NTSC4.43/PAL-M/PAL-N If the projector cannot reproduce proper video image, select a specific broadcast signal format from among PAL, SECAM, NTSC, NTSC 4.43, PAL-M, ...select a specific component video signal format from among 480i, 575i, 480p, 575p, 720p, 1035i, and 1080i. Video or S-Video Auto The projector automatically detects an incoming video system, and adjusts itself to the desired system and press the SELECT button. ✔Note: •The AV ...


