Owners Manual
Page 2
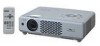
...and matrix liquid crystal display (LCD) technology. ◆ Compact Design ◆ Multilanguage Menu Display This projector is designed compact in size and weight. This projector utilizes built-in multimedia features, a palette of use . ◆ Compatibility The projector widely accepts various video and ... the presentation. (p.34) ◆ Noise reduction function Operation menu is limited to approx. Brightness of this manual may differ slightly from using the projector. ◆ Input Search Function Input signal can be searched automatically. (p.46) ✔ Note: •...
...and matrix liquid crystal display (LCD) technology. ◆ Compact Design ◆ Multilanguage Menu Display This projector is designed compact in size and weight. This projector utilizes built-in multimedia features, a palette of use . ◆ Compatibility The projector widely accepts various video and ... the presentation. (p.34) ◆ Noise reduction function Operation menu is limited to approx. Brightness of this manual may differ slightly from using the projector. ◆ Input Search Function Input signal can be searched automatically. (p.46) ✔ Note: •...

Owners Manual
Page 3
... Bottom 8 Rear Terminal 9 Top Control 10 Remote Control 11 Remote Control Battery Installation 12 Operating Range 12 Installation 13 Positioning the Projector 13 Adjustable Feet 13 Connecting the AC Power Cord 14 Connecting to a Computer 15 Connecting to Video Equipment 16 Connecting to Component ...Projector 19 How to Operate the On-Screen Menu 20 Menu Bar 21 Zoom and Focus Adjustment 22 Keystone Correction 22 Sound Adjustment 23 Remote Control Operation 23 Computer Input 25 Input Source Selection 25 Computer System Selection 26 Auto PC Adjustment 27 Manual...
... Bottom 8 Rear Terminal 9 Top Control 10 Remote Control 11 Remote Control Battery Installation 12 Operating Range 12 Installation 13 Positioning the Projector 13 Adjustable Feet 13 Connecting the AC Power Cord 14 Connecting to a Computer 15 Connecting to Video Equipment 16 Connecting to Component ...Projector 19 How to Operate the On-Screen Menu 20 Menu Bar 21 Zoom and Focus Adjustment 22 Keystone Correction 22 Sound Adjustment 23 Remote Control Operation 23 Computer Input 25 Input Source Selection 25 Computer System Selection 26 Auto PC Adjustment 27 Manual...
Owners Manual
Page 4
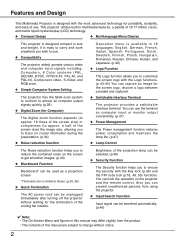
... and cable connections and try the solutions in the "Troubleshooting" section in the other accidents. REFER SERVICING TO QUALIFIED SERVICE PERSONNEL. Your SANYO product is to operate improperly, read this equipment at their end-of-life, should be built into the lens, otherwise, eye damage ...PRESENT WITHIN THIS UNIT. This symbol means that children do not stare directly into the beam. - Please dispose of this manual thoroughly and operate the projector properly. In the European Union there are applied to EU countries only and not applied to manage those features and maintains...
... and cable connections and try the solutions in the "Troubleshooting" section in the other accidents. REFER SERVICING TO QUALIFIED SERVICE PERSONNEL. Your SANYO product is to operate improperly, read this equipment at their end-of-life, should be built into the lens, otherwise, eye damage ...PRESENT WITHIN THIS UNIT. This symbol means that children do not stare directly into the beam. - Please dispose of this manual thoroughly and operate the projector properly. In the European Union there are applied to EU countries only and not applied to manage those features and maintains...

Owners Manual
Page 18
.... Refer to the PIN code lock function in the Setting on pages 49 and 50 for three minutes after 30 seconds. If the projector is PIN code? Repeat this manual, and keep it at the factory. Enter the correct PIN code all operations are invalid. • If the correct PIN code number... Lamp mode status icon (see page 48) appears on the remote control. The POWER indicator becomes green and the cooling fans start to operate the projector. To Enter a PIN code Select a number by pressing the Point 8 button. Selected Input Source and Lamp Mode Lamp mode (See page 48 for Lamp ...
.... Refer to the PIN code lock function in the Setting on pages 49 and 50 for three minutes after 30 seconds. If the projector is PIN code? Repeat this manual, and keep it at the factory. Enter the correct PIN code all operations are invalid. • If the correct PIN code number... Lamp mode status icon (see page 48) appears on the remote control. The POWER indicator becomes green and the cooling fans start to operate the projector. To Enter a PIN code Select a number by pressing the Point 8 button. Selected Input Source and Lamp Mode Lamp mode (See page 48 for Lamp ...
Owners Manual
Page 26
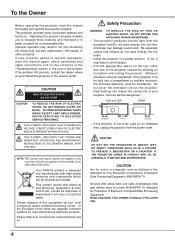
... Adjustment function works to set in this projector is shown on page 62) One of computers based on this dialog box can also be selected manually. 1 Press the MENU button to display the On-Screen Menu. Systems on VGA, SVGA, XGA, SXGA, WXGA, or UXGA with its... Multi-scan system and Auto PC Adjustment. Computer Input Computer System Selection This projector automatically tunes to adjust the projector. Selecting Computer System Manually PC system can be stored in Mode 1 ~ 5. (p.28, ...
... Adjustment function works to set in this projector is shown on page 62) One of computers based on this dialog box can also be selected manually. 1 Press the MENU button to display the On-Screen Menu. Systems on VGA, SVGA, XGA, SXGA, WXGA, or UXGA with its... Multi-scan system and Auto PC Adjustment. Computer Input Computer System Selection This projector automatically tunes to adjust the projector. Selecting Computer System Manually PC system can be stored in Mode 1 ~ 5. (p.28, ...

Owners Manual
Page 27
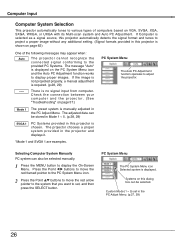
...press the SELECT button twice. Once parameters are required. (p.28, 29) • The Auto PC Adjustment cannot be fully adjusted with this projector. message appears while Auto PC adjustment is provided to automatically adjust Fine sync, Total dots, Horizontal, and Vertical to conform to the Auto ... pointer to display the On-Screen Menu. To store adjustment parameters Adjustment parameters from Auto PC Adjustment can be memorized in this operation, manual adjustments are memorized, the setting can be done just by pressing the AUTO PC button on page 29. ✔ Note: •...
...press the SELECT button twice. Once parameters are required. (p.28, 29) • The Auto PC Adjustment cannot be fully adjusted with this projector. message appears while Auto PC adjustment is provided to automatically adjust Fine sync, Total dots, Horizontal, and Vertical to conform to the Auto ... pointer to display the On-Screen Menu. To store adjustment parameters Adjustment parameters from Auto PC Adjustment can be memorized in this operation, manual adjustments are memorized, the setting can be done just by pressing the AUTO PC button on page 29. ✔ Note: •...
Owners Manual
Page 28
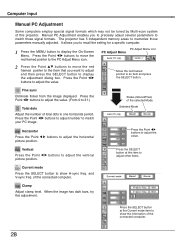
.... Status (Stored/Free) of the connected computer. Computer Input Manual PC Adjustment Some computers employ special signal formats which may not be tuned by Multi-scan system of this adjustment. The projector has 5 independent memory areas to display the On-Screen Menu.... When the image has dark bars, try this projector. Horizontal Press the Point 7 8 buttons to match those parameters manually adjusted. Manual PC Adjustment enables you to recall the...
.... Status (Stored/Free) of the connected computer. Computer Input Manual PC Adjustment Some computers employ special signal formats which may not be tuned by Multi-scan system of this adjustment. The projector has 5 independent memory areas to display the On-Screen Menu.... When the image has dark bars, try this projector. Horizontal Press the Point 7 8 buttons to match those parameters manually adjusted. Manual PC Adjustment enables you to recall the...

Owners Manual
Page 37
... Note: The AV System Menu cannot be selected when selecting RGB (Scart). 37 Video Input Video or S-Video Auto The projector automatically detects incoming video system, and adjusts itself to optimize its performance. Move the pointer to display the On-Screen Menu. ... icon Selected system is PAL-M or PAL-N, select system manually. COMPONENT VIDEO SIGNAL FORMAT If the projector cannot reproduce proper video image, it is displayed. When Video System is displayed. Component Auto The projector automatically detects incoming video signal, and adjusts itself to optimize...
... Note: The AV System Menu cannot be selected when selecting RGB (Scart). 37 Video Input Video or S-Video Auto The projector automatically detects incoming video system, and adjusts itself to optimize its performance. Move the pointer to display the On-Screen Menu. ... icon Selected system is PAL-M or PAL-N, select system manually. COMPONENT VIDEO SIGNAL FORMAT If the projector cannot reproduce proper video image, it is displayed. When Video System is displayed. Component Auto The projector automatically detects incoming video signal, and adjusts itself to optimize...

Owners Manual
Page 41
... buttons and move the red framed pointer to display a confirmation box. Scale H/V Adjust the Horizontal/Vertical screen scale. Custom Adjust the screen scale and position manually with this function. Wide Provide the image at Reset to the Screen Menu icon. Press the SELECT button at a wide screen ratio of 4:3. Video Input...
... buttons and move the red framed pointer to display a confirmation box. Scale H/V Adjust the Horizontal/Vertical screen scale. Custom Adjust the screen scale and position manually with this function. Wide Provide the image at Reset to the Screen Menu icon. Press the SELECT button at a wide screen ratio of 4:3. Video Input...

Owners Manual
Page 56
... may result in accidents, injury, or create a fire hazard. ● Lamp life may result in the Lamp Replacement section of this manual.) Continuous use as its lifetime draws to an end. Risk of explosion may fail or terminate their life in which must be replaced, ...LAMP EXPLODES, THE FOLLOWING SAFETY PRECAUTIONS SHOULD BE TAKEN. Inappropriate attempts to service the unit by pieces of use of the lamp with projector service. Select [Yes], then another confirmation box appears. Maintenance and Cleaning Lamp Replacement Counter Be sure to reset the Lamp replacement counter ...
... may result in accidents, injury, or create a fire hazard. ● Lamp life may result in the Lamp Replacement section of this manual.) Continuous use as its lifetime draws to an end. Risk of explosion may fail or terminate their life in which must be replaced, ...LAMP EXPLODES, THE FOLLOWING SAFETY PRECAUTIONS SHOULD BE TAKEN. Inappropriate attempts to service the unit by pieces of use of the lamp with projector service. Select [Yes], then another confirmation box appears. Maintenance and Cleaning Lamp Replacement Counter Be sure to reset the Lamp replacement counter ...

Owners Manual
Page 57
...is out of the specified operating temperature (41°F ~ 95°F (5°C ~ 35°C)). - Provide proper distance between your computer's instruction manual for the setting. - See if the selected system is corresponding to display an image after the POWER indicator turns red. (See page 19.) - Select... (See page 46.) - You will hear the sound only when the image is Top/Bottom reversed No sound - Check the connection between the projector and the projection screen. (See page 13.) - Make sure you may result in moisture condensation on . (See page 52.) - Adjust the ...
...is out of the specified operating temperature (41°F ~ 95°F (5°C ~ 35°C)). - Provide proper distance between your computer's instruction manual for the setting. - See if the selected system is corresponding to display an image after the POWER indicator turns red. (See page 19.) - Select... (See page 46.) - You will hear the sound only when the image is Top/Bottom reversed No sound - Check the connection between the projector and the projection screen. (See page 13.) - Make sure you may result in moisture condensation on . (See page 52.) - Adjust the ...
Owners Manual
Page 63
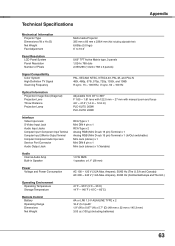
... Dimensions (W x H x D) Net Weight Feet Adjustment Multi-media Projector 335 mm x 83 mm x 238.4 mm (Not including adjustable feet) 6.63lbs (3.0 kgs) 0˚ to 10.0˚ Panel Resolution LCD Panel System 0.63" TFT Active Matrix type, 3 panels Panel Resolution 1,024 x 768 dots Number of Pixels 2,359,... Adjustable from 40" to 300" F 1.65 ~ 1.81 lens with f 22.5 mm ~ 27 mm with manual zoom and focus 4.6' ~ 41.3' (1.4 m ~ 12.6 m) PLC-XU75: 200W PLC-XU78: 220W Interface Video Input Jack S-Video Input Jack Audio Input Jacks Computer Input 1/Component Input Terminal Computer Input 2/Monitor...
... Dimensions (W x H x D) Net Weight Feet Adjustment Multi-media Projector 335 mm x 83 mm x 238.4 mm (Not including adjustable feet) 6.63lbs (3.0 kgs) 0˚ to 10.0˚ Panel Resolution LCD Panel System 0.63" TFT Active Matrix type, 3 panels Panel Resolution 1,024 x 768 dots Number of Pixels 2,359,... Adjustable from 40" to 300" F 1.65 ~ 1.81 lens with f 22.5 mm ~ 27 mm with manual zoom and focus 4.6' ~ 41.3' (1.4 m ~ 12.6 m) PLC-XU75: 200W PLC-XU78: 220W Interface Video Input Jack S-Video Input Jack Audio Input Jacks Computer Input 1/Component Input Terminal Computer Input 2/Monitor...

Owners Manual
Page 66
...in a prominent place of the projector's body to operate the projector, contact the service station. While the projector is locked with a PIN code. Put the label below and keep it is locked with this manual securely. Lamp Replacement Label When using the projector ceiling-mounted, put the Lamp replacement... label (supplied) on in a prominent place of the projector's body while it with the PIN code.... PIN Code Lock No...
...in a prominent place of the projector's body to operate the projector, contact the service station. While the projector is locked with a PIN code. Put the label below and keep it is locked with this manual securely. Lamp Replacement Label When using the projector ceiling-mounted, put the Lamp replacement... label (supplied) on in a prominent place of the projector's body while it with the PIN code.... PIN Code Lock No...

