
Owners Manual
Page 2
Table of Contents Table of Contents To the Owner Safety Instructions Installing the Projector in the owner's manual is a trademark or a registered trademark of Microsoft Corporation. G IBM, VGA, XGA, and PS/2 are trademarks or registered trademarks of Apple Computer,Inc. G Windows and PowerPoint are registered trademarks of its respective corporation. 2 G Each name of...
Table of Contents Table of Contents To the Owner Safety Instructions Installing the Projector in the owner's manual is a trademark or a registered trademark of Microsoft Corporation. G IBM, VGA, XGA, and PS/2 are trademarks or registered trademarks of Apple Computer,Inc. G Windows and PowerPoint are registered trademarks of its respective corporation. 2 G Each name of...

Owners Manual
Page 3
...maintained. Eye damage may result in not only shortening the product-life, but also malfunctions, fire hazard, or other people. This projector provides many convenient features and functions. If the problem still persists, contact the dealer where you to be maintained. THIS SYMBOL INDICATES ... look into a compartment or similarly enclosed, the minimum distances must be used for a considerable time. To the Owner Before operating this projector, read this manual again, check operations and cable connections and try the solutions in the "Troubleshooting" section at the end of this ...
...maintained. Eye damage may result in not only shortening the product-life, but also malfunctions, fire hazard, or other people. This projector provides many convenient features and functions. If the problem still persists, contact the dealer where you to be maintained. THIS SYMBOL INDICATES ... look into a compartment or similarly enclosed, the minimum distances must be used for a considerable time. To the Owner Before operating this projector, read this manual again, check operations and cable connections and try the solutions in the "Troubleshooting" section at the end of this ...

Owners Manual
Page 4
... overload wall outlets and extension cords as improper adjustment of other similar surface. Refer all warnings and instructions marked on the projector. d. When the projector exhibits a distinct change in fire or electric shock. Unauthorized substitutions may fall, causing serious injury to a child or adult...excessive force, and uneven surfaces may result in the back and bottom of the cabinet are required, be moved with the projector. Unplug this projector yourself as they may be placed in a built-in Nederland Bij dit product zijn batterijen geleverd. f. Read all of ...
... overload wall outlets and extension cords as improper adjustment of other similar surface. Refer all warnings and instructions marked on the projector. d. When the projector exhibits a distinct change in fire or electric shock. Unauthorized substitutions may fall, causing serious injury to a child or adult...excessive force, and uneven surfaces may result in the back and bottom of the cabinet are required, be moved with the projector. Unplug this projector yourself as they may be placed in a built-in Nederland Bij dit product zijn batterijen geleverd. f. Read all of ...

Owners Manual
Page 5
... or malfunctions may cause damage to project an image. 20˚ NO SIDEWAYS Do not point the projector down the projector. To transport the projector through a courier or transport services with the projector. Air Intake Vent Exhaust Vent (Hot air exhaust) CAUTION Air Intake Vent Hot air is not designed... to protect the projector from dust and scratches on the cabinet will become hot while the projector is not in the cabinet are provided to cool down to strong forces or put it from overheating...
... or malfunctions may cause damage to project an image. 20˚ NO SIDEWAYS Do not point the projector down the projector. To transport the projector through a courier or transport services with the projector. Air Intake Vent Exhaust Vent (Hot air exhaust) CAUTION Air Intake Vent Hot air is not designed... to protect the projector from dust and scratches on the cabinet will become hot while the projector is not in the cabinet are provided to cool down to strong forces or put it from overheating...

Owners Manual
Page 6
... must be connected to the terminal in the mains lead of the plug. The wire which is encouraged to try to defeat this projector meets the requirement for help. GROUND AC Power Cord for the United Kingdom : This cord is already fitted with a moulded plug ... LIVE SOCKET OUTLET. The end of the same rating, marked thus ASA . Model Numbers Trade Name Responsible party Address Telephone No. : PLC-XU55, PLC-XU50, PLC-SU50 : Sanyo : SANYO FISHER COMPANY : 21605 Plummer Street, Chatsworth, California 91311 : (818)998-7322 AC POWER CORD REQUIREMENT The AC Power Cord supplied with ...
... must be connected to the terminal in the mains lead of the plug. The wire which is encouraged to try to defeat this projector meets the requirement for help. GROUND AC Power Cord for the United Kingdom : This cord is already fitted with a moulded plug ... LIVE SOCKET OUTLET. The end of the same rating, marked thus ASA . Model Numbers Trade Name Responsible party Address Telephone No. : PLC-XU55, PLC-XU50, PLC-SU50 : Sanyo : SANYO FISHER COMPANY : 21605 Plummer Street, Chatsworth, California 91311 : (818)998-7322 AC POWER CORD REQUIREMENT The AC Power Cord supplied with ...
Owners Manual
Page 7
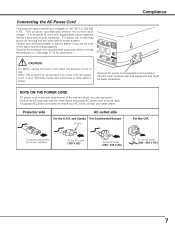
...U.K. To power cord connector on . (See page 17-18 for connection.) Compliance CAUTION For safety, unplug AC power cord when the projector is designed to the projector. Consult your authorized dealer or service station if you use . Connect AC power cord (supplied) to work with AC power cord, it... is in use a projector. Connecting the AC Power Cord This projector uses nominal input voltages of power being supplied. To reduce risk of electrical shock, do not plug into any other type ...
...U.K. To power cord connector on . (See page 17-18 for connection.) Compliance CAUTION For safety, unplug AC power cord when the projector is designed to the projector. Consult your authorized dealer or service station if you use . Connect AC power cord (supplied) to work with AC power cord, it... is in use a projector. Connecting the AC Power Cord This projector uses nominal input voltages of power being supplied. To reduce risk of electrical shock, do not plug into any other type ...

Owners Manual
Page 8
...These functions will make your presentation instead of blackout image with this projector has wireless mouse function for the starting display of 16.77 million colors, and matrix liquid crystal display (LCD) technology. You can also enjoy digital entertainment content protected by the...German, French, Italian, Spanish, Portuguese, Dutch, Swedish, Russian, Chinese, Korean, or Japanese. (See page 38.) N Switchable Interface Terminal The projector provides a switchable interface terminal. Contact the dealer where you wish to an input signal for the best suited image. (See page 40.) N ...
...These functions will make your presentation instead of blackout image with this projector has wireless mouse function for the starting display of 16.77 million colors, and matrix liquid crystal display (LCD) technology. You can also enjoy digital entertainment content protected by the...German, French, Italian, Spanish, Portuguese, Dutch, Swedish, Russian, Chinese, Korean, or Japanese. (See page 38.) N Switchable Interface Terminal The projector provides a switchable interface terminal. Contact the dealer where you wish to an input signal for the best suited image. (See page 40.) N ...
Owners Manual
Page 10
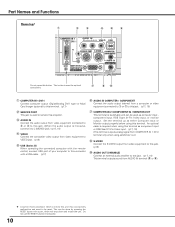
Part Names and Functions Terminal q w e r t y COMPUTER IN 1 DVI - This can be reset. An optional cable is used to this projector. Set the terminal up as either Computer input or Monitor output properly before using this connector with a USB cable. (p17) y AUDIO IN COMPUTER / COMPONENT Connect ...
Part Names and Functions Terminal q w e r t y COMPUTER IN 1 DVI - This can be reset. An optional cable is used to this projector. Set the terminal up as either Computer input or Monitor output properly before using this connector with a USB cable. (p17) y AUDIO IN COMPUTER / COMPONENT Connect ...

Owners Manual
Page 11
... o q KEYSTONE button Corrects keystone distortion. (p20, 38) w INPUT button Selects input source. (p24, 32 ) e POWER ON-OFF button Turns the projector on . This also flashes red when the internal temperature of the projection lamp draws to be turned on or off. (p19) r SELECT button Executes the... KEYSTONE SELECT LAMP REPLACE VOLUME - button. (p21) t POWER indicator Flashes red until the projector gets ready to an end. (p43) 11 o LAMP REPLACE indicator Turns yellow when the life of the projector exceeds the operating range. (p41) u MENU button Opens or closes the On-Screen Menu....
... o q KEYSTONE button Corrects keystone distortion. (p20, 38) w INPUT button Selects input source. (p24, 32 ) e POWER ON-OFF button Turns the projector on . This also flashes red when the internal temperature of the projection lamp draws to be turned on or off. (p19) r SELECT button Executes the... KEYSTONE SELECT LAMP REPLACE VOLUME - button. (p21) t POWER indicator Flashes red until the projector gets ready to an end. (p43) 11 o LAMP REPLACE indicator Turns yellow when the life of the projector exceeds the operating range. (p41) u MENU button Opens or closes the On-Screen Menu....

Owners Manual
Page 12
...wireless mouse operation. (p14) w SIGNAL EMISSION indicator This indicator lights red while the laser beam is being sent from the remote control to the projector. Connect the projector and your computer with a USB cable before use. (p17) i POINT (UP/DOWN/LEFT/RIGHT) button Selects an item or adjusts value ...in the Digital zoom +/- mode. (p31) Point Left/Right button are also used as a switching button to activate the Pointer function of the projector or a pointer for an image from a computer. Set it to "ALL OFF" for more than 1 minute, release the LASER button and press it...
...wireless mouse operation. (p14) w SIGNAL EMISSION indicator This indicator lights red while the laser beam is being sent from the remote control to the projector. Connect the projector and your computer with a USB cable before use. (p17) i POINT (UP/DOWN/LEFT/RIGHT) button Selects an item or adjusts value ...in the Digital zoom +/- mode. (p31) Point Left/Right button are also used as a switching button to activate the Pointer function of the projector or a pointer for an image from a computer. Set it to "ALL OFF" for more than 1 minute, release the LASER button and press it...
Owners Manual
Page 13
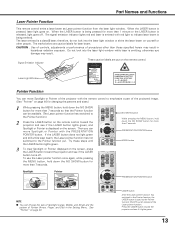
... Light Window Pointer Function You can move Spotlight or Pointer with red light to the Pointer function yet. Press the LASER button toward the projector and see if it lights green. 13 If the LASER button does not light green and still emits laser beam, the Laser pointer function...can be available. (The Laser pointer function has switched to the Pointer function.) 2 Press the LASER button on the remote control toward the projector and see if the LASER button lights green, and Spotlight or Pointer is used as Laser pointer function from the laser light window. PRESENTATION POINTER...
... Light Window Pointer Function You can move Spotlight or Pointer with red light to the Pointer function yet. Press the LASER button toward the projector and see if it lights green. 13 If the LASER button does not light green and still emits laser beam, the Laser pointer function...can be available. (The Laser pointer function has switched to the Pointer function.) 2 Press the LASER button on the remote control toward the projector and see if the LASER button lights green, and Spotlight or Pointer is used as Laser pointer function from the laser light window. PRESENTATION POINTER...

Owners Manual
Page 14
...sequentially. (See the list below.) 2 To initialize the remote control code for your computer and the projector with this button. L-CLICK button Acts as right click while the projector and a computer are connected with a USB cable. 14 R-CLICK button Acts as left click while...control. This switching function prevents remote control interference when operating several projectors or video equipment at the same time. (Change the remote control code for the projector first before changing that for the projector. The initial code is not available. MENU button Wireless Mouse ...
...sequentially. (See the list below.) 2 To initialize the remote control code for your computer and the projector with this button. L-CLICK button Acts as right click while the projector and a computer are connected with a USB cable. 14 R-CLICK button Acts as left click while...control. This switching function prevents remote control interference when operating several projectors or video equipment at the same time. (Change the remote control code for the projector first before changing that for the projector. The initial code is not available. MENU button Wireless Mouse ...

Owners Manual
Page 15
Two AA size batteries For correct polarity (+ and -), be sure battery terminals are in contact with pins in front of the projector. 16.4' (5 m) 60° Remote Control Batteries Installation 1 Remove the battery compartment lid. G Avoid contact with a used batteries according to moisture, or heat. Press the lid ... range for the remote control is replaced by an incorrect type. Part Names and Functions Remote Control Operating Range Point the remote control toward the projector (Infrared Remote Receiver) whenever pressing any button.
Two AA size batteries For correct polarity (+ and -), be sure battery terminals are in contact with pins in front of the projector. 16.4' (5 m) 60° Remote Control Batteries Installation 1 Remove the battery compartment lid. G Avoid contact with a used batteries according to moisture, or heat. Press the lid ... range for the remote control is replaced by an incorrect type. Part Names and Functions Remote Control Operating Range Point the remote control toward the projector (Infrared Remote Receiver) whenever pressing any button.

Owners Manual
Page 16
...1524 12.8' (3.9m) 8.2' (2.5m) 150" 3048 x 2286 19.3' (5.9m) 12.5' (3.8m) NOTE G The brightness in a room has a great influence on both sides of the projector. 2 Release the feet lock latches to lock the adjustable feet and rotate the adjustable feet to adjust the position and tilt. 3 To retract the adjustable... feet, lift the front of the projector and pull and undo the feet lock latches. G The values shown are approximate and may vary from 3.3'(1.0m) - 25.3'(7.7m). Refer to ...
...1524 12.8' (3.9m) 8.2' (2.5m) 150" 3048 x 2286 19.3' (5.9m) 12.5' (3.8m) NOTE G The brightness in a room has a great influence on both sides of the projector. 2 Release the feet lock latches to lock the adjustable feet and rotate the adjustable feet to adjust the position and tilt. 3 To retract the adjustable... feet, lift the front of the projector and pull and undo the feet lock latches. G The values shown are approximate and may vary from 3.3'(1.0m) - 25.3'(7.7m). Refer to ...
Owners Manual
Page 17
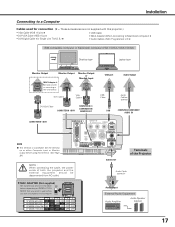
...equipment should be disconnected from AC outlet. Installation Connecting to a Computer Cables used for connection (✽ = These accessories are not supplied with this projector.) • VGA Cable (HDB 15 pin) ✽ • DVI-VGA Cable (HDB 15 pin) • DVI-Digital Cable (for ...) ✽ • Audio Cables ( Mini Plug (stereo) x 2) ✽ IBM-compatible computer or Macintosh computer (VGA / SVGA / XGA / SXGA) Desktop type Laptop type Monitor Output Monitor Output MAC Adapter ✽ Set slide switches according to the chart below depending on RESOLUTION MODE...
...equipment should be disconnected from AC outlet. Installation Connecting to a Computer Cables used for connection (✽ = These accessories are not supplied with this projector.) • VGA Cable (HDB 15 pin) ✽ • DVI-VGA Cable (HDB 15 pin) • DVI-Digital Cable (for ...) ✽ • Audio Cables ( Mini Plug (stereo) x 2) ✽ IBM-compatible computer or Macintosh computer (VGA / SVGA / XGA / SXGA) Desktop type Laptop type Monitor Output Monitor Output MAC Adapter ✽ Set slide switches according to the chart below depending on RESOLUTION MODE...
Owners Manual
Page 18
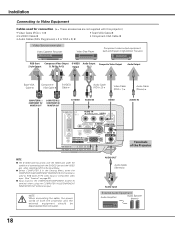
... in the Setting Menu when the COMPUTER IN 2/COMPONENT IN/MONITOR OUT terminal is used for connection (✽ = These accessories are not supplied with this projector.) • Video Cable (RCA x 1) ✽ • S-VIDEO Cable ✽ • Audio Cables (Mini Plug (stereo) x 2 or RCA x 2) ✽... Player Component video output equipment. (such as input. NOTE : When connecting the cable, the power cords of connecting both the projector and the external equipment should be disconnected from AC outlet. AUDIO OUT Audio Cable (Stereo) ✽ Audio Input External Audio Equipment...
... in the Setting Menu when the COMPUTER IN 2/COMPONENT IN/MONITOR OUT terminal is used for connection (✽ = These accessories are not supplied with this projector.) • Video Cable (RCA x 1) ✽ • S-VIDEO Cable ✽ • Audio Cables (Mini Plug (stereo) x 2 or RCA x 2) ✽... Player Component video output equipment. (such as input. NOTE : When connecting the cable, the power cords of connecting both the projector and the external equipment should be disconnected from AC outlet. AUDIO OUT Audio Cable (Stereo) ✽ Audio Input External Audio Equipment...

Owners Manual
Page 19
... into an AC outlet. Selected Input Source and Lamp Mode Lamp mode (See page 40 for more than 24 hours continuously. Turn off the projector at least once in shortening the lamp lifetime. See "Capture" on again, the POWER indicator lights red. Then you can turn off ?" ...image can be turned on during the cooling period with a computer, VCR, etc.) before turning on the remote control, and a message "Power off the projector. G If the WARNING indicator flashes or lights red, see "Warning Indicator" on the remote control. You can disconnect the AC power cord. The POWER ...
... into an AC outlet. Selected Input Source and Lamp Mode Lamp mode (See page 40 for more than 24 hours continuously. Turn off the projector at least once in shortening the lamp lifetime. See "Capture" on again, the POWER indicator lights red. Then you can turn off ?" ...image can be turned on during the cooling period with a computer, VCR, etc.) before turning on the remote control, and a message "Power off the projector. G If the WARNING indicator flashes or lights red, see "Warning Indicator" on the remote control. You can disconnect the AC power cord. The POWER ...

Owners Manual
Page 22
... the item that you want to adjust, and then press the SELECT button to the following pages for details of respective adjustments. 5 To close this projector through the On-Screen Menu. OFF INPUT POWER WARNING KEYSTONE SELECT LAMP REPLACE VOLUME - Basic Operation On-Screen Menu You can control and adjust this...
... the item that you want to adjust, and then press the SELECT button to the following pages for details of respective adjustments. 5 To close this projector through the On-Screen Menu. OFF INPUT POWER WARNING KEYSTONE SELECT LAMP REPLACE VOLUME - Basic Operation On-Screen Menu You can control and adjust this...

Owners Manual
Page 23
..., and Image 1 ~ 4. (p29) Screen Menu Used to adjust size of image. [Normal / True / Wide / Digital zoom +/-] (p31) Setting Menu Used to change settings of the projector or reset lamp replace counter. (p38-40) Input Menu Used to select input source either Computer or Video. (p24) PC Adjust Menu Used to adjust...
..., and Image 1 ~ 4. (p29) Screen Menu Used to adjust size of image. [Normal / True / Wide / Digital zoom +/-] (p31) Setting Menu Used to change settings of the projector or reset lamp replace counter. (p38-40) Input Menu Used to select input source either Computer or Video. (p24) PC Adjust Menu Used to adjust...

Owners Manual
Page 24
... SELECT button. NOTE G HDCP (High-bandwidth Digital Content Protection) is used as described below. Before using these buttons, correct input source should be changed, this projector may not display the digital content protected by DVI (Digital Visual Interface) from a computer through menu operation as Monitor out. INPUT button Computer 1 Computer 2 ✽...
... SELECT button. NOTE G HDCP (High-bandwidth Digital Content Protection) is used as described below. Before using these buttons, correct input source should be changed, this projector may not display the digital content protected by DVI (Digital Visual Interface) from a computer through menu operation as Monitor out. INPUT button Computer 1 Computer 2 ✽...


