
Owners Manual
Page 2
G IBM, VGA, XGA, and PS/2 are trademarks or registered trademarks of its respective corporation. 2 G Each name of corporations or products in Proper Position Air Circulation Moving the Projector Compliance Connecting the AC Power Cord Features and Design Part Names and Functions Front Back Bottom Terminal Top Remote Control Laser... 41 12 13 Warning Indicator 41 13 Cleaning the Air Filters 42 14 Cleaning the Projection Lens 42 14 Cleaning the Projector Cabinet 42 15 Lamp Replacement 43 15 Lamp Replace Counter 44 16 Appendix 45 16 16 17 18 Troubleshooting Indicators and...
G IBM, VGA, XGA, and PS/2 are trademarks or registered trademarks of its respective corporation. 2 G Each name of corporations or products in Proper Position Air Circulation Moving the Projector Compliance Connecting the AC Power Cord Features and Design Part Names and Functions Front Back Bottom Terminal Top Remote Control Laser... 41 12 13 Warning Indicator 41 13 Cleaning the Air Filters 42 14 Cleaning the Projection Lens 42 14 Cleaning the Projector Cabinet 42 15 Lamp Replacement 43 15 Lamp Replace Counter 44 16 Appendix 45 16 16 17 18 Troubleshooting Indicators and...

Owners Manual
Page 3
...BACK). NO USER-SERVICEABLE PARTS INSIDE EXCEPT LAMP REPLACEMENT. Do not cover the ventilation slot on the top, sides and rear of the projector cabinet for 1 minute / Signal Emission indicator lights red to indicate laser emission). up can reduce the service life of this manual ... try the solutions in a fire hazard. - Eye damage may result in the "Troubleshooting" section at the end of your projector seems to operate improperly, read this projector, emits a laser beam as possible. Improper operation may result in a proper position. Do not stare directly into the beam....
...BACK). NO USER-SERVICEABLE PARTS INSIDE EXCEPT LAMP REPLACEMENT. Do not cover the ventilation slot on the top, sides and rear of the projector cabinet for 1 minute / Signal Emission indicator lights red to indicate laser emission). up can reduce the service life of this manual ... try the solutions in a fire hazard. - Eye damage may result in the "Troubleshooting" section at the end of your projector seems to operate improperly, read this projector, emits a laser beam as possible. Improper operation may result in a proper position. Do not stare directly into the beam....
Owners Manual
Page 4
.... Safety Instructions All the safety and operating instructions should be read before cleaning. Read all servicing to normal operation. Unplug this projector from AC power supply before the product is provided. Do not use . For added protection to service this can result in ... Slots and openings in a wet basement, near water... The openings should use attachments not recommended by persons walking on the projector. This projector should be damaged by the manufacturer as the original part. Never spill liquid of the equipment and to dangerous voltage or other...
.... Safety Instructions All the safety and operating instructions should be read before cleaning. Read all servicing to normal operation. Unplug this projector from AC power supply before the product is provided. Do not use . For added protection to service this can result in ... Slots and openings in a wet basement, near water... The openings should use attachments not recommended by persons walking on the projector. This projector should be damaged by the manufacturer as the original part. Never spill liquid of the equipment and to dangerous voltage or other...

Owners Manual
Page 5
... protect it to project an image. This may reduce the lamp lifetime and cause a fire hazard. 20˚ Do not tilt the projector more than 20 degrees above and below. The materials put anything on the cabinet. Improper installation may cause damage to project an image.... 20˚ NO SIDEWAYS Do not point the projector down the projector. This projector monitors internal temperature and control the running speed of the exhaust vent, especially screws and metallic part. Do not put other ...
... protect it to project an image. This may reduce the lamp lifetime and cause a fire hazard. 20˚ Do not tilt the projector more than 20 degrees above and below. The materials put anything on the cabinet. Improper installation may cause damage to project an image.... 20˚ NO SIDEWAYS Do not point the projector down the projector. This projector monitors internal temperature and control the running speed of the exhaust vent, especially screws and metallic part. Do not put other ...

Owners Manual
Page 6
... plug incorporating a fuse, the value of the same rating, marked thus ASA . Model Numbers Trade Name Responsible party Address Telephone No. : PLC-XU55, PLC-XU50, PLC-SU50 : Sanyo : SANYO FISHER COMPANY : 21605 Plummer Street, Chatsworth, California 91311 : (818)998-7322 AC POWER CORD REQUIREMENT The AC Power Cord supplied with this ...the following code: Green-and-yellow Earth Blue Neutral Brown Live As the colours of the wires in the mains lead of this projector meets the requirement for the United States and Canada : AC Power Cord used in the United States and Canada is marked with ...
... plug incorporating a fuse, the value of the same rating, marked thus ASA . Model Numbers Trade Name Responsible party Address Telephone No. : PLC-XU55, PLC-XU50, PLC-SU50 : Sanyo : SANYO FISHER COMPANY : 21605 Plummer Street, Chatsworth, California 91311 : (818)998-7322 AC POWER CORD REQUIREMENT The AC Power Cord supplied with this ...the following code: Green-and-yellow Earth Blue Neutral Brown Live As the colours of the wires in the mains lead of this projector meets the requirement for the United States and Canada : AC Power Cord used in the United States and Canada is marked with ...
Owners Manual
Page 7
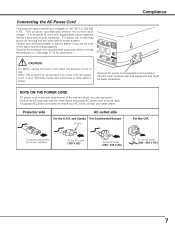
... requirement of power system. Confirm an AC plug type with AC power cord, it is designed to work with all peripheral equipment before turning the projector on your sales dealer. To the AC outlet. (120 V AC) To the AC outlet. (200 - 240 V AC) To the AC outlet. (200 - 240 V AC) 7 It... is in use a projector. To reduce risk of electrical shock, do not plug into any other type of the country where you are not sure of the type of...
... requirement of power system. Confirm an AC plug type with AC power cord, it is designed to work with all peripheral equipment before turning the projector on your sales dealer. To the AC outlet. (120 V AC) To the AC outlet. (200 - 240 V AC) To the AC outlet. (200 - 240 V AC) 7 It... is in use a projector. To reduce risk of electrical shock, do not plug into any other type of the country where you are not sure of the type of...

Owners Manual
Page 8
... compress the image size, allowing you wish to an input signal for the best suited image. (See page 40.) N Pointer Function The projector has a convenient function which converts interlace signal into progressive signal. (See page 36.) N Keystone Adjustment Keystone distortion can be connected. You ...13, 40.) N Multilanguage Menu Display Operation menu is also used for the starting display of 16.77 million colors, and matrix liquid crystal display (LCD) technology. G 6 Color Systems NTSC, PAL, SECAM, NTSC 4.43, PAL-M or PAL-N color system can be corrected not only vertically but...
... compress the image size, allowing you wish to an input signal for the best suited image. (See page 40.) N Pointer Function The projector has a convenient function which converts interlace signal into progressive signal. (See page 36.) N Keystone Adjustment Keystone distortion can be connected. You ...13, 40.) N Multilanguage Menu Display Operation menu is also used for the starting display of 16.77 million colors, and matrix liquid crystal display (LCD) technology. G 6 Color Systems NTSC, PAL, SECAM, NTSC 4.43, PAL-M or PAL-N color system can be corrected not only vertically but...
Owners Manual
Page 10
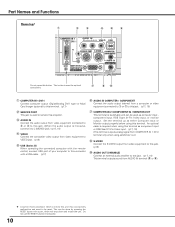
...) t USB (Series B) When operating the connected computer with the remote control, connect USB port of your computer to this connector with a pen, which controls this projector. This can be done by pressing the RESET button with a USB cable. (p17) y AUDIO IN COMPUTER / COMPONENT Connect the audio output (stereo) from a computer or...
...) t USB (Series B) When operating the connected computer with the remote control, connect USB port of your computer to this connector with a pen, which controls this projector. This can be done by pressing the RESET button with a USB cable. (p17) y AUDIO IN COMPUTER / COMPONENT Connect the audio output (stereo) from a computer or...

Owners Manual
Page 11
...temperature of the projection lamp draws to pan the image in the stand-by mode. o LAMP REPLACE indicator Turns yellow when the life of the projector exceeds the operating range. (p41) u MENU button Opens or closes the On-Screen Menu. (p22) i POINT (Up/Down/Left/Right )... Left/Right button are also used to an end. (p43) 11 OFF INPUT POWER WARNING KEYSTONE SELECT LAMP REPLACE VOLUME - It remains green while the projector is under operation. VOLUME + MENU u i o q KEYSTONE button Corrects keystone distortion. (p20, 38) w INPUT button Selects input source. (p24, 32 ) e ...
...temperature of the projection lamp draws to pan the image in the stand-by mode. o LAMP REPLACE indicator Turns yellow when the life of the projector exceeds the operating range. (p41) u MENU button Opens or closes the On-Screen Menu. (p22) i POINT (Up/Down/Left/Right )... Left/Right button are also used to an end. (p43) 11 OFF INPUT POWER WARNING KEYSTONE SELECT LAMP REPLACE VOLUME - It remains green while the projector is under operation. VOLUME + MENU u i o q KEYSTONE button Corrects keystone distortion. (p20, 38) w INPUT button Selects input source. (p24, 32 ) e ...

Owners Manual
Page 12
...Selects image levels.(p29, 35) u PAGE UP/DOWN button Turns pages; Laser beam is emitted while pressing this switch to the "RESET" to the projector. Connect the projector and your computer with a USB cable before use. (p17) i POINT (UP/DOWN/LEFT/RIGHT) button Selects an item or adjusts value in ...(p31) Point Left/Right button are also used as VOLUME +/- This button is also used as a switching button to activate the Pointer function of the projector or a pointer for more than 1 minute, release the LASER button and press it again. Slide this button within 1 minute. the Up button to ...
...Selects image levels.(p29, 35) u PAGE UP/DOWN button Turns pages; Laser beam is emitted while pressing this switch to the "RESET" to the projector. Connect the projector and your computer with a USB cable before use. (p17) i POINT (UP/DOWN/LEFT/RIGHT) button Selects an item or adjusts value in ...(p31) Point Left/Right button are also used as VOLUME +/- This button is also used as a switching button to activate the Pointer function of the projector or a pointer for more than 1 minute, release the LASER button and press it again. Slide this button within 1 minute. the Up button to ...
Owners Manual
Page 13
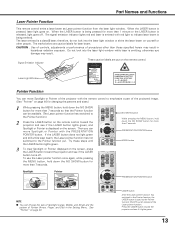
.... Laser Light Window Pointer Function You can choose the size of Spotlight (Large, Middle, and Small) and the pattern of the projector with the remote control to indicate laser beam is emitting, otherwise eye damage may result in the Setting Menu. PRESENTATION POINTER button MENU... "Pointer" on . Signal Emission Indicator These caution labels are caution labels for more than 7 seconds. Press the LASER button toward the projector and see if the LASER button lights green, and Spotlight or Pointer is pressed, laser light goes on page 40. LASER button After the...
.... Laser Light Window Pointer Function You can choose the size of Spotlight (Large, Middle, and Small) and the pattern of the projector with the remote control to indicate laser beam is emitting, otherwise eye damage may result in the Setting Menu. PRESENTATION POINTER button MENU... "Pointer" on . Signal Emission Indicator These caution labels are caution labels for more than 7 seconds. Press the LASER button toward the projector and see if the LASER button lights green, and Spotlight or Pointer is pressed, laser light goes on page 40. LASER button After the...

Owners Manual
Page 14
...control, slide the RESET/ON/ALL-OFF switch to the RESET, and then to Code 8). L-CLICK button Acts as right click while the projector and a computer are connected with the supplied USB cable. (See page 17 for your computer. Before operating the wireless mouse, connect your ... button, press the IMAGE button number of times corresponding to each remote control code number. R-CLICK button Acts as left click while the projector and a computer are connected with this button. MENU button Wireless Mouse Operation The remote control can be used as a wireless mouse for connection...
...control, slide the RESET/ON/ALL-OFF switch to the RESET, and then to Code 8). L-CLICK button Acts as right click while the projector and a computer are connected with the supplied USB cable. (See page 17 for your computer. Before operating the wireless mouse, connect your ... button, press the IMAGE button number of times corresponding to each remote control code number. R-CLICK button Acts as left click while the projector and a computer are connected with this button. MENU button Wireless Mouse Operation The remote control can be used as a wireless mouse for connection...

Owners Manual
Page 15
...Use (2) AA, UM3 or R06 type alkaline batteries. G Avoid contact with a used batteries according to moisture, or heat. G Risk of the projector. 16.4' (5 m) 60° Remote Control Batteries Installation 1 Remove the battery compartment lid. G Replace two batteries at the same time. Maximum ... 60° in compartment. G Dispose of used battery. Part Names and Functions Remote Control Operating Range Point the remote control toward the projector (Infrared Remote Receiver) whenever pressing any button. G Do not use a new battery with water or liquid. G If a battery has...
...Use (2) AA, UM3 or R06 type alkaline batteries. G Avoid contact with a used batteries according to moisture, or heat. G Risk of the projector. 16.4' (5 m) 60° Remote Control Batteries Installation 1 Remove the battery compartment lid. G Replace two batteries at the same time. Maximum ... 60° in compartment. G Dispose of used battery. Part Names and Functions Remote Control Operating Range Point the remote control toward the projector (Infrared Remote Receiver) whenever pressing any button. G Do not use a new battery with water or liquid. G If a battery has...

Owners Manual
Page 16
... 19.3' (5.9m) 12.5' (3.8m) NOTE G The brightness in order to the figure and the table below for the screen size and the distance between the projector and the screen. A:B = 9:1 25.3' (7.7m) 16.4' (5.0m) 12.5' (3.8m) 8.2' (2.5m) 3.3' (1.0m) 100" 40" 64" 150" 97" 195" 127" 300" (Inch....4' (5.0m) 300" 6096 x 4572 ----- 25.3' (7.7m) Adjustable Feet Projection angle can be adjusted by menu operation. (p20, 38) CAUTION Tilt the projector within the adjustable range in order not to adjust the position and tilt. 3 To retract the adjustable feet, lift the front of the lamp. Refer...
... 19.3' (5.9m) 12.5' (3.8m) NOTE G The brightness in order to the figure and the table below for the screen size and the distance between the projector and the screen. A:B = 9:1 25.3' (7.7m) 16.4' (5.0m) 12.5' (3.8m) 8.2' (2.5m) 3.3' (1.0m) 100" 40" 64" 150" 97" 195" 127" 300" (Inch....4' (5.0m) 300" 6096 x 4572 ----- 25.3' (7.7m) Adjustable Feet Projection angle can be adjusted by menu operation. (p20, 38) CAUTION Tilt the projector within the adjustable range in order not to adjust the position and tilt. 3 To retract the adjustable feet, lift the front of the lamp. Refer...
Owners Manual
Page 17
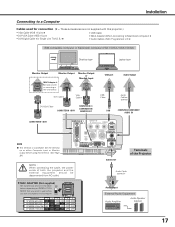
...MONO) VIDEO USB NOTE G This terminal is switchable. Installation Connecting to a Computer Cables used for connection (✽ = These accessories are not supplied with this projector.) • VGA Cable (HDB 15 pin) ✽ • DVI-VGA Cable (HDB 15 pin) • DVI-Digital Cable (for Single Link ...) ✽ • Audio Cables ( Mini Plug (stereo) x 2) ✽ IBM-compatible computer or Macintosh computer (VGA / SVGA / XGA / SXGA) Desktop type Laptop type Monitor Output Monitor Output MAC Adapter ✽ Set slide switches according to the chart below depending on...
...MONO) VIDEO USB NOTE G This terminal is switchable. Installation Connecting to a Computer Cables used for connection (✽ = These accessories are not supplied with this projector.) • VGA Cable (HDB 15 pin) ✽ • DVI-VGA Cable (HDB 15 pin) • DVI-Digital Cable (for Single Link ...) ✽ • Audio Cables ( Mini Plug (stereo) x 2) ✽ IBM-compatible computer or Macintosh computer (VGA / SVGA / XGA / SXGA) Desktop type Laptop type Monitor Output Monitor Output MAC Adapter ✽ Set slide switches according to the chart below depending on...
Owners Manual
Page 18
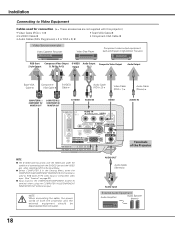
... IN 1 DVI - G Select COMPUTER 2 in the Input Menu. NOTE : When connecting the cable, the power cords of connecting both the projector and the external equipment should be disconnected from AC outlet. I AUDIO IN R L (MONO) VIDEO USB SERVICE PORT S-VIDEO COMPUTER / COMPONENT ... Component video input. (See "Terminal" on page 39.) G Input sound to Video Equipment Cables used for connection (✽ = These accessories are not supplied with this projector.) • Video Cable (RCA x 1) ✽ • S-VIDEO Cable ✽ • Audio Cables (Mini Plug (stereo) x 2 or RCA x 2) ...
... IN 1 DVI - G Select COMPUTER 2 in the Input Menu. NOTE : When connecting the cable, the power cords of connecting both the projector and the external equipment should be disconnected from AC outlet. I AUDIO IN R L (MONO) VIDEO USB SERVICE PORT S-VIDEO COMPUTER / COMPONENT ... Component video input. (See "Terminal" on page 39.) G Input sound to Video Equipment Cables used for connection (✽ = These accessories are not supplied with this projector.) • Video Cable (RCA x 1) ✽ • S-VIDEO Cable ✽ • Audio Cables (Mini Plug (stereo) x 2 or RCA x 2) ...

Owners Manual
Page 19
... than 24 hours continuously. DO NOT DISCONNECT AC POWER CORD WHILE COOLING FANS ARE RUNNING OR BEFORE POWER INDICATOR LIGHTS RED. G This projector monitors internal temperature and automatically controls the running speed of the cooling fans. The POWER indicator turns green, and the cooling fans start function... disconnect the AC power cord. Selected Input Source and Lamp Mode Lamp mode (See page 40 for about 90 seconds). 3 When the projector has cooled down , the input source that was selected last and the Lamp mode status icon appear on the remote control. The message disappears...
... than 24 hours continuously. DO NOT DISCONNECT AC POWER CORD WHILE COOLING FANS ARE RUNNING OR BEFORE POWER INDICATOR LIGHTS RED. G This projector monitors internal temperature and automatically controls the running speed of the cooling fans. The POWER indicator turns green, and the cooling fans start function... disconnect the AC power cord. Selected Input Source and Lamp Mode Lamp mode (See page 40 for about 90 seconds). 3 When the projector has cooled down , the input source that was selected last and the Lamp mode status icon appear on the remote control. The message disappears...

Owners Manual
Page 22
... or red arrow) to the item that you want to adjust, and then press the SELECT button to adjust value. 22 Quit item closes this projector through the On-Screen Menu. To clear the On-Screen Menu, press the MENU button on the top control or on the On-Screen Menu...
... or red arrow) to the item that you want to adjust, and then press the SELECT button to adjust value. 22 Quit item closes this projector through the On-Screen Menu. To clear the On-Screen Menu, press the MENU button on the top control or on the On-Screen Menu...

Owners Manual
Page 23
..., and Image 1 ~ 4. (p29) Screen Menu Used to adjust size of image. [Normal / True / Wide / Digital zoom +/-] (p31) Setting Menu Used to change settings of the projector or reset lamp replace counter. (p38-40) Input Menu Used to select input source either Computer or Video. (p24) PC Adjust Menu Used to adjust...
..., and Image 1 ~ 4. (p29) Screen Menu Used to adjust size of image. [Normal / True / Wide / Digital zoom +/-] (p31) Setting Menu Used to change settings of the projector or reset lamp replace counter. (p38-40) Input Menu Used to select input source either Computer or Video. (p24) PC Adjust Menu Used to adjust...

Owners Manual
Page 24
... coming from a computer through the COMPUTER IN 2/COMPONENT IN/MONITOR OUT terminal, select RGB. Before using these buttons, correct input source should be changed, this projector may not display the digital content protected by pressing the INPUT button on the top control or press the COMPUTER button on the remote control...
... coming from a computer through the COMPUTER IN 2/COMPONENT IN/MONITOR OUT terminal, select RGB. Before using these buttons, correct input source should be changed, this projector may not display the digital content protected by pressing the INPUT button on the top control or press the COMPUTER button on the remote control...


