Owners Manual
Page 2
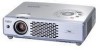
...keystone correction function is provided to use . You can be selected in the Setting menu. (See page 42.) ◆ Compatibility The projector widely accepts various video and computer input signals including; Computers, 6 Color systems, Component video, S-video and RGB scart. ◆ ...12 languages; Features and Design This Multimedia Projector is designed with the most advanced technology for portability, durability, and ease of 16.77 million colors, and matrix liquid crystal display (LCD) technology. ◆ Compact Design This projector is designed compact in size and weight....
...keystone correction function is provided to use . You can be selected in the Setting menu. (See page 42.) ◆ Compatibility The projector widely accepts various video and computer input signals including; Computers, 6 Color systems, Component video, S-video and RGB scart. ◆ ...12 languages; Features and Design This Multimedia Projector is designed with the most advanced technology for portability, durability, and ease of 16.77 million colors, and matrix liquid crystal display (LCD) technology. ◆ Compact Design This projector is designed compact in size and weight....
Owners Manual
Page 3
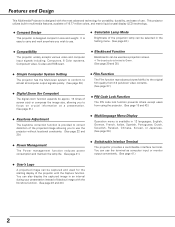
... Bottom 8 Rear Terminal 9 Top Control 10 Remote Control 11 Operating Range 11 Remote Control Battery Installation 12 Installation 13 Positioning the Projector 13 Adjustable Feet 13 Connecting the AC Power Cord 14 Connecting to a Computer 15 Connecting to Video Equipment 16 Connecting to Component ...Video Equipment 17 Basic Operation 18 Turning On the Projector 18 Turning Off the Projector 19 How to Operate the On-Screen Menu 20 Menu Bar 21 Zoom and Focus Adjustment 22 Keystone ...
... Bottom 8 Rear Terminal 9 Top Control 10 Remote Control 11 Operating Range 11 Remote Control Battery Installation 12 Installation 13 Positioning the Projector 13 Adjustable Feet 13 Connecting the AC Power Cord 14 Connecting to a Computer 15 Connecting to Video Equipment 16 Connecting to Component ...Video Equipment 17 Basic Operation 18 Turning On the Projector 18 Turning Off the Projector 19 How to Operate the On-Screen Menu 20 Menu Bar 21 Zoom and Focus Adjustment 22 Keystone ...
Owners Manual
Page 4
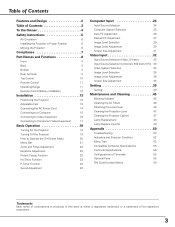
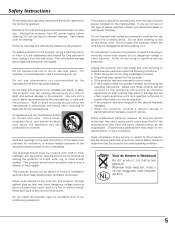
...Precaution WARNING : TO REDUCE THE RISK OF FIRE OR ELECTRIC SHOCK, DO NOT EXPOSE THIS APPLIANCE TO RAIN OR MOISTURE. - Install the projector in not only shortening the product-life, but also malfunctions, fire hazard, or other accidents. REFER SERVICING TO QUALIFIED SERVICE PERSONNEL. Be ...outlet. Do not put any flammable object or spray can also be used for allowing air circulation and cooling the projector. If your projector, and can near the projector, hot air is not to manage those features and maintains it may result in a proper position. If the problem...
...Precaution WARNING : TO REDUCE THE RISK OF FIRE OR ELECTRIC SHOCK, DO NOT EXPOSE THIS APPLIANCE TO RAIN OR MOISTURE. - Install the projector in not only shortening the product-life, but also malfunctions, fire hazard, or other accidents. REFER SERVICING TO QUALIFIED SERVICE PERSONNEL. Be ...outlet. Do not put any flammable object or spray can also be used for allowing air circulation and cooling the projector. If your projector, and can near the projector, hot air is not to manage those features and maintains it may result in a proper position. If the problem...
Owners Manual
Page 5
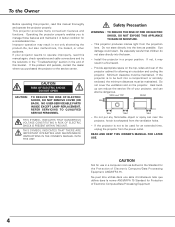
..., or other materials, and the bottom opening or removing covers may expose you are covered by the manufacturer that the projector is in performance-this projector yourself as a book case unless proper ventilation is left unattended and unused for ventilation, to persons. If you to ...cart, stand, or table. Adjust only those controls that could result in fire or electric shock. f. Unplug this projector on the projector. The projector may cause the appliance and cart combination to rain or use liquid or aerosol cleaners. Never spill liquid of the ...
..., or other materials, and the bottom opening or removing covers may expose you are covered by the manufacturer that the projector is in performance-this projector yourself as a book case unless proper ventilation is left unattended and unused for ventilation, to persons. If you to ...cart, stand, or table. Adjust only those controls that could result in fire or electric shock. f. Unplug this projector on the projector. The projector may cause the appliance and cart combination to rain or use liquid or aerosol cleaners. Never spill liquid of the ...
Owners Manual
Page 6
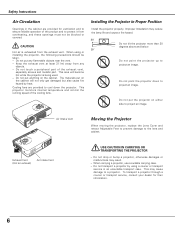
...case. This area will not only get damaged but also cause fire hazard by using or installing the projector, the following precautions should be blocked or covered. This projector monitors internal temperature and control the running speed of the exhaust vent, especially screws and metallic part. Do...the cabinet are provided to cool down to project an image. Do not put the projector on the cabinet. Improper Installation may result. - Air Intake Vent Moving the Projector When moving the projector, replace the Lens Cover and retract Adjustable Feet to prevent damage to the lens and ...
...case. This area will not only get damaged but also cause fire hazard by using or installing the projector, the following precautions should be blocked or covered. This projector monitors internal temperature and control the running speed of the exhaust vent, especially screws and metallic part. Do...the cabinet are provided to cool down to project an image. Do not put the projector on the cabinet. Improper Installation may result. - Air Intake Vent Moving the Projector When moving the projector, replace the Lens Cover and retract Adjustable Feet to prevent damage to the lens and ...
Owners Manual
Page 7
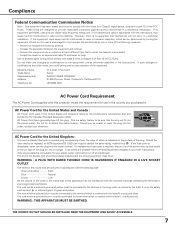
...be used of shielded cable is connected. - The wire which is coloured blue must be required to stop operation of this projector meets the requirement for your User Instructions. This equipment generates, uses and can be connected to the terminal in the mains ... in a particular installation. red or orange). The end of the plug. Model Numbers Trade Name Responsible party Address Telephone No. : PLC-XU41 / PLC-XU47 : Sanyo : SANYO FISHER COMPANY : 21605 Plummer Street, Chatsworth, California 91311 : (818)998-7322 AC Power Cord Requirement The AC Power Cord supplied with...
...be used of shielded cable is connected. - The wire which is coloured blue must be required to stop operation of this projector meets the requirement for your User Instructions. This equipment generates, uses and can be connected to the terminal in the mains ... in a particular installation. red or orange). The end of the plug. Model Numbers Trade Name Responsible party Address Telephone No. : PLC-XU41 / PLC-XU47 : Sanyo : SANYO FISHER COMPANY : 21605 Plummer Street, Chatsworth, California 91311 : (818)998-7322 AC Power Cord Requirement The AC Power Cord supplied with...
Owners Manual
Page 9
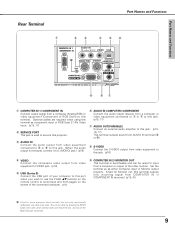
This can be used to service this projector. i S-VIDEO Connect the S-VIDEO output from video equipment to this jack. (p16) r VIDEO Connect the composite video output from video equipment to VIDEO jack. (p16) t ...
This can be used to service this projector. i S-VIDEO Connect the S-VIDEO output from video equipment to this jack. (p16) r VIDEO Connect the composite video output from video equipment to VIDEO jack. (p16) t ...

Owners Manual
Page 10
... REPLACE o i u q KEYSTONE button Corrects keystone distortion. (p22, 39) w INPUT button Selects input source. (p24, 32 ) e POWER ON-OFF button Turns the projector on . button. (p23) o MENU button Opens or closes the On-Screen Menu. (p20) 10 mode. (p31) Point 7 8 button are also used as VOLUME ...+/- This also blinks red when the internal temperature of the projector exceeds the operating range. (p45) u LAMP REPLACE indicator Turns yellow when the life of the projection lamp draws to expand/ compress the image...
... REPLACE o i u q KEYSTONE button Corrects keystone distortion. (p22, 39) w INPUT button Selects input source. (p24, 32 ) e POWER ON-OFF button Turns the projector on . button. (p23) o MENU button Opens or closes the On-Screen Menu. (p20) 10 mode. (p31) Point 7 8 button are also used as VOLUME ...+/- This also blinks red when the internal temperature of the projector exceeds the operating range. (p45) u LAMP REPLACE indicator Turns yellow when the life of the projection lamp draws to expand/ compress the image...

Owners Manual
Page 11
...!1 u AUTO PC P-TIMER IMAGE FREEZE MUTE i o !0 Part Names and Functions q POWER ON-OFF button Turns the projector on or off the image on the screen when giving a presentation. (p9, 15, 42) Connect the projector and your computer with a USB cable to moisture or heat. - Executes the selected item. (p20) - Do not...remote control is about 16.4' (5m) and 60° in the On-Screen Menu. (p20) - Select an item or adjust value in front of the projector. 16.4' (5 m) 30° 30° 11 Do not bend, drop the remote control or expose Remote Control to use soft dry cloth. Part Names...
...!1 u AUTO PC P-TIMER IMAGE FREEZE MUTE i o !0 Part Names and Functions q POWER ON-OFF button Turns the projector on or off the image on the screen when giving a presentation. (p9, 15, 42) Connect the projector and your computer with a USB cable to moisture or heat. - Executes the selected item. (p20) - Do not...remote control is about 16.4' (5m) and 60° in the On-Screen Menu. (p20) - Select an item or adjust value in front of the projector. 16.4' (5 m) 30° 30° 11 Do not bend, drop the remote control or expose Remote Control to use soft dry cloth. Part Names...
Owners Manual
Page 13
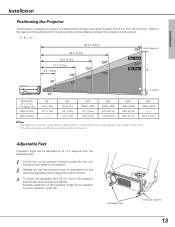
...The values shown above are approximate and may vary from 4.3'(1.3m) - 32.8'(10.0m). Zoom 247" Min. Keystone distortion of the projector and pull and undo the feet lock latches. Refer to adjust the position and tilt. 3 To retract the adjustable feet, lift the ...front of the projected image can be focused from the actual size. Installation Installation Positioning the Projector This projector is recommended to limit ambient lighting in a room has a great influence on picture quality. A:B = 9:1 32.8' (10.0m) 22.0' (6.7m) 16...
...The values shown above are approximate and may vary from 4.3'(1.3m) - 32.8'(10.0m). Zoom 247" Min. Keystone distortion of the projector and pull and undo the feet lock latches. Refer to adjust the position and tilt. 3 To retract the adjustable feet, lift the ...front of the projected image can be focused from the actual size. Installation Installation Positioning the Projector This projector is recommended to limit ambient lighting in a room has a great influence on picture quality. A:B = 9:1 32.8' (10.0m) 22.0' (6.7m) 16...
Owners Manual
Page 14
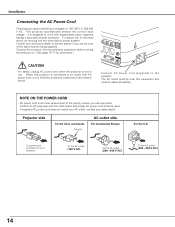
... risk of electrical shock, do not plug into any other type of 100-120 V or 200-240 V AC. The AC outlet must be near this projector is connected to work with the chart below and proper AC power cord must meet requirement of power being supplied. Confirm an AC plug type... your authorized dealer or service station if you are not sure of the type of the country where you use . This projector automatically selects the correct input voltage. Connect the projector with AC power cord, it is not in Stand-by mode and consumes a little electric power. Connect AC power cord (supplied...
... risk of electrical shock, do not plug into any other type of 100-120 V or 200-240 V AC. The AC outlet must be near this projector is connected to work with the chart below and proper AC power cord must meet requirement of power being supplied. Confirm an AC plug type... your authorized dealer or service station if you are not sure of the type of the country where you use . This projector automatically selects the correct input voltage. Connect the projector with AC power cord, it is not in Stand-by mode and consumes a little electric power. Connect AC power cord (supplied...
Owners Manual
Page 15
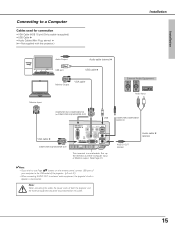
... to use Page ed buttons on the remote control, connect USB port of your computer to the USB socket of both the projector and the external equipment should be disconnected from AC outlet. Note: When connecting the cable, the power cords of the... / AUDIO IN AUDIO OUT (AVRARIAIALBEL)E) This terminal is supplied.) • USB Cable ✽ • Audio Cables (Mini Plug: stereo Not supplied with this projector.) Installation Audio Output Audio cable (stereo) ✽ USB port USB cable ✽ Monitor Output VGA cable Monitor Input External Audio Equipment Audio Input COMPUTER IN...
... to use Page ed buttons on the remote control, connect USB port of your computer to the USB socket of both the projector and the external equipment should be disconnected from AC outlet. Note: When connecting the cable, the power cords of the... / AUDIO IN AUDIO OUT (AVRARIAIALBEL)E) This terminal is supplied.) • USB Cable ✽ • Audio Cables (Mini Plug: stereo Not supplied with this projector.) Installation Audio Output Audio cable (stereo) ✽ USB port USB cable ✽ Monitor Output VGA cable Monitor Input External Audio Equipment Audio Input COMPUTER IN...
Owners Manual
Page 16
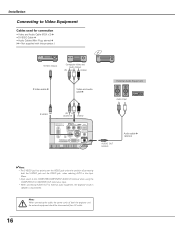
... Audio Cable (RCA x 3) ✽ • S-VIDEO Cable ✽ • Audio Cables (Mini Plug: stereo Not supplied with this projector.) S-Video Output Composite Video and Audio Output (R) (L) (Video) S-Video cable ✽ Video and audio cable✽ External Audio Equipment Audio Input... S-VIDEO (R) (L) AUDIO IN VIDEO CCOOMMPPUUTTEERR IINN 11 / COMPONENDTVIIN- Note: When connecting the cable, the power cords of connecting both the projector and the external equipment should be disconnected from AC outlet. 16 I AUDIO IN R L (MONO) VIDEO USB SERVICE PORT S-VIDEO COMPUTER...
... Audio Cable (RCA x 3) ✽ • S-VIDEO Cable ✽ • Audio Cables (Mini Plug: stereo Not supplied with this projector.) S-Video Output Composite Video and Audio Output (R) (L) (Video) S-Video cable ✽ Video and audio cable✽ External Audio Equipment Audio Input... S-VIDEO (R) (L) AUDIO IN VIDEO CCOOMMPPUUTTEERR IINN 11 / COMPONENDTVIIN- Note: When connecting the cable, the power cords of connecting both the projector and the external equipment should be disconnected from AC outlet. 16 I AUDIO IN R L (MONO) VIDEO USB SERVICE PORT S-VIDEO COMPUTER...

Owners Manual
Page 17
...Mini Plug (stereo) x 2 or RCA x 2) ✽ • Scart-VGA Cable ✽ • Component-VGA Cable ✽ (✽ = Not supplied with this projector.) Installation RGB Scart 21-pin Output Component Video Output (Y, Pb/Cb, Pr/Cr) Audio Output Scart-VGA cable ✽ Component-VGA cable✽ Audio cable... IN COMPUTER IN 1/ COMPONENT IN CCOOMMPPUUTTEERR IINN 11 / COMPONENDTVIIN- Note: When connecting the cable, the power cords of both the projector and the external equipment should be disconnected from AC outlet. 17 Installation Connecting to external audio equipment, the...
...Mini Plug (stereo) x 2 or RCA x 2) ✽ • Scart-VGA Cable ✽ • Component-VGA Cable ✽ (✽ = Not supplied with this projector.) Installation RGB Scart 21-pin Output Component Video Output (Y, Pb/Cb, Pr/Cr) Audio Output Scart-VGA cable ✽ Component-VGA cable✽ Audio cable... IN COMPUTER IN 1/ COMPONENT IN CCOOMMPPUUTTEERR IINN 11 / COMPONENDTVIIN- Note: When connecting the cable, the power cords of both the projector and the external equipment should be disconnected from AC outlet. 17 Installation Connecting to external audio equipment, the...
Owners Manual
Page 18
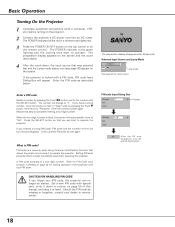
... down starts. 4 After the count-down in column on page 59 of this step to complete entering a four-digit number. If you can operate the projector. 18 What is fixed, the pointer will automatically move the pointer to PIN Code Lock function in a moment and lights red. 3 Press the POWER ON... control or on the screen. Refer to "Set" or "Clear" once by pressing the Point 7 8 button and fix the number with your PIN code, the projector can start to "PIN code". CAUTION ON HANDLING PIN CODE If you forget your PIN code. Selected Input Source and Lamp Mode Lamp mode (See...
... down starts. 4 After the count-down in column on page 59 of this step to complete entering a four-digit number. If you can operate the projector. 18 What is fixed, the pointer will automatically move the pointer to PIN Code Lock function in a moment and lights red. 3 Press the POWER ON... control or on the screen. Refer to "Set" or "Clear" once by pressing the Point 7 8 button and fix the number with your PIN code, the projector can start to "PIN code". CAUTION ON HANDLING PIN CODE If you forget your PIN code. Selected Input Source and Lamp Mode Lamp mode (See...
Owners Manual
Page 19
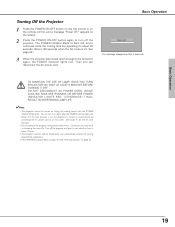
... button again to turn it continues while the cooling fans are operating for the On start function is on, this projector is L2. TO MAINTAIN THE LIFE OF LAMP, ONCE YOU TURN PROJECTOR ON, WAIT AT LEAST 5 MINUTES BEFORE TURNING IT OFF. DO NOT DISCONNECT AC POWER CORD WHILE COOLING FANS ARE... OR BEFORE POWER INDICATOR LIGHTS RED. The POWER indicator starts to blink red, and it on again after 4 seconds. Then you can turn off the projector and give it a rest about 90 seconds. (About 120 seconds when the fan mode is turned on the remote control, and a message "Power off?" You...
... button again to turn it continues while the cooling fans are operating for the On start function is on, this projector is L2. TO MAINTAIN THE LIFE OF LAMP, ONCE YOU TURN PROJECTOR ON, WAIT AT LEAST 5 MINUTES BEFORE TURNING IT OFF. DO NOT DISCONNECT AC POWER CORD WHILE COOLING FANS ARE... OR BEFORE POWER INDICATOR LIGHTS RED. The POWER indicator starts to blink red, and it on again after 4 seconds. Then you can turn off the projector and give it a rest about 90 seconds. (About 120 seconds when the fan mode is turned on the remote control, and a message "Power off?" You...
Owners Manual
Page 20
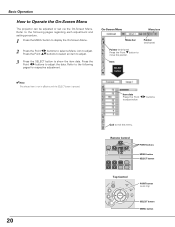
.... 1 Press the MENU button to display the On-Screen Menu. 2 Press the Point 7 8 buttons to select a Menu icon to Operate the On-Screen Menu The projector can be adjusted or set via the On-Screen Menu. On-Screen Menu Menu icon Menu bar Pointer (red frame) Pointer (red frame) Press the...
.... 1 Press the MENU button to display the On-Screen Menu. 2 Press the Point 7 8 buttons to select a Menu icon to Operate the On-Screen Menu The projector can be adjusted or set via the On-Screen Menu. On-Screen Menu Menu icon Menu bar Pointer (red frame) Pointer (red frame) Press the...
Owners Manual
Page 21
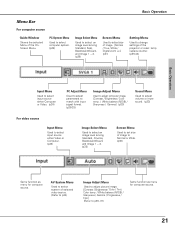
...), and Image 1 ~ 4. (p29) Screen Menu Used to adjust size of image. [Normal / True / Wide / Digital zoom +/-] (p31) Setting Menu Used to change settings of the projector or reset lamp replace counter. (p39-44) Basic Operation Input Menu Used to select input source either Computer or Video. (p24) PC Adjust Menu Used...
...), and Image 1 ~ 4. (p29) Screen Menu Used to adjust size of image. [Normal / True / Wide / Digital zoom +/-] (p31) Setting Menu Used to change settings of the projector or reset lamp replace counter. (p39-44) Basic Operation Input Menu Used to select input source either Computer or Video. (p24) PC Adjust Menu Used...
Owners Manual
Page 25
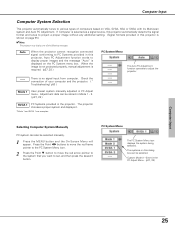
... the PC System menu box. Auto When the projector cannot recognize connected signal conforming to PC Systems provided in the PC Adjust Menu. (p27, 28) Computer Input 25 When the image is not projected properly, manual adjustment is displayed on VGA, SVGA, XGA or SXGA with its Multi-scan system and Auto... PC Adjustment. Press the Point 7 8 buttons to move the red frame pointer to the PC System Menu icon. 2 Press the Point d button to move the red arrow pointer to the system that you want to set in this projector is no...
... the PC System menu box. Auto When the projector cannot recognize connected signal conforming to PC Systems provided in the PC Adjust Menu. (p27, 28) Computer Input 25 When the image is not projected properly, manual adjustment is displayed on VGA, SVGA, XGA or SXGA with its Multi-scan system and Auto... PC Adjustment. Press the Point 7 8 buttons to move the red frame pointer to the PC System Menu icon. 2 Press the Point d button to move the red arrow pointer to the system that you want to set in this projector is no...
Owners Manual
Page 26
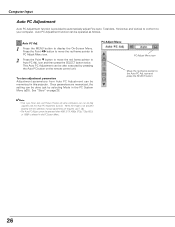
icon and then press the SELECT button twice. This Auto PC Adjustment can be memorized in this projector. PC Adjust Menu PC Adjust Menu icon Move the red frame pointer to Auto PC Adj. Press the Point 7 8 button to move the red frame ...
icon and then press the SELECT button twice. This Auto PC Adjustment can be memorized in this projector. PC Adjust Menu PC Adjust Menu icon Move the red frame pointer to Auto PC Adj. Press the Point 7 8 button to move the red frame ...


