Owners Manual
Page 2
... 3:2 pull-down video contents. (See page 37.) ◆ Digital Zoom (for Computer) The digital zoom function expands (to approx. 16 times of screen size) or compress the image size, allowing you to focus on crucial information at a presentation. (See page 31.) ◆ PIN Code Lock Function The PIN code lock function prevents others except users from using the projector. (See page 18 and 43.) ◆ Keystone Adjustment The keystone correction function...
... 3:2 pull-down video contents. (See page 37.) ◆ Digital Zoom (for Computer) The digital zoom function expands (to approx. 16 times of screen size) or compress the image size, allowing you to focus on crucial information at a presentation. (See page 31.) ◆ PIN Code Lock Function The PIN code lock function prevents others except users from using the projector. (See page 18 and 43.) ◆ Keystone Adjustment The keystone correction function...
Owners Manual
Page 3
... 32 Input Source Selection (Video, S-Video) 32 Input Source Selection (Component, RGB Scart 21-Pin) 33 Video System Selection 34 Image Level Selection 35 Image Level Adjustment 36 Screen Size Adjustment 38 Setting 39 Setting 39 Maintenance and Cleaning 45 Warning Indicator 45 Cleaning the Air Filters 46 Attaching the Lens Cover 46 Cleaning the Projection Lens 47 Cleaning the Projector Cabinet 47 Lamp Replacement 48 Lamp Replace Counter 49 Appendix 50 Troubleshooting 50 Indicators and Projector Condition 52 Menu Tree 53 Compatible Computer Specifications...
... 32 Input Source Selection (Video, S-Video) 32 Input Source Selection (Component, RGB Scart 21-Pin) 33 Video System Selection 34 Image Level Selection 35 Image Level Adjustment 36 Screen Size Adjustment 38 Setting 39 Setting 39 Maintenance and Cleaning 45 Warning Indicator 45 Cleaning the Air Filters 46 Attaching the Lens Cover 46 Cleaning the Projection Lens 47 Cleaning the Projector Cabinet 47 Lamp Replacement 48 Lamp Replace Counter 49 Appendix 50 Troubleshooting 50 Indicators and Projector Condition 52 Menu Tree 53 Compatible Computer Specifications...
Owners Manual
Page 4
NO USER-SERVICEABLE PARTS INSIDE EXCEPT LAMP REPLACEMENT. REFER SERVICING TO QUALIFIED SERVICE PERSONNEL. This projector produces intense light from the power outlet. Minimum clearance must be used for use in the end of Electronic Computer/Data Processing Equipment 4 CAUTION RISK OF ELECTRIC SHOCK DO NOT OPEN CAUTION : TO REDUCE THE RISK OF ELECTRIC SHOCK, DO NOT REMOVE COVER (OR BACK). Do not put any flammable object...
NO USER-SERVICEABLE PARTS INSIDE EXCEPT LAMP REPLACEMENT. REFER SERVICING TO QUALIFIED SERVICE PERSONNEL. This projector produces intense light from the power outlet. Minimum clearance must be used for use in the end of Electronic Computer/Data Processing Equipment 4 CAUTION RISK OF ELECTRIC SHOCK DO NOT OPEN CAUTION : TO REDUCE THE RISK OF ELECTRIC SHOCK, DO NOT REMOVE COVER (OR BACK). Do not put any flammable object...
Owners Manual
Page 6
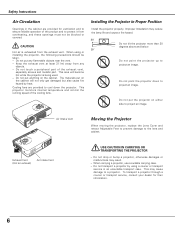
... from overheating, and these openings must not be taken. - This may result. - Improper Installation may reduce the lamp life and cause a fire hazard. 20˚ Do not tilt the projector more than 20 degrees above and below. 20˚ Do not point the projector up to project an image. Air Intake Vent Moving the Projector When moving the projector, replace the Lens Cover and retract Adjustable...
... from overheating, and these openings must not be taken. - This may result. - Improper Installation may reduce the lamp life and cause a fire hazard. 20˚ Do not tilt the projector more than 20 degrees above and below. 20˚ Do not point the projector up to project an image. Air Intake Vent Moving the Projector When moving the projector, replace the Lens Cover and retract Adjustable...
Owners Manual
Page 7
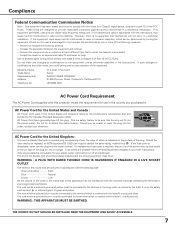
.... Use of shielded cable is required to comply with class B limits in a residential installation. Model Numbers Trade Name Responsible party Address Telephone No. : PLC-XU41 / PLC-XU47 : Sanyo : SANYO FISHER COMPANY : 21605 Plummer Street, Chatsworth, California 91311 : (818)998-7322 AC Power Cord Requirement The AC Power Cord supplied with this projector meets the requirement for a Class B digital device, pursuant to part 15 of the FCC Rules. AC Power Cord has...
.... Use of shielded cable is required to comply with class B limits in a residential installation. Model Numbers Trade Name Responsible party Address Telephone No. : PLC-XU41 / PLC-XU47 : Sanyo : SANYO FISHER COMPANY : 21605 Plummer Street, Chatsworth, California 91311 : (818)998-7322 AC Power Cord Requirement The AC Power Cord supplied with this projector meets the requirement for a Class B digital device, pursuant to part 15 of the FCC Rules. AC Power Cord has...

Owners Manual
Page 10
... remains green while the projector is in Digital zoom +/- button. (p23) o MENU button Opens or closes the On-Screen Menu. (p20) 10 This also blinks red when the internal temperature of the projector exceeds the operating range. (p45) u LAMP REPLACE indicator Turns yellow when the life of the projection lamp draws to pan the image in the On-Screen Menu. mode. (p31) Point 7 8 button are also used to an end. (p48) r SELECT button Executes the item selected. OFF INPUT POWER WARNING VOLUME - mode. (p31) t POWER indicator Blinks red...
... remains green while the projector is in Digital zoom +/- button. (p23) o MENU button Opens or closes the On-Screen Menu. (p20) 10 This also blinks red when the internal temperature of the projector exceeds the operating range. (p45) u LAMP REPLACE indicator Turns yellow when the life of the projection lamp draws to pan the image in the On-Screen Menu. mode. (p31) Point 7 8 button are also used to an end. (p48) r SELECT button Executes the item selected. OFF INPUT POWER WARNING VOLUME - mode. (p31) t POWER indicator Blinks red...

Owners Manual
Page 11
...+ t !3 !2 y D.ZOOM PAGE KEYSTONE NO SHOW !1 u AUTO PC P-TIMER IMAGE FREEZE MUTE i o !0 Part Names and Functions q POWER ON-OFF button Turns the projector on or off. (p18, 19) w VIDEO button Selects VIDEO input source. (p32, 33) e COMPUTER button Selects COMPUTER input source. (p24) r MENU button Opens or closes the On-Screen Menu. (p20) t PAGE ed button Scroll back and forth pages on the screen when giving a presentation. (p9, 15, 42) Connect the projector and your computer with a USB cable to...
...+ t !3 !2 y D.ZOOM PAGE KEYSTONE NO SHOW !1 u AUTO PC P-TIMER IMAGE FREEZE MUTE i o !0 Part Names and Functions q POWER ON-OFF button Turns the projector on or off. (p18, 19) w VIDEO button Selects VIDEO input source. (p32, 33) e COMPUTER button Selects COMPUTER input source. (p24) r MENU button Opens or closes the On-Screen Menu. (p20) t PAGE ed button Scroll back and forth pages on the screen when giving a presentation. (p9, 15, 42) Connect the projector and your computer with a USB cable to...
Owners Manual
Page 15
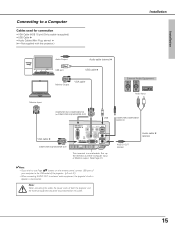
... input or Monitor output. (See Page 41.) ✔Note: • If you wish to use Page ed buttons on the remote control, connect USB port of your computer to the USB socket of both the projector and the external equipment should be disconnected from AC outlet. Note: When connecting the cable, the power cords of the projector. (p9 and 42) • When connecting AUDIO OUT to a Computer Cables used...
... input or Monitor output. (See Page 41.) ✔Note: • If you wish to use Page ed buttons on the remote control, connect USB port of your computer to the USB socket of both the projector and the external equipment should be disconnected from AC outlet. Note: When connecting the cable, the power cords of the projector. (p9 and 42) • When connecting AUDIO OUT to a Computer Cables used...
Owners Manual
Page 18
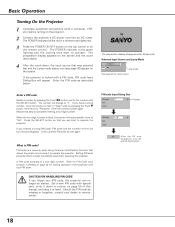
... to operate. Selected Input Source and Lamp Mode Lamp mode (See page 42 for locking operation of a four-digit number. Setting PIN code prevents others except the specific users from operating the projector. The POWER indicator turns green lighting and the cooling fans start to PIN Code Lock function in a moment and lights red. 3 Press the POWER ON-OFF button on the top control or on the projector. 2 Connect the projector's AC power cord into an AC outlet. Enter the PIN code as instructed below. 16 The preparation display...
... to operate. Selected Input Source and Lamp Mode Lamp mode (See page 42 for locking operation of a four-digit number. Setting PIN code prevents others except the specific users from operating the projector. The POWER indicator turns green lighting and the cooling fans start to PIN Code Lock function in a moment and lights red. 3 Press the POWER ON-OFF button on the top control or on the projector. 2 Connect the projector's AC power cord into an AC outlet. Enter the PIN code as instructed below. 16 The preparation display...
Owners Manual
Page 19
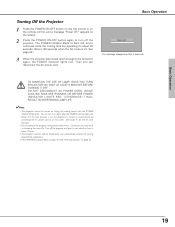
... connecting the AC power cord to turn it continues while the cooling fans are operating for the On start function is on, this projector is turned on during the cooling period with the POWER indicator blinking red. Basic Operation The message disappears after the POWER indicator lights red. • When the On start function.) • Do not operate the projector continuously without rest. You can disconnect the AC power cord. appears on the remote control, and a message "Power...
... connecting the AC power cord to turn it continues while the cooling fans are operating for the On start function is on, this projector is turned on during the cooling period with the POWER indicator blinking red. Basic Operation The message disappears after the POWER indicator lights red. • When the On start function.) • Do not operate the projector continuously without rest. You can disconnect the AC power cord. appears on the remote control, and a message "Power...
Owners Manual
Page 21
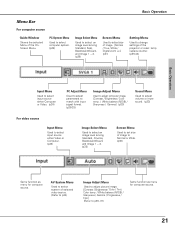
...4. (p29) Screen Menu Used to adjust size of image. [Normal / True / Wide / Digital zoom +/-] (p31) Setting Menu Used to change settings of the projector or reset lamp replace counter. (p39-44) Basic Operation Input Menu Used to select input source either Computer or Video. (p24) PC Adjust Menu Used to adjust parameters to match with input signal format. (p26-28) Image Adjust Menu Used to adjust computer image. [Contrast / Brightness / Color temp. / White balance (R/G/B) / Sharpness / Gamma] (p30) Sound Menu Used to adjust volume or mute sound. (p23) For video source Input Menu Used to...
...4. (p29) Screen Menu Used to adjust size of image. [Normal / True / Wide / Digital zoom +/-] (p31) Setting Menu Used to change settings of the projector or reset lamp replace counter. (p39-44) Basic Operation Input Menu Used to select input source either Computer or Video. (p24) PC Adjust Menu Used to adjust parameters to match with input signal format. (p26-28) Image Adjust Menu Used to adjust computer image. [Contrast / Brightness / Color temp. / White balance (R/G/B) / Sharpness / Gamma] (p30) Sound Menu Used to adjust volume or mute sound. (p23) For video source Input Menu Used to...

Owners Manual
Page 31
... original image size is selected, the On-Screen Menu disappears and the message "D. Zoom +" is displayed. A projected image can be also compressed by pressing the D.ZOOM ▲ button on the remote control. Digital zoom - Press the SELECT button to expand the image size. If your computer's screen resolution is higher than 1280 X 1024, reset the resolution to the lower before connecting to the projector. • The image data in other than the screen size (1024 x 768), this projector enters "Digital zoom +" mode...
... original image size is selected, the On-Screen Menu disappears and the message "D. Zoom +" is displayed. A projected image can be also compressed by pressing the D.ZOOM ▲ button on the remote control. Digital zoom - Press the SELECT button to expand the image size. If your computer's screen resolution is higher than 1280 X 1024, reset the resolution to the lower before connecting to the projector. • The image data in other than the screen size (1024 x 768), this projector enters "Digital zoom +" mode...
Owners Manual
Page 40
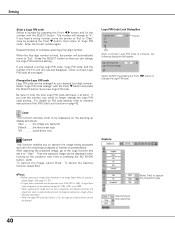
... SELECT button. For details on the projector next time or pressing the NO SHOW button. (p23) To capture the image, select [Yes]. Enter the correct number again. Set a new Logo PIN code. If you lost the number, you can be captured except for a starting-up display or interval of the PIN Code Lock function on the starting-up display as follows: User . . . . . .the image you captured Default . . . .the factory-set it...
... SELECT button. For details on the projector next time or pressing the NO SHOW button. (p23) To capture the image, select [Yes]. Enter the correct number again. Set a new Logo PIN code. If you lost the number, you can be captured except for a starting-up display or interval of the PIN Code Lock function on the starting-up display as follows: User . . . . . .the image you captured Default . . . .the factory-set it...
Owners Manual
Page 41
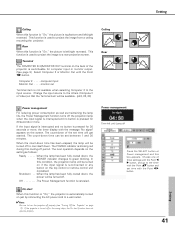
... 30 minutes. On start function does not operate properly. If the projector is switcheable for 30 seconds or more . Change the input source to the timer with the Point ed button and set time will get started. The count-down , the power will be turned off to a rear projection screen. Choose one of the set time with the message "No signal" appears on the top control or remote control unit is pressed...
... 30 minutes. On start function does not operate properly. If the projector is switcheable for 30 seconds or more . Change the input source to the timer with the Point ed button and set time will get started. The count-down , the power will be turned off to a rear projection screen. Choose one of the set time with the message "No signal" appears on the top control or remote control unit is pressed...
Owners Manual
Page 44
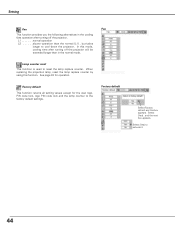
In this mode, cooling time after turning off the projector will be extended longer than the normal (L1) , but takes longer to the factory default settings. Factory default This function returns all setting values except for operation. Factory default Select Factory default and this function. L1 normal operation L2 . . . . . .slower operation than in the normal mode. When replacing the projection lamp, reset the lamp replace counter by using this box appears. Select [Yes] to reset the lamp replace counter. Setting Fan Fan This function...
In this mode, cooling time after turning off the projector will be extended longer than the normal (L1) , but takes longer to the factory default settings. Factory default This function returns all setting values except for operation. Factory default Select Factory default and this function. L1 normal operation L2 . . . . . .slower operation than in the normal mode. When replacing the projection lamp, reset the lamp replace counter by using this box appears. Select [Yes] to reset the lamp replace counter. Setting Fan Fan This function...
Owners Manual
Page 48
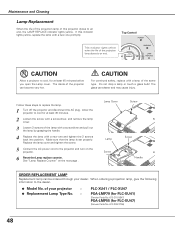
...; Model No. Follow these steps to an end. See "Lamp Replace Counter" on the projector. 6 Reset the Lamp replace counter. Make sure that the lamp is set properly. of this indicator lights yellow, replace the lamp with a new one promptly. Top Control POWER This indicator lights yellow when the life of the lamp with a screwdriver and pull out the lamp by grasping the handle. 4 Replace the lamp with a new one and tighten the 2 screws back into position. Maintenance and Cleaning Lamp Replacement...
...; Model No. Follow these steps to an end. See "Lamp Replace Counter" on the projector. 6 Reset the Lamp replace counter. Make sure that the lamp is set properly. of this indicator lights yellow, replace the lamp with a new one promptly. Top Control POWER This indicator lights yellow when the life of the lamp with a screwdriver and pull out the lamp by grasping the handle. 4 Replace the lamp with a new one and tighten the 2 screws back into position. Maintenance and Cleaning Lamp Replacement...
Owners Manual
Page 49
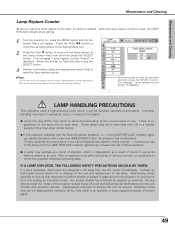
... message "Lamp replace counter Reset?" is reset, the LAMP REPLACE indicator stops lighting. 1 Turn the projector on, press the MENU button and the OnScreen Menu will appear. Contact an authorized service station for each lamp. Any broken shards found should check the inside of the projector except those who are being used. Be sure to Lamp counter reset and then press the SELECT button. LAMP HANDLING PRECAUTIONS This projector uses a high-pressure lamp which the projector and lamp are familiar with projector service...
... message "Lamp replace counter Reset?" is reset, the LAMP REPLACE indicator stops lighting. 1 Turn the projector on, press the MENU button and the OnScreen Menu will appear. Contact an authorized service station for each lamp. Any broken shards found should check the inside of the projector except those who are being used. Be sure to Lamp counter reset and then press the SELECT button. LAMP HANDLING PRECAUTIONS This projector uses a high-pressure lamp which the projector and lamp are familiar with projector service...
Owners Manual
Page 50
... correct input source once again through menu operation. (See page 24, 32 and 33) - Press the Volume (+) button. (See page 23) - Plug the power cord of focus. Check the WARNING indicator. Check the projection lamp. (See page 48.) - If the projector does not project an image being operated with your computer or video equipment. (See page 25 and 34) - Problem: No power Image is turned on page15-17. - See if the input signal is Left...
... correct input source once again through menu operation. (See page 24, 32 and 33) - Press the Volume (+) button. (See page 23) - Plug the power cord of focus. Check the WARNING indicator. Check the projection lamp. (See page 48.) - If the projector does not project an image being operated with your computer or video equipment. (See page 25 and 34) - Problem: No power Image is turned on page15-17. - See if the input signal is Left...
Owners Manual
Page 52
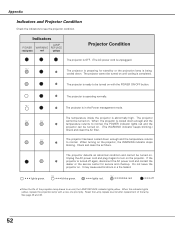
... clean the air filters. Appendix Indicators and Projector Condition Check the indicators to normal. Indicators LAMP POWER WARNING REPLACE red/green red yellow Projector Condition The projector is OFF. (The AC power cord is unplugged.) ✽ The projector is preparing for service and checkup. Unplug the AC power cord and plug it again to normal, the POWER indicator lights red and the projector can be turned on with a new one promptly. Reset the Lamp replace counter after replacement of the projection lamp draws to be turned on the projector, the WARNING indicator...
... clean the air filters. Appendix Indicators and Projector Condition Check the indicators to normal. Indicators LAMP POWER WARNING REPLACE red/green red yellow Projector Condition The projector is OFF. (The AC power cord is unplugged.) ✽ The projector is preparing for service and checkup. Unplug the AC power cord and plug it again to normal, the POWER indicator lights red and the projector can be turned on with a new one promptly. Reset the Lamp replace counter after replacement of the projection lamp draws to be turned on the projector, the WARNING indicator...
Owners Manual
Page 54
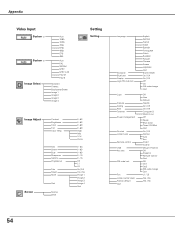
...Standard Cinema Blackboard(Green) Image 1 Image 2 Image 3 Image 4 Setting Setting Image Adjust Contrast Brightness Color Tint Color Temp Screen Red Green Blue Sharpness Gamma Progressive Film Reset Store Quit Normal Wide 0 - 63 0 - 63 0 - 63 0 - 63 High Mid Low XLow 0 - 63 0 - 63 0 - 63 0 - 15 0 - 15 Off L1 L2 On/ Off Yes / No Image 1 Image 2 Image 3 Image 4 Quit Language Keystone Blue back Display Logo PIN code lock Logo Capture Ceiling Rear Terminal Power management On start Lamp mode Remote control USB Key lock PIN code lock Fan Lamp counter reset Factory default Quit English German...
...Standard Cinema Blackboard(Green) Image 1 Image 2 Image 3 Image 4 Setting Setting Image Adjust Contrast Brightness Color Tint Color Temp Screen Red Green Blue Sharpness Gamma Progressive Film Reset Store Quit Normal Wide 0 - 63 0 - 63 0 - 63 0 - 63 High Mid Low XLow 0 - 63 0 - 63 0 - 63 0 - 15 0 - 15 Off L1 L2 On/ Off Yes / No Image 1 Image 2 Image 3 Image 4 Quit Language Keystone Blue back Display Logo PIN code lock Logo Capture Ceiling Rear Terminal Power management On start Lamp mode Remote control USB Key lock PIN code lock Fan Lamp counter reset Factory default Quit English German...


