Owners Manual
Page 3
... 9 Top Control 10 Remote Control 11 Operating Range 11 Remote Control Battery Installation 12 Installation 13 Positioning the Projector 13 Adjustable Feet 13 Connecting the AC Power Cord 14 Connecting to a Computer 15 Connecting to Video Equipment ...Projector 19 How to Operate the On-Screen Menu 20 Menu Bar 21 Zoom and Focus Adjustment 22 Keystone Adjustment 22 Picture Freeze Function 22 No Show Function 23 P-Timer Function 23 Sound Adjustment 23 Computer Input 24 Input Source Selection 24 Computer System Selection 25 Auto PC Adjustment 26 Manual...
... 9 Top Control 10 Remote Control 11 Operating Range 11 Remote Control Battery Installation 12 Installation 13 Positioning the Projector 13 Adjustable Feet 13 Connecting the AC Power Cord 14 Connecting to a Computer 15 Connecting to Video Equipment ...Projector 19 How to Operate the On-Screen Menu 20 Menu Bar 21 Zoom and Focus Adjustment 22 Keystone Adjustment 22 Picture Freeze Function 22 No Show Function 23 P-Timer Function 23 Sound Adjustment 23 Computer Input 24 Input Source Selection 24 Computer System Selection 25 Auto PC Adjustment 26 Manual...
Owners Manual
Page 4
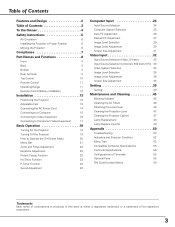
... SYMBOL INDICATES THAT THERE ARE IMPORTANT OPERATING AND MAINTENANCE INSTRUCTIONS IN THE OWNER'S MANUAL WITH THIS UNIT. SIDE and TOP REAR 20cm 50cm 50cm 50cm - This projector provides many convenient features and functions. REFER SERVICING TO QUALIFIED SERVICE PERSONNEL. Safety...the ventilation slot on the top, sides and rear of this manual thoroughly and operate the projector properly. Operating the projector properly enables you purchased the projector or the service center. This projector produces intense light from the power outlet. Eye damage could result....
... SYMBOL INDICATES THAT THERE ARE IMPORTANT OPERATING AND MAINTENANCE INSTRUCTIONS IN THE OWNER'S MANUAL WITH THIS UNIT. SIDE and TOP REAR 20cm 50cm 50cm 50cm - This projector provides many convenient features and functions. REFER SERVICING TO QUALIFIED SERVICE PERSONNEL. Safety...the ventilation slot on the top, sides and rear of this manual thoroughly and operate the projector properly. Operating the projector properly enables you purchased the projector or the service center. This projector produces intense light from the power outlet. Eye damage could result....
Owners Manual
Page 18
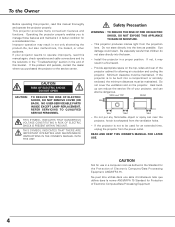
... code". A PIN code consists of the projector with your PIN code. Refer to operate the projector. The number will appear. Setting PIN code prevents others except the specific users from operating the projector. If the projector is PIN code? Repeat this manual, and keep it to PIN Code Lock function... in a moment and lights red. 3 Press the POWER ON-OFF button on the top control or on the projector. 2 Connect the projector's AC power cord into...
... code". A PIN code consists of the projector with your PIN code. Refer to operate the projector. The number will appear. Setting PIN code prevents others except the specific users from operating the projector. If the projector is PIN code? Repeat this manual, and keep it to PIN Code Lock function... in a moment and lights red. 3 Press the POWER ON-OFF button on the top control or on the projector. 2 Connect the projector's AC power cord into...
Owners Manual
Page 25
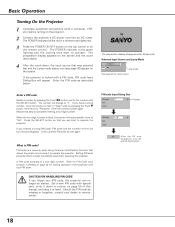
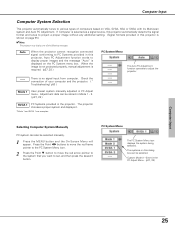
... System Menu The Auto PC Adjustment function operates to project a proper image without any additional setting. (Signal formats provided in the projector. When the image is not projected properly, manual adjustment is displayed on this dialog box can be selected. Adjustment data can also be stored in Mode 1 - 5. ( p27...in PC Adjust menu. If Computer is selected as a signal source, this projector is no signal input from computer. Check the connection of the following messages. There is shown on VGA, SVGA, XGA or SXGA with its Multi-scan system and Auto PC Adjustment. PC System ...
... System Menu The Auto PC Adjustment function operates to project a proper image without any additional setting. (Signal formats provided in the projector. When the image is not projected properly, manual adjustment is displayed on this dialog box can be selected. Adjustment data can also be stored in Mode 1 - 5. ( p27...in PC Adjust menu. If Computer is selected as a signal source, this projector is no signal input from computer. Check the connection of the following messages. There is shown on VGA, SVGA, XGA or SXGA with its Multi-scan system and Auto PC Adjustment. PC System ...
Owners Manual
Page 26
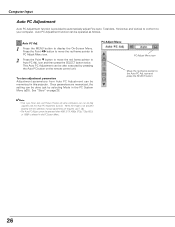
... store adjustment parameters Adjustment parameters from Auto PC Adjustment can be fully adjusted with this projector. Once parameters are required. (p27, 28) • The Auto PC Adjust cannot be also executed by selecting Mode in this operation, manual adjustments are memorized, the setting can be done just by pressing the Auto PC...
... store adjustment parameters Adjustment parameters from Auto PC Adjustment can be fully adjusted with this projector. Once parameters are required. (p27, 28) • The Auto PC Adjust cannot be also executed by selecting Mode in this operation, manual adjustments are memorized, the setting can be done just by pressing the Auto PC...
Owners Manual
Page 27
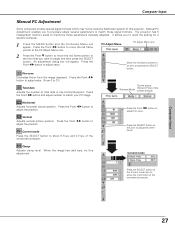
...the Point 7 8 button and adjust number to adjust the position. Current mode Press the SELECT button to the PC Adjust Menu icon. Manual PC Adjustment enables you to memorize those signal formats. Press the Point 7 8 button to adjust the value. Shows status Selected Mode ... adjustment. Press the SELECT button at the Current mode icon to match those parameters manually adjusted. An adjustment dialog box will appear. When the image has dark bars, try this projector. The projector has 5 independent memory areas to recall the setting for a specific computer. 1 Press...
...the Point 7 8 button and adjust number to adjust the position. Current mode Press the SELECT button to the PC Adjust Menu icon. Manual PC Adjustment enables you to memorize those signal formats. Press the Point 7 8 button to adjust the value. Shows status Selected Mode ... adjustment. Press the SELECT button at the Current mode icon to match those parameters manually adjusted. An adjustment dialog box will appear. When the image has dark bars, try this projector. The projector has 5 independent memory areas to recall the setting for a specific computer. 1 Press...

Owners Manual
Page 30
Adjust each item is displayed. Store To store the image data adjusted manually, move the red frame pointer to the item that you want to adjust, and then press the SELECT button. Image Level Menu Move the red ...
Adjust each item is displayed. Store To store the image data adjusted manually, move the red frame pointer to the item that you want to adjust, and then press the SELECT button. Image Level Menu Move the red ...
Owners Manual
Page 34
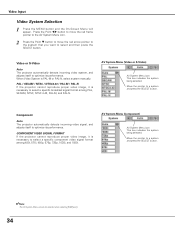
...;Note: The AV System Menu cannot be selected when selecting RGB(Scart). 34 COMPONENT VIDEO SIGNAL FORMAT If the projector cannot reproduce proper video image, it is PAL-M or PAL-N, select system manually. AV System Menu (Video or S-Video) AV System Menu icon This box indicates the system being selected. Move the...
...;Note: The AV System Menu cannot be selected when selecting RGB(Scart). 34 COMPONENT VIDEO SIGNAL FORMAT If the projector cannot reproduce proper video image, it is PAL-M or PAL-N, select system manually. AV System Menu (Video or S-Video) AV System Menu icon This box indicates the system being selected. Move the...
Owners Manual
Page 49
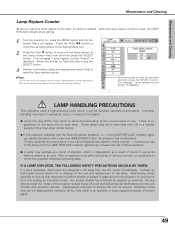
... so, may differ according to the environment or conditions in the Lamp Replacement section of this manual. ) Continuous use of the lamp with projector service. If a lamp explodes, disconnect the projector's AC plug from lamp to lamp and according to the environment of lamp replacement. Be sure... counter without implementation of use as its lifetime draws to an end. The message "Lamp replace counter Reset?" No one IMMEDIATELY after the projector has cooled down. ( Follow carefully the instructions in which must be cleaned up , replace the lamp with a new one should be...
... so, may differ according to the environment or conditions in the Lamp Replacement section of this manual. ) Continuous use of the lamp with projector service. If a lamp explodes, disconnect the projector's AC plug from lamp to lamp and according to the environment of lamp replacement. Be sure... counter without implementation of use as its lifetime draws to an end. The message "Lamp replace counter Reset?" No one IMMEDIATELY after the projector has cooled down. ( Follow carefully the instructions in which must be cleaned up , replace the lamp with a new one should be...
Owners Manual
Page 50
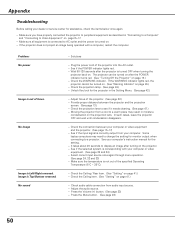
...sound - See if the POWER indicator lights red. - If the WARNING indicator lights red, the projector cannot be turned on after the POWER indicator turns red. (See "Turning Off the Projector" on the projection lens. See if the input signal is corresponding with a computer, restart the ...computer. Some laptop computers may result in moisture condensation on page 19.) - See your computer's instruction manual for the projector in "Connecting to a Computer" and "Connecting to Video Equipment" on . - Adjust the audio source. - Adjust focus of the...
...sound - See if the POWER indicator lights red. - If the WARNING indicator lights red, the projector cannot be turned on after the POWER indicator turns red. (See "Turning Off the Projector" on the projection lens. See if the input signal is corresponding with a computer, restart the ...computer. Some laptop computers may result in moisture condensation on page 19.) - See your computer's instruction manual for the projector in "Connecting to a Computer" and "Connecting to Video Equipment" on . - Adjust the audio source. - Adjust focus of the...
Owners Manual
Page 56
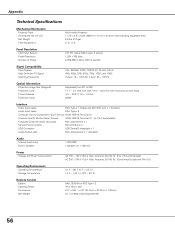
... Dimensions (W x H x D) Net Weight Feet Adjustment Multi-media Projector 11.73" x 2.8" x 8.39" (298mm x 71mm x 213mm) (Not including adjustable feet) 6.0 lbs (2.7kgs) 0˚ to 11.8˚ Panel Resolution LCD Panel System Panel Resolution Number of Pixels 0.8" TFT Active Matrix type, 3 panels 1,024 x 768 dots 2,359,296 ...Image Size (Diagonal) Projection Lens Throw Distance Projection Lamp Adjustable from 33" to 300" F 1.7 ~ 2.1 lens with f 26.7 mm ~ 32.0 mm with manual zoom and focus 4.3' ~ 32.8' (1.3m ~ 10.0m) 200W Interface Video Input Jacks RCA Type x 1 (Video) and Mini DIN 4 pin x 1...
... Dimensions (W x H x D) Net Weight Feet Adjustment Multi-media Projector 11.73" x 2.8" x 8.39" (298mm x 71mm x 213mm) (Not including adjustable feet) 6.0 lbs (2.7kgs) 0˚ to 11.8˚ Panel Resolution LCD Panel System Panel Resolution Number of Pixels 0.8" TFT Active Matrix type, 3 panels 1,024 x 768 dots 2,359,296 ...Image Size (Diagonal) Projection Lens Throw Distance Projection Lamp Adjustable from 33" to 300" F 1.7 ~ 2.1 lens with f 26.7 mm ~ 32.0 mm with manual zoom and focus 4.3' ~ 32.8' (1.3m ~ 10.0m) 200W Interface Video Input Jacks RCA Type x 1 (Video) and Mini DIN 4 pin x 1...
Owners Manual
Page 57
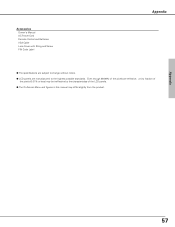
Even though 99.99% of the pixels are manufactured to change without notice. ● LCD panels are effective, a tiny fraction of the pixels (0.01% or less) may be ineffective by the characteristics of the LCD panels. ● The On-Screen Menu and figures in this manual may differ slightly from the product. Appendix 57 Accessories Owner's Manual AC Power Cord Remote Control and Batteries VGA Cable Lens Cover with String and Screw PIN Code Label Appendix ● The specifications are subject to the highest possible standards.
Even though 99.99% of the pixels are manufactured to change without notice. ● LCD panels are effective, a tiny fraction of the pixels (0.01% or less) may be ineffective by the characteristics of the LCD panels. ● The On-Screen Menu and figures in this manual may differ slightly from the product. Appendix 57 Accessories Owner's Manual AC Power Cord Remote Control and Batteries VGA Cable Lens Cover with String and Screw PIN Code Label Appendix ● The specifications are subject to the highest possible standards.
Owners Manual
Page 59
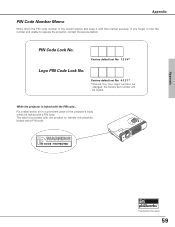
... in the column below on in a prominent place of the projector's body while it with this manual securely. PIN Code Lock No. Put a label below and keep it is locked with the PIN code... Appendix Pixelworks ICs used. 59 While the projector is locked with a PIN code. If you forgot or lost... the number and unable to identify the projector locked with a PIN code...
... in the column below on in a prominent place of the projector's body while it with this manual securely. PIN Code Lock No. Put a label below and keep it is locked with the PIN code... Appendix Pixelworks ICs used. 59 While the projector is locked with a PIN code. If you forgot or lost... the number and unable to identify the projector locked with a PIN code...


