Owners Manual
Page 3
... 3 To the Owner 4 Safety Instructions 5 Air Circulation 6 Installing the Projector in Proper Position 6 Moving the Projector 6 Compliance 7 Part Names and Functions 8 Front 8 Back 8 Bottom 8 Rear Terminal 9 Top Control 10 Remote Control 11 Operating Range 11 Remote Control Battery Installation 12 Installation 13 Positioning the Projector 13 Adjustable Feet 13 Connecting the AC Power Cord 14...
... 3 To the Owner 4 Safety Instructions 5 Air Circulation 6 Installing the Projector in Proper Position 6 Moving the Projector 6 Compliance 7 Part Names and Functions 8 Front 8 Back 8 Bottom 8 Rear Terminal 9 Top Control 10 Remote Control 11 Operating Range 11 Remote Control Battery Installation 12 Installation 13 Positioning the Projector 13 Adjustable Feet 13 Connecting the AC Power Cord 14...
Owners Manual
Page 8
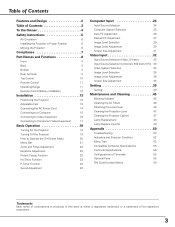
Part Names and Functions Front q we rt Back !6 y ui o !0 Bottom !2 !3 !1 !4 q Power Cord Connector w Infrared Remote Receiver e Projection Lens r Lens Cover (See page 46 for attaching.) t Air Intake Vent y Top Controls and Indicators u Focus Ring i Zoom Ring o Air Intake Vent !0 Terminals and Connectors !1 Speaker !2 Lamp Cover !3 Air Intake Vent (back and bottom) !4 Air Filter !5 Adjustable Feet !6 Exhaust Vent CAUTION Hot air is exhausted from the exhaust vent. Do not put heat-sensitive objects near this side. !5 8
Part Names and Functions Front q we rt Back !6 y ui o !0 Bottom !2 !3 !1 !4 q Power Cord Connector w Infrared Remote Receiver e Projection Lens r Lens Cover (See page 46 for attaching.) t Air Intake Vent y Top Controls and Indicators u Focus Ring i Zoom Ring o Air Intake Vent !0 Terminals and Connectors !1 Speaker !2 Lamp Cover !3 Air Intake Vent (back and bottom) !4 Air Filter !5 Adjustable Feet !6 Exhaust Vent CAUTION Hot air is exhausted from the exhaust vent. Do not put heat-sensitive objects near this side. !5 8
Owners Manual
Page 9
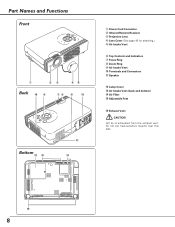
... this jack. (p15, 16, 17) This terminal outputs sound from AUDIO IN terminal (e or y). Do not use the PAGE ed buttons on the remote control to scroll back and forth pages on the screen of the connected computer. (p15) o COMPUTER IN 2/ MONITOR OUT This terminal is monaural, connect...the RESET button with a pen, which controls this unit may occasionally malfunction and need to the other monitor. This can be used to service this projector. e AUDIO IN Connect the audio output from video equipment connected to r or i to this terminal. Optional cables are required when using this ...
... this jack. (p15, 16, 17) This terminal outputs sound from AUDIO IN terminal (e or y). Do not use the PAGE ed buttons on the remote control to scroll back and forth pages on the screen of the connected computer. (p15) o COMPUTER IN 2/ MONITOR OUT This terminal is monaural, connect...the RESET button with a pen, which controls this unit may occasionally malfunction and need to the other monitor. This can be used to service this projector. e AUDIO IN Connect the audio output from video equipment connected to r or i to this terminal. Optional cables are required when using this ...

Owners Manual
Page 11
... p39) !4 Point ed 7 8 ( VOLUME + / - ) buttons - Do not apply benzene, thinner, splay or any button. Pan the image in front of the projector. 16.4' (5 m) 30° 30° 11 Adjust volume level. (Point 7 8 buttons)(p23) !5 Select button - Executes the selected item. (p20) - SELECT ...- Expands / compresses the image in the On-Screen Menu. (p20) - Operating Range Point the remote control toward the projector (Infrared Remote Receiver) when pressing any chemical material. Part Names and Functions Remote Control ew q COMPUTER VIDEO ON-OFF !5 r !4 MENU VOLUME-
... p39) !4 Point ed 7 8 ( VOLUME + / - ) buttons - Do not apply benzene, thinner, splay or any button. Pan the image in front of the projector. 16.4' (5 m) 30° 30° 11 Adjust volume level. (Point 7 8 buttons)(p23) !5 Select button - Executes the selected item. (p20) - SELECT ...- Expands / compresses the image in the On-Screen Menu. (p20) - Operating Range Point the remote control toward the projector (Infrared Remote Receiver) when pressing any chemical material. Part Names and Functions Remote Control ew q COMPUTER VIDEO ON-OFF !5 r !4 MENU VOLUME-

Owners Manual
Page 12
... : - Replace two batteries at the same time. - Do not drop the remote control. - Part Names and Functions Remote Control Battery Installation 1 Remove the battery compartment lid. Do not expose the remote control to the instructions. 12 If a battery has leaked on remote control, carefully wipe case clean and install new batteries. - Dispose of explosion...
... : - Replace two batteries at the same time. - Do not drop the remote control. - Part Names and Functions Remote Control Battery Installation 1 Remove the battery compartment lid. Do not expose the remote control to the instructions. 12 If a battery has leaked on remote control, carefully wipe case clean and install new batteries. - Dispose of explosion...
Owners Manual
Page 15
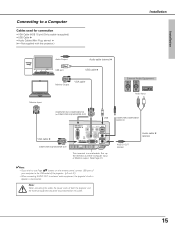
...Page 41.) ✔Note: • If you wish to use Page ed buttons on the remote control, connect USB port of your computer to the USB socket of both the projector and the external equipment should be disconnected from AC outlet. COMPUTER/ COMPONENT AUDIO IN AUDIO OUT ... 15 pin) (Only a cable is supplied.) • USB Cable ✽ • Audio Cables (Mini Plug: stereo Not supplied with this projector.) Installation Audio Output Audio cable (stereo) ✽ USB port USB cable ✽ Monitor Output VGA cable Monitor Input External Audio Equipment Audio Input COMPUTER...
...Page 41.) ✔Note: • If you wish to use Page ed buttons on the remote control, connect USB port of your computer to the USB socket of both the projector and the external equipment should be disconnected from AC outlet. COMPUTER/ COMPONENT AUDIO IN AUDIO OUT ... 15 pin) (Only a cable is supplied.) • USB Cable ✽ • Audio Cables (Mini Plug: stereo Not supplied with this projector.) Installation Audio Output Audio cable (stereo) ✽ USB port USB cable ✽ Monitor Output VGA cable Monitor Input External Audio Equipment Audio Input COMPUTER...
Owners Manual
Page 18
... return to "PIN code". Press the SELECT button so that was selected last and the Lamp mode status icon (see page 42) appear on the remote control. CAUTION ON HANDLING PIN CODE If you forget your dealer or service center. When the four-digit number is PIN code? If you can... can start to "Set". The preparation display appears on the screen and the count down starts. 4 After the count-down in column on the projector. 2 Connect the projector's AC power cord into an AC outlet. If you fixed a wrong number, move to operate. Repeat this manual, and keep it at hand. Enter...
... return to "PIN code". Press the SELECT button so that was selected last and the Lamp mode status icon (see page 42) appear on the remote control. CAUTION ON HANDLING PIN CODE If you forget your dealer or service center. When the four-digit number is PIN code? If you can... can start to "Set". The preparation display appears on the screen and the count down starts. 4 After the count-down in column on the projector. 2 Connect the projector's AC power cord into an AC outlet. If you fixed a wrong number, move to operate. Repeat this manual, and keep it at hand. Enter...
Owners Manual
Page 19
... the projector has cooled down enough to blink red, and it a rest about 90 seconds. (About 120 seconds when the fan mode is turned on automatically by connecting the AC power cord to turn it on again, the POWER indicator lights red. The POWER indicator starts to be turned on the remote... control, and a message "Power off the projector and give it continues while the cooling fans are operating for the On start function is on, this...
... the projector has cooled down enough to blink red, and it a rest about 90 seconds. (About 120 seconds when the fan mode is turned on automatically by connecting the AC power cord to turn it on again, the POWER indicator lights red. The POWER indicator starts to be turned on the remote... control, and a message "Power off the projector and give it continues while the cooling fans are operating for the On start function is on, this...
Owners Manual
Page 20
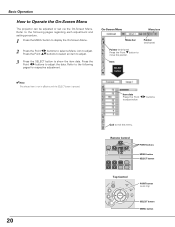
...item data. Press the Point ed buttons to select an item to adjust. 3 Press the SELECT button to Operate the On-Screen Menu The projector can be adjusted or set via the On-Screen Menu. Item SELECT button ✔Note: The selected item is not in effective until the SELECT... button is pressed. Item data Press the Point 7 8 buttons to adjust value. 20 Quit to move the pointer. COMPUTER VIDEO ON-OFF Remote Control MENU VOLUME- VOLUME + KEYSTONE MENU SELECT LAMP REPLACE POINT buttons MENU button SELECT button POINT button (outer ring) SELECT button MENU button SELECT ...
...item data. Press the Point ed buttons to select an item to adjust. 3 Press the SELECT button to Operate the On-Screen Menu The projector can be adjusted or set via the On-Screen Menu. Item SELECT button ✔Note: The selected item is not in effective until the SELECT... button is pressed. Item data Press the Point 7 8 buttons to adjust value. 20 Quit to move the pointer. COMPUTER VIDEO ON-OFF Remote Control MENU VOLUME- VOLUME + KEYSTONE MENU SELECT LAMP REPLACE POINT buttons MENU button SELECT button POINT button (outer ring) SELECT button MENU button SELECT ...

Owners Manual
Page 22
... Ring Focus Ring Keystone Adjustment If a projected picture has keystone distortion, correct the image with KEYSTONE adjustment. 1 Press the KEYSTONE button on the remote control once more while the keystone dialog box is no correction. • The arrows disappear at the maximum correction. • The direction of ... is being corrected turns red. • If you press the KEYSTONE button on the top control or on the top control, the remote control or select Keystone in and out. To cancel the FREEZE function, press the FREEZE button again or press any other button. (p11...
... Ring Focus Ring Keystone Adjustment If a projected picture has keystone distortion, correct the image with KEYSTONE adjustment. 1 Press the KEYSTONE button on the remote control once more while the keystone dialog box is no correction. • The arrows disappear at the maximum correction. • The direction of ... is being corrected turns red. • If you press the KEYSTONE button on the top control or on the top control, the remote control or select Keystone in and out. To cancel the FREEZE function, press the FREEZE button again or press any other button. (p11...

Owners Manual
Page 23
... is changed to black out the image. black out ➜ the captured image ➜ normal P-Timer Function Press the P-TIMER button on the remote control to cut off sound. To stop the P-Timer, press the P-TIMER button. Mute Press the Point 7 8 button to adjust volume. Sound...Menu icon indicates approximate level of volume. Sound Adjustment Direct Operation Volume Press the VOLUME (+/-) button on the top control or on the remote control. The display disappears after 4 seconds. Mute Press the MUTE button on the screen and the timer starts to turn down the ...
... is changed to black out the image. black out ➜ the captured image ➜ normal P-Timer Function Press the P-TIMER button on the remote control to cut off sound. To stop the P-Timer, press the P-TIMER button. Mute Press the Point 7 8 button to adjust volume. Sound...Menu icon indicates approximate level of volume. Sound Adjustment Direct Operation Volume Press the VOLUME (+/-) button on the top control or on the remote control. The display disappears after 4 seconds. Mute Press the MUTE button on the screen and the timer starts to turn down the ...

Owners Manual
Page 24
... page. Menu Operation 1 Press the MENU button and the On-Screen Menu will appear. Component See "Selecting Input Source (Component / RGBScart 21-pin )" on the remote control. Press the Point 7 8 button to move the red frame pointer to the Input Menu icon. 2 Press the Point d button to move the pointer to...
... page. Menu Operation 1 Press the MENU button and the On-Screen Menu will appear. Component See "Selecting Input Source (Component / RGBScart 21-pin )" on the remote control. Press the Point 7 8 button to move the red frame pointer to the Input Menu icon. 2 Press the Point d button to move the pointer to...
Owners Manual
Page 26
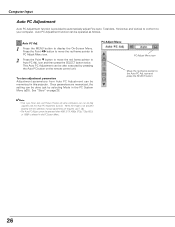
... red frame pointer to display the On-Screen Menu. To store adjustment parameters Adjustment parameters from Auto PC Adjustment can be memorized in this projector. Once parameters are memorized, the setting can not be fully adjusted with this Auto PC Adjustment function. icon and press the SELECT button.... 26 See "Store" on the remote control unit. This Auto PC Adjustment can be also executed by pressing the Auto PC button on page 28. ✔Note: • Fine sync...
... red frame pointer to display the On-Screen Menu. To store adjustment parameters Adjustment parameters from Auto PC Adjustment can be memorized in this projector. Once parameters are memorized, the setting can not be fully adjusted with this Auto PC Adjustment function. icon and press the SELECT button.... 26 See "Store" on the remote control unit. This Auto PC Adjustment can be also executed by pressing the Auto PC button on page 28. ✔Note: • Fine sync...

Owners Manual
Page 29
...and Image 4 by pressing the IMAGE button on a black colored board. This is mainly effective on a green colored board, not truly effective on the remote control. Press the Point 7 8 button to move the red frame pointer to the Image Select Menu icon. 2 Press the Point d button to ...Image Select Menu icon Move the red frame pointer to set and then press the SELECT button. Standard Normal picture level preset on this projector. Blackboard(Green) Picture level suitable for the image projected on a blackboard (Green). Real Picture level with improved halftone for further description....
...and Image 4 by pressing the IMAGE button on a black colored board. This is mainly effective on a green colored board, not truly effective on the remote control. Press the Point 7 8 button to move the red frame pointer to the Image Select Menu icon. 2 Press the Point d button to ...Image Select Menu icon Move the red frame pointer to set and then press the SELECT button. Standard Normal picture level preset on this projector. Blackboard(Green) Picture level suitable for the image projected on a blackboard (Green). Real Picture level with improved halftone for further description....

Owners Manual
Page 31
...press the SELECT button. Zoom +" is selected in the PC System Menu (p25). • This projector cannot display any button except the D.ZOOM ▲/▼, SELECT, and Point button. cannot be operated... 1024. Zoom -" is larger than the screen size. mode, press any resolution higher than XGA (1024 x 768) is modified to display the desirable image size. 1 Press the MENU ...-Screen Menu will appear. This function can be also expanded by pressing the D.ZOOM ▼ button on the remote control. ✔Note: • This Screen Menu cannot be selected when "480i", "575i", "480p", or...
...press the SELECT button. Zoom +" is selected in the PC System Menu (p25). • This projector cannot display any button except the D.ZOOM ▲/▼, SELECT, and Point button. cannot be operated... 1024. Zoom -" is larger than the screen size. mode, press any resolution higher than XGA (1024 x 768) is modified to display the desirable image size. 1 Press the MENU ...-Screen Menu will appear. This function can be also expanded by pressing the D.ZOOM ▼ button on the remote control. ✔Note: • This Screen Menu cannot be selected when "480i", "575i", "480p", or...

Owners Manual
Page 32
... is not displayed. (p41) 32 INPUT button Video Computer 1 Computer 2 ✳ VIDEO button Video ✳ See Note on the remote control. The projector selects connection in the Setting Menu, Computer 2 is connected to select and press the SELECT button. ✔Note: When Monitor out is...the source that you want to the VIDEO jack, select Video. The Source Select Menu will appear. Auto When selecting Auto, the projector automatically detects incoming video signal, and adjusts itself to Video and press the SELECT button. Video Input Input Source Selection (Video, S-...
... is not displayed. (p41) 32 INPUT button Video Computer 1 Computer 2 ✳ VIDEO button Video ✳ See Note on the remote control. The projector selects connection in the Setting Menu, Computer 2 is connected to select and press the SELECT button. ✔Note: When Monitor out is...the source that you want to the VIDEO jack, select Video. The Source Select Menu will appear. Auto When selecting Auto, the projector automatically detects incoming video signal, and adjusts itself to Video and press the SELECT button. Video Input Input Source Selection (Video, S-...

Owners Manual
Page 33
INPUT button Computer 1 Computer 2 ✳ Video COMPUTER button Computer 1 Computer 2 ✳ ✳ See Note on the remote control. Component When the input source is used as described below. Before using these buttons, correct input source should be selected through menu operation as ...
INPUT button Computer 1 Computer 2 ✳ Video COMPUTER button Computer 1 Computer 2 ✳ ✳ See Note on the remote control. Component When the input source is used as described below. Before using these buttons, correct input source should be selected through menu operation as ...

Owners Manual
Page 35
... level preset on a blackboard (Green). See above for the image projected on this projector. This is mainly effective on a green colored board, not truly effective on the remote control. Blackboard(Green) Picture level suitable for the picture with fine tone. The level... being selected. Video Input 35 Cinema Picture level adjusted for the image projected on this projector. Image Level Selection Direct Operation Select...
... level preset on a blackboard (Green). See above for the image projected on this projector. This is mainly effective on a green colored board, not truly effective on the remote control. Blackboard(Green) Picture level suitable for the picture with fine tone. The level... being selected. Video Input 35 Cinema Picture level adjusted for the image projected on this projector. Image Level Selection Direct Operation Select...
Owners Manual
Page 41
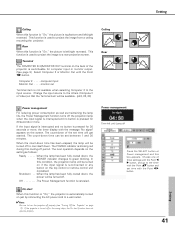
...and no button is pressed. Off The Power Management function is not available when selecting Computer 2 to turn the projector off properly (see "Turning Off the Projector" on the top control or remote control unit is pressed for 30 seconds or more , the timer display with the Point 78 button. The ...count-down time can be turned off period. The next operation depends on the screen. If the projector is pressed for computer ...
...and no button is pressed. Off The Power Management function is not available when selecting Computer 2 to turn the projector off properly (see "Turning Off the Projector" on the top control or remote control unit is pressed for 30 seconds or more , the timer display with the Point 78 button. The ...count-down time can be turned off period. The next operation depends on the screen. If the projector is pressed for computer ...
Owners Manual
Page 42
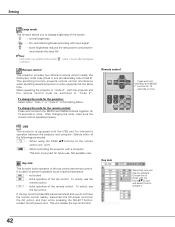
...Setting Menu. RemCoOMtPeUTERcoVnIDEtOrol ON-OFF MENU VOLUME- SELECT VOLUME+ Press and hold both the projector and the remote control must be switched to change the code for the projector; Choose one of the top control. the factory-set, initial code (Code 1) and... using the PAGE ed buttons on . ) within 2 minutes after the projector Remote control This projector provides two different remote control codes; This switching function prevents remote control interference when operating several projectors or video equipment at the same time. Setting Lamp mode This function allows...
...Setting Menu. RemCoOMtPeUTERcoVnIDEtOrol ON-OFF MENU VOLUME- SELECT VOLUME+ Press and hold both the projector and the remote control must be switched to change the code for the projector; Choose one of the top control. the factory-set, initial code (Code 1) and... using the PAGE ed buttons on . ) within 2 minutes after the projector Remote control This projector provides two different remote control codes; This switching function prevents remote control interference when operating several projectors or video equipment at the same time. Setting Lamp mode This function allows...


