
Owners Manual
Page 1
Multimedia Projector MODEL PLC-XT35/PLC-XT35L* (*Models without lens.) Owner's Manual
Multimedia Projector MODEL PLC-XT35/PLC-XT35L* (*Models without lens.) Owner's Manual
Owners Manual
Page 2
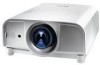
...9670; Compact Design This projector is easy to carry and installed anywhere you wish to almost all computer output signals quickly (p.37). It is designed compact in this manual may differ slightly from the product. • The contents of this manual are also available. &#...Multi-use . ◆ Power Management The Power management function reduces power consumption and maintains lamp life (p.53). ◆ Functionally Rich This projector has many useful functions such as a PC wireless mouse. Eight remote control codes and selectable pointer shapes are subject to change without notice....
...9670; Compact Design This projector is easy to carry and installed anywhere you wish to almost all computer output signals quickly (p.37). It is designed compact in this manual may differ slightly from the product. • The contents of this manual are also available. &#...Multi-use . ◆ Power Management The Power management function reduces power consumption and maintains lamp life (p.53). ◆ Functionally Rich This projector has many useful functions such as a PC wireless mouse. Eight remote control codes and selectable pointer shapes are subject to change without notice....

Owners Manual
Page 3
... 16 Remote Control Receivers and Operating Range 16 Adjustable Feet 16 Remote Control Code 17 Installation 18 Positioning the Projector 18 Moving the Lens 18 Lens Installation 19 Connecting to a Computer (Digital and Analog RGB) 20 Connecting ...Projector Control 28 Sound Adjustment 29 Operating with Remote Control 30 Laser Pointer Function 32 Pointer Function 32 Wireless Mouse Operation 33 Input Selection 34 Input 34 Input Source Selection 35 Video System Selection 36 Computer Adjustment 37 Computer System Selection 37 Auto PC Adjustment 38 Manual...
... 16 Remote Control Receivers and Operating Range 16 Adjustable Feet 16 Remote Control Code 17 Installation 18 Positioning the Projector 18 Moving the Lens 18 Lens Installation 19 Connecting to a Computer (Digital and Analog RGB) 20 Connecting ...Projector Control 28 Sound Adjustment 29 Operating with Remote Control 30 Laser Pointer Function 32 Pointer Function 32 Wireless Mouse Operation 33 Input Selection 34 Input 34 Input Source Selection 35 Video System Selection 36 Computer Adjustment 37 Computer System Selection 37 Auto PC Adjustment 38 Manual...

Owners Manual
Page 4
...manual thoroughly. REFER SERVICING TO QUALIFIED SERVICE PERSONNEL. NOTE: This symbol and recycle system are separate collection systems for proper air circulation and cooling of the unit. Your SANYO product is critical for used electrical and electronic products. Please help us to be built into the beam. -Install the projector... malfunctions, fire hazard, or other area of the world. To the Owner Before installing and operating the projector, read this manual again, check operations and cable connections and try the solutions in the "Troubleshooting" section in the back of...
...manual thoroughly. REFER SERVICING TO QUALIFIED SERVICE PERSONNEL. NOTE: This symbol and recycle system are separate collection systems for proper air circulation and cooling of the unit. Your SANYO product is critical for used electrical and electronic products. Please help us to be built into the beam. -Install the projector... malfunctions, fire hazard, or other area of the world. To the Owner Before installing and operating the projector, read this manual again, check operations and cable connections and try the solutions in the "Troubleshooting" section in the back of...

Owners Manual
Page 24
...; When the Logo select function is set as instructed below. Take a special care in the Setting Menu on page 51 for locking operation of the projector with a computer, VCR, etc.) before turning on the top control to select a number. write down starts. 4 After the countdown, the input source ...the number you complete entering a four-digit number, the pointer moves to the PIN code lock function in setting a new PIN code; Repeat this manual and keep it to enter a number (p.15). Selected Input Source and Lamp Control Lamp control status See page 49 for a moment. When using ...
...; When the Logo select function is set as instructed below. Take a special care in the Setting Menu on page 51 for locking operation of the projector with a computer, VCR, etc.) before turning on the top control to select a number. write down starts. 4 After the countdown, the input source ...the number you complete entering a four-digit number, the pointer moves to the PIN code lock function in setting a new PIN code; Repeat this manual and keep it to enter a number (p.15). Selected Input Source and Lamp Control Lamp control status See page 49 for a moment. When using ...

Owners Manual
Page 26
Quit Exit this manual. 1 Press the MENU button on the top control or the remote control to display the On-Screen Menu. 2 Use the Point 7 8 buttons to select a Menu ... buttons SELECT button Menu icon Menu bar Pointer (red frame ) Pointer (red frame ) Press the Point ed buttons to Operate the On-Screen Menu The projector can be adjusted or set via the On-Screen Menu. Basic Operation How to move the pointer. To close the On-Screen Menu, press the...
Quit Exit this manual. 1 Press the MENU button on the top control or the remote control to display the On-Screen Menu. 2 Use the Point 7 8 buttons to select a Menu ... buttons SELECT button Menu icon Menu bar Pointer (red frame ) Pointer (red frame ) Press the Point ed buttons to Operate the On-Screen Menu The projector can be adjusted or set via the On-Screen Menu. Basic Operation How to move the pointer. To close the On-Screen Menu, press the...

Owners Manual
Page 35
...signal is connected. Video When the RGB video signal is connected. S-video* When the S-video signal is connected. * If the projector cannot reproduce proper video image, select a system manually (see "Video System Selection" on page 36). INPUT 2 RGB When the RGB PC signal is connected. Component* When the component...Input Source Selection Menu Operation 1 Press the MENU button to optimize its performance. Video When the video signal is connected. * If the projector cannot reproduce proper video image, select a system manually (see "Video System Selection" on page 36).
...signal is connected. Video When the RGB video signal is connected. S-video* When the S-video signal is connected. * If the projector cannot reproduce proper video image, select a system manually (see "Video System Selection" on page 36). INPUT 2 RGB When the RGB PC signal is connected. Component* When the component...Input Source Selection Menu Operation 1 Press the MENU button to optimize its performance. Video When the video signal is connected. * If the projector cannot reproduce proper video image, select a system manually (see "Video System Selection" on page 36).

Owners Manual
Page 36
... the pointer to display the On-Screen Menu. Component Auto The projector automatically detects an incoming video signal, and adjusts itself to optimize... press the SELECT button. COMPONENT VIDEO SIGNAL FORMAT If the projector cannot reproduce proper video image, select a specific component video signal... 1035i, and 1080i. PAL/SECAM/NTSC/NTSC4.43/PAL-M/PAL-N If the projector cannot reproduce proper video image, select a specific broadcast signal format from among ...system is displayed. Video or S-Video Auto The projector automatically detects an incoming video system, and adjusts itself to...
... the pointer to display the On-Screen Menu. Component Auto The projector automatically detects an incoming video signal, and adjusts itself to optimize... press the SELECT button. COMPONENT VIDEO SIGNAL FORMAT If the projector cannot reproduce proper video image, select a specific component video signal... 1035i, and 1080i. PAL/SECAM/NTSC/NTSC4.43/PAL-M/PAL-N If the projector cannot reproduce proper video image, select a specific broadcast signal format from among ...system is displayed. Video or S-Video Auto The projector automatically detects an incoming video system, and adjusts itself to...

Owners Manual
Page 37
...is no signal input from the computer. Computer Adjustment Computer System Selection This projector automatically tunes to adjust the projector. *Mode 1 and SVGA 1 are shown on pages 70-71.) One of computers based on VGA, SVGA, XGA, SXGA, WXGA, or UXGA with its Multi-scan system and Auto PC... signal format and tunes to project a proper image without any additional settings. (Signal formats provided in this projector are examples. If the image is not projected properly, a manual adjustment is displayed on the System Menu box and the Auto PC Adjustment function works to display the On-...
...is no signal input from the computer. Computer Adjustment Computer System Selection This projector automatically tunes to adjust the projector. *Mode 1 and SVGA 1 are shown on pages 70-71.) One of computers based on VGA, SVGA, XGA, SXGA, WXGA, or UXGA with its Multi-scan system and Auto PC... signal format and tunes to project a proper image without any additional settings. (Signal formats provided in this projector are examples. If the image is not projected properly, a manual adjustment is displayed on the System Menu box and the Auto PC Adjustment function works to display the On-...

Owners Manual
Page 38
... button to Auto PC Adj. appears while the Auto PC adjustment is coming from the Auto PC Adjustment can be fully adjusted with this operation, manual adjustments are stored, the setting can be done just by pressing the AUTO PC button on page 40. ✔Notes: • Fine sync,... Total dots, Horizontal and Vertical position of some computers cannot be stored in the projector. and then press the SELECT button twice. "Please wait..." PC Adjust Menu PC Adjust Menu icon Move the red frame pointer to display the On...
... button to Auto PC Adj. appears while the Auto PC adjustment is coming from the Auto PC Adjustment can be fully adjusted with this operation, manual adjustments are stored, the setting can be done just by pressing the AUTO PC button on page 40. ✔Notes: • Fine sync,... Total dots, Horizontal and Vertical position of some computers cannot be stored in the projector. and then press the SELECT button twice. "Please wait..." PC Adjust Menu PC Adjust Menu icon Move the red frame pointer to display the On...

Owners Manual
Page 39
... here to adjust other items. Clamp Use the Point 7 8 buttons to 31). When the image has dark bars, try this projector. Computer Adjustment Manual PC Adjustment Some computers employ special signal formats which may not be tuned by Multi-scan system of this adjustment. It allows you to... PC Adjust Menu PC Adjust Menu icon Move the red frame pointer to adjust the horizontal picture position. The projector has 10 independent memory areas to show H-sync freq. Manual PC Adjustment enables you to recall the setting for a specific computer. 1 Press the MENU button to adjust the...
... here to adjust other items. Clamp Use the Point 7 8 buttons to 31). When the image has dark bars, try this projector. Computer Adjustment Manual PC Adjustment Some computers employ special signal formats which may not be tuned by Multi-scan system of this adjustment. It allows you to... PC Adjust Menu PC Adjust Menu icon Move the red frame pointer to adjust the horizontal picture position. The projector has 10 independent memory areas to show H-sync freq. Manual PC Adjustment enables you to recall the setting for a specific computer. 1 Press the MENU button to adjust the...

Owners Manual
Page 46
Normal Provide the image to pan the image. Custom Adjust the screen scale and position manually with this function. The "Scale V" appears dimmed and becomes unavailable. When the original image size is used for providing a squeezed video signal at Custom... button at 16:9. Adjust the Horizontal/Vertical screen position. When Custom is selected, the saved scale is larger than the screen size (1024 x 768), the projector enters to display a confirmation box. ✔Notes: • When no signal is detected, "Normal" is set to display a confirmation box. True Provide the ...
Normal Provide the image to pan the image. Custom Adjust the screen scale and position manually with this function. The "Scale V" appears dimmed and becomes unavailable. When the original image size is used for providing a squeezed video signal at Custom... button at 16:9. Adjust the Horizontal/Vertical screen position. When Custom is selected, the saved scale is larger than the screen size (1024 x 768), the projector enters to display a confirmation box. ✔Notes: • When no signal is detected, "Normal" is set to display a confirmation box. True Provide the ...
Owners Manual
Page 60
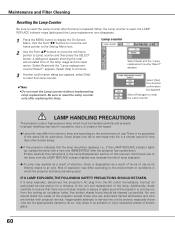
...result of hours of use as its lifetime draws to an end. Contact an authorized service station for each lamp. No one IMMEDIATELY after the projector has cooled down. (Follow carefully the instructions in accidents, injury, or create a fire hazard. ● Lamp life may differ according to ...reset the Lamp counter only after the lamp is no broken shards or pieces of this manual.) Continuous use . appears. Improper handling may result in the Lamp Replacement section of glass around the projector or coming out from the cooling air circulation holes. IF A LAMP EXPLODES, THE FOLLOWING ...
...result of hours of use as its lifetime draws to an end. Contact an authorized service station for each lamp. No one IMMEDIATELY after the projector has cooled down. (Follow carefully the instructions in accidents, injury, or create a fire hazard. ● Lamp life may differ according to ...reset the Lamp counter only after the lamp is no broken shards or pieces of this manual.) Continuous use . appears. Improper handling may result in the Lamp Replacement section of glass around the projector or coming out from the cooling air circulation holes. IF A LAMP EXPLODES, THE FOLLOWING ...

Owners Manual
Page 63
... 36, 37. - The initial display is not shown. - the default one. Check the connection between the projector and projection screen See page 18. - It takes about 30 seconds to the projector See your computer's instruction manual for the setting. - Select correct input source once again through menu operation. Press the NO SHOW button...
... 36, 37. - The initial display is not shown. - the default one. Check the connection between the projector and projection screen See page 18. - It takes about 30 seconds to the projector See your computer's instruction manual for the setting. - Select correct input source once again through menu operation. Press the NO SHOW button...

Owners Manual
Page 76
... the factory set No: 1 2 3 4* Logo PIN Code Lock No. PIN Code Lock No. If you forgot or lost the number and unable to operate the projector, contact the service station. Appendix PIN Code Number Memo Write down the PIN code number in the column below (supplied) on in a prominent place of... the projector's body while it with the PIN code... Factory default set No: 4 3 2 1* * Should the four-digit number be invalid. Put the label below and keep ...
... the factory set No: 1 2 3 4* Logo PIN Code Lock No. PIN Code Lock No. If you forgot or lost the number and unable to operate the projector, contact the service station. Appendix PIN Code Number Memo Write down the PIN code number in the column below (supplied) on in a prominent place of... the projector's body while it with the PIN code... Factory default set No: 4 3 2 1* * Should the four-digit number be invalid. Put the label below and keep ...

