Owners Manual
Page 5
... IMAGE SELECT 28 8 IMAGE LEVEL SELECT 28 9 PICTURE SCREEN ADJUSTMENT 29 10 INSTALLING PROJECTOR IN PROPER POSITION 10 MOVING PROJECTOR 11 VIDEO INPUT 30 CONNECTING PROJECTOR 12 SELECTING INPUT SOURCE 30 SELECTING VIDEO SYSTEM 31 PICTURE IMAGE SELECT 32 TERMINALS OF PROJECTOR 12 IMAGE LEVEL SELECT 32 CONNECTING TO COMPUTER 13 PICTURE SCREEN ADJUSTMENT 33 CONNECTING...
... IMAGE SELECT 28 8 IMAGE LEVEL SELECT 28 9 PICTURE SCREEN ADJUSTMENT 29 10 INSTALLING PROJECTOR IN PROPER POSITION 10 MOVING PROJECTOR 11 VIDEO INPUT 30 CONNECTING PROJECTOR 12 SELECTING INPUT SOURCE 30 SELECTING VIDEO SYSTEM 31 PICTURE IMAGE SELECT 32 TERMINALS OF PROJECTOR 12 IMAGE LEVEL SELECT 32 CONNECTING TO COMPUTER 13 PICTURE SCREEN ADJUSTMENT 33 CONNECTING...
Owners Manual
Page 6
... Multilanguage Menu Display Operation menu is no need for connecting DVI output from a computer between XGA (1024 x 768) and SXGA (1280 x 1024) is always precise. This projector utilizes built-in a trapezoid shape. G Computers IBM-compatible or Macintosh computer up and down ...and matrix liquid crystal display (LCD) technology. G Component Video Component video signal, such as a S-VHS VCR output signal, can be connected. The projector can be also controlled and maintained through a web browser. 6 FEATURES AND DESIGN This Multimedia Projector is designed to carry and ...
... Multilanguage Menu Display Operation menu is no need for connecting DVI output from a computer between XGA (1024 x 768) and SXGA (1280 x 1024) is always precise. This projector utilizes built-in a trapezoid shape. G Computers IBM-compatible or Macintosh computer up and down ...and matrix liquid crystal display (LCD) technology. G Component Video Component video signal, such as a S-VHS VCR output signal, can be connected. The projector can be also controlled and maintained through a web browser. 6 FEATURES AND DESIGN This Multimedia Projector is designed to carry and ...
Owners Manual
Page 12
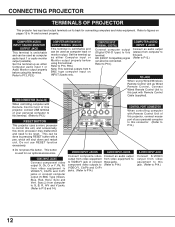
... BUTTON This projector uses a micro processor to control this unit, and occasionally, this terminal. Sync.)} from computer to G, B, R, H/V and V jacks. (Refer to P13 and 14.) VIDEO INPUT JACKS Connect composite video output from video equipment to VIDEO/Y jack or connect component video outputs to VIDEO/Y, Cb/Pb...AUDIO INPUT 2 JACK Connect an audio output (stereo) from video equipment to P13.) R/C JACK INPUT 1 ANALOG IN/OUT DIGITAL(DVI-D) R/C JACK When using this jack with Remote Control Unit of this projector, connect mouse port of your personal computer to this connector....
... BUTTON This projector uses a micro processor to control this unit, and occasionally, this terminal. Sync.)} from computer to G, B, R, H/V and V jacks. (Refer to P13 and 14.) VIDEO INPUT JACKS Connect composite video output from video equipment to VIDEO/Y jack or connect component video outputs to VIDEO/Y, Cb/Pb...AUDIO INPUT 2 JACK Connect an audio output (stereo) from video equipment to P13.) R/C JACK INPUT 1 ANALOG IN/OUT DIGITAL(DVI-D) R/C JACK When using this jack with Remote Control Unit of this projector, connect mouse port of your personal computer to this connector....
Owners Manual
Page 13
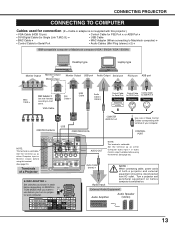
...turn on projec- 123456 tor and computer. CONNECTING PROJECTOR CONNECTING TO COMPUTER Cables used for Serial Port • Audio Cables (Mini Plug (stereo) x 2) ✽ IBM-compatible computer or Macintosh computer (VGA / SVGA / XGA / SXGA) Desktop type Laptop type Monitor Output ... Input NOTE : When connecting cable, power cords of a Projector INPUT 1 ANALOG IN/OUT DIGITAL(DVI-D) R/C JACK AUDIO 1 IN/OUT USB RESET CONTROL PORT AUDIO 2 G B R H/V V VIDEO/Y Cb/Pb Cr/Pr INPUT 2 VIDEO/Y Cb/Pb Cr/Pr R-AUDIO-L S-VIDEO (MONO) INPUT 3 N MAC ADAPTER ✽ Set switches...
...turn on projec- 123456 tor and computer. CONNECTING PROJECTOR CONNECTING TO COMPUTER Cables used for Serial Port • Audio Cables (Mini Plug (stereo) x 2) ✽ IBM-compatible computer or Macintosh computer (VGA / SVGA / XGA / SXGA) Desktop type Laptop type Monitor Output ... Input NOTE : When connecting cable, power cords of a Projector INPUT 1 ANALOG IN/OUT DIGITAL(DVI-D) R/C JACK AUDIO 1 IN/OUT USB RESET CONTROL PORT AUDIO 2 G B R H/V V VIDEO/Y Cb/Pb Cr/Pr INPUT 2 VIDEO/Y Cb/Pb Cr/Pr R-AUDIO-L S-VIDEO (MONO) INPUT 3 N MAC ADAPTER ✽ Set switches...
Owners Manual
Page 14
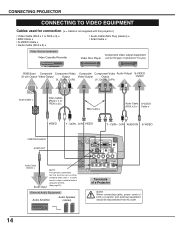
... output (variable) before using this projector.) • Video Cable (RCA x 1 or RCA x 3) ✽ • BNC Cable ✽ • S-VIDEO Cable ✽ • Audio Cable (RCA x 2) ✽ • Audio Cable {Mini Plug (stereo)} ✽ • Scart Cable ✽ Video Source (example) Video Cassette Recorder Component video output equipment. CONNECTING PROJECTOR CONNECTING TO VIDEO EQUIPMENT Cables used for connection (✽...
... output (variable) before using this projector.) • Video Cable (RCA x 1 or RCA x 3) ✽ • BNC Cable ✽ • S-VIDEO Cable ✽ • Audio Cable (RCA x 2) ✽ • Audio Cable {Mini Plug (stereo)} ✽ • Scart Cable ✽ Video Source (example) Video Cassette Recorder Component video output equipment. CONNECTING PROJECTOR CONNECTING TO VIDEO EQUIPMENT Cables used for connection (✽...
Owners Manual
Page 18
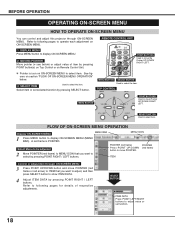
...item. Select item or set function. 18 A red frame is icon on Remote Control Unit. ✽ Pointer is POINTER. P-TIMERCOMPUTER 1 ZOOM COMPUTER 2 VIDEO SELECT BUTTON Used to move Pointer UP/ DOWN/ RIGHT/ LEFT. POINTER (red frame) POINTER Press POINT UP/DOWN (red frame) button to move the Pointer... UP/ DOWN/ RIGHT/ LEFT. BEFORE OPERATION OPERATING ON-SCREEN MENU HOW TO OPERATE ON-SCREEN MENU You can control and adjust this projector through ON-SCREEN MENU 3 Press POINT UP/DOWN button and move POINTER (red frame or red arrow) to ITEM that you want to ...
...item. Select item or set function. 18 A red frame is icon on Remote Control Unit. ✽ Pointer is POINTER. P-TIMERCOMPUTER 1 ZOOM COMPUTER 2 VIDEO SELECT BUTTON Used to move Pointer UP/ DOWN/ RIGHT/ LEFT. POINTER (red frame) POINTER Press POINT UP/DOWN (red frame) button to move the Pointer... UP/ DOWN/ RIGHT/ LEFT. BEFORE OPERATION OPERATING ON-SCREEN MENU HOW TO OPERATE ON-SCREEN MENU You can control and adjust this projector through ON-SCREEN MENU 3 Press POINT UP/DOWN button and move POINTER (red frame or red arrow) to ITEM that you want to ...
Owners Manual
Page 19
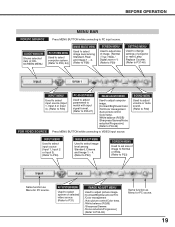
AV SYSTEM MENU Used to select system of projector or reset Lamp Replace Counter. (Refer to P37-40) INPUT MENU Used... picture control /Color temp. /White balance (R/G/B) /Sharpness/Gamma/Noise reduction/Progressive] (Refer to P34-36) FOR VIDEO SOURCE Press MENU BUTTON while connecting to PC input source. PC SYSTEM MENU Used to select computer system. (Refer... [Normal / True / Wide / Digital zoom +/-] (Refer to P29) SETTING MENU Used to change settings of selected video source. (Refer to P31) IMAGE ADJUST MENU Used to adjust picture image. [Contrast/Brightness/Color/Tint /Color management ...
AV SYSTEM MENU Used to select system of projector or reset Lamp Replace Counter. (Refer to P37-40) INPUT MENU Used... picture control /Color temp. /White balance (R/G/B) /Sharpness/Gamma/Noise reduction/Progressive] (Refer to P34-36) FOR VIDEO SOURCE Press MENU BUTTON while connecting to PC input source. PC SYSTEM MENU Used to select computer system. (Refer... [Normal / True / Wide / Digital zoom +/-] (Refer to P29) SETTING MENU Used to change settings of selected video source. (Refer to P31) IMAGE ADJUST MENU Used to adjust picture image. [Contrast/Brightness/Color/Tint /Color management ...
Owners Manual
Page 20
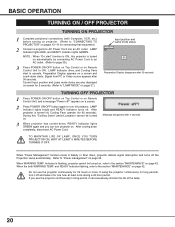
... pages 12~14 for long periods, turn it off ?" Signal from PC or Video source appears after 4 seconds. 3 When projector has cooled down , projector detects signal interruption and turns off . TURNING OFF PROJECTOR 1 Press POWER ON-OFF button on Top Control or on Remote Control Unit, and a message "Power off and leave it can...
... pages 12~14 for long periods, turn it off ?" Signal from PC or Video source appears after 4 seconds. 3 When projector has cooled down , projector detects signal interruption and turns off . TURNING OFF PROJECTOR 1 Press POWER ON-OFF button on Top Control or on Remote Control Unit, and a message "Power off and leave it can...
Owners Manual
Page 23
...Protection, LLC. NOTE; The specification of HDCP is connected to INPUT 1 (DIGITAL) terminal, select RGB(PC Digital). RGB(Scart) When video equipment is connected to the INPUT 1 (DIGITAL) terminal, select RGB(AV HDCP). INPUT Menu icon SELECTING COMPUTER SYSTEM WHEN SELECT INPUT ... Protection) is a system for protecting digital entertainment content which is connected to INPUT 1 (ANALOG) terminal, select RGB(Scart). If projector cannot reproduce proper image, select correct input source through MENU OPERATION (see below). INPUT MENU Input 1 INPUT Menu icon Move a ...
...Protection, LLC. NOTE; The specification of HDCP is connected to INPUT 1 (DIGITAL) terminal, select RGB(PC Digital). RGB(Scart) When video equipment is connected to the INPUT 1 (DIGITAL) terminal, select RGB(AV HDCP). INPUT Menu icon SELECTING COMPUTER SYSTEM WHEN SELECT INPUT ... Protection) is a system for protecting digital entertainment content which is connected to INPUT 1 (ANALOG) terminal, select RGB(Scart). If projector cannot reproduce proper image, select correct input source through MENU OPERATION (see below). INPUT MENU Input 1 INPUT Menu icon Move a ...

Owners Manual
Page 29
... Provides image to pan image. Wide Provides image to fit wide video aspect ratio (16 : 9) by pressing D.ZOOM L button on Remote Control Unit. This function can work only when image is higher than screen size (1024 x 768), this projector enters "Digital zoom +" mode automatically. Zoom +" is modified to... size. Press POINT LEFT/RIGHT button(s) to move a red frame pointer to function that you to expand image size. True Provides image in other than XGA (1024 x 768) is displayed. Panning function can be operated when "480i", "575i", "480p", "575p", "1035i (HDTV)" or "1080i (HDTV)" is ...
... Provides image to pan image. Wide Provides image to fit wide video aspect ratio (16 : 9) by pressing D.ZOOM L button on Remote Control Unit. This function can work only when image is higher than screen size (1024 x 768), this projector enters "Digital zoom +" mode automatically. Zoom +" is modified to... size. Press POINT LEFT/RIGHT button(s) to move a red frame pointer to function that you to expand image size. True Provides image in other than XGA (1024 x 768) is displayed. Panning function can be operated when "480i", "575i", "480p", "575p", "1035i (HDTV)" or "1080i (HDTV)" is ...
Owners Manual
Page 31
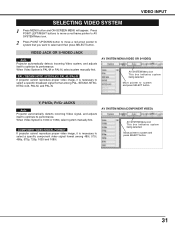
..., 575p, 720p, 1035i and 1080i. VIDEO JACK OR S-VIDEO JACK Auto Projector automatically detects incoming Video system, and adjusts itself to system and press SELECT button. 31 AV SYSTEM MENU (VIDEO OR S-VIDEO) AV SYSTEM Menu icon This box indicates system being selected. COMPONENT VIDEO SIGNAL FORMAT If projector cannot reproduce proper video image, it is necessary to optimize...
..., 575p, 720p, 1035i and 1080i. VIDEO JACK OR S-VIDEO JACK Auto Projector automatically detects incoming Video system, and adjusts itself to system and press SELECT button. 31 AV SYSTEM MENU (VIDEO OR S-VIDEO) AV SYSTEM Menu icon This box indicates system being selected. COMPONENT VIDEO SIGNAL FORMAT If projector cannot reproduce proper video image, it is necessary to optimize...
Owners Manual
Page 32
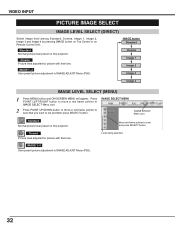
... level and press SELECT button. Move red frame pointer to set and then press SELECT button. Cinema Picture level adjusted for picture with fine tone. VIDEO INPUT PICTURE IMAGE SELECT IMAGE LEVEL SELECT (DIRECT) Select image level among Standard, Cinema, Image 1, Image 2, Image 3 and Image 4 by pressing IMAGE button on Top...
... level and press SELECT button. Move red frame pointer to set and then press SELECT button. Cinema Picture level adjusted for picture with fine tone. VIDEO INPUT PICTURE IMAGE SELECT IMAGE LEVEL SELECT (DIRECT) Select image level among Standard, Cinema, Image 1, Image 2, Image 3 and Image 4 by pressing IMAGE button on Top...
Owners Manual
Page 33
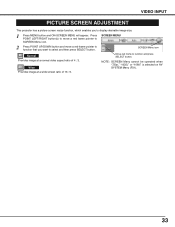
...," "1035i," or "1080i" is selected on AV SYSTEM Menu (P31). 33 Move red frame to function and press SELECT button. Wide Provides image at a normal video aspect ratio of 16 : 9. VIDEO INPUT PICTURE SCREEN ADJUSTMENT This projector has a picture screen resize function, which enables you want to select and then press SELECT button.
...," "1035i," or "1080i" is selected on AV SYSTEM Menu (P31). 33 Move red frame to function and press SELECT button. Wide Provides image at a normal video aspect ratio of 16 : 9. VIDEO INPUT PICTURE SCREEN ADJUSTMENT This projector has a picture screen resize function, which enables you want to select and then press SELECT button.
Owners Manual
Page 34
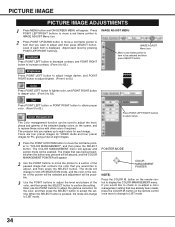
There are four preset images for VIDEO mode and four preset images for the color, and then press the SELECT button to accept the setting. button on the screen, and to replace .... The COLOR MANAGEMENT menu will appear and pointer mode will be enabled. When the SELECT button is displayed. Adjust each image. Press the COLOR M. The projector lets you replace up to eight colors for each level by pressing POINT LEFT/RIGHT button(s). POINTER MODE COLOR MANAGEMENT POINTER NOTE; The mode will...
There are four preset images for VIDEO mode and four preset images for the color, and then press the SELECT button to accept the setting. button on the screen, and to replace .... The COLOR MANAGEMENT menu will appear and pointer mode will be enabled. When the SELECT button is displayed. Adjust each image. Press the COLOR M. The projector lets you replace up to eight colors for each level by pressing POINT LEFT/RIGHT button(s). POINTER MODE COLOR MANAGEMENT POINTER NOTE; The mode will...
Owners Manual
Page 38
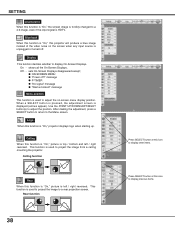
... function is used to display previous items. On ··· shows all the On-Screen Displays. SETTING Anamorphic When this function is "On," projector displays logo when starting up. Blue back When this function is "On," this icon to project the image from a ceiling mounting the...unplugged or turned off ?" Use the POINT UP/DOWN/LEFT/RIGHT button(s) to display other items. Press SELECT button at this projector will produce a blue image instead of the video noise on -screen menu display position. Logo When this function is "On," the screen image is forcibly changed to adjust ...
... function is used to display previous items. On ··· shows all the On-Screen Displays. SETTING Anamorphic When this function is "On," projector displays logo when starting up. Blue back When this function is "On," this icon to project the image from a ceiling mounting the...unplugged or turned off ?" Use the POINT UP/DOWN/LEFT/RIGHT button(s) to display other items. Press SELECT button at this projector will produce a blue image instead of the video noise on -screen menu display position. Logo When this function is "On," the screen image is forcibly changed to adjust ...
Owners Manual
Page 39
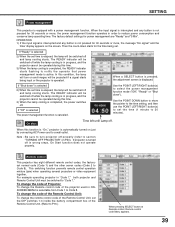
...power management function. If "Ready" is selected 2) When the set the DIP switches 1-3 inside the battery compartment box of Projector; In this time. 3) When the lamp cooling is not pressed for power management are "Ready" and "5 Min". ...projector has eight different remote control codes; The READY indicator will be switched off . Use the POINT DOWN button to move the pointer to the time setting, and then use the POINT LEFT/RIGHT button(s) to Code 8. This switching function prevents remote control operation mixture (jam) when operating several projectors or video...
...power management function. If "Ready" is selected 2) When the set the DIP switches 1-3 inside the battery compartment box of Projector; In this time. 3) When the lamp cooling is not pressed for power management are "Ready" and "5 Min". ...projector has eight different remote control codes; The READY indicator will be switched off . Use the POINT DOWN button to move the pointer to the time setting, and then use the POINT LEFT/RIGHT button(s) to Code 8. This switching function prevents remote control operation mixture (jam) when operating several projectors or video...
Owners Manual
Page 41
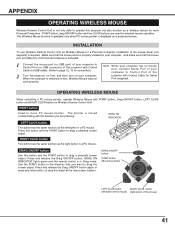
... used for Serial Port (supplied). Note : When your computer has no mouse port, connect Serial Port of the mouse) P-TIMERCOMPUTER 1 ZOOM COMPUTER 2 VIDEO FOCUS LENS 41 Press and release the Drag ON/OFF button again or press any other button, to Control Port of the mouse driver (not...in a PC mouse. SELECT VOLUME+ RIGHT CLICK button This button has the same function as Wireless Mouse for a Personal Computer, installation of the projector with POINT button, Drag ON/OFF button, LEFT CLICK button and RIGHT CLICK button on your computer to Control Port (or USB connector) of your...
... used for Serial Port (supplied). Note : When your computer has no mouse port, connect Serial Port of the mouse) P-TIMERCOMPUTER 1 ZOOM COMPUTER 2 VIDEO FOCUS LENS 41 Press and release the Drag ON/OFF button again or press any other button, to Control Port of the mouse driver (not...in a PC mouse. SELECT VOLUME+ RIGHT CLICK button This button has the same function as Wireless Mouse for a Personal Computer, installation of the projector with POINT button, Drag ON/OFF button, LEFT CLICK button and RIGHT CLICK button on your computer to Control Port (or USB connector) of your...
Owners Manual
Page 46
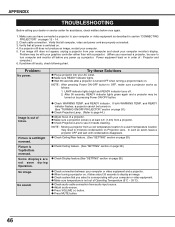
...temperature location may result in section "CONNECTING PROJECTOR" on page 38.) G Check connection between your computer or video equipment and a projector. LAMP indicator lights bright and READY indicator turns off before you power up a projector. APPENDIX TROUBLESHOOTING Before calling your computer. 5.... during Operation. Problem may be turned on in order of a projector. and READY indicator flashes, a projector cannot be sure to your computer or video equipment. NOTE : Moving a projector from your computer and check your AC outlet. Picture is Left/Right...
...temperature location may result in section "CONNECTING PROJECTOR" on page 38.) G Check connection between your computer or video equipment and a projector. LAMP indicator lights bright and READY indicator turns off before you power up a projector. APPENDIX TROUBLESHOOTING Before calling your computer. 5.... during Operation. Problem may be turned on in order of a projector. and READY indicator flashes, a projector cannot be sure to your computer or video equipment. NOTE : Moving a projector from your computer and check your AC outlet. Picture is Left/Right...

Owners Manual
Page 52
... and Power Consumption Operating Temperature Storage Temperature Remote Control Transmitter Accessories Multi-media Projector 12.6" x 6.6" x 18.5" (319 mm x 168 mm x 470 mm) 20.3 lbs (9.2 kg) PLC-XP55, 17.4 lbs (7.9 kg) PLC-XP55L 1.3" TFT Active Matrix type, 3 panels 1024 x 768 dots 2,359,...pin (S-Video) DIN 8-pin (Control port), USB port (Series B receptacle), Wired Remote Jack and PJ-Net Organizer Connector INT. Ampere), 50 / 60 Hz (The U.S.A and Canada) AC 200 ~ 240 V (2.5 A Max. APPENDIX TECHNICAL SPECIFICATIONS Projector Type Dimensions (W x H x D) Net Weight LCD Panel System...
... and Power Consumption Operating Temperature Storage Temperature Remote Control Transmitter Accessories Multi-media Projector 12.6" x 6.6" x 18.5" (319 mm x 168 mm x 470 mm) 20.3 lbs (9.2 kg) PLC-XP55, 17.4 lbs (7.9 kg) PLC-XP55L 1.3" TFT Active Matrix type, 3 panels 1024 x 768 dots 2,359,...pin (S-Video) DIN 8-pin (Control port), USB port (Series B receptacle), Wired Remote Jack and PJ-Net Organizer Connector INT. Ampere), 50 / 60 Hz (The U.S.A and Canada) AC 200 ~ 240 V (2.5 A Max. APPENDIX TECHNICAL SPECIFICATIONS Projector Type Dimensions (W x H x D) Net Weight LCD Panel System...


