Owners Manual
Page 2
... Light Window while pressing LASER button (for a considerable time. NO USERSERVICEABLE PARTS INSIDE EXCEPT LAMP REPLACEMENT. This projector provides many convenient features and functions. If your projector, and can reduce the service life of this manual thoroughly and operate the projector properly. G This projector should be maintained. If not, it in the way indicated. Do not cover the ventilation slot on yourself or other accidents. G Remote Control Unit, supplied to operate...
... Light Window while pressing LASER button (for a considerable time. NO USERSERVICEABLE PARTS INSIDE EXCEPT LAMP REPLACEMENT. This projector provides many convenient features and functions. If your projector, and can reduce the service life of this manual thoroughly and operate the projector properly. G This projector should be maintained. If not, it in the way indicated. Do not cover the ventilation slot on yourself or other accidents. G Remote Control Unit, supplied to operate...
Owners Manual
Page 4
... socket outlet, it . If a replacement fuse cover is required, ensure it is connected. - The Wires in this mains lead are coloured in your User Instructions. WARNING : THIS APPARATUS MUST BE EARTHED. If this projector meets the requirement for your electrician. Reorient or relocate the receiving antenna. - Model Number Trade Name Responsible party Address Telephone No. : PLC-XP55/PLC-XP55L : Sanyo : SANYO FISHER COMPANY : 21605 Plummer...
... socket outlet, it . If a replacement fuse cover is required, ensure it is connected. - The Wires in this mains lead are coloured in your User Instructions. WARNING : THIS APPARATUS MUST BE EARTHED. If this projector meets the requirement for your electrician. Reorient or relocate the receiving antenna. - Model Number Trade Name Responsible party Address Telephone No. : PLC-XP55/PLC-XP55L : Sanyo : SANYO FISHER COMPANY : 21605 Plummer...
Owners Manual
Page 5
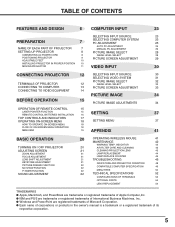
... IMAGE ADJUSTMENTS 34 OPERATION OF REMOTE CONTROL 15 LASER POINTER FUNCTION 15 REMOTE CONTROL BATTERIES INSTALLATION 16 SETTING 37 TOP CONTROLS AND INDICATORS 17 OPERATING ON-SCREEN MENU 18 SETTING MENU 37 HOW TO OPERATE ON-SCREEN MENU 18 FLOW OF ON-SCREEN MENU OPERATION 18 MENU BAR 19 APPENDIX 41 BASIC OPERATION TURNING ON / OFF PROJECTOR ADJUSTING SCREEN ZOOM ADJUSTMENT FOCUS ADJUSTMENT LENS SHIFT ADJUSTMENT KEYSTONE ADJUSTMENT PICTURE FREEZE FUNCTION NO SHOW FUNCTION P-TIMER FUNCTION SOUND ADJUSTMENT 20 OPERATING WIRELESS MOUSE 41 MAINTENANCE 42 WARNING TEMP...
... IMAGE ADJUSTMENTS 34 OPERATION OF REMOTE CONTROL 15 LASER POINTER FUNCTION 15 REMOTE CONTROL BATTERIES INSTALLATION 16 SETTING 37 TOP CONTROLS AND INDICATORS 17 OPERATING ON-SCREEN MENU 18 SETTING MENU 37 HOW TO OPERATE ON-SCREEN MENU 18 FLOW OF ON-SCREEN MENU OPERATION 18 MENU BAR 19 APPENDIX 41 BASIC OPERATION TURNING ON / OFF PROJECTOR ADJUSTING SCREEN ZOOM ADJUSTMENT FOCUS ADJUSTMENT LENS SHIFT ADJUSTMENT KEYSTONE ADJUSTMENT PICTURE FREEZE FUNCTION NO SHOW FUNCTION P-TIMER FUNCTION SOUND ADJUSTMENT 20 OPERATING WIRELESS MOUSE 41 MAINTENANCE 42 WARNING TEMP...
Owners Manual
Page 6
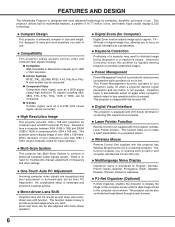
... adjustment is automatically set by digitally altering projection to display the image of over than 1280 x 1024, reset a computer output for lower resolution. G Component Video Component video signal, such as a S-VHS VCR output signal, can be connected. N High Resolution Image This projector provides 1024 x 768 dots resolution for computer input and 800 horizontal TV lines. G Computers IBM-compatible or Macintosh computer up and down with motordriven lens shift function. N Wireless Mouse Remote Control Unit supplied...
... adjustment is automatically set by digitally altering projection to display the image of over than 1280 x 1024, reset a computer output for lower resolution. G Component Video Component video signal, such as a S-VHS VCR output signal, can be connected. N High Resolution Image This projector provides 1024 x 768 dots resolution for computer input and 800 horizontal TV lines. G Computers IBM-compatible or Macintosh computer up and down with motordriven lens shift function. N Wireless Mouse Remote Control Unit supplied...
Owners Manual
Page 13
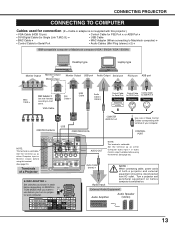
... MODE that you turn on . Turn a projector and peripheral equipment on before computer is not supplied with terminal of your computer. CONNECTING PROJECTOR CONNECTING TO COMPUTER Cables used for Serial Port • Audio Cables (Mini Plug (stereo) x 2) ✽ IBM-compatible computer or Macintosh computer (VGA / SVGA / XGA / SXGA) Desktop type Laptop type Monitor Output Monitor Output or Monitor Input Monitor Output USB port Audio Output Serial port PS/2 port ADB port BNC Cable ✽ MAC Adapter ✽ Set slide switches...
... MODE that you turn on . Turn a projector and peripheral equipment on before computer is not supplied with terminal of your computer. CONNECTING PROJECTOR CONNECTING TO COMPUTER Cables used for Serial Port • Audio Cables (Mini Plug (stereo) x 2) ✽ IBM-compatible computer or Macintosh computer (VGA / SVGA / XGA / SXGA) Desktop type Laptop type Monitor Output Monitor Output or Monitor Input Monitor Output USB port Audio Output Serial port PS/2 port ADB port BNC Cable ✽ MAC Adapter ✽ Set slide switches...
Owners Manual
Page 15
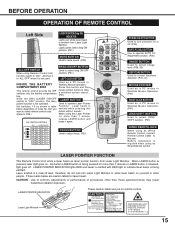
... ON Code 7 OFF OFF OFF Code 8 DRAG ON/OFF BUTTON Used to "OFF" position. SELECT VOLUME+ MENU KEYSTONE LASER P-TIMER INPUT 1 ZOOM COLOR.M INPUT 2 INPUT 3 FOCUS LENS NETWORK POWER ON-OFF BUTTON Used to operate Laser Pointer Function. LASER POINTER FUNCTION This Remote Control Unit emits a laser beam as Wired Remote Control. And when LASER button is being emitted. Press this button and the mouse pointer button to drag a selected screen object. (P41) LASER BUTTON Used to turn projector on Code No...
... ON Code 7 OFF OFF OFF Code 8 DRAG ON/OFF BUTTON Used to "OFF" position. SELECT VOLUME+ MENU KEYSTONE LASER P-TIMER INPUT 1 ZOOM COLOR.M INPUT 2 INPUT 3 FOCUS LENS NETWORK POWER ON-OFF BUTTON Used to operate Laser Pointer Function. LASER POINTER FUNCTION This Remote Control Unit emits a laser beam as Wired Remote Control. And when LASER button is being emitted. Press this button and the mouse pointer button to drag a selected screen object. (P41) LASER BUTTON Used to turn projector on Code No...
Owners Manual
Page 16
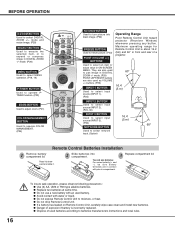
... about 16.4' (5m) and 60° in ON-SCREEN MENU. G Do not drop Remote Control Unit. SELECT VOLUME+ MENU KEYSTONE P-TIMER BUTTON Used to operate PTIMER function. (P22) ZOOM BUTTON Used to adjust zoom. (P21) COLOR MANAGEMENT BUTTON Used to operate COLOR MANAGEMENT. (P34) LASER P-TIMER INPUT 1 ZOOM COLOR.M INPUT 2 INPUT 3 FOCUS LENS NETWORK NO SHOW BUTTON Used to turn picture into compartment. 3 Replace compartment lid. G Avoid contact with pins in DIGITAL ZOOM +/- mode. (P29) POINT LEFT/RIGHT buttons are in contact with water or liquid. Press lid...
... about 16.4' (5m) and 60° in ON-SCREEN MENU. G Do not drop Remote Control Unit. SELECT VOLUME+ MENU KEYSTONE P-TIMER BUTTON Used to operate PTIMER function. (P22) ZOOM BUTTON Used to adjust zoom. (P21) COLOR MANAGEMENT BUTTON Used to operate COLOR MANAGEMENT. (P34) LASER P-TIMER INPUT 1 ZOOM COLOR.M INPUT 2 INPUT 3 FOCUS LENS NETWORK NO SHOW BUTTON Used to turn picture into compartment. 3 Replace compartment lid. G Avoid contact with pins in DIGITAL ZOOM +/- mode. (P29) POINT LEFT/RIGHT buttons are in contact with water or liquid. Press lid...
Owners Manual
Page 17
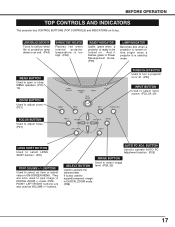
.... (P44) WARNING TEMP. And it flashes green in Power Management mode. (P39) LAMP INDICATOR Becomes dim when a projector is ready to pan image in ON-SCREEN MENU. It is in DIGITAL ZOOM mode. (P29) 17 They are also used to be turned on its top. buttons. LAMP REPLACE INDICATOR Turns to yellow when life of projection lamp draws to execute the selected item. MENU BUTTON Used to open or close MENU operation. (P18, 19) ZOOM BUTTON Used to adjust zoom. (P21) POWER ON-OFF BUTTON Used to expand/compress image in...
.... (P44) WARNING TEMP. And it flashes green in Power Management mode. (P39) LAMP INDICATOR Becomes dim when a projector is ready to pan image in ON-SCREEN MENU. It is in DIGITAL ZOOM mode. (P29) 17 They are also used to be turned on its top. buttons. LAMP REPLACE INDICATOR Turns to yellow when life of projection lamp draws to execute the selected item. MENU BUTTON Used to open or close MENU operation. (P18, 19) ZOOM BUTTON Used to adjust zoom. (P21) POWER ON-OFF BUTTON Used to expand/compress image in...
Owners Manual
Page 18
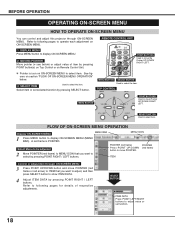
...-SCREEN MENU HOW TO OPERATE ON-SCREEN MENU You can control and adjust this projector through ON-SCREEN MENU 3 Press POINT UP/DOWN button and move Pointer UP/ DOWN/ RIGHT/ LEFT. AUTO PC ON-OFF D.ZOOM FREEZE NO SHOW MUTE IMAGE VOLUME- TOP CONTROL MENU BUTTON LASER POINT BUTTONS Used to adjust value or set selected function by pressing POINT button(s) on Top Control or on Remote Control Unit. ✽ Pointer is POINTER. Refer to display...
...-SCREEN MENU HOW TO OPERATE ON-SCREEN MENU You can control and adjust this projector through ON-SCREEN MENU 3 Press POINT UP/DOWN button and move Pointer UP/ DOWN/ RIGHT/ LEFT. AUTO PC ON-OFF D.ZOOM FREEZE NO SHOW MUTE IMAGE VOLUME- TOP CONTROL MENU BUTTON LASER POINT BUTTONS Used to adjust value or set selected function by pressing POINT button(s) on Top Control or on Remote Control Unit. ✽ Pointer is POINTER. Refer to display...
Owners Manual
Page 19
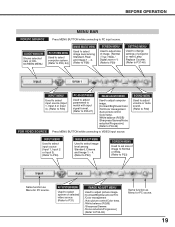
...) SCREEN MENU Used to set size of projector or reset Lamp Replace Counter. (Refer to P37-40) INPUT MENU Used to select input source (Input 1, Input 2 or Input 3). (Refer to P23) PC ADJUST MENU Used to adjust parameters to match with input signal format. (Refer to P25-27) IMAGE ADJUST MENU Used to adjust computer image. [Contrast/Brightness/Color /Tint/Color management /Auto picture control /Color temp. /White balance (R/G/B) /Sharpness/Gamma/Noise reduction/Progressive] (Refer to P34-36) FOR VIDEO SOURCE Press MENU BUTTON while connecting to P33) Same function as Menu for PC source...
...) SCREEN MENU Used to set size of projector or reset Lamp Replace Counter. (Refer to P37-40) INPUT MENU Used to select input source (Input 1, Input 2 or Input 3). (Refer to P23) PC ADJUST MENU Used to adjust parameters to match with input signal format. (Refer to P25-27) IMAGE ADJUST MENU Used to adjust computer image. [Contrast/Brightness/Color /Tint/Color management /Auto picture control /Color temp. /White balance (R/G/B) /Sharpness/Gamma/Noise reduction/Progressive] (Refer to P34-36) FOR VIDEO SOURCE Press MENU BUTTON while connecting to P33) Same function as Menu for PC source...
Owners Manual
Page 20
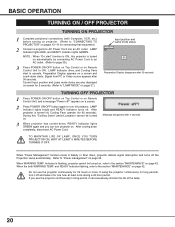
... both WARNING TEMP. Current Input position and Lamp mode status are also displayed on screen for 24 hours or more. During this projector is flashing, projector cannot be turned on page 39. Refer to "Power management" on . and READY Indicator flashing, refer to the section "MAINTENANCE" on a screen. 2 Press POWER ON-OFF button again to turn off , Cooling Fans operate (for one hour at least once during a 24 hour period. Signal from PC or Video source appears...
... both WARNING TEMP. Current Input position and Lamp mode status are also displayed on screen for 24 hours or more. During this projector is flashing, projector cannot be turned on page 39. Refer to "Power management" on . and READY Indicator flashing, refer to the section "MAINTENANCE" on a screen. 2 Press POWER ON-OFF button again to turn off , Cooling Fans operate (for one hour at least once during a 24 hour period. Signal from PC or Video source appears...
Owners Manual
Page 39
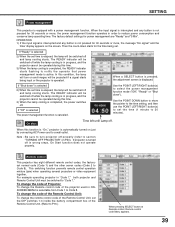
... be operated during this time. 3) When the lamp cooling is completed, the READY indicator starts flashing to select the power management function mode ("Off", "Ready" or "Shut down " is selected 2) When the set time is equipped with a power management function. To change the Remote control code of the Remote Control Unit; If "Shut down "). For example operating projector in ONSCREEN MENU is displayed. To change the code of the projector used in "Code 7," both projector and Remote Control Unit must be switched...
... be operated during this time. 3) When the lamp cooling is completed, the READY indicator starts flashing to select the power management function mode ("Off", "Ready" or "Shut down " is selected 2) When the set time is equipped with a power management function. To change the Remote control code of the Remote Control Unit; If "Shut down "). For example operating projector in ONSCREEN MENU is displayed. To change the code of the projector used in "Code 7," both projector and Remote Control Unit must be switched...
Owners Manual
Page 41
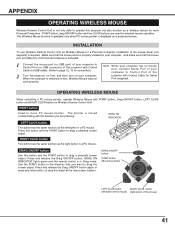
... is switched on a projected screen. INSTALLATION To use Wireless Remote Control Unit as the right button in a PC mouse. When the computer is displayed on first, Wireless Mouse may not work properly. Note : When your computer has no mouse port, connect Serial Port of your computer to Control Port (or USB connector) of this projector but also function as the left button of the mouse) (right button of the mouse) P-TIMERCOMPUTER 1 ZOOM COMPUTER 2 VIDEO FOCUS LENS...
... is switched on a projected screen. INSTALLATION To use Wireless Remote Control Unit as the right button in a PC mouse. When the computer is displayed on first, Wireless Mouse may not work properly. Note : When your computer has no mouse port, connect Serial Port of your computer to Control Port (or USB connector) of this projector but also function as the left button of the mouse) (right button of the mouse) P-TIMERCOMPUTER 1 ZOOM COMPUTER 2 VIDEO FOCUS LENS...
Owners Manual
Page 44
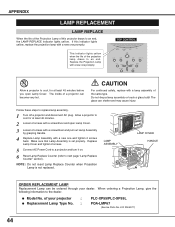
... 2 screws. 5 Connect AC Power Cord to a projector and turn it on. 6 Reset Lamp Replace Counter (refer to replace lamp assembly. 1 Turn off a projector and disconnect AC plug. When ordering a Projection Lamp, give the following information to an end. The inside of this indicator lights yellow, replace the projection lamp with a lamp assembly of your dealer. CAUTION For continued safety, replace with a new one promptly. The glass can be ordered through your projector : G Replacement Lamp Type No. : PLC-XP55/PLC-XP55L POA...
... 2 screws. 5 Connect AC Power Cord to a projector and turn it on. 6 Reset Lamp Replace Counter (refer to replace lamp assembly. 1 Turn off a projector and disconnect AC plug. When ordering a Projection Lamp, give the following information to an end. The inside of this indicator lights yellow, replace the projection lamp with a lamp assembly of your dealer. CAUTION For continued safety, replace with a new one promptly. The glass can be ordered through your projector : G Replacement Lamp Type No. : PLC-XP55/PLC-XP55L POA...
Owners Manual
Page 45
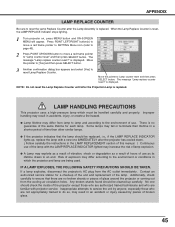
... be cleaned up , replace the lamp with projector service. The message "Lamp replace counter reset?" is reset, the LAMP REPLACE Indicator stops lighting. 1 Turn projector on, press MENU button and ON-SCREEN MENU will appear. G A Lamp may increase the risk of glass around the projector or coming out from the cooling air circulation holes. If a lamp explodes, disconnect the projector's AC plug from lamp to lamp and according to reset Lamp Replace Counter. Press POINT LEFT/RIGHT button(s) to move a red frame pointer to SETTING Menu...
... be cleaned up , replace the lamp with projector service. The message "Lamp replace counter reset?" is reset, the LAMP REPLACE Indicator stops lighting. 1 Turn projector on, press MENU button and ON-SCREEN MENU will appear. G A Lamp may increase the risk of glass around the projector or coming out from the cooling air circulation holes. If a lamp explodes, disconnect the projector's AC plug from lamp to lamp and according to reset Lamp Replace Counter. Press POINT LEFT/RIGHT button(s) to move a red frame pointer to SETTING Menu...
Owners Manual
Page 46
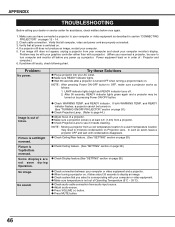
... indicator lights green again and a projector may be with your graphics controller rather than with your computer or video equipment as follows: 1. No sound. If both WARNING TEMP. NOTE : Moving a projector from audio input source. G When turning a projector on, it needs cleaning. Some displays are properly connected. 3. G Check WARNING TEMP. G Check Ceiling/Rear feature. (See "SETTING" section on page 38.) G Check Ceiling feature. (See "SETTING" section on page 38.) G Check Display feature.(See "SETTING" section on pages 12 ~ 14. 2. APPENDIX TROUBLESHOOTING...
... indicator lights green again and a projector may be with your graphics controller rather than with your computer or video equipment as follows: 1. No sound. If both WARNING TEMP. NOTE : Moving a projector from audio input source. G When turning a projector on, it needs cleaning. Some displays are properly connected. 3. G Check WARNING TEMP. G Check Ceiling/Rear feature. (See "SETTING" section on page 38.) G Check Ceiling feature. (See "SETTING" section on page 38.) G Check Display feature.(See "SETTING" section on pages 12 ~ 14. 2. APPENDIX TROUBLESHOOTING...
Owners Manual
Page 48
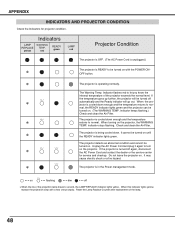
... READY indicator lights green and the projector can be turned on until the READY indicator lights green. It cannot be turned on • • • flashing • • • dim • • • off ✽ When the life of the projector exceeds the normal level. indicator keeps flashing.) Check and clean the Air Filter. When this indicator lights yellow, replace the projection lamp with the POWER ONOFF button. ✽ The projector is operating normally. The Warning Temp. Unplug the AC Power Cord and...
... READY indicator lights green and the projector can be turned on until the READY indicator lights green. It cannot be turned on • • • flashing • • • dim • • • off ✽ When the life of the projector exceeds the normal level. indicator keeps flashing.) Check and clean the Air Filter. When this indicator lights yellow, replace the projection lamp with the POWER ONOFF button. ✽ The projector is operating normally. The Warning Temp. Unplug the AC Power Cord and...
Owners Manual
Page 51
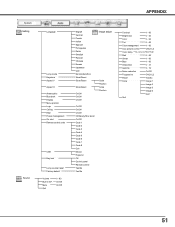
System Setting Sound Language Lamp mode Keystone Aspect V Aspect H Anamorphic Blue back Display Menu position Logo Ceiling Rear Power management On start Remote control code USB Key lock Lamp counter reset Factory default Volume Built-in SP. Mute Quit 0 - 63 On/Off On/Off APPENDIX English German French Italian Spanish Portuguese Dutch Swedish Russian Chinese Korean Japanese Quit Normal/Auto/Eco Store/Reset Store/Reset Store/Reset On/Off On/Off On/Off Image adjust Scale Position Scale...
System Setting Sound Language Lamp mode Keystone Aspect V Aspect H Anamorphic Blue back Display Menu position Logo Ceiling Rear Power management On start Remote control code USB Key lock Lamp counter reset Factory default Volume Built-in SP. Mute Quit 0 - 63 On/Off On/Off APPENDIX English German French Italian Spanish Portuguese Dutch Swedish Russian Chinese Korean Japanese Quit Normal/Auto/Eco Store/Reset Store/Reset Store/Reset On/Off On/Off On/Off Image adjust Scale Position Scale...

Owners Manual
Page 52
... Cable VGA Cable USB Cable Control Cable for Serial port Protective Dust Cover Lens Cover (PLC-XP55) Lens Attachment (PLC-XP55L) G Specifications are effective, a tiny fraction of the pixels (0.01% or less) may be ineffective by the characteristics of Pixels Color System High Definition TV Signal Scanning Frequency Projection Lens Throw distance Motorized Lens Shift Projection Image Size (Diagonal) Horizontal Resolution Projection Lamp Input 1/Monitor Output Jacks Input 2 Jacks Input 3 Jacks Other Jacks Built-in Speakers Feet Adjustment Voltage and Power Consumption Operating Temperature...
... Cable VGA Cable USB Cable Control Cable for Serial port Protective Dust Cover Lens Cover (PLC-XP55) Lens Attachment (PLC-XP55L) G Specifications are effective, a tiny fraction of the pixels (0.01% or less) may be ineffective by the characteristics of Pixels Color System High Definition TV Signal Scanning Frequency Projection Lens Throw distance Motorized Lens Shift Projection Image Size (Diagonal) Horizontal Resolution Projection Lamp Input 1/Monitor Output Jacks Input 2 Jacks Input 3 Jacks Other Jacks Built-in Speakers Feet Adjustment Voltage and Power Consumption Operating Temperature...
Owners Manual
Page 54
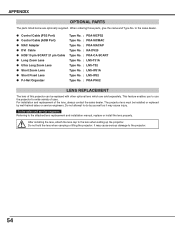
... lens replacement and installation manual, replace or install the lens properly. to do by well-trained sales or service engineers. For installation and replacement of uses. Do not attempt to the sales dealer. This feature enables you to the projector. 54 APPENDIX OPTIONAL PARTS The parts listed below are sold separately. G Control Cable (PS2 Port) G Control Cable (ADB Port) G MAC Adapter G DVI Cable G HDB 15 pin-SCART 21 pin Cable G Long Zoom Lens G Ultra Long Zoom Lens G Short Zoom Lens...
... lens replacement and installation manual, replace or install the lens properly. to do by well-trained sales or service engineers. For installation and replacement of uses. Do not attempt to the sales dealer. This feature enables you to the projector. 54 APPENDIX OPTIONAL PARTS The parts listed below are sold separately. G Control Cable (PS2 Port) G Control Cable (ADB Port) G MAC Adapter G DVI Cable G HDB 15 pin-SCART 21 pin Cable G Long Zoom Lens G Ultra Long Zoom Lens G Short Zoom Lens...


