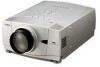
Owners Manual
Page 2
... not cover the ventilation slot on the top, sides and rear of the projector cabinet for 1 minute / LASER POINTER INDICATOR lights red to this projector, emits the laser beam as possible. G Remote Control Unit, supplied to indicate laser emission). G If the projector is not to operate improperly, read this booklet. READ AND KEEP THIS...
... not cover the ventilation slot on the top, sides and rear of the projector cabinet for 1 minute / LASER POINTER INDICATOR lights red to this projector, emits the laser beam as possible. G Remote Control Unit, supplied to indicate laser emission). G If the projector is not to operate improperly, read this booklet. READ AND KEEP THIS...
Owners Manual
Page 5
... 31 PICTURE IMAGE SELECT 32 TERMINALS OF PROJECTOR 12 IMAGE LEVEL SELECT 32 CONNECTING TO COMPUTER 13 PICTURE SCREEN ADJUSTMENT 33 CONNECTING TO VIDEO EQUIPMENT 14 PICTURE IMAGE 34 BEFORE OPERATION 15 PICTURE IMAGE ADJUSTMENTS 34 OPERATION OF REMOTE CONTROL 15 LASER POINTER FUNCTION 15 REMOTE CONTROL BATTERIES INSTALLATION 16 SETTING 37 TOP...
... 31 PICTURE IMAGE SELECT 32 TERMINALS OF PROJECTOR 12 IMAGE LEVEL SELECT 32 CONNECTING TO COMPUTER 13 PICTURE SCREEN ADJUSTMENT 33 CONNECTING TO VIDEO EQUIPMENT 14 PICTURE IMAGE 34 BEFORE OPERATION 15 PICTURE IMAGE ADJUSTMENTS 34 OPERATION OF REMOTE CONTROL 15 LASER POINTER FUNCTION 15 REMOTE CONTROL BATTERIES INSTALLATION 16 SETTING 37 TOP...
Owners Manual
Page 6
... crystal display (LCD) technology. This projector utilizes built-in the computer via a network. G Computers IBM-compatible or Macintosh computer up and down with this projector has Wireless Mouse... projector detects signal or any button is not in ; N Laser Pointer Function Remote Control Unit supplied with DVI 24-pin terminal for lower resolution. N Compatibility This projector ... from a computer between XGA (1024 x 768) and SXGA (1280 x 1024) is pressed. N Power Management Power Management function is provided to reduce power consumption while a projector is not pressed. This...
... crystal display (LCD) technology. This projector utilizes built-in the computer via a network. G Computers IBM-compatible or Macintosh computer up and down with this projector has Wireless Mouse... projector detects signal or any button is not in ; N Laser Pointer Function Remote Control Unit supplied with DVI 24-pin terminal for lower resolution. N Compatibility This projector ... from a computer between XGA (1024 x 768) and SXGA (1280 x 1024) is pressed. N Power Management Power Management function is provided to reduce power consumption while a projector is not pressed. This...

Owners Manual
Page 7
...CABINET When attached the PJ-Net organizer (optional part) to the owner's manual in the optional PJ-Net organizer. This projector detects internal temperature and automatically controls operating power of any object, especially heat-sensitive object. Pay attention to ensure proper ... Fans. PREPARATION NAME OF EACH PART OF PROJECTOR FRONT OF CABINET TOP CONTROLS AND INDICATORS PROJECTION LENS AIR INTAKE VENT LENS COVER SPEAKERS INFRARED REMOTE RECEIVER BACK OF CABINET EXHAUST VENT POWER CORD CONNECTOR TERMINALS AND CONNECTORS INFRARED REMOTE RECEIVER HOT AIR EXHAUSTED ! G Do not...
...CABINET When attached the PJ-Net organizer (optional part) to the owner's manual in the optional PJ-Net organizer. This projector detects internal temperature and automatically controls operating power of any object, especially heat-sensitive object. Pay attention to ensure proper ... Fans. PREPARATION NAME OF EACH PART OF PROJECTOR FRONT OF CABINET TOP CONTROLS AND INDICATORS PROJECTION LENS AIR INTAKE VENT LENS COVER SPEAKERS INFRARED REMOTE RECEIVER BACK OF CABINET EXHAUST VENT POWER CORD CONNECTOR TERMINALS AND CONNECTORS INFRARED REMOTE RECEIVER HOT AIR EXHAUSTED ! G Do not...

Owners Manual
Page 12
...can be used as computer audio input 1 or audio monitor output (variable). USB CONNECTOR (Series B) When controlling computer with Remote Control Unit of this projector, connect mouse port of your personal computer to this connector. (Refer to P13.) ✽ Do not press this micro ...-L S-VIDEO (MONO) INPUT 3 CONTROL PORT CONNECTOR When controlling computer with Remote Control Unit of this projector, connect USB terminal of your personal computer to this terminal. (Refer to P13.) RESET BUTTON This projector uses a micro processor to be used for our optional accessories. 5 BNC...
...can be used as computer audio input 1 or audio monitor output (variable). USB CONNECTOR (Series B) When controlling computer with Remote Control Unit of this projector, connect mouse port of your personal computer to this connector. (Refer to P13.) ✽ Do not press this micro ...-L S-VIDEO (MONO) INPUT 3 CONTROL PORT CONNECTOR When controlling computer with Remote Control Unit of this projector, connect USB terminal of your personal computer to this terminal. (Refer to P13.) RESET BUTTON This projector uses a micro processor to be used for our optional accessories. 5 BNC...
Owners Manual
Page 15
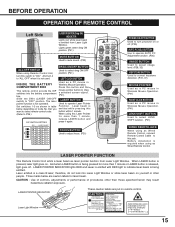
...those specified herein may result hazardous radiation exposure. And when LASER button is emitted while pressing this jack. that you want to select remote control code. (Refer to adjust focus. (P21) LOCK AUTO PC ON-OFF D.ZOOM FREEZE NO SHOW MUTE IMAGE VOLUME- LASER ... beam as Wired Remote Control, connect Remote Control Cable to "ON." therefore, do not look into the battery compartment box. LASER POINTER INDICATOR These caution labels are caution labels for more than 1 minute or LASER button is required when using Remote Control Unit, turn projector on Code No....
...those specified herein may result hazardous radiation exposure. And when LASER button is emitted while pressing this jack. that you want to select remote control code. (Refer to adjust focus. (P21) LOCK AUTO PC ON-OFF D.ZOOM FREEZE NO SHOW MUTE IMAGE VOLUME- LASER ... beam as Wired Remote Control, connect Remote Control Cable to "ON." therefore, do not look into the battery compartment box. LASER POINTER INDICATOR These caution labels are caution labels for more than 1 minute or LASER button is required when using Remote Control Unit, turn projector on Code No....
Owners Manual
Page 16
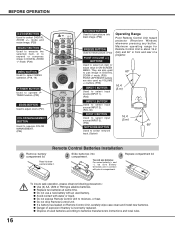
... of used to batteries manufacturers instructions and local rules. G Do not drop Remote Control Unit. mode and resize image. (P29) SELECT BUTTON Used to execute the selected item, or to moisture, or heat. G Dispose of a projector. 60° 16.4' (5 m) INPUT 2 BUTTON Used to select input ... (INPUT 3). 16.4' (5 m) (P30) 60° NETWORK BUTTON Used to select input source (INPUT 1). (P23) Operating Range Point Remote Control Unit toward projector (Receiver Window) whenever pressing any button. They are in contact with pins in ON-SCREEN MENU. Press lid downward and slide it. 2...
... of used to batteries manufacturers instructions and local rules. G Do not drop Remote Control Unit. mode and resize image. (P29) SELECT BUTTON Used to execute the selected item, or to moisture, or heat. G Dispose of a projector. 60° 16.4' (5 m) INPUT 2 BUTTON Used to select input ... (INPUT 3). 16.4' (5 m) (P30) 60° NETWORK BUTTON Used to select input source (INPUT 1). (P23) Operating Range Point Remote Control Unit toward projector (Receiver Window) whenever pressing any button. They are in contact with pins in ON-SCREEN MENU. Press lid downward and slide it. 2...
Owners Manual
Page 18
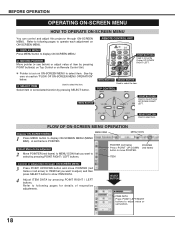
... ICON that you want to adjust, and then press SELECT button to move Pointer UP/ DOWN/ RIGHT/ LEFT. REMOTE CONTROL UNIT 1 DISPLAY MENU Press MENU button to display ON-SCREEN MENU. 2 MOVING POINTER Move pointer (✽ ...see below . 3 SELECT ITEM Used to select item. See figures on Remote Control Unit. ✽ Pointer is POINTER. Refer to following pages to operate each adjustment on ON-SCREEN MENU...SCREEN MENU You can control and adjust this projector through ON-SCREEN MENU 3 Press POINT UP/DOWN button and move POINTER.
... ICON that you want to adjust, and then press SELECT button to move Pointer UP/ DOWN/ RIGHT/ LEFT. REMOTE CONTROL UNIT 1 DISPLAY MENU Press MENU button to display ON-SCREEN MENU. 2 MOVING POINTER Move pointer (✽ ...see below . 3 SELECT ITEM Used to select item. See figures on Remote Control Unit. ✽ Pointer is POINTER. Refer to following pages to operate each adjustment on ON-SCREEN MENU...SCREEN MENU You can control and adjust this projector through ON-SCREEN MENU 3 Press POINT UP/DOWN button and move POINTER.
Owners Manual
Page 20
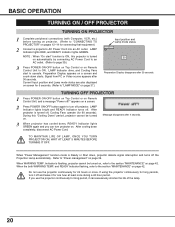
...flashing, refer to the section "MAINTENANCE" on Remote Control Unit, and a message "Power off , Cooling Fans operate (for one hour at least once during a 24 hour period. If you can excessively shorten the life of the lamp. 20 TURNING OFF PROJECTOR 1 Press POWER ON-OFF button on Top ...and Lamp mode status 30 Preparation Display disappears after 30 seconds. LAMP Indicator dims, and Cooling Fans start " function is flashing, projector cannot be turned on Remote Control Unit to ON. Current Input position and Lamp mode status are also displayed on screen for long period, it for 90 ...
...flashing, refer to the section "MAINTENANCE" on Remote Control Unit, and a message "Power off , Cooling Fans operate (for one hour at least once during a 24 hour period. If you can excessively shorten the life of the lamp. 20 TURNING OFF PROJECTOR 1 Press POWER ON-OFF button on Top ...and Lamp mode status 30 Preparation Display disappears after 30 seconds. LAMP Indicator dims, and Cooling Fans start " function is flashing, projector cannot be turned on Remote Control Unit to ON. Current Input position and Lamp mode status are also displayed on screen for long period, it for 90 ...

Owners Manual
Page 21
... to reduce the lower part. BASIC OPERATION ADJUSTING SCREEN ZOOM ADJUSTMENT 1 Press ZOOM button on Top Control or ZOOM L/M button on Remote Control Unit. NOTE; Message disappears after 4 seconds. Reduce the lower width with POINT RIGHT button. 21 FOCUS ADJUSTMENT 1 Press FOCUS... button on Top Control or FOCUS L/M button on Remote Control Unit. Message "Focus" is being corrected turn(s) red. • Arrow(s) disappear(s) at the maximum correction. • If you press ...
... to reduce the lower part. BASIC OPERATION ADJUSTING SCREEN ZOOM ADJUSTMENT 1 Press ZOOM button on Top Control or ZOOM L/M button on Remote Control Unit. NOTE; Message disappears after 4 seconds. Reduce the lower width with POINT RIGHT button. 21 FOCUS ADJUSTMENT 1 Press FOCUS... button on Top Control or FOCUS L/M button on Remote Control Unit. Message "Focus" is being corrected turn(s) red. • Arrow(s) disappear(s) at the maximum correction. • If you press ...

Owners Manual
Page 22
...and timer starts to count time (00 : 00 ~ 59 : 59). Timer display "00 : 00" appears on Remote Control unit. Volume Press VOLUME (+/-) button(s) on Top Control or on Remote Control Unit to cut off . Volume To increase volume, press POINT RIGHT button, and press POINT LEFT button for ... LEFT/RIGHT button(s) to switch built-in SP. Mute Press MUTE button on Remote Control Unit to adjust volume. BASIC OPERATION PICTURE FREEZE FUNCTION Press FREEZE button on Remote Control Unit to freeze picture on Remote Control Unit to black out image. NO SHOW FUNCTION Press NO SHOW button on...
...and timer starts to count time (00 : 00 ~ 59 : 59). Timer display "00 : 00" appears on Remote Control unit. Volume Press VOLUME (+/-) button(s) on Top Control or on Remote Control Unit to cut off . Volume To increase volume, press POINT RIGHT button, and press POINT LEFT button for ... LEFT/RIGHT button(s) to switch built-in SP. Mute Press MUTE button on Remote Control Unit to adjust volume. BASIC OPERATION PICTURE FREEZE FUNCTION Press FREEZE button on Remote Control Unit to freeze picture on Remote Control Unit to black out image. NO SHOW FUNCTION Press NO SHOW button on...

Owners Manual
Page 23
...Should the specification be used as Monitor out. COMPUTER INPUT SELECTING INPUT SOURCE DIRECT OPERATION Select INPUT source by pressing INPUT button on Remote Control Unit. Press POINT LEFT/RIGHT button to move a red frame pointer to INPUT Menu icon. 2 Press POINT UP/DOWN button...select Monitor out. Press POINT LEFT/RIGHT buttons to move a red arrow pointer to the INPUT 1 (DIGITAL) terminal, select RGB(AV HDCP). If projector cannot reproduce proper image, select correct input source through MENU OPERATION (see below). INPUT button ✽ Input 1 Input 2 Input 3 ✽ Input...
...Should the specification be used as Monitor out. COMPUTER INPUT SELECTING INPUT SOURCE DIRECT OPERATION Select INPUT source by pressing INPUT button on Remote Control Unit. Press POINT LEFT/RIGHT button to move a red frame pointer to INPUT Menu icon. 2 Press POINT UP/DOWN button...select Monitor out. Press POINT LEFT/RIGHT buttons to move a red arrow pointer to the INPUT 1 (DIGITAL) terminal, select RGB(AV HDCP). If projector cannot reproduce proper image, select correct input source through MENU OPERATION (see below). INPUT button ✽ Input 1 Input 2 Input 3 ✽ Input...

Owners Manual
Page 25
button on Top Control or on Remote Control Unit. PC ADJUST MENU PC ADJUST Menu icon Move a red frame pointer to AUTO PC Adj. When image is not provided properly through this ... ADJUSTMENT AUTO PC ADJUSTMENT Auto PC Adjustment function is selected on PC SYSTEM Menu. 25 This Auto PC Adjustment can be fully adjusted with this projector. icon and press SELECT button. Press POINT LEFT/RIGHT button to move a red frame pointer to PC ADJUST Menu icon. 2 Press POINT UP/DOWN button...
button on Top Control or on Remote Control Unit. PC ADJUST MENU PC ADJUST Menu icon Move a red frame pointer to AUTO PC Adj. When image is not provided properly through this ... ADJUSTMENT AUTO PC ADJUSTMENT Auto PC Adjustment function is selected on PC SYSTEM Menu. 25 This Auto PC Adjustment can be fully adjusted with this projector. icon and press SELECT button. Press POINT LEFT/RIGHT button to move a red frame pointer to PC ADJUST Menu icon. 2 Press POINT UP/DOWN button...
Owners Manual
Page 28
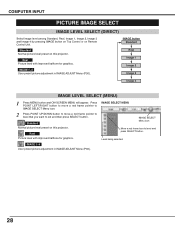
... 1~4 User preset picture adjustment in IMAGE ADJUST Menu (P36). Standard Normal picture level preset on Remote Control Unit. Standard Normal picture level preset on this projector. Level being selected. 28 IMAGE button Standard Real Image 1 Image 2 Image 3 Image 4 IMAGE LEVEL SELECT (MENU) 1 Press MENU button and ON-SCREEN MENU will appear. ...
... 1~4 User preset picture adjustment in IMAGE ADJUST Menu (P36). Standard Normal picture level preset on Remote Control Unit. Standard Normal picture level preset on this projector. Level being selected. 28 IMAGE button Standard Real Image 1 Image 2 Image 3 Image 4 IMAGE LEVEL SELECT (MENU) 1 Press MENU button and ON-SCREEN MENU will appear. ...

Owners Manual
Page 29
... pressing D.ZOOM M button on Remote Control Unit. G Panning function may not operate properly if computer system prepared on PC SYSTEM Menu (P24). mode, press any resolution higher than XGA (1024 x 768) is larger than screen size (1024 x 768), this projector enters "Digital zoom +" mode ... size. G Wide cannot be used . Zoom -" is selected, ON-SCREEN MENU disappears and message "D. COMPUTER INPUT PICTURE SCREEN ADJUSTMENT This projector has a picture screen resize function, which enables you want to function and press SELECT button. Digital zoom + When Digital zoom + is ...
... pressing D.ZOOM M button on Remote Control Unit. G Panning function may not operate properly if computer system prepared on PC SYSTEM Menu (P24). mode, press any resolution higher than XGA (1024 x 768) is larger than screen size (1024 x 768), this projector enters "Digital zoom +" mode ... size. G Wide cannot be used . Zoom -" is selected, ON-SCREEN MENU disappears and message "D. COMPUTER INPUT PICTURE SCREEN ADJUSTMENT This projector has a picture screen resize function, which enables you want to function and press SELECT button. Digital zoom + When Digital zoom + is ...
Owners Manual
Page 32
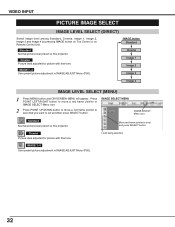
...Select image level among Standard, Cinema, Image 1, Image 2, Image 3 and Image 4 by pressing IMAGE button on Top Control or on this projector. IMAGE 1~4 User preset picture adjustment in IMAGE ADJUST Menu (P36). 32 Cinema Picture level adjusted for picture with fine tone. IMAGE SELECT MENU... IMAGE SELECT Menu icon Standard Normal picture level preset on Remote Control Unit. Level being selected. Standard Normal picture level preset on this projector. IMAGE 1~4 User preset picture adjustment in IMAGE ADJUST Menu (P36).
...Select image level among Standard, Cinema, Image 1, Image 2, Image 3 and Image 4 by pressing IMAGE button on Top Control or on this projector. IMAGE 1~4 User preset picture adjustment in IMAGE ADJUST Menu (P36). 32 Cinema Picture level adjusted for picture with fine tone. IMAGE SELECT MENU... IMAGE SELECT Menu icon Standard Normal picture level preset on Remote Control Unit. Level being selected. Standard Normal picture level preset on this projector. IMAGE 1~4 User preset picture adjustment in IMAGE ADJUST Menu (P36).

Owners Manual
Page 34
... with other colors if required. POINTER MODE COLOR MANAGEMENT POINTER NOTE; button on the remote control once more to change to "COLOR MANAGEMENT", and then press the SELECT button. button on the remote control to LIST mode. 34 The mode will be selected and then press SELECT button... setting that has already been made, press the COLOR M. Next, use the POINT buttons to adjust, and then press the SELECT button. The projector lets you would like to adjust the gamma correction for PC, giving a total of eight images. When the SELECT button is displayed. Press the...
... with other colors if required. POINTER MODE COLOR MANAGEMENT POINTER NOTE; button on the remote control once more to change to "COLOR MANAGEMENT", and then press the SELECT button. button on the remote control to LIST mode. 34 The mode will be selected and then press SELECT button... setting that has already been made, press the COLOR M. Next, use the POINT buttons to adjust, and then press the SELECT button. The projector lets you would like to adjust the gamma correction for PC, giving a total of eight images. When the SELECT button is displayed. Press the...

Owners Manual
Page 35
... check mark will return to the next mode (LIST mode). ALL DEL The setting adjustment for that you press the MENU key on the projector or the remote control). (You will need to reselect and re-adjust the color in all lines will be exited and the display will be stored. NOTE... will be canceled. COLOR M. Auto picture control Press either POINT LEFT button or POINT RIGHT button to Auto picture control position that line on the remote control, the COLOR MANAGEMENT menu will return to the pointer mode (even if you want to "MENU", and then press the SELECT button. PICTURE ...
... check mark will return to the next mode (LIST mode). ALL DEL The setting adjustment for that you press the MENU key on the projector or the remote control). (You will need to reselect and re-adjust the color in all lines will be exited and the display will be stored. NOTE... will be canceled. COLOR M. Auto picture control Press either POINT LEFT button or POINT RIGHT button to Auto picture control position that line on the remote control, the COLOR MANAGEMENT menu will return to the pointer mode (even if you want to "MENU", and then press the SELECT button. PICTURE ...

Owners Manual
Page 39
...3) When the lamp cooling is active. Use the POINT LEFT/RIGHT button(s) to 30 minutes). Remote control This projector has eight different remote control codes; To change the remote control code of the Remote Control Unit, set the time (1 minute to select the power management function mode ("Off", ... seconds or more , the power management function operates in "Code 7," both projector and Remote Control Unit must be switched off and lamp cooling starts. To change the Remote control code of the Remote Control Unit. (Refer to "Code 7." The READY indicator will be switched off...
...3) When the lamp cooling is active. Use the POINT LEFT/RIGHT button(s) to 30 minutes). Remote control This projector has eight different remote control codes; To change the remote control code of the Remote Control Unit, set the time (1 minute to select the power management function mode ("Off", ... seconds or more , the power management function operates in "Code 7," both projector and Remote Control Unit must be switched off and lamp cooling starts. To change the Remote control code of the Remote Control Unit. (Refer to "Code 7." The READY indicator will be switched off...
Owners Manual
Page 40
...press SELECT button. is provided not for basic operation but for interactive operation between a projector and computer. This locks operation of the remote control. NOTE: This is displayed. When replacing Projection Lamp, reset Lamp Replace Counter by using this... mode following steps below. Key lock This function locks the operation of this function. Projector mode Select " " when controlling a projector with Remote Control of the projector's control panel and the remote control. Wireless Mouse mode Select " " when controlling a computer with computer. SETTING USB...
...press SELECT button. is provided not for basic operation but for interactive operation between a projector and computer. This locks operation of the remote control. NOTE: This is displayed. When replacing Projection Lamp, reset Lamp Replace Counter by using this... mode following steps below. Key lock This function locks the operation of this function. Projector mode Select " " when controlling a projector with Remote Control of the projector's control panel and the remote control. Wireless Mouse mode Select " " when controlling a computer with computer. SETTING USB...


