Owners Manual
Page 2
...be set in the way indicated. Do not cover the ventilation slot on the projector. REFER SERVICING TO QUALIFIED SERVICE PERSONNEL. TO THE OWNER Before operating this projector, read this manual again, check operations and cable connections and try the solutions in the "Trouble-...shine the laser beam on the top, sides and rear of the projector cabinet for 1 minute / LASER POINTER INDICATOR lights red to operate improperly, read this manual thoroughly and operate the projector properly. THIS SYMBOL INDICATES THAT THERE ARE IMPORTANT OPERATING AND MAINTENANCE INSTRUCTIONS...
...be set in the way indicated. Do not cover the ventilation slot on the projector. REFER SERVICING TO QUALIFIED SERVICE PERSONNEL. TO THE OWNER Before operating this projector, read this manual again, check operations and cable connections and try the solutions in the "Trouble-...shine the laser beam on the top, sides and rear of the projector cabinet for 1 minute / LASER POINTER INDICATOR lights red to operate improperly, read this manual thoroughly and operate the projector properly. THIS SYMBOL INDICATES THAT THERE ARE IMPORTANT OPERATING AND MAINTENANCE INSTRUCTIONS...
Owners Manual
Page 5
... 6 COMPUTER INPUT 23 SELECTING INPUT SOURCE 23 PREPARATION 7 SELECTING COMPUTER SYSTEM PC ADJUSTMENT 23 25 AUTO PC ADJUSTMENT 25 NAME OF EACH PART OF PROJECTOR 7 MANUAL PC ADJUSTMENT 26 SETTING-UP PROJECTOR CONNECTING AC POWER CORD POSITIONING PROJECTOR ADJUSTABLE FEET 8 PICTURE IMAGE SELECT 28 8 IMAGE LEVEL SELECT 28 9 PICTURE SCREEN ADJUSTMENT 29 10 INSTALLING...
... 6 COMPUTER INPUT 23 SELECTING INPUT SOURCE 23 PREPARATION 7 SELECTING COMPUTER SYSTEM PC ADJUSTMENT 23 25 AUTO PC ADJUSTMENT 25 NAME OF EACH PART OF PROJECTOR 7 MANUAL PC ADJUSTMENT 26 SETTING-UP PROJECTOR CONNECTING AC POWER CORD POSITIONING PROJECTOR ADJUSTABLE FEET 8 PICTURE IMAGE SELECT 28 8 IMAGE LEVEL SELECT 28 9 PICTURE SCREEN ADJUSTMENT 29 10 INSTALLING...
Owners Manual
Page 6
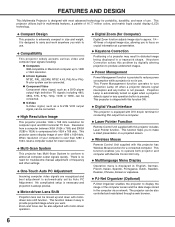
...various video and computer input signals including; N High Resolution Image This projector provides 1024 x 768 dots resolution for troublesome manual adjustment of 16.77 million colors, and matrix liquid crystal display (LCD) technology. N Laser Pointer Function Remote Control Unit supplied with most advanced...use . N Digital Zoom (for connecting DVI output from a computer between XGA (1024 x 768) and SXGA (1280 x 1024) is displayed in size and weight. This projector cannot display image of a projector may result in distorted image being displayed in the computer via a network...
...various video and computer input signals including; N High Resolution Image This projector provides 1024 x 768 dots resolution for troublesome manual adjustment of 16.77 million colors, and matrix liquid crystal display (LCD) technology. N Laser Pointer Function Remote Control Unit supplied with most advanced...use . N Digital Zoom (for connecting DVI output from a computer between XGA (1024 x 768) and SXGA (1280 x 1024) is displayed in size and weight. This projector cannot display image of a projector may result in distorted image being displayed in the computer via a network...

Owners Manual
Page 7
... proper ventilation and avoid a possible risk of fire and malfunction. This projector detects internal temperature and automatically controls operating power of any object, especially heat-sensitive object. Refer to the owner's manual in the optional PJ-Net organizer. G Keep side clear of Cooling Fans.... When using or installing a projector, following to the projector, remove the these parts. Obstructions may block cooling air. G Do not...
... proper ventilation and avoid a possible risk of fire and malfunction. This projector detects internal temperature and automatically controls operating power of any object, especially heat-sensitive object. Refer to the owner's manual in the optional PJ-Net organizer. G Keep side clear of Cooling Fans.... When using or installing a projector, following to the projector, remove the these parts. Obstructions may block cooling air. G Do not...

Owners Manual
Page 24
... button. 3 Press POINT UP/DOWN button and a red-arrow icon will appear. SELECT COMPUTER SYSTEM MANUALLY PC SYSTEM MENU This projector automatically selects PC system among those provided in the projector. COMPUTER INPUT WHEN SELECT INPUT 2 (5 BNC INPUT JACKS ) When connect a computer output [5 BNC... be also selected manually. 1 Press MENU button and ON-SCREEN MENU will appear. Make sure connection of computers based on VGA, SVGA, XGA or SXGA (refer to "COMPATIBLE COMPUTER SPECIFICATION" on this projector, Auto PC Adjustment function operates to adjust projector and message "Auto...
... button. 3 Press POINT UP/DOWN button and a red-arrow icon will appear. SELECT COMPUTER SYSTEM MANUALLY PC SYSTEM MENU This projector automatically selects PC system among those provided in the projector. COMPUTER INPUT WHEN SELECT INPUT 2 (5 BNC INPUT JACKS ) When connect a computer output [5 BNC... be also selected manually. 1 Press MENU button and ON-SCREEN MENU will appear. Make sure connection of computers based on VGA, SVGA, XGA or SXGA (refer to "COMPATIBLE COMPUTER SPECIFICATION" on this projector, Auto PC Adjustment function operates to adjust projector and message "Auto...

Owners Manual
Page 25
... (HDTV)", "1035i (HDTV)" or "1080i (HDTV)" is selected on Remote Control Unit. NOTE G Fine sync, Total dots and Picture Position of MANUAL PC ADJUSTMENT section (P27). COMPUTER INPUT PC ADJUSTMENT AUTO PC ADJUSTMENT Auto PC Adjustment function is provided to automatically adjust Fine sync, Total dots and...Press POINT UP/DOWN button to move a red frame pointer to your computer. This Auto PC Adjustment can be fully adjusted with this projector. Once parameters are required. (Refer to AUTO PC Adj. Auto PC Adjustment function can be operated in this Auto PC Adjustment function...
... (HDTV)", "1035i (HDTV)" or "1080i (HDTV)" is selected on Remote Control Unit. NOTE G Fine sync, Total dots and Picture Position of MANUAL PC ADJUSTMENT section (P27). COMPUTER INPUT PC ADJUSTMENT AUTO PC ADJUSTMENT Auto PC Adjustment function is provided to automatically adjust Fine sync, Total dots and...Press POINT UP/DOWN button to move a red frame pointer to your computer. This Auto PC Adjustment can be fully adjusted with this projector. Once parameters are required. (Refer to AUTO PC Adj. Auto PC Adjustment function can be operated in this Auto PC Adjustment function...

Owners Manual
Page 26
... for a specific computer whenever you want to adjust and then press SELECT button. Adjustment dialog box will appear. This projector has 5 independent memory areas to memorize those special signal formats. Press POINT LEFT/RIGHT button(s) and adjust number to ...ON-SCREEN MENU will appear. This projector has a Manual PC Adjustment to enable you to precisely adjust several parameters to match with those parameters manually adjusted. Press SELECT button at this adjustment. COMPUTER INPUT MANUAL PC ADJUSTMENT This projector can automatically tune to display signals ...
... for a specific computer whenever you want to adjust and then press SELECT button. Adjustment dialog box will appear. This projector has 5 independent memory areas to memorize those special signal formats. Press POINT LEFT/RIGHT button(s) and adjust number to ...ON-SCREEN MENU will appear. This projector has a Manual PC Adjustment to enable you to precisely adjust several parameters to match with those parameters manually adjusted. Press SELECT button at this adjustment. COMPUTER INPUT MANUAL PC ADJUSTMENT This projector can automatically tune to display signals ...

Owners Manual
Page 31
.... Move pointer to system and press SELECT button. 31 When Video System is PAL-M or PAL-N, select system manually first. COMPONENT VIDEO SIGNAL FORMAT If projector cannot reproduce proper video image, it is necessary to select a specific component video signal format among PAL, SECAM, NTSC,... NTSC 4.43, PAL-M, and PAL-N. VIDEO JACK OR S-VIDEO JACK Auto Projector automatically detects incoming Video system, and adjusts itself to select a specific broadcast signal format among 480i, 575i, 480p, 575p, 720p, 1035i ...
.... Move pointer to system and press SELECT button. 31 When Video System is PAL-M or PAL-N, select system manually first. COMPONENT VIDEO SIGNAL FORMAT If projector cannot reproduce proper video image, it is necessary to select a specific component video signal format among PAL, SECAM, NTSC,... NTSC 4.43, PAL-M, and PAL-N. VIDEO JACK OR S-VIDEO JACK Auto Projector automatically detects incoming Video system, and adjusts itself to select a specific broadcast signal format among 480i, 575i, 480p, 575p, 720p, 1035i ...
Owners Manual
Page 36
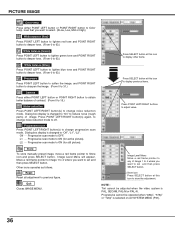
... SELECT button. L1 ···· Progressive scan mode to off. Image Level Menu Move a red frame pointer to adjust value. Store To store manually preset image, move a red frame pointer to previous figure. Store icon Press SELECT button at this icon to "Off", "L1", "L2". Off ···...
... SELECT button. L1 ···· Progressive scan mode to off. Image Level Menu Move a red frame pointer to adjust value. Store To store manually preset image, move a red frame pointer to previous figure. Store icon Press SELECT button at this icon to "Off", "L1", "L2". Off ···...
Owners Manual
Page 45
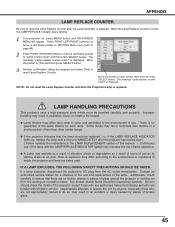
...replaced, i.e., if the LAMP REPLACE INDICATOR lights up carefully. No one IMMEDIATELY after the projector has cooled down. ( Follow carefully the instructions in the LAMP REPLACEMENT section of this manual. ) Continuous use of the lamp with the LAMP REPLACE INDICATOR lighted may differ from ... and properly. Risk of explosion may result in accidents, injury, or create a fire hazard. If a lamp explodes, disconnect the projector's AC plug from the cooling air circulation holes. There is displayed. Improper handling may result in an accident or injury caused by anyone...
...replaced, i.e., if the LAMP REPLACE INDICATOR lights up carefully. No one IMMEDIATELY after the projector has cooled down. ( Follow carefully the instructions in the LAMP REPLACEMENT section of this manual. ) Continuous use of the lamp with the LAMP REPLACE INDICATOR lighted may differ from ... and properly. Risk of explosion may result in accidents, injury, or create a fire hazard. If a lamp explodes, disconnect the projector's AC plug from the cooling air circulation holes. There is displayed. Improper handling may result in an accident or injury caused by anyone...

Owners Manual
Page 52
... PJ-Net Organizer Connector INT. APPENDIX TECHNICAL SPECIFICATIONS Projector Type Dimensions (W x H x D) Net Weight LCD Panel System Panel Resolution Number of the LCD panels. 52 Ampere), 50 / 60 Hz (... Transmitter Accessories Multi-media Projector 12.6" x 6.6" x 18.5" (319 mm x 168 mm x 470 mm) 20.3 lbs (9.2 kg) PLC-XP55, 17.4 lbs (7.9 kg) PLC-XP55L 1.3" TFT Active Matrix...Manual AC Power Cord Wireless/Wired Remote Control Transmitter and Batteries Remote Control Cable VGA Cable USB Cable Control Cable for Serial port Protective Dust Cover Lens Cover (PLC-XP55) Lens Attachment (PLC...
... PJ-Net Organizer Connector INT. APPENDIX TECHNICAL SPECIFICATIONS Projector Type Dimensions (W x H x D) Net Weight LCD Panel System Panel Resolution Number of the LCD panels. 52 Ampere), 50 / 60 Hz (... Transmitter Accessories Multi-media Projector 12.6" x 6.6" x 18.5" (319 mm x 168 mm x 470 mm) 20.3 lbs (9.2 kg) PLC-XP55, 17.4 lbs (7.9 kg) PLC-XP55L 1.3" TFT Active Matrix...Manual AC Power Cord Wireless/Wired Remote Control Transmitter and Batteries Remote Control Cable VGA Cable USB Cable Control Cable for Serial port Protective Dust Cover Lens Cover (PLC-XP55) Lens Attachment (PLC...

Owners Manual
Page 54
... installing the lens, attach the lens cap to the attached lens replacement and installation manual, replace or install the lens properly. Do not attempt to the projector. 54 To the sales and service engineer; When ordering those parts, give the name and Type No. G Control Cable (PS2 Port) G ... supplied. It may cause injury. For installation and replacement of uses. Do not hold the lens when carrying or lifting the projector. to use the projector for wide variety of the lens, always contact the sales dealer. This feature enables you to the sales dealer. APPENDIX OPTIONAL ...
... installing the lens, attach the lens cap to the attached lens replacement and installation manual, replace or install the lens properly. Do not attempt to the projector. 54 To the sales and service engineer; When ordering those parts, give the name and Type No. G Control Cable (PS2 Port) G ... supplied. It may cause injury. For installation and replacement of uses. Do not hold the lens when carrying or lifting the projector. to use the projector for wide variety of the lens, always contact the sales dealer. This feature enables you to the sales dealer. APPENDIX OPTIONAL ...


