Owners Manual
Page 2
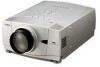
...OWNER'S MANUAL FOR LATER USE. REFER SERVICING TO QUALIFIED SERVICE PERSONNEL. TO THE OWNER Before operating this projector, read this manual again, check operations and cable connections and try the solutions in the "Trouble-shooting" section of the end of this booklet. SAFETY ... could result. Do not cover the ventilation slot on yourself or other accidents. G Remote Control Unit, supplied to indicate laser emission). Operating the projector properly enables you purchased the projector or the service center. Do not stare directly into a compartment or similarly enclosed, the...
...OWNER'S MANUAL FOR LATER USE. REFER SERVICING TO QUALIFIED SERVICE PERSONNEL. TO THE OWNER Before operating this projector, read this manual again, check operations and cable connections and try the solutions in the "Trouble-shooting" section of the end of this booklet. SAFETY ... could result. Do not cover the ventilation slot on yourself or other accidents. G Remote Control Unit, supplied to indicate laser emission). Operating the projector properly enables you purchased the projector or the service center. Do not stare directly into a compartment or similarly enclosed, the...

Owners Manual
Page 12
... Cb/Pb Cr/Pr R-AUDIO-L S-VIDEO (MONO) INPUT 3 CONTROL PORT CONNECTOR When controlling computer with Remote Control Unit of this projector, connect USB terminal of your personal computer to this terminal. (Refer to P13.) RESET BUTTON This projector uses a micro processor to P13.) ✽ Do not press ....) COMPUTER AUDIO INPUT 2 JACK Connect an audio output (stereo) from video equipment to be done by pressing RESET button with Remote Control Cable (supplied). Set the terminal up as computer audio input 1 or audio monitor output (variable). This button is switchable and can...
... Cb/Pb Cr/Pr R-AUDIO-L S-VIDEO (MONO) INPUT 3 CONTROL PORT CONNECTOR When controlling computer with Remote Control Unit of this projector, connect USB terminal of your personal computer to this terminal. (Refer to P13.) RESET BUTTON This projector uses a micro processor to P13.) ✽ Do not press ....) COMPUTER AUDIO INPUT 2 JACK Connect an audio output (stereo) from video equipment to be done by pressing RESET button with Remote Control Cable (supplied). Set the terminal up as computer audio input 1 or audio monitor output (variable). This button is switchable and can...
Owners Manual
Page 15
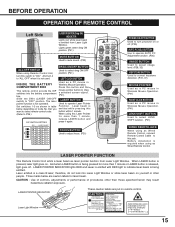
... on yourself or other than 1 minute or LASER button is pressed, laser light goes on or off . When using as Wired Remote Control, connect Remote Control Cable to correct keystone distortion. (P21, 37) MOUSE POINTER Used as a PC mouse in Wireless Mouse Operation. (P41) RIGHT CLICK ...remote control code. (Refer to turn it is being pressed for laser beam. When LASER button is released, light goes off . (P20) AUTO PC ADJ. LASER POINTER INDICATOR These caution labels are caution labels for more than 1 minute, release LASER button and press it again. And turn projector...
... on yourself or other than 1 minute or LASER button is pressed, laser light goes on or off . When using as Wired Remote Control, connect Remote Control Cable to correct keystone distortion. (P21, 37) MOUSE POINTER Used as a PC mouse in Wireless Mouse Operation. (P41) RIGHT CLICK ...remote control code. (Refer to turn it is being pressed for laser beam. When LASER button is released, light goes off . (P20) AUTO PC ADJ. LASER POINTER INDICATOR These caution labels are caution labels for more than 1 minute, release LASER button and press it again. And turn projector...
Owners Manual
Page 41
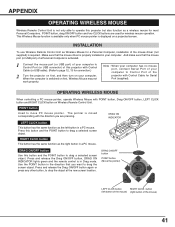
... to drop the object at the new screen location. OPERATING WIRELESS MOUSE When controlling a PC mouse pointer, operate Wireless Mouse with Control Cable (or USB cable). (Refer to page 12, 13 for connection.) 2 Turn the projector on first, and then turn on Wireless Remote Control Unit. DRAG ON D.ZOOM FREEZE NO SHOW INDICATOR LEFT CLICK button MUTE...
... to drop the object at the new screen location. OPERATING WIRELESS MOUSE When controlling a PC mouse pointer, operate Wireless Mouse with Control Cable (or USB cable). (Refer to page 12, 13 for connection.) 2 Turn the projector on first, and then turn on Wireless Remote Control Unit. DRAG ON D.ZOOM FREEZE NO SHOW INDICATOR LEFT CLICK button MUTE...
Owners Manual
Page 47
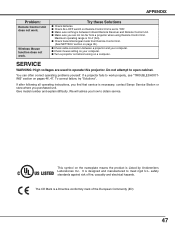
... G Check transmitted signal mode from a projector when using Remote Control Unit. SERVICE WARNING: High voltages are not too far from Remote Control Unit. (See"SETTING" section on Remote Control Unit is between a projector and your computer. To correct failure, try "Solutions". Try these Solutions G Check batteries. Maximum operating range is necessary, contact Sanyo Service Station or store where you...
... G Check transmitted signal mode from a projector when using Remote Control Unit. SERVICE WARNING: High voltages are not too far from Remote Control Unit. (See"SETTING" section on Remote Control Unit is between a projector and your computer. To correct failure, try "Solutions". Try these Solutions G Check batteries. Maximum operating range is necessary, contact Sanyo Service Station or store where you...

Owners Manual
Page 52
... Batteries Remote Control Cable VGA Cable USB Cable Control Cable for Serial port Protective Dust Cover Lens Cover (PLC-XP55) Lens Attachment (PLC-XP55L) G Specifications are subject to 10.5˚ AC 100 ~ 120 V (5.0 A Max. SP. G LCD panels are effective, a tiny fraction of the pixels (0.01% or less) may be ineffective by the characteristics of the LCD panels. 52 APPENDIX TECHNICAL SPECIFICATIONS Projector Type...
... Batteries Remote Control Cable VGA Cable USB Cable Control Cable for Serial port Protective Dust Cover Lens Cover (PLC-XP55) Lens Attachment (PLC-XP55L) G Specifications are subject to 10.5˚ AC 100 ~ 120 V (5.0 A Max. SP. G LCD panels are effective, a tiny fraction of the pixels (0.01% or less) may be ineffective by the characteristics of the LCD panels. 52 APPENDIX TECHNICAL SPECIFICATIONS Projector Type...


