Owners Manual
Page 2
...maintenance functions provide for better and proper maintenance of the projector. ◆ Multiple Interface Terminals The projector has several interface terminals that can capture an image for the screen logo and use Remote Control Use the remote control as wired and wireless, or as lens shifting, ceiling ... from the product. • The contents of 1.07 billion colors, and matrix liquid crystal display (LCD) technology. ◆ Functionally Rich ◆ Power Management This projector has many useful functions such as a PC wireless mouse. Up to UXGA resolution can also be moved...
...maintenance functions provide for better and proper maintenance of the projector. ◆ Multiple Interface Terminals The projector has several interface terminals that can capture an image for the screen logo and use Remote Control Use the remote control as wired and wireless, or as lens shifting, ceiling ... from the product. • The contents of 1.07 billion colors, and matrix liquid crystal display (LCD) technology. ◆ Functionally Rich ◆ Power Management This projector has many useful functions such as a PC wireless mouse. Up to UXGA resolution can also be moved...
Owners Manual
Page 3
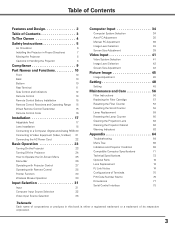
... Instructions 5 Air Circulation 6 Installing the Projector in Proper Directions 7 Moving the Projector 8 Cautions in Handling the Projector 8 Compliance 9 Part Names and Functions 10 Front 10 Back 10 Bottom 10 Rear Terminal 11 Side Control and Indicators 12 Remote Control 13 Remote Control Battery Installation 15 Remote Control Receivers and Operating Range 15 Wired Remote Control Transmitter 15 Remote Control Code 16 Installation 17 Adjustable...
... Instructions 5 Air Circulation 6 Installing the Projector in Proper Directions 7 Moving the Projector 8 Cautions in Handling the Projector 8 Compliance 9 Part Names and Functions 10 Front 10 Back 10 Bottom 10 Rear Terminal 11 Side Control and Indicators 12 Remote Control 13 Remote Control Battery Installation 15 Remote Control Receivers and Operating Range 15 Wired Remote Control Transmitter 15 Remote Control Code 16 Installation 17 Adjustable...
Owners Manual
Page 11
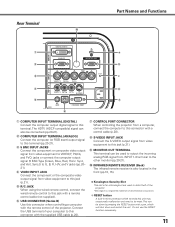
... the RESET button with a remote control cable (not supplied). e 5 BNC INPUT JACKS Connect the component or composite video output signal from a computer, connect the computer to this connector with a control cable (p.20). u CONTROL PORT CONNECTOR When controlling the projector from video equipment to VIDEO/Y,...the computer output signal (5 BNC Type [Green, Blue, Red, Horiz. y USB CONNECTOR (Series B) Use this connector with the remote control of the projector. Connect the USB terminal of ACCO Brands Corporation. [ RESET button A built-in the front (pp.10, 15). ] Kensington ...
... the RESET button with a remote control cable (not supplied). e 5 BNC INPUT JACKS Connect the component or composite video output signal from a computer, connect the computer to this connector with a control cable (p.20). u CONTROL PORT CONNECTOR When controlling the projector from video equipment to VIDEO/Y,...the computer output signal (5 BNC Type [Green, Blue, Red, Horiz. y USB CONNECTOR (Series B) Use this connector with the remote control of the projector. Connect the USB terminal of ACCO Brands Corporation. [ RESET button A built-in the front (pp.10, 15). ] Kensington ...
Owners Manual
Page 13
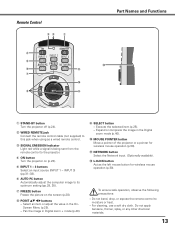
... the left mouse button for wireless mouse operation (p.30). i Point ed 7 8 buttons - To ensure safe operation, observe the following precautions: - Remote Control ew q r t y !1 u !0 i o Part Names and Functions !2 q STAND-BY button Turn the projector off (p.24). Expand or compress the image in Digital zoom + mode (p.40). For cleaning, use a soft dry cloth. INPUT 3) (pp...
... the left mouse button for wireless mouse operation (p.30). i Point ed 7 8 buttons - To ensure safe operation, observe the following precautions: - Remote Control ew q r t y !1 u !0 i o Part Names and Functions !2 q STAND-BY button Turn the projector off (p.24). Expand or compress the image in Digital zoom + mode (p.40). For cleaning, use a soft dry cloth. INPUT 3) (pp...
Owners Manual
Page 14
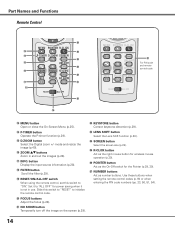
... button Scroll the filter (p.29). !9 RESET/ON/ALL-OFF switch When using the remote control, set this switch to "RESET" to "ON." Slide this switch to initialize the remote control code. @0 FOCUS buttons Adjust the focus (p.28). @1 NO SHOW button Temporarily turn... as number buttons. mode and resize the image (p.40). !6 ZOOM ed buttons Zoom in use. Part Names and Functions Remote Control @6 !3 @5 !4 @4 !5 @3 !6 @2 !7 @1 !8 @0 !9 @7 For PIN code and remote control code. !3 MENU button Open or close the On-Screen Menu (p.25). !4 P-TIMER button Operate the P-timer function ...
... button Scroll the filter (p.29). !9 RESET/ON/ALL-OFF switch When using the remote control, set this switch to "RESET" to "ON." Slide this switch to initialize the remote control code. @0 FOCUS buttons Adjust the focus (p.28). @1 NO SHOW button Temporarily turn... as number buttons. mode and resize the image (p.40). !6 ZOOM ed buttons Zoom in use. Part Names and Functions Remote Control @6 !3 @5 !4 @4 !5 @3 !6 @2 !7 @1 !8 @0 !9 @7 For PIN code and remote control code. !3 MENU button Open or close the On-Screen Menu (p.25). !4 P-TIMER button Operate the P-timer function ...

Owners Manual
Page 15
... replaced by an incorrect type. ● Dispose of the operating range (16.4'/ 5 m). You can conveniently use the remote control outside of used as a wired remote control. Connect the remote control and the projector with the remote control cable, the remote control does not emit wireless signal. 15 To insure safe operation, please observe the following precautions : ● Use two (2) AAA or...
... replaced by an incorrect type. ● Dispose of the operating range (16.4'/ 5 m). You can conveniently use the remote control outside of used as a wired remote control. Connect the remote control and the projector with the remote control cable, the remote control does not emit wireless signal. 15 To insure safe operation, please observe the following precautions : ● Use two (2) AAA or...
Owners Manual
Page 16
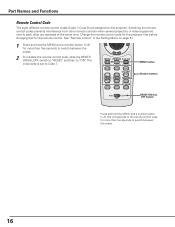
... "RESET," and then to each other remote controls when several projectors or video equipment next to "ON." The initial code is set to this projector. Switching the remote control codes prevents interference from other are assigned to Code 1. Change the remote control code for the projector first before changing that corresponds to the remote control code for more than five seconds...
... "RESET," and then to each other remote controls when several projectors or video equipment next to "ON." The initial code is set to this projector. Switching the remote control codes prevents interference from other are assigned to Code 1. Change the remote control code for the projector first before changing that corresponds to the remote control code for more than five seconds...
Owners Manual
Page 17
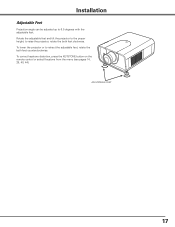
ADJUSTABLE FEET 17 To correct keystone distortion, press the KEYSTONE button on the remote control or select Keystone from the menu (see pages 14, 29, 40, 44). Installation Adjustable Feet Projection angle can be adjusted up to retract the adjustable feet, rotate the both feet clockwise. To lower the projector or to 6.5 degrees with the adjustable feet. to the proper height; Rotate the adjustable feet and tilt the projector to raise the projector, rotate the both feet counterclockwise.
ADJUSTABLE FEET 17 To correct keystone distortion, press the KEYSTONE button on the remote control or select Keystone from the menu (see pages 14, 29, 40, 44). Installation Adjustable Feet Projection angle can be adjusted up to retract the adjustable feet, rotate the both feet clockwise. To lower the projector or to 6.5 degrees with the adjustable feet. to the proper height; Rotate the adjustable feet and tilt the projector to raise the projector, rotate the both feet counterclockwise.
Owners Manual
Page 23
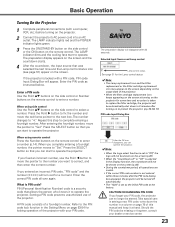
... down in setting a new PIN code; Basic Operation Turning On the Projector 1 Complete peripheral connections (with a computer, VCR, etc.) before turning on the side control to select a number. If the projector is PIN code? When using remote control Press the Number buttons on the remote control. When you forget your dealer or service center. 23 Enter the...
... down in setting a new PIN code; Basic Operation Turning On the Projector 1 Complete peripheral connections (with a computer, VCR, etc.) before turning on the side control to select a number. If the projector is PIN code? When using remote control Press the Number buttons on the remote control. When you forget your dealer or service center. 23 Enter the...
Owners Manual
Page 24
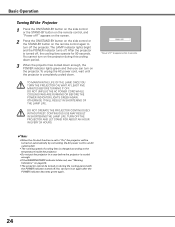
... AN HOUR IN EVERY 24 HOURS. You can turn on the remote control again to turn it on during this cooling down period. 3 When the projector has cooled down . indicator blinks red, see "Warning Indicators" on page 63. • The projector cannot be turned on again after 4 seconds. ✔Note:... • When the On start function is set to "On," the projector will be turned on the remote control, and "Power off , the cooling fans operate for 90 seconds. To...
... AN HOUR IN EVERY 24 HOURS. You can turn on the remote control again to turn it on during this cooling down period. 3 When the projector has cooled down . indicator blinks red, see "Warning Indicators" on page 63. • The projector cannot be turned on again after 4 seconds. ✔Note:... • When the On start function is set to "On," the projector will be turned on the remote control, and "Power off , the cooling fans operate for 90 seconds. To...
Owners Manual
Page 25
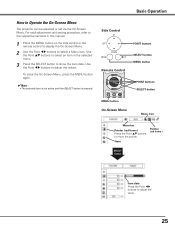
...to show the item data. Item Pointer (red frame ) SELECT button Item data Press the Point 7 8 buttons to move the pointer. Side Control POINT buttons Remote Control SELECT button MENU button POINT buttons SELECT button MENU button On-Screen Menu Menu icon Menu bar Pointer (red frame ) Press the Point ed...The selected item is not active until the SELECT button is pressed. Use the Point 7 8 buttons to Operate the On-Screen Menu The projector can be adjusted or set via the On-Screen Menu. For each adjustment and setting procedure, refer to the respective sections in the selected ...
...to show the item data. Item Pointer (red frame ) SELECT button Item data Press the Point 7 8 buttons to move the pointer. Side Control POINT buttons Remote Control SELECT button MENU button POINT buttons SELECT button MENU button On-Screen Menu Menu icon Menu bar Pointer (red frame ) Press the Point ed...The selected item is not active until the SELECT button is pressed. Use the Point 7 8 buttons to Operate the On-Screen Menu The projector can be adjusted or set via the On-Screen Menu. For each adjustment and setting procedure, refer to the respective sections in the selected ...
Owners Manual
Page 28
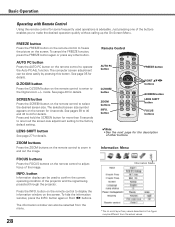
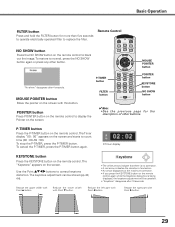
... page 35 for the description of the projector and the signal being projected through the projector. LENS SHIFT button See page 27 for details. FREEZE button Press the FREEZE button on the remote control to freeze the picture on the remote control to select the desired screen size. See...the information window, press the INFO. function. SCREEN button Press the SCREEN button on the screen. Basic Operation Operating with Remote Control Using the remote control for more than 5 seconds to return all the screen size adjustment setting to the factory default setting. Just pressing one ...
... page 35 for the description of the projector and the signal being projected through the projector. LENS SHIFT button See page 27 for details. FREEZE button Press the FREEZE button on the remote control to freeze the picture on the remote control to select the desired screen size. See...the information window, press the INFO. function. SCREEN button Press the SCREEN button on the screen. Basic Operation Operating with Remote Control Using the remote control for more than 5 seconds to return all the screen size adjustment setting to the factory default setting. Just pressing one ...
Owners Manual
Page 29
... description of correction. • An arrow disappears at the maximum correction. • If you press the KEYSTONE button on the remote control. Remote Control NO SHOW button Press the NO SHOW button on the screen with this button. P-Timer display KEYSTONE button Press the KEYSTONE button ...• "Keystone" disappears after 4 seconds. Reduce the lower width with Point e button. P-TIMER button Press the P-TIMER button on the remote control again while the Keystone dialog box is being displayed, the keystone adjustment will be stored (pp.40, 44). • The white arrows indicate ...
... description of correction. • An arrow disappears at the maximum correction. • If you press the KEYSTONE button on the remote control. Remote Control NO SHOW button Press the NO SHOW button on the screen with this button. P-Timer display KEYSTONE button Press the KEYSTONE button ...• "Keystone" disappears after 4 seconds. Reduce the lower width with Point e button. P-TIMER button Press the P-TIMER button on the remote control again while the Keystone dialog box is being displayed, the keystone adjustment will be stored (pp.40, 44). • The white arrows indicate ...
Owners Manual
Page 30
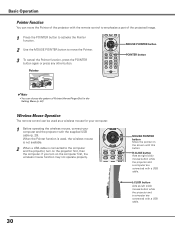
When the Pointer function is connected to move the Pointer of the projector with the remote control to emphasize a part of Pointer (Arrow/Finger/Dot) in the Setting Menu (p. 52) Wireless Mouse Operation The remote control can move the Pointer. 3 To cancel the Pointer function, press the POINTER ...button again or press any other button. L-CLICK button Acts as left (click) mouse button while the projector and a computer are connected with a USB cable...
When the Pointer function is connected to move the Pointer of the projector with the remote control to emphasize a part of Pointer (Arrow/Finger/Dot) in the Setting Menu (p. 52) Wireless Mouse Operation The remote control can move the Pointer. 3 To cancel the Pointer function, press the POINTER ...button again or press any other button. L-CLICK button Acts as left (click) mouse button while the projector and a computer are connected with a USB cable...

Owners Manual
Page 31
...INPUT 1, INPUT 2, or INPUT 3 buttons on the side control. Input Side Control Input Selection INPUT button Side Control button operation INPUT button Input 1 Input 2 Input 3 Side Control Operation Press the INPUT button on the remote control. The input source appears on the side control, you must select a correct input source by On-Screen... Menu and the latest input source will be displayed. Remote Control button operation INPUT 1 button Input 1 RGB (PC analog) RGB (Scart) RGB (PC digital) RGB (AV HDCP) INPUT 2 button Input 2 Video Y,Pb...
...INPUT 1, INPUT 2, or INPUT 3 buttons on the side control. Input Side Control Input Selection INPUT button Side Control button operation INPUT button Input 1 Input 2 Input 3 Side Control Operation Press the INPUT button on the remote control. The input source appears on the side control, you must select a correct input source by On-Screen... Menu and the latest input source will be displayed. Remote Control button operation INPUT 1 button Input 1 RGB (PC analog) RGB (Scart) RGB (PC digital) RGB (AV HDCP) INPUT 2 button Input 2 Video Y,Pb...
Owners Manual
Page 32
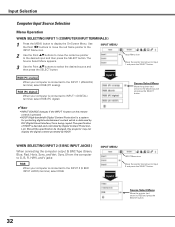
... Move the pointer (red arrow) to RGB and press the SELECT button. 32 Sync.)] from being copied. Should the specification be changed, this projector may not display the digital content protected by Digital Content Protection, LLC. Input 2 Source Select Menu Move the pointer (red arrow) to Input... to INPUT 1 (DIGITAL) terminal, select RGB (PC digital). ✔Note: • INPUT SOURCE changes if the INPUT 1 button on the remote control is pressed. • HDCP (High-bandwidth Digital Content Protection) is a system for protecting digital entertainment content which is decided and...
... Move the pointer (red arrow) to RGB and press the SELECT button. 32 Sync.)] from being copied. Should the specification be changed, this projector may not display the digital content protected by Digital Content Protection, LLC. Input 2 Source Select Menu Move the pointer (red arrow) to Input... to INPUT 1 (DIGITAL) terminal, select RGB (PC digital). ✔Note: • INPUT SOURCE changes if the INPUT 1 button on the remote control is pressed. • HDCP (High-bandwidth Digital Content Protection) is a system for protecting digital entertainment content which is decided and...
Owners Manual
Page 35
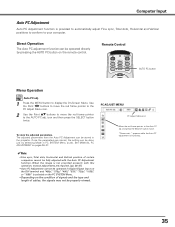
The adjusted parameters from the Auto PC Adjustment can be operated directly by selecting Mode in the projector. and press the SELECT button twice. Remote Control AUTO PC button Menu Operation Auto PC adj. 1 Press the MENU button to the AUTO PC adj. To store the adjusted parameters. See ...MANUAL PC ADJUSTMENT on the remote control. When the image is not provided properly with this operation, manual adjustments are stored, the setting can be stored in PC SYSTEM Menu (p.34)....
The adjusted parameters from the Auto PC Adjustment can be operated directly by selecting Mode in the projector. and press the SELECT button twice. Remote Control AUTO PC button Menu Operation Auto PC adj. 1 Press the MENU button to the AUTO PC adj. To store the adjusted parameters. See ...MANUAL PC ADJUSTMENT on the remote control. When the image is not provided properly with this operation, manual adjustments are stored, the setting can be stored in PC SYSTEM Menu (p.34)....
Owners Manual
Page 40
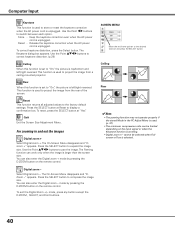
... function is working. • Digital zoom +/- Use the Point ed7 8 buttons to project the image from a ceiling-mounted projector. mode by pressing the D.ZOOM button on the remote control. cannot be limited depending on the remote control. Keep the keystone correction even when the AC power cord is unplugged. The Keystone dialog box appears. To...
... function is working. • Digital zoom +/- Use the Point ed7 8 buttons to project the image from a ceiling-mounted projector. mode by pressing the D.ZOOM button on the remote control. cannot be limited depending on the remote control. Keep the keystone correction even when the AC power cord is unplugged. The Keystone dialog box appears. To...

Owners Manual
Page 46
...to the COLOR MANAGEMENT POINTER. (If you press the MENU button on the side control or the remote control, it returns to the COLOR MANAGEMENT POINTER and you do not want to select the desired Auto picture control position (Off, L1 or L2). LIST MODE Clear the check mark if you ... . Use the Point 7 8 buttons to the projected image (see below). LIST COLOR M. Any settings that have been changed settings, be stored. Auto picture control LEVEL 1 position. level (High, Mid, Low, or XLow). Press the SELECT button and a confirmation box appears and then select [Yes] ALL DEL Delete...
...to the COLOR MANAGEMENT POINTER. (If you press the MENU button on the side control or the remote control, it returns to the COLOR MANAGEMENT POINTER and you do not want to select the desired Auto picture control position (Off, L1 or L2). LIST MODE Clear the check mark if you ... . Use the Point 7 8 buttons to the projected image (see below). LIST COLOR M. Any settings that have been changed settings, be stored. Auto picture control LEVEL 1 position. level (High, Mid, Low, or XLow). Press the SELECT button and a confirmation box appears and then select [Yes] ALL DEL Delete...
Owners Manual
Page 50
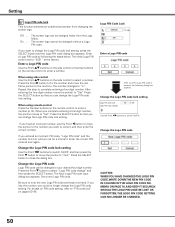
... Logo PIN code and keep it at the factory. Press the SELECT button to correct, and then enter the correct number. For details on the remote control to "✳." Off . . . . . Press the SELECT button so that you want to close the dialog box. The New Logo PIN code ... . . . If you can change the Logo PIN code lock setting. The number changes to enter a number (p.14). When using side control Use the Point ed buttons on the remote control to select a number. Press the Point 8 button to fix the number and move the pointer to the number you can change the...
... Logo PIN code and keep it at the factory. Press the SELECT button to correct, and then enter the correct number. For details on the remote control to "✳." Off . . . . . Press the SELECT button so that you want to close the dialog box. The New Logo PIN code ... . . . If you can change the Logo PIN code lock setting. The number changes to enter a number (p.14). When using side control Use the Point ed buttons on the remote control to select a number. Press the Point 8 button to fix the number and move the pointer to the number you can change the...


