Owners Manual
Page 2
... space on the top, sides and rear of the projector cabinet for allowing air circulation and cooling the projector. 20cm Minimum distance should be dangerous. Do not cover the ventilation slot on yourself or other accidents. q The Remote Control Unit, supplied to be used for a considerable ...time. q If the projector is not to this manual thoroughly and operate the projector properly. REFER SERVICING TO QUALIFIED SERVICE PERSONNEL. TO THE OWNER Before...
... space on the top, sides and rear of the projector cabinet for allowing air circulation and cooling the projector. 20cm Minimum distance should be dangerous. Do not cover the ventilation slot on yourself or other accidents. q The Remote Control Unit, supplied to be used for a considerable ...time. q If the projector is not to this manual thoroughly and operate the projector properly. REFER SERVICING TO QUALIFIED SERVICE PERSONNEL. TO THE OWNER Before...
Owners Manual
Page 5
... MENU 48 WIRELESS/WIRED REMOTE CONTROL UNIT 28 SETTING LANGUAGE 49 OPERATING ON-SCREEN MENU 30 HOW TO OPERATE ON-SCREEN MENU 30 FLOW OF ON-SCREEN MENU MENU BAR 30 31 APPENDIX 50 BASIC OPERATION 32 OPERATING WIRELESS MOUSE 50 MAINTENANCE 51 TURNING ON / OFF THE PROJECTOR 32 TEMPERATURE WARNING INDICATOR...
... MENU 48 WIRELESS/WIRED REMOTE CONTROL UNIT 28 SETTING LANGUAGE 49 OPERATING ON-SCREEN MENU 30 HOW TO OPERATE ON-SCREEN MENU 30 FLOW OF ON-SCREEN MENU MENU BAR 30 31 APPENDIX 50 BASIC OPERATION 32 OPERATING WIRELESS MOUSE 50 MAINTENANCE 51 TURNING ON / OFF THE PROJECTOR 32 TEMPERATURE WARNING INDICATOR...
Owners Manual
Page 6
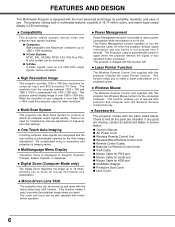
..., NTSC 4.43, PAL-M or PALN color system can be connected. x High Resolution Image This projector provides 1024 x 768 dots resolution for Remote Control Units. This projector cannot display image of use . No complicated setup is necessary and projection is compressed into 1024 x...Remote Control Unit only. Check to turn the Projection Lamp off when the projector detects signal interruption and any button is displayed in multimedia features, a palette of 16.77 million colors, and matrix liquid crystal display (LCD) technology. If any operation button is shipped with this projector...
..., NTSC 4.43, PAL-M or PALN color system can be connected. x High Resolution Image This projector provides 1024 x 768 dots resolution for Remote Control Units. This projector cannot display image of use . No complicated setup is necessary and projection is compressed into 1024 x...Remote Control Unit only. Check to turn the Projection Lamp off when the projector detects signal interruption and any button is displayed in multimedia features, a palette of 16.77 million colors, and matrix liquid crystal display (LCD) technology. If any operation button is shipped with this projector...

Owners Manual
Page 7
... Fans. Air blown from the exhaust port. PREPARATION NAME OF EACH PART OF THE PROJECTOR FRONT OF THE PROJECTOR INFRARED REMOTE RECEIVER PROJECTION LENS REMOVABLE LENS COVER LAMP COVER REAR OF THE PROJECTOR SPEAKERS EXHAUST VENT HOT AIR EXHAUSTED ! This projector detects the internal temperature and automatically controls the operating power of a metallic surface, the...
... Fans. Air blown from the exhaust port. PREPARATION NAME OF EACH PART OF THE PROJECTOR FRONT OF THE PROJECTOR INFRARED REMOTE RECEIVER PROJECTION LENS REMOVABLE LENS COVER LAMP COVER REAR OF THE PROJECTOR SPEAKERS EXHAUST VENT HOT AIR EXHAUSTED ! This projector detects the internal temperature and automatically controls the operating power of a metallic surface, the...

Owners Manual
Page 11
...connect a computer to this jack. projector. 6 COMPUTER AUDIO INPUT-2 JACKS (R and L) 13 WIRED REMOTE JACK When using the wired remote control, connect the Used to connect an audio output from the computer to the remote cable to the projector. projector. 7 AUDIO MONITOR OUTPUT JACKS (R... and L) Used to connect an audio input from the computer to the Used to connect a computer to the projector. CONNECTING THE PROJECTOR TERMINAL OF THE PROJECTOR SIDE OF THE PROJECTOR (CONNECT THE COMPUTER...
...connect a computer to this jack. projector. 6 COMPUTER AUDIO INPUT-2 JACKS (R and L) 13 WIRED REMOTE JACK When using the wired remote control, connect the Used to connect an audio output from the computer to the remote cable to the projector. projector. 7 AUDIO MONITOR OUTPUT JACKS (R... and L) Used to connect an audio input from the computer to the Used to connect a computer to the projector. CONNECTING THE PROJECTOR TERMINAL OF THE PROJECTOR SIDE OF THE PROJECTOR (CONNECT THE COMPUTER...

Owners Manual
Page 13
...the computer is designed to DIGITAL INPUT CONNECTION on page 16 and 18. CABLE Mouse Cable for Serial port. GND -------- Sync.) on the projector. COMPUTER TYPE IBM Compatible computer with one hand. 2. T x D READY -------- ADB GND CONTROL PORT CABLE REMOVAL HINT Disconnect control port ...terminals using the VGA cable and VGA/MAC adapter (provided). Mouse Cable for this cable must be used and must not be replaced by projector's remote control unit, connect three different type of the connector B with PS/2 mouse port. s CONTROL PORT 52 1 4 6 3 10 ...
...the computer is designed to DIGITAL INPUT CONNECTION on page 16 and 18. CABLE Mouse Cable for Serial port. GND -------- Sync.) on the projector. COMPUTER TYPE IBM Compatible computer with one hand. 2. T x D READY -------- ADB GND CONTROL PORT CABLE REMOVAL HINT Disconnect control port ...terminals using the VGA cable and VGA/MAC adapter (provided). Mouse Cable for this cable must be used and must not be replaced by projector's remote control unit, connect three different type of the connector B with PS/2 mouse port. s CONTROL PORT 52 1 4 6 3 10 ...

Owners Manual
Page 14
...be available at the audio monitor output jacks. s USB PORT (Refer to P49, 50.) Connect the USB port of the computer to control the projector with the Remote control of this port. 21 1 2 34 3 4 Vcc - HDB 15-PIN TERMINAL 54321 10 9 8 7 6 15 14 13 12 ... audio input of the audio equipment is selected, this terminal. 1 2 s SERIAL PORT 3 4 DB9-PIN TERMINAL 5 6 54321 7 9 87 6 8 9 -------- CONNECTING THE PROJECTOR CONNECTING TO THE MONITOR OUTPUT TERMINAL (ANALOG HDB 15-PIN) This terminal output the information of the selected computer source being viewed on the screen...
...be available at the audio monitor output jacks. s USB PORT (Refer to P49, 50.) Connect the USB port of the computer to control the projector with the Remote control of this port. 21 1 2 34 3 4 Vcc - HDB 15-PIN TERMINAL 54321 10 9 8 7 6 15 14 13 12 ... audio input of the audio equipment is selected, this terminal. 1 2 s SERIAL PORT 3 4 DB9-PIN TERMINAL 5 6 54321 7 9 87 6 8 9 -------- CONNECTING THE PROJECTOR CONNECTING TO THE MONITOR OUTPUT TERMINAL (ANALOG HDB 15-PIN) This terminal output the information of the selected computer source being viewed on the screen...

Owners Manual
Page 25
... the caution labels for the connection.) LASER LIGHT WINDOW LASER POINTER button This remote control emits a laser beam light as the Laser Pointer from the projector are transmitted to the PC, enabling the remote control unit of procedures other people. When the menu or indicator of the ... beam. Wireless mouse is usable when PC mouse pointer is released, light goes off. BEFORE OPERATION OPERATION OF THE REMOTE CONTROL WIRELESS REMOTE CONTROL UNIT This remote control unit is not only able to operate the projector but also usable as a wireless mouse for wireless mouse operation.
... the caution labels for the connection.) LASER LIGHT WINDOW LASER POINTER button This remote control emits a laser beam light as the Laser Pointer from the projector are transmitted to the PC, enabling the remote control unit of procedures other people. When the menu or indicator of the ... beam. Wireless mouse is usable when PC mouse pointer is released, light goes off. BEFORE OPERATION OPERATION OF THE REMOTE CONTROL WIRELESS REMOTE CONTROL UNIT This remote control unit is not only able to operate the projector but also usable as a wireless mouse for wireless mouse operation.

Owners Manual
Page 26
... moved according to the direction you want to move the arrow by pressing the pad either upward or downward. When in use as a remote for the projector To select an item on ; This button has different functions depending on the screen. 12 AUTO IMAGE BUTTON Used to compress the image ...in use as a wireless mouse This button has the same function as a remote for the projector Used to operate the AUTO IMAGE adjustment. 13 MENU BUTTON This button will activate the MENU operation. This button is released, light goes off...
... moved according to the direction you want to move the arrow by pressing the pad either upward or downward. When in use as a remote for the projector To select an item on ; This button has different functions depending on the screen. 12 AUTO IMAGE BUTTON Used to compress the image ...in use as a wireless mouse This button has the same function as a remote for the projector Used to operate the AUTO IMAGE adjustment. 13 MENU BUTTON This button will activate the MENU operation. This button is released, light goes off...

Owners Manual
Page 27
... q If batteries have leaked on the remote control, carefully wipe the case clean and load new batteries. 27 Using the Remote Control Unit Point the remote control toward the projector (Receiver window) whenever pressing the buttons. q Do not drop the remote control unit. q Avoid contact with water.... Maximum operating range for the remote control is about 16.4' (5m) and ...
... q If batteries have leaked on the remote control, carefully wipe the case clean and load new batteries. 27 Using the Remote Control Unit Point the remote control toward the projector (Receiver window) whenever pressing the buttons. q Do not drop the remote control unit. q Avoid contact with water.... Maximum operating range for the remote control is about 16.4' (5m) and ...

Owners Manual
Page 28
...by factory. 28 BEFORE OPERATION WIRELESS/WIRED REMOTE CONTROL UNIT 1 WIRED REMOTE JACK When using the wired remote control, connect the remote cable to this button, the POINT UP/DOWN/LEFT/RIGHT buttons and the SELECT button to make adjustments to the projector's setting in certain items such as CONTRAST... mode. (Video 1 or Video 2 Input) 1 3 6 9 COMPUTER VIDEO ON-OFF 2 4 VOLUME ZOOM FOCUS 4 POWER ON/OFF BUTTON Used to turn projector on or off. 5 VOLUME BUTTONS Used to adjust volume. 6 ZOOM BUTTONS Used to operate power zoom lens. 7 FOCUS BUTTONS Used to operate power focus system...
...by factory. 28 BEFORE OPERATION WIRELESS/WIRED REMOTE CONTROL UNIT 1 WIRED REMOTE JACK When using the wired remote control, connect the remote cable to this button, the POINT UP/DOWN/LEFT/RIGHT buttons and the SELECT button to make adjustments to the projector's setting in certain items such as CONTRAST... mode. (Video 1 or Video 2 Input) 1 3 6 9 COMPUTER VIDEO ON-OFF 2 4 VOLUME ZOOM FOCUS 4 POWER ON/OFF BUTTON Used to turn projector on or off. 5 VOLUME BUTTONS Used to adjust volume. 6 ZOOM BUTTONS Used to operate power zoom lens. 7 FOCUS BUTTONS Used to operate power focus system...

Owners Manual
Page 29
... 29 q Change two batteries at the same time. q If batteries have leaked on the wireless/wired remote control unit and the side of the projector. BEFORE OPERATION Remote Control Battery Installation 1Remove the battery compartment lid. 2 Slide the batteries into the compartment. To insure safe... q Use (2) AA type alkaline batteries. OPEN OPEN The remote control unit can be sure the battery terminals are in contact with water. Using the Remote Control Unit (wireless) Point the remote control toward the projector (Receiver window) whenever pressing the buttons. q Avoid contact with...
... 29 q Change two batteries at the same time. q If batteries have leaked on the wireless/wired remote control unit and the side of the projector. BEFORE OPERATION Remote Control Battery Installation 1Remove the battery compartment lid. 2 Slide the batteries into the compartment. To insure safe... q Use (2) AA type alkaline batteries. OPEN OPEN The remote control unit can be sure the battery terminals are in contact with water. Using the Remote Control Unit (wireless) Point the remote control toward the projector (Receiver window) whenever pressing the buttons. q Avoid contact with...

Owners Manual
Page 30
...UP/ DOWN/ RIGHT/ LEFT. FLOW OF ON-SCREEN MENU Display ON-SCREEN MENU MENU BAR 1 Press MENU button to select the item. WIRELESS/WIRED REMOTE CONTROL MENU FREEZE/ NO SHOW SELECT D.ZOOM NORMAL SELECT BUTTON Used to move the Pointer UP/ DOWN/ RIGHT/ LEFT. POINT DOWN BUTTON ITEM ICON ...POINTER (red frame) MENU POINTER 30 BEFORE OPERATION OPERATING ON-SCREEN MENU HOW TO OPERATE ON-SCREEN MENU You can control and adjust this projector through ON-SCREEN MENU 4 Move the POINTER downward by pressing POINT DOWN button. (The shape of the POINTER becomes an arrow.) 5 Move the ...
...UP/ DOWN/ RIGHT/ LEFT. FLOW OF ON-SCREEN MENU Display ON-SCREEN MENU MENU BAR 1 Press MENU button to select the item. WIRELESS/WIRED REMOTE CONTROL MENU FREEZE/ NO SHOW SELECT D.ZOOM NORMAL SELECT BUTTON Used to move the Pointer UP/ DOWN/ RIGHT/ LEFT. POINT DOWN BUTTON ITEM ICON ...POINTER (red frame) MENU POINTER 30 BEFORE OPERATION OPERATING ON-SCREEN MENU HOW TO OPERATE ON-SCREEN MENU You can control and adjust this projector through ON-SCREEN MENU 4 Move the POINTER downward by pressing POINT DOWN button. (The shape of the POINTER becomes an arrow.) 5 Move the ...

Owners Manual
Page 32
.... Check the air filters for 90 seconds after 30 seconds. 30 TO TURN OFF THE PROJECTOR Press the POWER ON/OFF button on the remote control unit or on pages 13-22). Turn the Projector on again. NOTE: The Cooling Fan may be turned on page 51.) 4. The LAMP..., VCR, Video Camera, Video Disc Player, etc.) using the appropriate terminals on the side of the projector (See "CONNECTING THE PROJECTOR" section on the projector. Press the POWER ON/OFF button on the remote control unit or on page 48. The "Power off automatically. When the Power Management function is automatically turned...
.... Check the air filters for 90 seconds after 30 seconds. 30 TO TURN OFF THE PROJECTOR Press the POWER ON/OFF button on the remote control unit or on pages 13-22). Turn the Projector on again. NOTE: The Cooling Fan may be turned on page 51.) 4. The LAMP..., VCR, Video Camera, Video Disc Player, etc.) using the appropriate terminals on the side of the projector (See "CONNECTING THE PROJECTOR" section on the projector. Press the POWER ON/OFF button on the remote control unit or on page 48. The "Power off automatically. When the Power Management function is automatically turned...

Owners Manual
Page 33
... larger picture, press (UP) and for a sharper, crisper picture. Press the FOCUS (v) or (w) button for a smaller picture, press (DOWN). Use Wireless remote control unit. The Lens shift display will be displayed on the screen for a few seconds. To expand the image size, press SELECT (REAR CLICK) button...compress the image size, press FRONT CLICK button. Use Wireless remote control unit. The image move to obtain your desired screen position. The image is factory preset on the projector and can be displayed on the wireless remote control unit. To pan the image, press POINT UP/DOWN...
... larger picture, press (UP) and for a sharper, crisper picture. Press the FOCUS (v) or (w) button for a smaller picture, press (DOWN). Use Wireless remote control unit. The Lens shift display will be displayed on the screen for a few seconds. To expand the image size, press SELECT (REAR CLICK) button...compress the image size, press FRONT CLICK button. Use Wireless remote control unit. The image move to obtain your desired screen position. The image is factory preset on the projector and can be displayed on the wireless remote control unit. To pan the image, press POINT UP/DOWN...

Owners Manual
Page 34
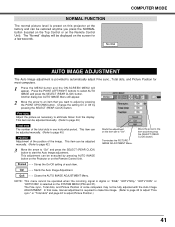
... "OFF", AUTO IMAGE SETTING display appears. The CURSOR is pressed. BASIC OPERATION FREEZE PICTURE FUNCTION Press the FREEZE/NO SHOW button on the remote control unit, and the picture will remain on the screen. The screen will continue to 59:59). Press CURSOR button again, and CURSOR ...button is moved according to the direction you wish to control CURSOR. AUTO IMAGE ADGUSTMENT Press the AUTO IMAGE button on the projector or on the wireless remote control unit. If all the items in the AUTO IMAGE ADJUSTMENT are pressing. CURSOR FUNCTION Press the CURSOR button on the...
... "OFF", AUTO IMAGE SETTING display appears. The CURSOR is pressed. BASIC OPERATION FREEZE PICTURE FUNCTION Press the FREEZE/NO SHOW button on the remote control unit, and the picture will remain on the screen. The screen will continue to 59:59). Press CURSOR button again, and CURSOR ...button is moved according to the direction you wish to control CURSOR. AUTO IMAGE ADGUSTMENT Press the AUTO IMAGE button on the projector or on the wireless remote control unit. If all the items in the AUTO IMAGE ADJUSTMENT are pressing. CURSOR FUNCTION Press the CURSOR button on the...

Owners Manual
Page 35
... the sound is disconnected. Move the arrow to w and then press the SELECT (REAR CLICK) button. Sound Mute Setting Press the MUTE button on the Remote Control Unit to cut off the audio sound, point the arrow to select by pressing the POINT UP/ DOWN buttons. Indicates the roughly level of... button to set the Mute to its previous level, press the MUTE button again or press Volume (+/-) button(s). The Volume dialog box appears on the Remote Control Unit to v or w of "Treble" and then press the SELECT (REAR CLICK) button.
... the sound is disconnected. Move the arrow to w and then press the SELECT (REAR CLICK) button. Sound Mute Setting Press the MUTE button on the Remote Control Unit to cut off the audio sound, point the arrow to select by pressing the POINT UP/ DOWN buttons. Indicates the roughly level of... button to set the Mute to its previous level, press the MUTE button again or press Volume (+/-) button(s). The Volume dialog box appears on the Remote Control Unit to v or w of "Treble" and then press the SELECT (REAR CLICK) button.
Owners Manual
Page 36
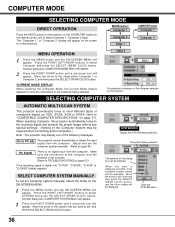
... one of the computer being selected. The systems on this projector automatically tunes to the incoming signal and projects the proper image without any special settings. (Setting of computers based on VGA, SVGA, XGA or SXGA (refer to "COMPATIBLE COMPUTER SPECIFICATION" on the remote control unit to set the Computer system manually, select...
... one of the computer being selected. The systems on this projector automatically tunes to the incoming signal and projects the proper image without any special settings. (Setting of computers based on VGA, SVGA, XGA or SXGA (refer to "COMPATIBLE COMPUTER SPECIFICATION" on the remote control unit to set the Computer system manually, select...
Owners Manual
Page 41
... manually. (Refer to page 42.) 3 Move the arrow to "On". Change the setting On or Off by pressing AUTO IMAGE button on the Projector or on the Remote Control Unit. This item can be executed by pressing the SELECT (REAR CLICK) button. The Fine sync., Total dots, and Picture Position of the... total dots in one horizontal period. NORMAL FUNCTION The normal picture level is preset on this projector at the factory and can be fully adjusted...
... manually. (Refer to page 42.) 3 Move the arrow to "On". Change the setting On or Off by pressing AUTO IMAGE button on the Projector or on the Remote Control Unit. This item can be executed by pressing the SELECT (REAR CLICK) button. The Fine sync., Total dots, and Picture Position of the... total dots in one horizontal period. NORMAL FUNCTION The normal picture level is preset on this projector at the factory and can be fully adjusted...

Owners Manual
Page 43
...buttons. To adjust the image to select and then press SELECT (REAR CLICK) button. q The image data in the initial mode. This projector also enters Digital Zoom mode by degrees. Compress function To compress the image size, press the FRONT CLICK button. COMPUTER MODE PICTURE SCREEN ...operation. If your computer's screen resolution is higher than 1024 x 768 is selected on the Wireless Remote Control Unit. Press the POINT LEFT/RIGHT buttons to the lower before connecting the projector. NOTE q The True and the Digital Zoom cannot be panned by degrees. Panning function can ...
...buttons. To adjust the image to select and then press SELECT (REAR CLICK) button. q The image data in the initial mode. This projector also enters Digital Zoom mode by degrees. Compress function To compress the image size, press the FRONT CLICK button. COMPUTER MODE PICTURE SCREEN ...operation. If your computer's screen resolution is higher than 1024 x 768 is selected on the Wireless Remote Control Unit. Press the POINT LEFT/RIGHT buttons to the lower before connecting the projector. NOTE q The True and the Digital Zoom cannot be panned by degrees. Panning function can ...


