Owners Manual
Page 2
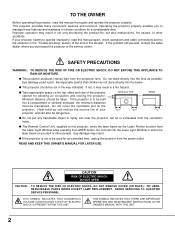
... projection lens. q If the projector is to be used for allowing air circulation and cooling the projector. 20cm Minimum distance should be built into the beam. Do not stare directly into the Laser Light Window or shine the laser beam on the projector. If the projector is not to be set in the way indicated. q The Remote Control Unit, supplied to operate improperly, read this manual thoroughly and operate...
... projection lens. q If the projector is to be used for allowing air circulation and cooling the projector. 20cm Minimum distance should be built into the beam. Do not stare directly into the Laser Light Window or shine the laser beam on the projector. If the projector is not to be set in the way indicated. q The Remote Control Unit, supplied to operate improperly, read this manual thoroughly and operate...

Owners Manual
Page 3
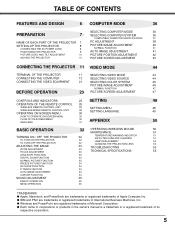
... as improper adjustment of power source indicated on the power cord. for later use liquid or aerosol cleaners. Upon completion of any kind into the projector. Do not place this projector, ask the service technician to perform routine safety checks to persons. Never push objects of any kind on an unstable cart, stand, or table. When replacement parts are provided for service. Use only with...
... as improper adjustment of power source indicated on the power cord. for later use liquid or aerosol cleaners. Upon completion of any kind into the projector. Do not place this projector, ask the service technician to perform routine safety checks to persons. Never push objects of any kind on an unstable cart, stand, or table. When replacement parts are provided for service. Use only with...
Owners Manual
Page 5
... WIRELESS/WIRED REMOTE CONTROL UNIT 28 SETTING LANGUAGE 49 OPERATING ON-SCREEN MENU 30 HOW TO OPERATE ON-SCREEN MENU 30 FLOW OF ON-SCREEN MENU MENU BAR 30 31 APPENDIX 50 BASIC OPERATION 32 OPERATING WIRELESS MOUSE 50 MAINTENANCE 51 TURNING ON / OFF THE PROJECTOR 32 TEMPERATURE WARNING INDICATOR AIR FILTER CARE AND CLEANING 51 51 TO TURN ON THE PROJECTOR 32 LAMP REPLACEMENT 52 TO TURN OFF THE PROJECTOR 32 CLEANING THE PROJECTION LENS 53 ADJUSTING THE IMAGE 33 TROUBLESHOOTING 53 ZOOM ADJUSTMENT FOCUS ADJUSTMENT 33 33 TECHNICAL SPECIFICATIONS...
... WIRELESS/WIRED REMOTE CONTROL UNIT 28 SETTING LANGUAGE 49 OPERATING ON-SCREEN MENU 30 HOW TO OPERATE ON-SCREEN MENU 30 FLOW OF ON-SCREEN MENU MENU BAR 30 31 APPENDIX 50 BASIC OPERATION 32 OPERATING WIRELESS MOUSE 50 MAINTENANCE 51 TURNING ON / OFF THE PROJECTOR 32 TEMPERATURE WARNING INDICATOR AIR FILTER CARE AND CLEANING 51 51 TO TURN ON THE PROJECTOR 32 LAMP REPLACEMENT 52 TO TURN OFF THE PROJECTOR 32 CLEANING THE PROJECTION LENS 53 ADJUSTING THE IMAGE 33 TROUBLESHOOTING 53 ZOOM ADJUSTMENT FOCUS ADJUSTMENT 33 33 TECHNICAL SPECIFICATIONS...
Owners Manual
Page 6
... a projected screen. q Remote Control Cable. The projector utilizes built-in multimedia features, a palette of use . x Motor-driven Lens Shift The projection lens can be moved up to 16 times, allowing you want. There is compressed into 1024 x 768 dots. The Projection Lamp is not in ; x Wireless Mouse The Wireless Remote Control Unit supplied with this Wireless Remote Control Unit only. q Mouse Cable for serial port. x Compatibility This projector widely accepts various video and computer input signals including; This function helps you...
... a projected screen. q Remote Control Cable. The projector utilizes built-in multimedia features, a palette of use . x Motor-driven Lens Shift The projection lens can be moved up to 16 times, allowing you want. There is compressed into 1024 x 768 dots. The Projection Lamp is not in ; x Wireless Mouse The Wireless Remote Control Unit supplied with this Wireless Remote Control Unit only. q Mouse Cable for serial port. x Compatibility This projector widely accepts various video and computer input signals including; This function helps you...

Owners Manual
Page 7
... projector detects the internal temperature and automatically controls the operating power of the hot air exhaust. PREPARATION NAME OF EACH PART OF THE PROJECTOR FRONT OF THE PROJECTOR INFRARED REMOTE RECEIVER PROJECTION LENS REMOVABLE LENS COVER LAMP COVER REAR OF THE PROJECTOR SPEAKERS EXHAUST VENT HOT AIR EXHAUSTED ! q Do not touch the cabinet near to install it. q Keep heat-sensitive objects away from the exhaust vent is used. Air blown from the exhaust port...
... projector detects the internal temperature and automatically controls the operating power of the hot air exhaust. PREPARATION NAME OF EACH PART OF THE PROJECTOR FRONT OF THE PROJECTOR INFRARED REMOTE RECEIVER PROJECTION LENS REMOVABLE LENS COVER LAMP COVER REAR OF THE PROJECTOR SPEAKERS EXHAUST VENT HOT AIR EXHAUSTED ! q Do not touch the cabinet near to install it. q Keep heat-sensitive objects away from the exhaust vent is used. Air blown from the exhaust port...

Owners Manual
Page 13
... projectors, the VGA cable provided is operated by any other cable. Sync.) on the projector. CONNECTING TO THE COMPUTER AUDIO INPUT JACKS (1 and 2) q Connect audio outputs from the computer can be connected to the computer input (Red, Green, Blue, Horiz. Mouse Cable for ADB port. Mouse Cable for Serial port. ADB GND CONTROL PORT CABLE REMOVAL HINT Disconnect control port cable with following instruction included in the Graphic Accelerator Board package. CONNECTING TO THE COMPUTER INPUT 1 TERMINAL (DIGITAL MDR 20-PIN) Digital output signal from...
... projectors, the VGA cable provided is operated by any other cable. Sync.) on the projector. CONNECTING TO THE COMPUTER AUDIO INPUT JACKS (1 and 2) q Connect audio outputs from the computer can be connected to the computer input (Red, Green, Blue, Horiz. Mouse Cable for ADB port. Mouse Cable for Serial port. ADB GND CONTROL PORT CABLE REMOVAL HINT Disconnect control port cable with following instruction included in the Graphic Accelerator Board package. CONNECTING TO THE COMPUTER INPUT 1 TERMINAL (DIGITAL MDR 20-PIN) Digital output signal from...

Owners Manual
Page 16
... connecting the cable, the power cords of the computer and set up the computer following instructions in the Graphic Accelerator Board package. MONITOR CABLE (NOT PROVIDED) SERIAL PORT PS/2 PORT INPUT INPUT GRAPHIC ACCELERATOR BOARD INSTALL (PLUG) INTO PCI BUS SLOT COMPUTER R AUDIO OUTPUT L ANALOG OUTPUT DIGITAL OUTPUT COMPUTER AUDIO INPUT 1 R DIGITAL FLAT PANEL CABLE (NOT PROVIDED) AUDIO CABLE (NOT PROVIDED) COMPUTER INPUT 1 L (DIGITAL) USB 1 CONTROL PORT 1 AUDIO 1 R L (MONO) ANALOG DIGITAL COMPUTER OUT COMPUTER IN-2 COMPUTER IN-1 MOUSE CABLE FOR...
... connecting the cable, the power cords of the computer and set up the computer following instructions in the Graphic Accelerator Board package. MONITOR CABLE (NOT PROVIDED) SERIAL PORT PS/2 PORT INPUT INPUT GRAPHIC ACCELERATOR BOARD INSTALL (PLUG) INTO PCI BUS SLOT COMPUTER R AUDIO OUTPUT L ANALOG OUTPUT DIGITAL OUTPUT COMPUTER AUDIO INPUT 1 R DIGITAL FLAT PANEL CABLE (NOT PROVIDED) AUDIO CABLE (NOT PROVIDED) COMPUTER INPUT 1 L (DIGITAL) USB 1 CONTROL PORT 1 AUDIO 1 R L (MONO) ANALOG DIGITAL COMPUTER OUT COMPUTER IN-2 COMPUTER IN-1 MOUSE CABLE FOR...
Owners Manual
Page 18
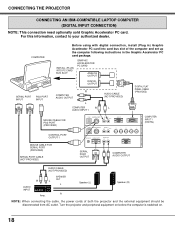
...: When connecting the cable, the power cords of the computer and set up the computer following instructions in the Graphic Accelerator PC card package. Turn the projector and peripheral equipment on before the computer is switched on. 18 INSTALL (PLUG) INTO PC CARD BUS SLOT GRAPHIC ACCELERATOR PC CARD ANALOG OUTPUT COMPUTER AUDIO OUTPUT DIGITAL OUTPUT R AUDIO CABLE (NOT PROVIDED) DIGITAL FLAT PANEL CABLE (PROVIDED) L COMPUTER R L AUDIO INPUT 1 COMPUTER...
...: When connecting the cable, the power cords of the computer and set up the computer following instructions in the Graphic Accelerator PC card package. Turn the projector and peripheral equipment on before the computer is switched on. 18 INSTALL (PLUG) INTO PC CARD BUS SLOT GRAPHIC ACCELERATOR PC CARD ANALOG OUTPUT COMPUTER AUDIO OUTPUT DIGITAL OUTPUT R AUDIO CABLE (NOT PROVIDED) DIGITAL FLAT PANEL CABLE (PROVIDED) L COMPUTER R L AUDIO INPUT 1 COMPUTER...

Owners Manual
Page 24
... items such as CONTRAST or BRIGHTNESS. 24 BEFORE OPERATION 1 LAMP REPLACEMENT INDICATOR Light is orange when the Lamp life draws to an end. 2 TEMPERATURE WARNING INDICATOR Flashes red when internal projector temperature is too high. 3 READY INDICATOR Light is green when projector lamp is ready to be turned on. 4 LAMP POWER INDICATOR Light is dim when the projector is on or off. 10 MODE BUTTON Used to select source. (Computer 1, Computer 2, Video 1 or Video 2 Input) 11 AUTO IMAGE BUTTON Used to operate the AUTO IMAGE adjustment. 12 MENU BUTTON This button will activate the MENU operation.
... items such as CONTRAST or BRIGHTNESS. 24 BEFORE OPERATION 1 LAMP REPLACEMENT INDICATOR Light is orange when the Lamp life draws to an end. 2 TEMPERATURE WARNING INDICATOR Flashes red when internal projector temperature is too high. 3 READY INDICATOR Light is green when projector lamp is ready to be turned on. 4 LAMP POWER INDICATOR Light is dim when the projector is on or off. 10 MODE BUTTON Used to select source. (Computer 1, Computer 2, Video 1 or Video 2 Input) 11 AUTO IMAGE BUTTON Used to operate the AUTO IMAGE adjustment. 12 MENU BUTTON This button will activate the MENU operation.

Owners Manual
Page 25
... operate the projector but also usable as a PC wireless mouse. (Refer to "CONNECTING THE PROJECTOR" in hazardous radiation exposure. Wireless mouse is usable when PC mouse pointer is a class laser; When the menu or indicator of the projector is displayed on the screen. Laser light is emitted with the attached cable. FRONT 1 4 9 12 13 57 2 COMPUTER VIDEO ON-OFF VOLUME ZOOM P-TIMER FOCUS NOFRSEHEZOEW/ MUTE LENS SHIFT CURSOR AUTO IMAGE MENU...
... operate the projector but also usable as a PC wireless mouse. (Refer to "CONNECTING THE PROJECTOR" in hazardous radiation exposure. Wireless mouse is usable when PC mouse pointer is a class laser; When the menu or indicator of the projector is displayed on the screen. Laser light is emitted with the attached cable. FRONT 1 4 9 12 13 57 2 COMPUTER VIDEO ON-OFF VOLUME ZOOM P-TIMER FOCUS NOFRSEHEZOEW/ MUTE LENS SHIFT CURSOR AUTO IMAGE MENU...

Owners Manual
Page 26
...-screen image or change the screen into black image. 9 SOUND MUTE BUTTON Used to mute sound. 10 LENS SHIFT BUTTON Used to select power lens shift. 11 CURSOR BUTTON Used to display CURSOR on the screen. 12 AUTO IMAGE BUTTON Used to operate the AUTO IMAGE adjustment. 13 MENU BUTTON This button will activate the MENU operation. To select an item, move the pointer. BASIC OPERATION 1 COMPUTER SELECT BUTTON Used to select computer mode. (Computer 1 or Computer 2 Input) 2 VIDEO SELECT BUTTON Used to select video mode. (Video 1 or Video 2 Input) 3 POWER ON/OFF BUTTON Used to turn the projector...
...-screen image or change the screen into black image. 9 SOUND MUTE BUTTON Used to mute sound. 10 LENS SHIFT BUTTON Used to select power lens shift. 11 CURSOR BUTTON Used to display CURSOR on the screen. 12 AUTO IMAGE BUTTON Used to operate the AUTO IMAGE adjustment. 13 MENU BUTTON This button will activate the MENU operation. To select an item, move the pointer. BASIC OPERATION 1 COMPUTER SELECT BUTTON Used to select computer mode. (Computer 1 or Computer 2 Input) 2 VIDEO SELECT BUTTON Used to select video mode. (Video 1 or Video 2 Input) 3 POWER ON/OFF BUTTON Used to turn the projector...

Owners Manual
Page 28
...) 3 VIDEO SELECT BUTTON Used to select video mode. (Video 1 or Video 2 Input) 1 3 6 9 COMPUTER VIDEO ON-OFF 2 4 VOLUME ZOOM FOCUS 4 POWER ON/OFF BUTTON Used to turn projector on the MENU that you want to operate the AUTO IMAGE adjustment. 12 MENU BUTTON This button will activate the MENU operation. This button is used . BEFORE OPERATION WIRELESS/WIRED REMOTE CONTROL UNIT 1 WIRED REMOTE JACK When using the wired remote control, connect the remote cable to this button, the POINT UP/DOWN/LEFT/RIGHT buttons and the SELECT button to make adjustments to the projector's setting in...
...) 3 VIDEO SELECT BUTTON Used to select video mode. (Video 1 or Video 2 Input) 1 3 6 9 COMPUTER VIDEO ON-OFF 2 4 VOLUME ZOOM FOCUS 4 POWER ON/OFF BUTTON Used to turn projector on the MENU that you want to operate the AUTO IMAGE adjustment. 12 MENU BUTTON This button will activate the MENU operation. This button is used . BEFORE OPERATION WIRELESS/WIRED REMOTE CONTROL UNIT 1 WIRED REMOTE JACK When using the wired remote control, connect the remote cable to this button, the POINT UP/DOWN/LEFT/RIGHT buttons and the SELECT button to make adjustments to the projector's setting in...

Owners Manual
Page 31
... MENU Used to select a color system of the selected video source. (Refer to P45) VIDEO SOURCE MENU Used to select a video source among [(Video), (Y,C) and (Y, Cb, Cr)]. (Refer to P44) SCREEN MENU Used to set the Display Menu and reset Lamp Replacement Monitor Timer. (Refer to P48, 49) LANGUAGE MENU Used to select the language used in Computer mode. MODE MENU Used to select the Computer input mode. (Refer to P36) AUTO IMAGE MENU Used to adjust Fine sync, Total dots, and Picture Position automatically. (Refer to P41) PC ADJUST MENU Used...
... MENU Used to select a color system of the selected video source. (Refer to P45) VIDEO SOURCE MENU Used to select a video source among [(Video), (Y,C) and (Y, Cb, Cr)]. (Refer to P44) SCREEN MENU Used to set the Display Menu and reset Lamp Replacement Monitor Timer. (Refer to P48, 49) LANGUAGE MENU Used to select the language used in Computer mode. MODE MENU Used to select the Computer input mode. (Refer to P36) AUTO IMAGE MENU Used to adjust Fine sync, Total dots, and Picture Position automatically. (Refer to P41) PC ADJUST MENU Used...

Owners Manual
Page 32
... POWER ON/OFF button. When the TEMPERATURE WARNING indicator flashes red, the projector is ON, the Projector detects the signal interruption and turns the Projection Lamp off . Wait at least 5 minutes before turning the projector on page 51.) 4. Clean the Air Filter. (See "AIR FILTER CARE AND CLEANING" section on again. NOTE: The Cooling Fan may be turned on again. The wait display appears on the projector. TO MAINTAIN THE LIFE OF THE LAMP, ONCE YOU TURN THE PROJECTOR...
... POWER ON/OFF button. When the TEMPERATURE WARNING indicator flashes red, the projector is ON, the Projector detects the signal interruption and turns the Projection Lamp off . Wait at least 5 minutes before turning the projector on page 51.) 4. Clean the Air Filter. (See "AIR FILTER CARE AND CLEANING" section on again. NOTE: The Cooling Fan may be turned on again. The wait display appears on the projector. TO MAINTAIN THE LIFE OF THE LAMP, ONCE YOU TURN THE PROJECTOR...

Owners Manual
Page 48
....) Power Management function operates to a rear projection screen. Time left / right reversed picture is operated with this function "On" in order to project the image from a ceiling mounted projector. Blue back When this function is "On," this "Cooling Down" period, the Lamp cannot be turned on when the input signal connected or the projector is provided to project the image to turn the Projection Lamp off when the input signal is interrupted and the projector is turned off . SETTING SETTING MENU...
....) Power Management function operates to a rear projection screen. Time left / right reversed picture is operated with this function "On" in order to project the image from a ceiling mounted projector. Blue back When this function is "On," this "Cooling Down" period, the Lamp cannot be turned on when the input signal connected or the projector is provided to project the image to turn the Projection Lamp off when the input signal is interrupted and the projector is turned off . SETTING SETTING MENU...
Owners Manual
Page 49
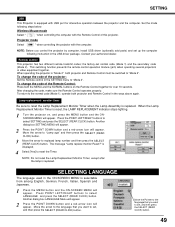
... box LANGUAGE Menu will appear. 2 Press the POINT DOWN button and a red-arrow icon will appear. To change the code of the projector; Wireless Mouse mode Select " " when controlling the computer with the computer. Lamp replacement monitor timer Be sure to reset the Lamp Replacement Monitor Timer when the Lamp Assembly is displayed. 4 Select [Yes] to the language that you control the projector by computer, install USB driver (optionally sold parts) and set , and then...
... box LANGUAGE Menu will appear. 2 Press the POINT DOWN button and a red-arrow icon will appear. To change the code of the projector; Wireless Mouse mode Select " " when controlling the computer with the computer. Lamp replacement monitor timer Be sure to reset the Lamp Replacement Monitor Timer when the Lamp Assembly is displayed. 4 Select [Yes] to the language that you control the projector by computer, install USB driver (optionally sold parts) and set , and then...

Owners Manual
Page 50
... button in your computer to the Control Port of this projector with the USB cable (not supplied). When the menu or the indicator of the projector is displayed on first, the Wireless Mouse may not work properly. Make sure that the mouse port of the computer connected to Control Port is activated. 1 Connect the mouse port of your computer. SELECT (REAR LICK) button FRONT CLICK button (left button in Menu mode. APPENDIX OPERATING WIRELESS MOUSE The Wireless Remote Control...
... button in your computer to the Control Port of this projector with the USB cable (not supplied). When the menu or the indicator of the projector is displayed on first, the Wireless Mouse may not work properly. Make sure that the mouse port of the computer connected to Control Port is activated. 1 Connect the mouse port of your computer. SELECT (REAR LICK) button FRONT CLICK button (left button in Menu mode. APPENDIX OPERATING WIRELESS MOUSE The Wireless Remote Control...
Owners Manual
Page 52
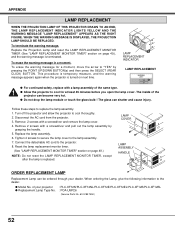
...-LMP26 (Service Parts No. 610 285 7450) 52 This procedure is temporary measure, and the warning massage appears again when the projector is turned on page 49.) NOTE: Do not reset the LAMP REPLACEMENT MONITOR TIMER, except after the lamp is terminated. APPENDIX LAMP REPLACEMENT WHEN THE PROJECTION LAMP OF THIS PROJECTOR DRAWS TO AN END, THE LAMP REPLACEMENT INDICATOR LIGHTS YELLOW AND THE WARNING MESSAGE "LAMP REPLACEMENT" APPEARS AS THE RIGHT FIGURE. Remove 2 screws with...
...-LMP26 (Service Parts No. 610 285 7450) 52 This procedure is temporary measure, and the warning massage appears again when the projector is turned on page 49.) NOTE: Do not reset the LAMP REPLACEMENT MONITOR TIMER, except after the lamp is terminated. APPENDIX LAMP REPLACEMENT WHEN THE PROJECTION LAMP OF THIS PROJECTOR DRAWS TO AN END, THE LAMP REPLACEMENT INDICATOR LIGHTS YELLOW AND THE WARNING MESSAGE "LAMP REPLACEMENT" APPEARS AS THE RIGHT FIGURE. Remove 2 screws with...
Owners Manual
Page 53
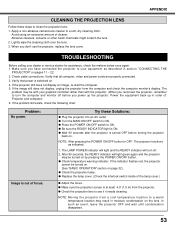
... turned on the lens. If the problem still exists, check the following chart. q Check temperature warning indicator. q Make sure the projection screen is switched on . Verify that all computer, video and power cords are properly connected. 3. The projector functions as described in order of focus. Avoid using an excessive amount of the lamp cover.) q Adjust the focus. TROUBLESHOOTING Before calling your graphics controller rather than with the projector. (When you reconnect the projector, remember to a warm temperature location...
... turned on the lens. If the problem still exists, check the following chart. q Check temperature warning indicator. q Make sure the projection screen is switched on . Verify that all computer, video and power cords are properly connected. 3. The projector functions as described in order of focus. Avoid using an excessive amount of the lamp cover.) q Adjust the focus. TROUBLESHOOTING Before calling your graphics controller rather than with the projector. (When you reconnect the projector, remember to a warm temperature location...
Owners Manual
Page 54
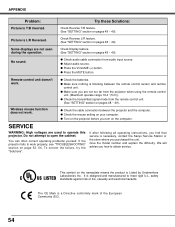
... work . q Check the transmitted signal mode from audio input source. q Turn on the projector before you how to work properly, see "TROUBLESHOOTING" section on pages 48 ~ 49). Do not attempt to meet rigid U.L. Give the model number and explain the difficulty. q Press the VOLUME (+) button. q Check the batteries. SERVICE WARNING: High voltages are not seen during the operation. We will advise you turn on pages 48 ~ 49). Picture is T/B inverted. q Check audio cable connection from the remote control...
... work . q Check the transmitted signal mode from audio input source. q Turn on the projector before you how to work properly, see "TROUBLESHOOTING" section on pages 48 ~ 49). Do not attempt to meet rigid U.L. Give the model number and explain the difficulty. q Press the VOLUME (+) button. q Check the batteries. SERVICE WARNING: High voltages are not seen during the operation. We will advise you turn on pages 48 ~ 49). Picture is T/B inverted. q Check audio cable connection from the remote control...


