

Owners Manual
Page 2
...immediately after turning off the projector without remote control. half of use . ◆ Simple Computer System Setting The projector has a Multi-scan system to conform to approx. The Logo page identifies the owner of 16.77 million colors, and matrix liquid crystal display (LCD) technology. ◆ ...Large Screen in size and weight. Keep the remote control securely at hand to use . You can be operated without waiting for the projector to cool down. (p. 20) ◆ Digital Zoom (for ...
...immediately after turning off the projector without remote control. half of use . ◆ Simple Computer System Setting The projector has a Multi-scan system to conform to approx. The Logo page identifies the owner of 16.77 million colors, and matrix liquid crystal display (LCD) technology. ◆ ...Large Screen in size and weight. Keep the remote control securely at hand to use . You can be operated without waiting for the projector to cool down. (p. 20) ◆ Digital Zoom (for ...

Owners Manual
Page 3
... 7 Part Names and Functions 8 Front 8 Back 8 Bottom 8 Rear Terminal 9 Top Control 10 Antitheft Alarm Setting Buttons 11 Remote Control 12 Remote Control Battery Installation 13 Operating Range 13 Installation 14 Positioning the Projector 14 Adjustable Feet 14 Connecting the AC Power Cord 15 Connecting to a Computer 16 Connecting to Video Equipment 17 Connecting...
... 7 Part Names and Functions 8 Front 8 Back 8 Bottom 8 Rear Terminal 9 Top Control 10 Antitheft Alarm Setting Buttons 11 Remote Control 12 Remote Control Battery Installation 13 Operating Range 13 Installation 14 Positioning the Projector 14 Adjustable Feet 14 Connecting the AC Power Cord 15 Connecting to a Computer 16 Connecting to Video Equipment 17 Connecting...

Owners Manual
Page 8
... to avoid scratching the lens surface. Attach the lens cover while the projector is for attaching) CAUTION Do not turn on the projector with putting the lens cover on. t Exhaust Vents CAUTION Hot air is a registered trademark of the projector. y Infrared Remote Receiver u Indicators i Speaker o Air Intake Vent !0 Power Cord Connector !1 Terminals and Connectors...
... to avoid scratching the lens surface. Attach the lens cover while the projector is for attaching) CAUTION Do not turn on the projector with putting the lens cover on. t Exhaust Vents CAUTION Hot air is a registered trademark of the projector. y Infrared Remote Receiver u Indicators i Speaker o Air Intake Vent !0 Power Cord Connector !1 Terminals and Connectors...
Owners Manual
Page 9
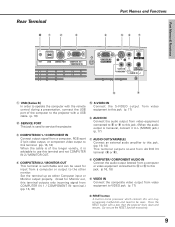
... scart 21-pin video output, or component video output to this terminal. (pp. 16, 18) When the cable is of the computer to the projector with a USB cable. (p. 16) w SERVICE PORT This jack is used for Monitor out, this terminal outputs only incoming signal from COMPUTER IN ... OUT R AUDIO OUT VIDEO IN L (MONO) COMPUTER / COMPONENT S-VIDEO IN AUDIO IN o i q USB (Series B) In order to operate the computer with the remote control during a presentation, connect the USB port of the longer variety, it to L (MONO) jack.) (p. 17) u AUDIO OUT(VARIABLE) Connect an external audio amplifier...
... scart 21-pin video output, or component video output to this terminal. (pp. 16, 18) When the cable is of the computer to the projector with a USB cable. (p. 16) w SERVICE PORT This jack is used for Monitor out, this terminal outputs only incoming signal from COMPUTER IN ... OUT R AUDIO OUT VIDEO IN L (MONO) COMPUTER / COMPONENT S-VIDEO IN AUDIO IN o i q USB (Series B) In order to operate the computer with the remote control during a presentation, connect the USB port of the longer variety, it to L (MONO) jack.) (p. 17) u AUDIO OUT(VARIABLE) Connect an external audio amplifier...
Owners Manual
Page 12
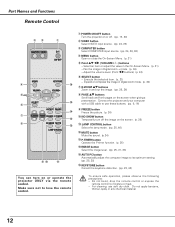
... or adjust the value in and out the image. (pp. 25, 34) t i PAGE ed buttons Scroll back and forth pages on or operate the projector ONLY via the remote control. For cleaning, use these buttons. (pp. 9, 16) o FREEZE button !4 Freeze the picture. (p. 24) u !0 NO SHOW button !3 Temporarily ...heat. - Pan the image in Digital zoom + mode. (p. 34) - Execute the selected item. (p. 21) - Part Names and Functions Remote Control ew q q POWER ON-OFF button Turn the projector on or off the image on the screen. (p. 25) i !2 !1 LAMP CONTROL button Select the lamp mode. (pp. 25, 46...
... or adjust the value in and out the image. (pp. 25, 34) t i PAGE ed buttons Scroll back and forth pages on or operate the projector ONLY via the remote control. For cleaning, use these buttons. (pp. 9, 16) o FREEZE button !4 Freeze the picture. (p. 24) u !0 NO SHOW button !3 Temporarily ...heat. - Pan the image in Digital zoom + mode. (p. 34) - Execute the selected item. (p. 21) - Part Names and Functions Remote Control ew q q POWER ON-OFF button Turn the projector on or off the image on the screen. (p. 25) i !2 !1 LAMP CONTROL button Select the lamp mode. (pp. 25, 46...

Owners Manual
Page 13
...Operating Range Point the remote control toward the projector (Infrared Remote Receiver) when pressing any button. Maximum operating range for the remote control is replaced by an incorrect type. ● Dispose of used batteries according to moisture or heat. ● Do not drop the remote control. ● If... the battery has leaked on the remote control, carefully wipe the case clean and install new batteries. ● Risk of the projector. 30° 30° 16.4' (5 m) 13 To insure safe...
...Operating Range Point the remote control toward the projector (Infrared Remote Receiver) when pressing any button. Maximum operating range for the remote control is replaced by an incorrect type. ● Dispose of used batteries according to moisture or heat. ● Do not drop the remote control. ● If... the battery has leaked on the remote control, carefully wipe the case clean and install new batteries. ● Risk of the projector. 30° 30° 16.4' (5 m) 13 To insure safe...

Owners Manual
Page 19
... number. Press the SELECT button so that was selected last and the Lamp mode status icon (see p. 46) appear on the projector. 2 Connect the projector's AC power cord into an AC outlet. The preparation display appears on the screen and the count down starts. 4 After the countdown... an incorrect number, move to complete entering a four-digit number. PIN code is not shown on the remote control. Setting PIN code prevents others except the specific users from operating the projector. A PIN code consists of the projector with the SELECT button. Should the PIN code be started.
... number. Press the SELECT button so that was selected last and the Lamp mode status icon (see p. 46) appear on the projector. 2 Connect the projector's AC power cord into an AC outlet. The preparation display appears on the screen and the count down starts. 4 After the countdown... an incorrect number, move to complete entering a four-digit number. PIN code is not shown on the remote control. Setting PIN code prevents others except the specific users from operating the projector. A PIN code consists of the projector with the SELECT button. Should the PIN code be started.
Owners Manual
Page 20
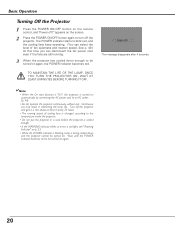
...not put the projector in a case before the projector is cooled enough. • If the WARNING indicator blinks or emits a red light, see "Warning Indicator" on p. 53. • While the POWER indicator is blinking, lamp is turned on the remote control, and "Power off?" Turn off the projector. appears on .... TO MAINTAIN THE LIFE OF THE LAMP, ONCE YOU TURN THE PROJECTOR ON, WAIT AT LEAST 5 MINUTES BEFORE TURNING IT OFF. Continuous use may result ...
...not put the projector in a case before the projector is cooled enough. • If the WARNING indicator blinks or emits a red light, see "Warning Indicator" on p. 53. • While the POWER indicator is blinking, lamp is turned on the remote control, and "Power off?" Turn off the projector. appears on .... TO MAINTAIN THE LIFE OF THE LAMP, ONCE YOU TURN THE PROJECTOR ON, WAIT AT LEAST 5 MINUTES BEFORE TURNING IT OFF. Continuous use may result ...
Owners Manual
Page 21
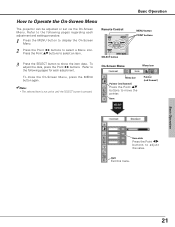
... selected item is not active until the SELECT button is pressed. Menu bar Pointer (red framed ) Press the Point ed buttons to select a Menu icon. Remote Control SELECT button MENU button POINT buttons 3 Press the SELECT button to the following pages regarding each adjustment. Basic Operation 21 Refer to show the... Operation How to adjust the value. Item Pointer (red framed ) SELECT button Item data Press the Point 7 8 buttons to Operate the On-Screen Menu The projector can be adjusted or set via the On-Screen Menu. Press the Point ed buttons to select an item.
... selected item is not active until the SELECT button is pressed. Menu bar Pointer (red framed ) Press the Point ed buttons to select a Menu icon. Remote Control SELECT button MENU button POINT buttons 3 Press the SELECT button to the following pages regarding each adjustment. Basic Operation 21 Refer to show the... Operation How to adjust the value. Item Pointer (red framed ) SELECT button Item data Press the Point 7 8 buttons to Operate the On-Screen Menu The projector can be adjusted or set via the On-Screen Menu. Press the Point ed buttons to select an item.
Owners Manual
Page 23
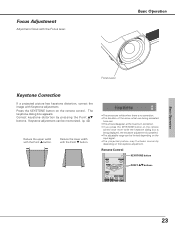
Press the KEYSTONE button on the keystone adjustment. The keystone dialog box appears. Remote Control KEYSTONE button POINT ed buttons Basic Operation 23 Keystone adjustment can be memorized. (p. 42) Reduce the upper width with the Point e button. Basic ...the arrow which are being corrected turns red. • The arrows disappear at the maximum correction. • If you press the KEYSTONE button on the remote control once more while the keystone dialog box is being displayed, the keystone adjustment is canceled. • The adjustable range can be limited depending on...
Press the KEYSTONE button on the keystone adjustment. The keystone dialog box appears. Remote Control KEYSTONE button POINT ed buttons Basic Operation 23 Keystone adjustment can be memorized. (p. 42) Reduce the upper width with the Point e button. Basic ...the arrow which are being corrected turns red. • The arrows disappear at the maximum correction. • If you press the KEYSTONE button on the remote control once more while the keystone dialog box is being displayed, the keystone adjustment is canceled. • The adjustable range can be limited depending on...
Owners Manual
Page 24
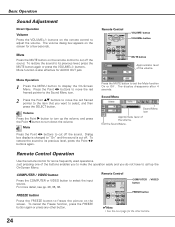
... for a few seconds. Menu Operation 1 Press the MENU button to select the input source. The display disappears after 4 seconds. Remote Control Operation Use the remote control for the other button. ✔Note: • See the next page for some frequently used operations. FREEZE button...to its previous level, press the Point 7 8 buttons again. buttons. Mute Press the MUTE button on the screen for AUDIO OUT jack. Remote Control VOLUME- Volume Press the Point 8 button to its previous level, press the MUTE button again or press the VOLUME+/- Sound Menu Sound ...
... for a few seconds. Menu Operation 1 Press the MENU button to select the input source. The display disappears after 4 seconds. Remote Control Operation Use the remote control for the other button. ✔Note: • See the next page for some frequently used operations. FREEZE button...to its previous level, press the Point 7 8 buttons again. buttons. Mute Press the MUTE button on the screen for AUDIO OUT jack. Remote Control VOLUME- Volume Press the Point 8 button to its previous level, press the MUTE button again or press the VOLUME+/- Sound Menu Sound ...
Owners Manual
Page 25
.... 31, 38. Normal ....Normal brightness Auto ........Brightness according with the input signal Eco ..........Lower brightness reduces the lamp power consumption and extends the lamp life. Remote Control VOLUME +/- LAMP CONTROL button Press the LAMP CONTROL button to black out the image. P-Timer display Basic Operation 25 For more detail, see p. 23...
.... 31, 38. Normal ....Normal brightness Auto ........Brightness according with the input signal Eco ..........Lower brightness reduces the lamp power consumption and extends the lamp life. Remote Control VOLUME +/- LAMP CONTROL button Press the LAMP CONTROL button to black out the image. P-Timer display Basic Operation 25 For more detail, see p. 23...
Owners Manual
Page 26
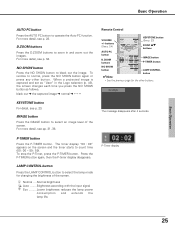
... RGB and press the SELECT button. ✔Note: • Computer 2 is not displayed when the COMPUTER IN 2/MONITOR OUT terminal is set as described below. Remote Control COMPUTER button COMPUTER button Computer 1 Computer 2 Input Menu Input Menu icon Computer 1 Move the pointer (red arrow) to Computer 2 and press the SELECT button.... 3 After the Source Select Menu appeared for Computer 1, move the red arrow pointer to either Computer 1 or Computer 2 by pressing the COMPUTER button on the remote control.
... RGB and press the SELECT button. ✔Note: • Computer 2 is not displayed when the COMPUTER IN 2/MONITOR OUT terminal is set as described below. Remote Control COMPUTER button COMPUTER button Computer 1 Computer 2 Input Menu Input Menu icon Computer 1 Move the pointer (red arrow) to Computer 2 and press the SELECT button.... 3 After the Source Select Menu appeared for Computer 1, move the red arrow pointer to either Computer 1 or Computer 2 by pressing the COMPUTER button on the remote control.
Owners Manual
Page 28
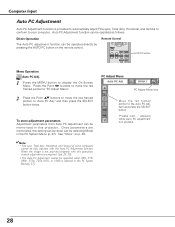
.... (pp. 29, 30) • The Auto PC Adjustment cannot be operated directly by selecting Mode in process. 28 See "Store" on the remote control. To store adjustment parameters Adjustment parameters from Auto PC Adjustment can be done just by pressing the AUTO PC button on p. 30. ✔Note... and Vertical of some computers cannot be operated as follows. Direct Operation The Auto PC adjustment function can be fully adjusted with this projector. appears while Auto PC adjustment is in the PC System Menu (p. 27). and then press the SELECT button twice. "Please wait..."
.... (pp. 29, 30) • The Auto PC Adjustment cannot be operated directly by selecting Mode in process. 28 See "Store" on the remote control. To store adjustment parameters Adjustment parameters from Auto PC Adjustment can be done just by pressing the AUTO PC button on p. 30. ✔Note... and Vertical of some computers cannot be operated as follows. Direct Operation The Auto PC adjustment function can be fully adjusted with this projector. appears while Auto PC adjustment is in the PC System Menu (p. 27). and then press the SELECT button twice. "Please wait..."
Owners Manual
Page 31
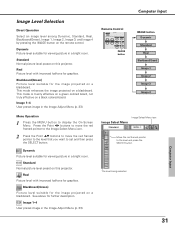
... button. Image 1~4 User preset image in the Image Adjust Menu (p. 33). This mode enhances the image projected on this projector. Computer Input 31 Standard Normal picture level preset on a blackboard. Dynamic Picture level suitable for viewing picture in a bright room.... Standard Normal picture level preset on the remote control. The level being selected. Image Level Selection Direct Operation Select an image level among Dynamic, Standard, Real, Blackboard(Green), ...
... button. Image 1~4 User preset image in the Image Adjust Menu (p. 33). This mode enhances the image projected on this projector. Computer Input 31 Standard Normal picture level preset on a blackboard. Dynamic Picture level suitable for viewing picture in a bright room.... Standard Normal picture level preset on the remote control. The level being selected. Image Level Selection Direct Operation Select an image level among Dynamic, Standard, Real, Blackboard(Green), ...
Owners Manual
Page 34
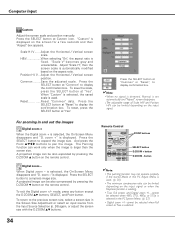
... the On-Screen Menu disappears and "D. Common ........Save the adjusted scale. When "Custom" is selected, the saved scale is displayed on the remote control. When Digital zoom - "Custom" is used . (p. 30) • The minimum compression ratio can work only when the image is...or select an input source from the Input Source Selection (p. 26) again, or adjust the screen size with the D.ZOOM ▲▼ buttons. 34 Remote Control POINT buttons SELECT button D.ZOOM + button D.ZOOM - Scale H / V .......Adjust the Horizontal / Vertical screen scale. To exit the Digital zoom ...
... the On-Screen Menu disappears and "D. Common ........Save the adjusted scale. When "Custom" is selected, the saved scale is displayed on the remote control. When Digital zoom - "Custom" is used . (p. 30) • The minimum compression ratio can work only when the image is...or select an input source from the Input Source Selection (p. 26) again, or adjust the screen size with the D.ZOOM ▲▼ buttons. 34 Remote Control POINT buttons SELECT button D.ZOOM + button D.ZOOM - Scale H / V .......Adjust the Horizontal / Vertical screen scale. To exit the Digital zoom ...
Owners Manual
Page 35
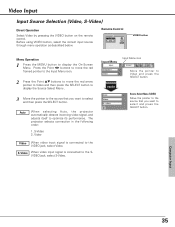
...select and then press the SELECT button. Auto When selecting Auto, the projector automatically detects incoming video signal, and adjusts itself to the VIDEO jack, select Video. Computer Input 35 The projector selects connection in the following order: 1. Video Video When video input signal... is connected to Video and press the SELECT button. Remote Control VIDEO button Menu Operation 1 Press the MENU button to select...
...select and then press the SELECT button. Auto When selecting Auto, the projector automatically detects incoming video signal, and adjusts itself to the VIDEO jack, select Video. Computer Input 35 The projector selects connection in the following order: 1. Video Video When video input signal... is connected to Video and press the SELECT button. Remote Control VIDEO button Menu Operation 1 Press the MENU button to select...
Owners Manual
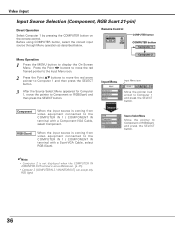
Page 36
... to Computer 1 and then press the SELECT button. 3 After the Source Select Menu appeared for Computer 1, move the pointer to display the On-Screen Menu. Remote Control COMPUTER button COMPUTER button Computer 1 Menu Operation 1 Press the MENU button to Component or RGB(Scart) and then press the SELECT button. Computer 2 Input... Cable, select RGB (Scart). Video Input Input Source Selection (Component, RGB Scart 21-pin) Direct Operation Select Computer 1 by pressing the COMPUTER button on the remote control.
... to Computer 1 and then press the SELECT button. 3 After the Source Select Menu appeared for Computer 1, move the pointer to display the On-Screen Menu. Remote Control COMPUTER button COMPUTER button Computer 1 Menu Operation 1 Press the MENU button to Component or RGB(Scart) and then press the SELECT button. Computer 2 Input... Cable, select RGB (Scart). Video Input Input Source Selection (Component, RGB Scart 21-pin) Direct Operation Select Computer 1 by pressing the COMPUTER button on the remote control.

Owners Manual
Page 38
... Dynamic Picture level suitable for further description. See above for viewing picture in the Image Adjust Menu (pp. 39, 40). 38 Remote Control IMAGE button IMAGE button Dynamic Standard Cinema Blackboard(Green) Image 1 Image 2 Image 3 Image 4 Image Select Menu Image Select ... in a bright room. Standard Normal picture level preset on this projector. Standard Normal picture level preset on this projector. This mode is mainly effective on a green colored board, not truly effective on the remote control. Cinema Picture level adjusted for the image projected on a ...
... Dynamic Picture level suitable for further description. See above for viewing picture in the Image Adjust Menu (pp. 39, 40). 38 Remote Control IMAGE button IMAGE button Dynamic Standard Cinema Blackboard(Green) Image 1 Image 2 Image 3 Image 4 Image Select Menu Image Select ... in a bright room. Standard Normal picture level preset on this projector. Standard Normal picture level preset on this projector. This mode is mainly effective on a green colored board, not truly effective on the remote control. Cinema Picture level adjusted for the image projected on a ...

Owners Manual
Page 45
... lamp is turned on if the input signal is reconnected or any button on the back of the projector is turned off. Terminal The COMPUTER IN 2/MONITOR OUT terminal on the remote control is pressed. The countdown starts to the others (Computer1 or Video) so that the Terminal function... the Point 7 8 buttons. Select one of three settings with the Point 7 8 buttons, and go to project the image from a ceiling mounting the projector. Rear When this function is "On," the picture is top/bottom and left/right reversed. Power management Time left /right reversed. This function is off...
... lamp is turned on if the input signal is reconnected or any button on the back of the projector is turned off. Terminal The COMPUTER IN 2/MONITOR OUT terminal on the remote control is pressed. The countdown starts to the others (Computer1 or Video) so that the Terminal function... the Point 7 8 buttons. Select one of three settings with the Point 7 8 buttons, and go to project the image from a ceiling mounting the projector. Rear When this function is "On," the picture is top/bottom and left/right reversed. Power management Time left /right reversed. This function is off...


