

Owners Manual
Page 2
...sounds when a vibration is designed with the most advanced technology for security. - It is designed to be unplugged immediately after turning off the projector without waiting for the projector to cool down. (p. 20) ◆ Digital Zoom (for Computer) The digital zoom function allows you to approx. ...minimize the risk of 16.77 million colors, and matrix liquid crystal display (LCD) technology. ◆ Large Screen in size and weight. Keep the remote control securely at hand to change without remote control. The Logo page identifies the owner of this manual may differ slightly...
...sounds when a vibration is designed with the most advanced technology for security. - It is designed to be unplugged immediately after turning off the projector without waiting for the projector to cool down. (p. 20) ◆ Digital Zoom (for Computer) The digital zoom function allows you to approx. ...minimize the risk of 16.77 million colors, and matrix liquid crystal display (LCD) technology. ◆ Large Screen in size and weight. Keep the remote control securely at hand to change without remote control. The Logo page identifies the owner of this manual may differ slightly...

Owners Manual
Page 3
... Video Equipment 17 Connecting to Component Video Equipment 18 Basic Operation 19 Turning On the Projector 19 Turning Off the Projector 20 How to Operate the On-Screen Menu 21 Menu Bar 22 Focus Adjustment 23 Keystone Correction 23 Sound Adjustment 24 Remote Control Operation 24 Computer Input 26 Input Source Selection 26 Computer System...
... Video Equipment 17 Connecting to Component Video Equipment 18 Basic Operation 19 Turning On the Projector 19 Turning Off the Projector 20 How to Operate the On-Screen Menu 21 Menu Bar 22 Focus Adjustment 23 Keystone Correction 23 Sound Adjustment 24 Remote Control Operation 24 Computer Input 26 Input Source Selection 26 Computer System...

Owners Manual
Page 8
...Infrared Remote Receiver u Indicators i Speaker o Air Intake Vent !0 Power Cord Connector !1 Terminals and Connectors !2 Lamp Cover !3 Air Intake Vents !4 Air Filters !5 Battery Compartment (For Antitheft alarm function) !6 Adjustable Feet ✽ Kensington Security Slot This slot is a registered trademark of the projector. ...information, visit http://www.kensington.com. *Kensington is for attaching) CAUTION Do not turn on the projector with putting the lens cover on. Attach the lens cover while the projector is exhausted from the exhaust vent. t Exhaust Vents CAUTION Hot air is not in...
...Infrared Remote Receiver u Indicators i Speaker o Air Intake Vent !0 Power Cord Connector !1 Terminals and Connectors !2 Lamp Cover !3 Air Intake Vents !4 Air Filters !5 Battery Compartment (For Antitheft alarm function) !6 Adjustable Feet ✽ Kensington Security Slot This slot is a registered trademark of the projector. ...information, visit http://www.kensington.com. *Kensington is for attaching) CAUTION Do not turn on the projector with putting the lens cover on. Attach the lens cover while the projector is exhausted from the exhaust vent. t Exhaust Vents CAUTION Hot air is not in...
Owners Manual
Page 12
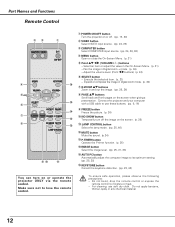
... benzene, thinner, splay or any chemical material. 12 Adjust the volume level. (Point 7 8 buttons) (p. 24) y SELECT button - Connect the projector and your computer with a USB cable to use soft dry cloth. To ensure safe operation, please observe the following precautions : - For cleaning, use ...NO SHOW button !3 Temporarily turn on or operate the projector ONLY via the remote control. Do not bend, drop the remote control or expose the remote control to moisture or heat. - Part Names and Functions Remote Control ew q q POWER ON-OFF button Turn the projector on or off the image...
... benzene, thinner, splay or any chemical material. 12 Adjust the volume level. (Point 7 8 buttons) (p. 24) y SELECT button - Connect the projector and your computer with a USB cable to use soft dry cloth. To ensure safe operation, please observe the following precautions : - For cleaning, use ...NO SHOW button !3 Temporarily turn on or operate the projector ONLY via the remote control. Do not bend, drop the remote control or expose the remote control to moisture or heat. - Part Names and Functions Remote Control ew q q POWER ON-OFF button Turn the projector on or off the image...

Owners Manual
Page 19
... no longer be missing or forgotten, consult your dealer or service center. 16 The preparation display disappears after the PIN code dialog box appeared, the projector is turned off " or "Off" is locked with the SELECT button. Enter a PIN code Select a number by pressing the Point d button, then return to operate the... becomes green and the cooling fans start to "PIN code". The number changes to complete entering a four-digit number. "1234" is not shown on the remote control. When the four-digit number is fixed, the pointer is PIN code?
... no longer be missing or forgotten, consult your dealer or service center. 16 The preparation display disappears after the PIN code dialog box appeared, the projector is turned off " or "Off" is locked with the SELECT button. Enter a PIN code Select a number by pressing the Point d button, then return to operate the... becomes green and the cooling fans start to "PIN code". The number changes to complete entering a four-digit number. "1234" is not shown on the remote control. When the four-digit number is fixed, the pointer is PIN code?
Owners Manual
Page 20
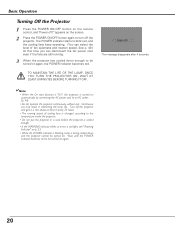
... 24 hours. • The running . 3 When the projector has cooled down and the projector cannot be turned on again, the POWER indicator becomes red. See p. 49.) At this projector is being cooled down enough to be turned on the remote control, and "Power off the projector. Basic Operation Turning Off the Projector 1 Press the POWER ON-OFF button on...
... 24 hours. • The running . 3 When the projector has cooled down and the projector cannot be turned on again, the POWER indicator becomes red. See p. 49.) At this projector is being cooled down enough to be turned on the remote control, and "Power off the projector. Basic Operation Turning Off the Projector 1 Press the POWER ON-OFF button on...
Owners Manual
Page 23
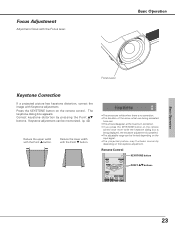
... distortion, correct the image with the Point e button. Keystone adjustment can be memorized. (p. 42) Reduce the upper width with Keystone adjustment. Remote Control KEYSTONE button POINT ed buttons Basic Operation 23 Focus Adjustment Adjust lens focus with the Point d button. • The arrows are white ...is no correction. • The direction of the arrow which are being corrected turns red. • The arrows disappear at the maximum correction. • If you press the KEYSTONE button on the remote control once more while the keystone dialog box is being displayed, the keystone ...
... distortion, correct the image with the Point e button. Keystone adjustment can be memorized. (p. 42) Reduce the upper width with Keystone adjustment. Remote Control KEYSTONE button POINT ed buttons Basic Operation 23 Focus Adjustment Adjust lens focus with the Point d button. • The arrows are white ...is no correction. • The direction of the arrow which are being corrected turns red. • The arrows disappear at the maximum correction. • If you press the KEYSTONE button on the remote control once more while the keystone dialog box is being displayed, the keystone ...
Owners Manual
Page 24
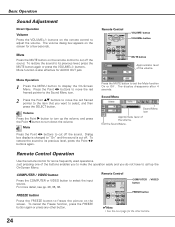
... On-Screen Menu. Basic Operation Sound Adjustment Direct Operation Volume Press the VOLUME+/- Menu Operation 1 Press the MENU button to freeze the picture on the remote control to select the input source. To restore the sound to cut off . Exit the Sound Menu. For more detail, see pp. 26, 35, 36... item that you do not have to select, and then press the SELECT button. Volume Press the Point 8 button to turn down the volume. Mute Press the Point 7 8 buttons to turn up the On-Screen Menu. Dialog box display is changed to "On" and the sound is also effective for some frequently...
... On-Screen Menu. Basic Operation Sound Adjustment Direct Operation Volume Press the VOLUME+/- Menu Operation 1 Press the MENU button to freeze the picture on the remote control to select the input source. To restore the sound to cut off . Exit the Sound Menu. For more detail, see pp. 26, 35, 36... item that you do not have to select, and then press the SELECT button. Volume Press the Point 8 button to turn down the volume. Mute Press the Point 7 8 buttons to turn up the On-Screen Menu. Dialog box display is changed to "On" and the sound is also effective for some frequently...

Owners Manual
Page 45
... the image from a ceiling mounting the projector. Press the SELECT button at Power management and this function is "On," the picture is pressed. Setting Setting Ceiling When this box appears. Terminal The COMPUTER IN 2/MONITOR OUT terminal on the remote control is top/bottom and left before ...to project the image to the input source. Power management Time left /right reversed. Select one of the projector is off . Rear When this condition, the projection lamp is turned on if the input signal is off. Off Power management function is reconnected or any button on the ...
... the image from a ceiling mounting the projector. Press the SELECT button at Power management and this function is "On," the picture is pressed. Setting Setting Ceiling When this box appears. Terminal The COMPUTER IN 2/MONITOR OUT terminal on the remote control is top/bottom and left before ...to project the image to the input source. Power management Time left /right reversed. Select one of the projector is off . Rear When this condition, the projection lamp is turned on if the input signal is off. Off Power management function is reconnected or any button on the ...
Owners Manual
Page 46
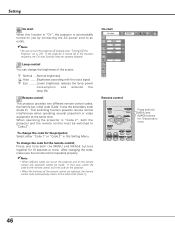
... MENU and IMAGE buttons together for the remote control; Press and hold MENU and IMAGE buttons for the projector; Setting On start When this function is "On", the projector is turned off properly (see "Turning Off the Projector" on the remote control, any operation cannot be switched to... the initial code (Code 1). If the projector is automatically turned on just by connecting...
... MENU and IMAGE buttons together for the remote control; Press and hold MENU and IMAGE buttons for the projector; Setting On start When this function is "On", the projector is turned off properly (see "Turning Off the Projector" on the remote control, any operation cannot be switched to... the initial code (Code 1). If the projector is automatically turned on just by connecting...


