

Owners Manual
Page 2
...16.77 million colors, and matrix liquid crystal display (LCD) technology. ◆ Large Screen in this manual are subject to change without waiting for the projector to focus on or operate the projector ONLY via the remote control. half of this manual may differ slightly from an unauthorized...- It is easy to carry and work anywhere you to almost all computer output signals quickly. (p. 27) ◆ Compatibility The projector widely accepts various video and computer input signals including; The Logo page identifies the owner of use . ◆ Simple Computer System Setting The...
...16.77 million colors, and matrix liquid crystal display (LCD) technology. ◆ Large Screen in this manual are subject to change without waiting for the projector to focus on or operate the projector ONLY via the remote control. half of this manual may differ slightly from an unauthorized...- It is easy to carry and work anywhere you to almost all computer output signals quickly. (p. 27) ◆ Compatibility The projector widely accepts various video and computer input signals including; The Logo page identifies the owner of use . ◆ Simple Computer System Setting The...

Owners Manual
Page 3
... Features and Design 2 Table of Contents 3 To the Owner 4 Safety Instructions 5 Air Circulation 6 Installing the Projector in Proper Position 6 Moving the Projector 6 Compliance 7 Part Names and Functions 8 Front 8 Back 8 Bottom 8 Rear Terminal 9 Top Control 10 Antitheft Alarm Setting Buttons 11 Remote Control 12 Remote Control Battery Installation 13 Operating Range 13 Installation 14 Positioning the...
... Features and Design 2 Table of Contents 3 To the Owner 4 Safety Instructions 5 Air Circulation 6 Installing the Projector in Proper Position 6 Moving the Projector 6 Compliance 7 Part Names and Functions 8 Front 8 Back 8 Bottom 8 Rear Terminal 9 Top Control 10 Antitheft Alarm Setting Buttons 11 Remote Control 12 Remote Control Battery Installation 13 Operating Range 13 Installation 14 Positioning the...

Owners Manual
Page 5
... overheating. Refer all servicing to normal operation. b. d. Adjust only those controls that could result in the back and bottom of the equipment and to rest on the marking label. When the projector exhibits a distinct change in fire or electric shock. NL Voor de klanten... hazards. For added protection to qualified service personnel under the following the operating instructions. This projector should never be read before cleaning. Never spill liquid of other controls may touch dangerous voltage points or short out parts that are provided for later use attachments not...
... overheating. Refer all servicing to normal operation. b. d. Adjust only those controls that could result in the back and bottom of the equipment and to rest on the marking label. When the projector exhibits a distinct change in fire or electric shock. NL Voor de klanten... hazards. For added protection to qualified service personnel under the following the operating instructions. This projector should never be read before cleaning. Never spill liquid of other controls may touch dangerous voltage points or short out parts that are provided for later use attachments not...
Owners Manual
Page 9
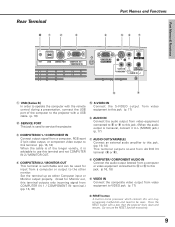
... 21-pin video output, or component video output to this terminal. (pp. 16, 18) When the cable is of the computer to the projector with a USB cable. (p. 16) w SERVICE PORT This jack is switchable and can be reset. Press the RESET button with a pen, then the... / MONITOR OUT R AUDIO OUT VIDEO IN L (MONO) COMPUTER / COMPONENT S-VIDEO IN AUDIO IN o i q USB (Series B) In order to operate the computer with the remote control during a presentation, connect the USB port of the longer variety, it is monaural, connect it to L (MONO) jack.) (p. 17) u AUDIO OUT(VARIABLE) Connect an external...
... 21-pin video output, or component video output to this terminal. (pp. 16, 18) When the cable is of the computer to the projector with a USB cable. (p. 16) w SERVICE PORT This jack is switchable and can be reset. Press the RESET button with a pen, then the... / MONITOR OUT R AUDIO OUT VIDEO IN L (MONO) COMPUTER / COMPONENT S-VIDEO IN AUDIO IN o i q USB (Series B) In order to operate the computer with the remote control during a presentation, connect the USB port of the longer variety, it is monaural, connect it to L (MONO) jack.) (p. 17) u AUDIO OUT(VARIABLE) Connect an external...
Owners Manual
Page 10
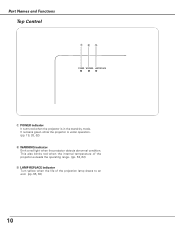
It remains green while the projector is in the stand-by mode. Part Names and Functions Top Control q we POWER WARNING LAMP REPLACE q POWER indicator It turns red when the projector is under operation. (pp. 19, 20, 62) w WARNING indicator Emit a red light when the projector detects abnormal condition. This also blinks red when the internal temperature of the projector exceeds the operating range. (pp. 53, 62) e LAMP REPLACE indicator Turn yellow when the life of the projection lamp draws to an end. (pp. 56, 62) 10
It remains green while the projector is in the stand-by mode. Part Names and Functions Top Control q we POWER WARNING LAMP REPLACE q POWER indicator It turns red when the projector is under operation. (pp. 19, 20, 62) w WARNING indicator Emit a red light when the projector detects abnormal condition. This also blinks red when the internal temperature of the projector exceeds the operating range. (pp. 53, 62) e LAMP REPLACE indicator Turn yellow when the life of the projection lamp draws to an end. (pp. 56, 62) 10
Owners Manual
Page 12
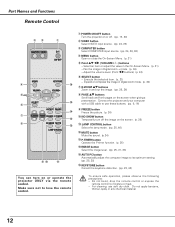
Make sure not to moisture or heat. - Part Names and Functions Remote Control ew q q POWER ON-OFF button Turn the projector on or off the image on the screen. (p. 25) i !2 !1 LAMP CONTROL button Select the lamp mode. (pp. 25, 46) !2 MUTE button Mute the sound. (p 24) !3 P-TIMER ... buttons) (p. 24) y SELECT button - Connect the projector and your computer with a USB cable to use soft dry cloth. Execute the selected item. (p. 21) - Do not bend, drop the remote control or expose the remote control to lose the remote control. Pan the image in the On-Screen Menu. (p. ...
Make sure not to moisture or heat. - Part Names and Functions Remote Control ew q q POWER ON-OFF button Turn the projector on or off the image on the screen. (p. 25) i !2 !1 LAMP CONTROL button Select the lamp mode. (pp. 25, 46) !2 MUTE button Mute the sound. (p 24) !3 P-TIMER ... buttons) (p. 24) y SELECT button - Connect the projector and your computer with a USB cable to use soft dry cloth. Execute the selected item. (p. 21) - Do not bend, drop the remote control or expose the remote control to lose the remote control. Pan the image in the On-Screen Menu. (p. ...

Owners Manual
Page 13
...9679; Avoid contact with pins in contact with water or liquid. ● Do not expose the remote control to the instructions. Part Names & Functions Remote Control Battery Installation Part Names and Functions 1 Open the battery compartment lid. 2 Install new batteries into the ...terminals are in the compartment. Operating Range Point the remote control toward the projector (Infrared Remote Receiver) when pressing any button. Maximum operating range for the remote control is replaced by an incorrect type. ● Dispose of the projector. 30° 30° 16.4' (5 m) 13...
...9679; Avoid contact with pins in contact with water or liquid. ● Do not expose the remote control to the instructions. Part Names & Functions Remote Control Battery Installation Part Names and Functions 1 Open the battery compartment lid. 2 Install new batteries into the ...terminals are in the compartment. Operating Range Point the remote control toward the projector (Infrared Remote Receiver) when pressing any button. Maximum operating range for the remote control is replaced by an incorrect type. ● Dispose of the projector. 30° 30° 16.4' (5 m) 13...

Owners Manual
Page 19
... four-digit number. When the four-digit number is fixed, the pointer is turned off " or "Off" is selected in Setting on the projector. 2 Connect the projector's AC power cord into an AC outlet. Press the SELECT button so that was selected last and the Lamp mode status icon (see p. 46...the projector. ✔Note: • When the Logo select function is "Off", the logo is not shown on the screen. Enter a PIN code Select a number by pressing the Point d button, then return to PIN code lock function in the Display function, the countdown is not shown on the remote control. Refer...
... four-digit number. When the four-digit number is fixed, the pointer is turned off " or "Off" is selected in Setting on the projector. 2 Connect the projector's AC power cord into an AC outlet. Press the SELECT button so that was selected last and the Lamp mode status icon (see p. 46...the projector. ✔Note: • When the Logo select function is "Off", the logo is not shown on the screen. Enter a PIN code Select a number by pressing the Point d button, then return to PIN code lock function in the Display function, the countdown is not shown on the remote control. Refer...
Owners Manual
Page 20
...53. • While the POWER indicator is blinking, lamp is changed according to an AC outlet. (p. 46) • Do not operate the projector continuously without rest. Wait until the POWER indicator becomes red to blink red, and the cooling fans keep operating. (You can disconnect the AC power... the AC power cord to the temperature inside the projector. • Do not put the projector in shortening the lamp life. Basic Operation Turning Off the Projector 1 Press the POWER ON-OFF button on the remote control, and "Power off the projector. appears on the screen. 2 Press the POWER ...
...53. • While the POWER indicator is blinking, lamp is changed according to an AC outlet. (p. 46) • Do not operate the projector continuously without rest. Wait until the POWER indicator becomes red to blink red, and the cooling fans keep operating. (You can disconnect the AC power... the AC power cord to the temperature inside the projector. • Do not put the projector in shortening the lamp life. Basic Operation Turning Off the Projector 1 Press the POWER ON-OFF button on the remote control, and "Power off the projector. appears on the screen. 2 Press the POWER ...
Owners Manual
Page 21
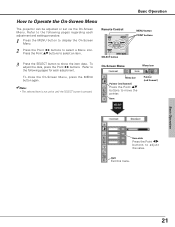
... and setting procedure. 1 Press the MENU button to display the On-Screen Menu. 2 Press the Point 7 8 buttons to select a Menu icon. Basic Operation 21 Remote Control SELECT button MENU button POINT buttons 3 Press the SELECT button to select an item. On-Screen Menu Menu icon To close the On-Screen Menu... active until the SELECT button is pressed. Basic Operation How to the following pages regarding each adjustment. Refer to Operate the On-Screen Menu The projector can be adjusted or set via the On-Screen Menu. To adjust the data, press the Point 7 8 buttons.
... and setting procedure. 1 Press the MENU button to display the On-Screen Menu. 2 Press the Point 7 8 buttons to select a Menu icon. Basic Operation 21 Remote Control SELECT button MENU button POINT buttons 3 Press the SELECT button to select an item. On-Screen Menu Menu icon To close the On-Screen Menu... active until the SELECT button is pressed. Basic Operation How to the following pages regarding each adjustment. Refer to Operate the On-Screen Menu The projector can be adjusted or set via the On-Screen Menu. To adjust the data, press the Point 7 8 buttons.
Owners Manual
Page 28
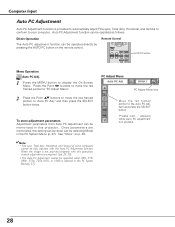
... Adjustment parameters from Auto PC Adjustment can be operated directly by selecting Mode in this Auto PC Adjustment function. See "Store" on the remote control. item and press the SELECT button. appears while Auto PC adjustment is in the PC System Menu(p. 27) PC Adjust Menu PC Adjust Menu...adjust Fine sync, Total dots, Horizontal, and Vertical to conform to the Auto PC Adj. When the image is not provided properly with this projector. and then press the SELECT button twice. Direct Operation The Auto PC adjustment function can be done just by pressing the AUTO PC button on...
... Adjustment parameters from Auto PC Adjustment can be operated directly by selecting Mode in this Auto PC Adjustment function. See "Store" on the remote control. item and press the SELECT button. appears while Auto PC adjustment is in the PC System Menu(p. 27) PC Adjust Menu PC Adjust Menu...adjust Fine sync, Total dots, Horizontal, and Vertical to conform to the Auto PC Adj. When the image is not provided properly with this projector. and then press the SELECT button twice. Direct Operation The Auto PC adjustment function can be done just by pressing the AUTO PC button on...
Owners Manual
Page 31
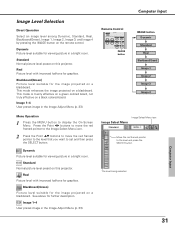
...suitable for viewing picture in a bright room. Blackboard(Green) Picture level suitable for viewing picture in a bright room. Computer Input Remote Control IMAGE button IMAGE button Dynamic Standard Real Blackboard(Green) Image 1 Image 2 Image 3 Image 4 Image Select Menu icon Image Select Menu... to set and then press the SELECT button. The level being selected. Dynamic Picture level suitable for the image projected on this projector. Computer Input 31 This mode enhances the image projected on a blackboard. Image 1~4 User preset image in the Image Adjust Menu ...
...suitable for viewing picture in a bright room. Blackboard(Green) Picture level suitable for viewing picture in a bright room. Computer Input Remote Control IMAGE button IMAGE button Dynamic Standard Real Blackboard(Green) Image 1 Image 2 Image 3 Image 4 Image Select Menu icon Image Select Menu... to set and then press the SELECT button. The level being selected. Dynamic Picture level suitable for the image projected on this projector. Computer Input 31 This mode enhances the image projected on a blackboard. Image 1~4 User preset image in the Image Adjust Menu ...
Owners Manual
Page 35
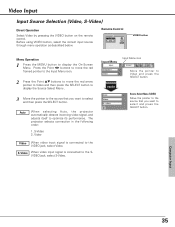
The projector selects connection in the following order: 1. S-Video When video input signal is connected to select and press the SELECT button. Press the Point 7 8 buttons to ... Input Source Selection (Video, S-Video) Direct Operation Select Video by pressing the VIDEO button on the remote control. Remote Control VIDEO button Menu Operation 1 Press the MENU button to Video and press the SELECT button. Auto When selecting Auto, the projector automatically detects incoming video signal, and adjusts itself to optimize its performance.
The projector selects connection in the following order: 1. S-Video When video input signal is connected to select and press the SELECT button. Press the Point 7 8 buttons to ... Input Source Selection (Video, S-Video) Direct Operation Select Video by pressing the VIDEO button on the remote control. Remote Control VIDEO button Menu Operation 1 Press the MENU button to Video and press the SELECT button. Auto When selecting Auto, the projector automatically detects incoming video signal, and adjusts itself to optimize its performance.

Owners Manual
Page 38
... On-Screen Menu. Cinema Picture level adjusted for viewing picture in a bright room. Standard Normal picture level preset on the remote control. Blackboard(Green) Picture level suitable for further description. See above for the image projected on a Blackboard. This mode enhances the ...image projected on a black colored board. Dynamic Picture level suitable for the image projected on this projector. This mode is mainly effective on a green colored board, not truly effective on a blackboard. Standard Normal picture level preset on a ...
... On-Screen Menu. Cinema Picture level adjusted for viewing picture in a bright room. Standard Normal picture level preset on the remote control. Blackboard(Green) Picture level suitable for further description. See above for the image projected on a Blackboard. This mode enhances the ...image projected on a black colored board. Dynamic Picture level suitable for the image projected on this projector. This mode is mainly effective on a green colored board, not truly effective on a blackboard. Standard Normal picture level preset on a ...

Owners Manual
Page 45
... When this function is "On," the picture is left /right reversed. Terminal The COMPUTER IN 2/MONITOR OUT terminal on the remote control is pressed. The countdown starts to turn off the projection lamp when the input signal is interrupted and no button is not available... when selecting Computer 2 to project the image from a ceiling mounting the projector. Ready When the lamp has been fully cooled down . . . Change the input source to green blinking. In this condition, the projection lamp ...
... When this function is "On," the picture is left /right reversed. Terminal The COMPUTER IN 2/MONITOR OUT terminal on the remote control is pressed. The countdown starts to turn off the projection lamp when the input signal is interrupted and no button is not available... when selecting Computer 2 to project the image from a ceiling mounting the projector. Ready When the lamp has been fully cooled down . . . Change the input source to green blinking. In this condition, the projection lamp ...
Owners Manual
Page 46
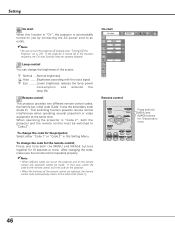
... start When this Setting Menu. Remote control This projector provides two different remote control codes; After changing the code, make sure the remote control operates properly. ✔Note: • When different codes are replaced, the remote control code automatically returns to fit the code...prevents remote control interference when operating several projectors or video equipment at the same time. Setting On start Remote control Press and hold both the projector and the remote control must be made. If the projector is automatically turned on the remote control, any ...
... start When this Setting Menu. Remote control This projector provides two different remote control codes; After changing the code, make sure the remote control operates properly. ✔Note: • When different codes are replaced, the remote control code automatically returns to fit the code...prevents remote control interference when operating several projectors or video equipment at the same time. Setting On start Remote control Press and hold both the projector and the remote control must be made. If the projector is automatically turned on the remote control, any ...

Owners Manual
Page 50
...stealing. • The alarm does not ring while the AC power cord is connected even if the projector detects vibrations. • Pressing the button is always accompanied by a sound. Side Control ALARM indicator F button button 1, 2, 3 50 If any sound is not produced after the lowpitched ...sound, the alarm starts ringing. ✔Note: • You can test the alarming sound without setting the alarm. When the projector detects more vibrations after pressing...
...stealing. • The alarm does not ring while the AC power cord is connected even if the projector detects vibrations. • Pressing the button is always accompanied by a sound. Side Control ALARM indicator F button button 1, 2, 3 50 If any sound is not produced after the lowpitched ...sound, the alarm starts ringing. ✔Note: • You can test the alarming sound without setting the alarm. When the projector detects more vibrations after pressing...

Owners Manual
Page 53
... the AC power cord and reconnect it can be turned on once again for the projector to be hot? The projector is automatically shut down to protect the inside the projector returns to normal, the WARNING indicator still continues to its normal operating temperature), it ...WARNING indicator stops blinking. When the projector has cooled down and the WARNING indicator is red. Maintenance & Cleaning Maintenance and Cleaning Warning Indicator The WARNING indicator shows the state of the function which may be ventilated? Top Control WARNING emit a red light POWER WARNING...
... the AC power cord and reconnect it can be turned on once again for the projector to be hot? The projector is automatically shut down to protect the inside the projector returns to normal, the WARNING indicator still continues to its normal operating temperature), it ...WARNING indicator stops blinking. When the projector has cooled down and the WARNING indicator is red. Maintenance & Cleaning Maintenance and Cleaning Warning Indicator The WARNING indicator shows the state of the function which may be ventilated? Top Control WARNING emit a red light POWER WARNING...
Owners Manual
Page 56
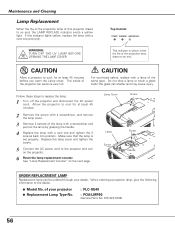
... lamp of the projection lamp draws to replace the lamp. 1 Turn off the projector and disconnect the AC power cord. WARNING: TURN OFF THE UV LAMP BEFORE OPENING THE LAMP COVER Top Control POWER WARNING LAMP REPLACE This indicator is set properly. The glass can become very hot.... Follow these steps to an end. Lamp Cover Screw Lamp Screw Screw Handle ORDER REPLACEMENT LAMP Replacement lamp can be ordered through your projector ● Replacement Lamp Type No. : PLC-XE40 : POA...
... lamp of the projection lamp draws to replace the lamp. 1 Turn off the projector and disconnect the AC power cord. WARNING: TURN OFF THE UV LAMP BEFORE OPENING THE LAMP COVER Top Control POWER WARNING LAMP REPLACE This indicator is set properly. The glass can become very hot.... Follow these steps to an end. Lamp Cover Screw Lamp Screw Screw Handle ORDER REPLACEMENT LAMP Replacement lamp can be ordered through your projector ● Replacement Lamp Type No. : PLC-XE40 : POA...
Owners Manual
Page 59
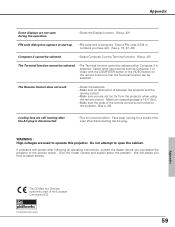
... the model number and explain about the problem. Appendix The CE Mark is a Directive conformity mark of the remote control is conformed to operate this projector. Select other input source such as Computer 1 or Video with the COMPUTER button or the VIDEO button on the ...after following all operating instructions, contact the dealer where you how to open the cabinet. The Remote Control does not work. -Check the batteries. -Make sure no obstruction is between the projector and the remote control. -Make sure you have set . Maximum operating range is being set ). (See p. 19...
... the model number and explain about the problem. Appendix The CE Mark is a Directive conformity mark of the remote control is conformed to operate this projector. Select other input source such as Computer 1 or Video with the COMPUTER button or the VIDEO button on the ...after following all operating instructions, contact the dealer where you how to open the cabinet. The Remote Control does not work. -Check the batteries. -Make sure no obstruction is between the projector and the remote control. -Make sure you have set . Maximum operating range is being set ). (See p. 19...


