

Instruction Manual, PDG-DSU20B
Page 8
... Product ...12 Control Panel ...12 Connection Ports ...13 Remote Control ...14 Replacing the Battery ...15 Remote Control Operation ...16 Installation ...17 Connecting the Projector ...17 Powering On/Off the Projector 18 Adjusting the Projector ...19 Menu Operation ...21 Maintenance ...25 Cleaning the Lens ...25 Cleaning the Projector Housing 25 Replacing the Lamp ...26 Specifications ...28 Appendix...
... Product ...12 Control Panel ...12 Connection Ports ...13 Remote Control ...14 Replacing the Battery ...15 Remote Control Operation ...16 Installation ...17 Connecting the Projector ...17 Powering On/Off the Projector 18 Adjusting the Projector ...19 Menu Operation ...21 Maintenance ...25 Cleaning the Lens ...25 Cleaning the Projector Housing 25 Replacing the Lamp ...26 Specifications ...28 Appendix...
Instruction Manual, PDG-DSU20B
Page 10
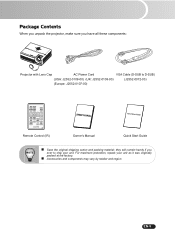
EN-9 they will comein handy if you have all these components: Projector with Lens Cap AC Power Cord VGA Cable (D-SUB to ship your unit as it was originally packed at the factory. „ Accessories and components may vary by retailer and region. For maximum protection, repack your unit. Package Contents When you unpack the projector, make sure you ever to D-SUB) (USA: J2552-0109-00) (UK: J2552-0108-00) (J2552-0072-03) (Europe: J2552-0107-00) Remote Control (IR) Owner's Manual Quick Start Guide „ Save the original shipping carton and packing material;
EN-9 they will comein handy if you have all these components: Projector with Lens Cap AC Power Cord VGA Cable (D-SUB to ship your unit as it was originally packed at the factory. „ Accessories and components may vary by retailer and region. For maximum protection, repack your unit. Package Contents When you unpack the projector, make sure you ever to D-SUB) (USA: J2552-0109-00) (UK: J2552-0108-00) (J2552-0072-03) (Europe: J2552-0107-00) Remote Control (IR) Owner's Manual Quick Start Guide „ Save the original shipping carton and packing material;

Instruction Manual, PDG-DSU20B
Page 11
Projector Overview Front View 12 11 10 9 1 2 34 5 6 7 8 1 Lens cap 2 Elevator button 3 Lens cap strap 4 Projection lens 5 Front IR remote control sensor 6 Speaker 7 Ventilation holes 8 AC power socket 9 Zoom ring 10 Focus ring 11 Control panel 12 Lamp cover EN-10
Projector Overview Front View 12 11 10 9 1 2 34 5 6 7 8 1 Lens cap 2 Elevator button 3 Lens cap strap 4 Projection lens 5 Front IR remote control sensor 6 Speaker 7 Ventilation holes 8 AC power socket 9 Zoom ring 10 Focus ring 11 Control panel 12 Lamp cover EN-10

Instruction Manual, PDG-DSU20B
Page 12
Rear View 1 2 3 4 1 Connection ports 2 Kensington lock 3 Rear IR remote control sensor 4 Ventilation holes Bottom View 1 2 3 1 Elevator foot 2 Ceiling mount (3-M4*6) 3 Tilt-adjustment foot „ This projector can be used with a ceiling mount for support. The ceiling mount is not included in the package. EN-11
Rear View 1 2 3 4 1 Connection ports 2 Kensington lock 3 Rear IR remote control sensor 4 Ventilation holes Bottom View 1 2 3 1 Elevator foot 2 Ceiling mount (3-M4*6) 3 Tilt-adjustment foot „ This projector can be used with a ceiling mount for support. The ceiling mount is not included in the package. EN-11

Instruction Manual, PDG-DSU20B
Page 15
...Press "FREEZE" to sub-menu and confirm the menu cancel the MUTE function. Enter to pause the screen image. EN-14 Connect the projector and your selection. - Press again to use these buttons. 7 MUTE 13 ENTER Cut off . Use four directional buttons to cancel the...connected with a USB cable to - Act as computer Enter button when keyboard function is selected. - selection. Remote Control 1 INPUT Manually select an input source. 2 AUTO PC Resynchronize the projector to the input signal from 4:3 to 16:9. 15 KEYSTONE + / Correct the keystone distortion. 11 ESC. 16...
...Press "FREEZE" to sub-menu and confirm the menu cancel the MUTE function. Enter to pause the screen image. EN-14 Connect the projector and your selection. - Press again to use these buttons. 7 MUTE 13 ENTER Cut off . Use four directional buttons to cancel the...connected with a USB cable to - Act as computer Enter button when keyboard function is selected. - selection. Remote Control 1 INPUT Manually select an input source. 2 AUTO PC Resynchronize the projector to the input signal from 4:3 to 16:9. 15 KEYSTONE + / Correct the keystone distortion. 11 ESC. 16...

Instruction Manual, PDG-DSU20B
Page 16
... to local regulations. „ Danger of children. Replace only with household waste. Remove the battery holder. 2. EN-15 Push the battery holder back into the remote control until you feel a click. „ Keep the battery out of the reach of explosion may happen if batteries are incorrectly replaced. Dispose of used...
... to local regulations. „ Danger of children. Replace only with household waste. Remove the battery holder. 2. EN-15 Push the battery holder back into the remote control until you feel a click. „ Keep the battery out of the reach of explosion may happen if batteries are incorrectly replaced. Dispose of used...

Instruction Manual, PDG-DSU20B
Page 17
...132; Operating the projector from the front „ Operating the projector from the rear 15 15 7m 15 15 7m „ The remote control may not operate when there is sunlight or other strong light such as a fluorescent lamp shining on the remote sensor. „ Operate the remote control from a ...position where the remote sensor is visible....
...132; Operating the projector from the front „ Operating the projector from the rear 15 15 7m 15 15 7m „ The remote control may not operate when there is sunlight or other strong light such as a fluorescent lamp shining on the remote sensor. „ Operate the remote control from a ...position where the remote sensor is visible....

Instruction Manual, PDG-DSU20B
Page 23
...on the remote control, the screen will be scaled to enter sub-menu for various types of images. „ PC : For computer or notebook. „ Movie : For home theater. „ sRGB : For PC standard color. „ User : Memorize user's settings. The OSD menu will close and the projector will ...the original size and aspect ratio. At higher temperature the screen looks colder; EN-22 Aspect (Computer Mode) Select how the picture fits on the remote control again. When OSD is bigger than DMD output resolution, it will full all the whole screen and ignore the aspect ratio. „ 4:3...
...on the remote control, the screen will be scaled to enter sub-menu for various types of images. „ PC : For computer or notebook. „ Movie : For home theater. „ sRGB : For PC standard color. „ User : Memorize user's settings. The OSD menu will close and the projector will ...the original size and aspect ratio. At higher temperature the screen looks colder; EN-22 Aspect (Computer Mode) Select how the picture fits on the remote control again. When OSD is bigger than DMD output resolution, it will full all the whole screen and ignore the aspect ratio. „ 4:3...

Instruction Manual, PDG-DSU20B
Page 29
Remote Control Battery Operating Range Dimensions Net Weight Lithium battery (CR2025) ±15º/7m 86.5 x 54 x 8.3mm 26.2g (without prior notice. Vertical Freq. 31 - ... x 85 mm Weight 2.5 kg (5.5lb) Note: Design and Specifications are subject to change without batteries) EN-28 Specifications Display Type Single 0.55" DLP® chip, 5-segment color wheel Resolution (Pixels) SVGA (800 × 600) Lens Manual Zoom (1.1x) Screen Size 30" - 300" Lamp 180W Input Source D-Sub 15 pin, S-video, composite video...
Remote Control Battery Operating Range Dimensions Net Weight Lithium battery (CR2025) ±15º/7m 86.5 x 54 x 8.3mm 26.2g (without prior notice. Vertical Freq. 31 - ... x 85 mm Weight 2.5 kg (5.5lb) Note: Design and Specifications are subject to change without batteries) EN-28 Specifications Display Type Single 0.55" DLP® chip, 5-segment color wheel Resolution (Pixels) SVGA (800 × 600) Lens Manual Zoom (1.1x) Screen Size 30" - 300" Lamp 180W Input Source D-Sub 15 pin, S-video, composite video...

Instruction Manual, PDG-DSU20B
Page 32
If the image is out of focus: „ Be sure the lens cap is blocking the remote control receiver on the front or back of or behind the projector and not as well. if it needs cleaning. Please refer to see if it does, you are functioning properly. „ Remove the ... screen or at the front or back of the projector. „ Move the remote control so it in front of the projector. If no lights turn the projector on -screen menu, adjust the focus ring. (The image size should not change; Remote control problems If the remote control does not operate: „ Be sure nothing...
If the image is out of focus: „ Be sure the lens cap is blocking the remote control receiver on the front or back of or behind the projector and not as well. if it needs cleaning. Please refer to see if it does, you are functioning properly. „ Remove the ... screen or at the front or back of the projector. „ Move the remote control so it in front of the projector. If no lights turn the projector on -screen menu, adjust the focus ring. (The image size should not change; Remote control problems If the remote control does not operate: „ Be sure nothing...


