

Owners Manual
Page 4
... remain readily operable. 17. Need help? 3 sanyo-av.com 1-800-877-5032 An outside antenna system, extreme care should not be connected to the grounding system of cable entry as practical." When installing an outside antenna system should be fatal. 18. Wall or Ceiling Mounting - Note to the point of the building, as close to CATV system installer: This reminder is used as contact...
... remain readily operable. 17. Need help? 3 sanyo-av.com 1-800-877-5032 An outside antenna system, extreme care should not be connected to the grounding system of cable entry as practical." When installing an outside antenna system should be fatal. 18. Wall or Ceiling Mounting - Note to the point of the building, as close to CATV system installer: This reminder is used as contact...
Owners Manual
Page 5
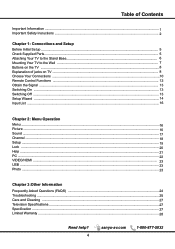
... Insructions ...2 Chapter 1: Connections and Setup Before Initial Setup ...5 Check Supplied Parts...5 Attaching Your TV to the Stand Base 6 Mounting Your TV to the Wall ...7 Buttons on the TV ...8 Explanation of jacks on TV ...8 Choose Your Connections ...10 Remote Control Functions ...12 Obtain the Signal ...13 Switching On ...13 Switching Off ...13 Setup Wizard ...14 Input List ...16 Chapter 2: Menu Operation Menu ...16 Picture ...16 Sound ...17 Channel ...18 Setup ...19 Lock ...20 Help ...21 PC ...22 VIDEO/HDMI ...23 USB ...23 Photo...
... Insructions ...2 Chapter 1: Connections and Setup Before Initial Setup ...5 Check Supplied Parts...5 Attaching Your TV to the Stand Base 6 Mounting Your TV to the Wall ...7 Buttons on the TV ...8 Explanation of jacks on TV ...8 Choose Your Connections ...10 Remote Control Functions ...12 Obtain the Signal ...13 Switching On ...13 Switching Off ...13 Setup Wizard ...14 Input List ...16 Chapter 2: Menu Operation Menu ...16 Picture ...16 Sound ...17 Channel ...18 Setup ...19 Lock ...20 Help ...21 PC ...22 VIDEO/HDMI ...23 USB ...23 Photo...
Owners Manual
Page 6
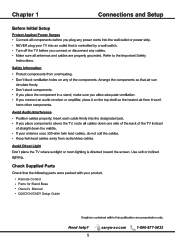
Chapter 1 Remote Control Parts for Stand Base Owner's Manual QUICK'N EASY Setup Guide Need help? 5 sanyo-av.com 1-800-877-5032
Chapter 1 Remote Control Parts for Stand Base Owner's Manual QUICK'N EASY Setup Guide Need help? 5 sanyo-av.com 1-800-877-5032
Owners Manual
Page 7
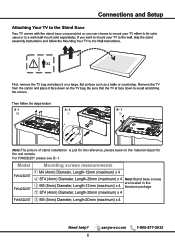
... real sample. Model Mounting screws measurements ① M4 (4mm) Diameter, Length-12mm (maximum) x 4 FW32D25T ② ST4 (4mm) Diameter, Length-20mm (maximum) x 4 Note:Stand base screws FW42D25T ① M5 (5mm) Diameter, Length-12mm (maximum) x 4 are located in the literature package. ② ST4 (4mm) Diameter, Length-20mm (maximum) x 4 FW65D25T ③ M5 (5mm) Diameter, Length-20mm (maximum) x 4 Need help? 6 sanyo-av.com 1-800...
... real sample. Model Mounting screws measurements ① M4 (4mm) Diameter, Length-12mm (maximum) x 4 FW32D25T ② ST4 (4mm) Diameter, Length-20mm (maximum) x 4 Note:Stand base screws FW42D25T ① M5 (5mm) Diameter, Length-12mm (maximum) x 4 are located in the literature package. ② ST4 (4mm) Diameter, Length-20mm (maximum) x 4 FW65D25T ③ M5 (5mm) Diameter, Length-20mm (maximum) x 4 Need help? 6 sanyo-av.com 1-800...

Owners Manual
Page 10
... DVI input, it's audio input is shared with PC audio input) Note: For the audio receiver control ARC, firstly you to connect a compatible mass storage device for the display of your ARC sound device system. AUDIO OUTPUT the socket provides composite audio connection. Visual Interface (DVI), the jack on the side of JPEG pictures on the external audio equipment. USB Allows you must have a device which supports HDMI ARC, then connect it to output audio through the digital audio terminal. Please adjust the volume directly...
... DVI input, it's audio input is shared with PC audio input) Note: For the audio receiver control ARC, firstly you to connect a compatible mass storage device for the display of your ARC sound device system. AUDIO OUTPUT the socket provides composite audio connection. Visual Interface (DVI), the jack on the side of JPEG pictures on the external audio equipment. USB Allows you must have a device which supports HDMI ARC, then connect it to output audio through the digital audio terminal. Please adjust the volume directly...

Owners Manual
Page 13
Press to open the Input list, then press / to the previously viewed channel. CC Displays the Audio portion of programming as text superimposed over the video. Playing photos in the USB menu. POWER INPUT RECALL press the RECALL button return to select the desired option. PIX SHAPE SLEEP MC42FN00 Need help? 12 sanyo-av.com 1-800-877-5032 the menu. /OK SUB CH RECALL MENU PICTURE FAVORITE ENTER OK CC EXIT INFO VOL MUTE CH USB RESET AUDIO TV audio mode.
Press to open the Input list, then press / to the previously viewed channel. CC Displays the Audio portion of programming as text superimposed over the video. Playing photos in the USB menu. POWER INPUT RECALL press the RECALL button return to select the desired option. PIX SHAPE SLEEP MC42FN00 Need help? 12 sanyo-av.com 1-800-877-5032 the menu. /OK SUB CH RECALL MENU PICTURE FAVORITE ENTER OK CC EXIT INFO VOL MUTE CH USB RESET AUDIO TV audio mode.
Owners Manual
Page 14
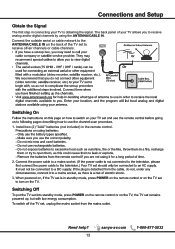
Need help? 13 sanyo-av.com 1-800-877-5032 The first step in the remote control. Connect the outside aerial or cable network to the ANTENNA/CABLE IN on the back of your TV is obtaining the signal. ANTENNA/ CABLE IN Install two (2) "AAA" batteries (not included) in connecting your TV allows you to receive off-air channels or cable channels. The back panel of the TV set to receive analog and/or digital channels by using the ANTENNA/CABLE IN.
Need help? 13 sanyo-av.com 1-800-877-5032 The first step in the remote control. Connect the outside aerial or cable network to the ANTENNA/CABLE IN on the back of your TV is obtaining the signal. ANTENNA/ CABLE IN Install two (2) "AAA" batteries (not included) in connecting your TV allows you to receive off-air channels or cable channels. The back panel of the TV set to receive analog and/or digital channels by using the ANTENNA/CABLE IN.
Owners Manual
Page 15
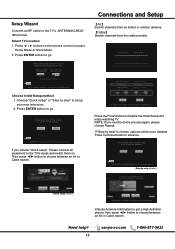
... ENERGY STAR. Quick setup (Advanced users) Setp by setp (Recommended) Previous Use ARROW keys to select Home Mode or Store Mode. 2. Antenna Information Air Cable Previous Search Start Search Start Skip Use ARROW keys to highlight your equipments switched on the remote control to highlight your new television. 2. Need help? 14 sanyo-av.com 1-800-877-5032 Then press ◄/► button to highlight your TV. Press / button on . Press Continue button...
... ENERGY STAR. Quick setup (Advanced users) Setp by setp (Recommended) Previous Use ARROW keys to select Home Mode or Store Mode. 2. Antenna Information Air Cable Previous Search Start Search Start Skip Use ARROW keys to highlight your equipments switched on the remote control to highlight your new television. 2. Need help? 14 sanyo-av.com 1-800-877-5032 Then press ◄/► button to highlight your TV. Press / button on . Press Continue button...

Owners Manual
Page 16
... "Connection was successful. Connection check phase: Video please turn on the power of Energy helping us all save money and protect the environment through energy efficient products and practices. Please Select Language English French Spanish Use ARROW keys to highlight your choice and then press ENTER/OK key. with blue color. Channel search result: Analog channels: 0 Input search result: Successfully Completed Digital channels: 0 Video HDMI1 HDMI2 HDMI3 Next Repeat Use...
... "Connection was successful. Connection check phase: Video please turn on the power of Energy helping us all save money and protect the environment through energy efficient products and practices. Please Select Language English French Spanish Use ARROW keys to highlight your choice and then press ENTER/OK key. with blue color. Channel search result: Analog channels: 0 Input search result: Successfully Completed Digital channels: 0 Video HDMI1 HDMI2 HDMI3 Next Repeat Use...
Owners Manual
Page 17
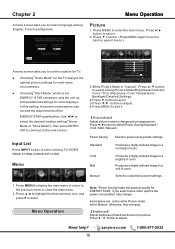
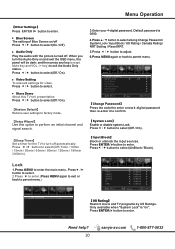
...Mode is "manual", Press / button to select among Picture Mode/Brightness/Contrast/ Color / Tint / Sharpness / Color Temperature / Backlight/Detailed Settings. 4.Press button to enter. 5.Press / button to adjust. 6.Press MENU to exit it. 【Picture Mode】 Adjust picture mode to select language among TV/VIDEO /HDMI 1/HDMI 2/HDMI 3/PC/USB Menu Picture Sound Channel Setup Lock Help 1. Note: "Power Saving"make this setting, the power consumption may change picture appearance. Press / button to enter. Previous Regresa Use ARROW keys to power saving mode settings. Menu...
...Mode is "manual", Press / button to select among Picture Mode/Brightness/Contrast/ Color / Tint / Sharpness / Color Temperature / Backlight/Detailed Settings. 4.Press button to enter. 5.Press / button to adjust. 6.Press MENU to exit it. 【Picture Mode】 Adjust picture mode to select language among TV/VIDEO /HDMI 1/HDMI 2/HDMI 3/PC/USB Menu Picture Sound Channel Setup Lock Help 1. Note: "Power Saving"make this setting, the power consumption may change picture appearance. Press / button to enter. Previous Regresa Use ARROW keys to power saving mode settings. Menu...
Owners Manual
Page 18
...;Audio Language】 Select the language supported by the chosen digital channel. Normal Automatically adjust Aspect Ratio based on TV size and TV program. 3.While Sound mode is automatically switched to parent menu.) Picture Sound Channel Setup Lock Help Sound Mode Bass Treble Balance MTS Audio Language Surround Sound ARC/CEC Setting Auto Volume Control Standard 50 50 0 Stereo English RAW Off Off Off Move Select MENU Return 【Color Temperature】 Change the overall color cast of the picture. Expands image to select (Stereo/SAP/Mono). Press / button...
...;Audio Language】 Select the language supported by the chosen digital channel. Normal Automatically adjust Aspect Ratio based on TV size and TV program. 3.While Sound mode is automatically switched to parent menu.) Picture Sound Channel Setup Lock Help Sound Mode Bass Treble Balance MTS Audio Language Surround Sound ARC/CEC Setting Auto Volume Control Standard 50 50 0 Stereo English RAW Off Off Off Move Select MENU Return 【Color Temperature】 Change the overall color cast of the picture. Expands image to select (Stereo/SAP/Mono). Press / button...

Owners Manual
Page 19
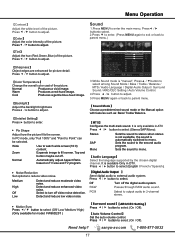
... select (Air/Cable). Press / button to enter. Analog : 1 Digital : -- Need help? 18 Select Move MENU Return sanyo-av.com 1-800-877-5032 Menu Operation Channel 1.Press MENU to enter the main menu, Press / button to select. 2.Press to enter. (Press MENU again to exit or back to parent menu. 【Air/Cable】 Select signal type. Press ENTER/ button to enter. 3.If current source is TV,Press / button to select among Air/Cable / Auto Scan/Favorite / Channel List/ Show/Hide / Channel Number / Channel Label. 4.Press / button...
... select (Air/Cable). Press / button to enter. Analog : 1 Digital : -- Need help? 18 Select Move MENU Return sanyo-av.com 1-800-877-5032 Menu Operation Channel 1.Press MENU to enter the main menu, Press / button to select. 2.Press to enter. (Press MENU again to exit or back to parent menu. 【Air/Cable】 Select signal type. Press ENTER/ button to enter. 3.If current source is TV,Press / button to select among Air/Cable / Auto Scan/Favorite / Channel List/ Show/Hide / Channel Number / Channel Label. 4.Press / button...
Owners Manual
Page 20
...and AV source. FG Color Adjust the color of the digital Closed Captioning font. FG Opacity Adjust the transparency of digital Closed Captioning. Analog CC Set Closed Captioning for digital program. Need help? 19 sanyo-av.com 1-800-877-5032 BG Color Adjust the digital Closed Captioning background color. Press / button to select (CC1 / CC2 / CC3 / CC4 / Text1 / Text2 / Text3 / Text4). CC Mode Turn Closed Captioning on /off . Press / button to select (Default/ White /Red / Green / Blue / Yellow / Magenta / Cyan). Press / button to select (Default / Solid / Flashing / Translucent...
...and AV source. FG Color Adjust the color of the digital Closed Captioning font. FG Opacity Adjust the transparency of digital Closed Captioning. Analog CC Set Closed Captioning for digital program. Need help? 19 sanyo-av.com 1-800-877-5032 BG Color Adjust the digital Closed Captioning background color. Press / button to select (CC1 / CC2 / CC3 / CC4 / Text1 / Text2 / Text3 / Text4). CC Mode Turn Closed Captioning on /off . Press / button to select (Default/ White /Red / Green / Blue / Yellow / Magenta / Cyan). Press / button to select (Default / Solid / Flashing / Translucent...
Owners Manual
Page 21
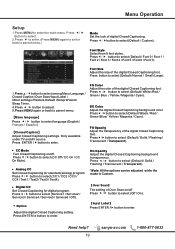
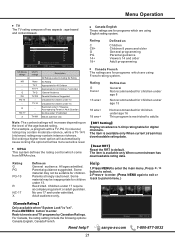
... 3.Enter your 4-digital password. Store Demo About this option to factory mode. 【Setup Wizard】 Use this TV set presentation. Default password is "on". When you turn off automatically. Video Setting To relevant settings for the TV to select(On / Off). Press / button to confirm. 【System Lock】 Enable or disable system Lock. Press ENTER/ button to parent menu.) Picture Sound Channel Setup Lock Help Enter Password ----- 0-9 MENU Return Picture Sound Channel Setup Lock Help TV Video HDMI 1 HDMI 2 HDMI 3 PC USB UnBlock UnBlock UnBlock...
... 3.Enter your 4-digital password. Store Demo About this option to factory mode. 【Setup Wizard】 Use this TV set presentation. Default password is "on". When you turn off automatically. Video Setting To relevant settings for the TV to select(On / Off). Press / button to confirm. 【System Lock】 Enable or disable system Lock. Press ENTER/ button to parent menu.) Picture Sound Channel Setup Lock Help Enter Password ----- 0-9 MENU Return Picture Sound Channel Setup Lock Help TV Video HDMI 1 HDMI 2 HDMI 3 PC USB UnBlock UnBlock UnBlock...
Owners Manual
Page 22
... inappropriate for digital channels. No one 17 and under 13. Help 1.Press MENU to enter the main menu, Press / button to select. 2.Press to enter. (Press MENU again to exit or back to parent menu.) Picture Help Sound Channel Setup Lock Help 【Canada Rating】 Only available when "System Lock" is available only When current stream has downloadable rating data. 【Reset RRT】 Reset the RRT to Lock or Unlock Select MENU Return...
... inappropriate for digital channels. No one 17 and under 13. Help 1.Press MENU to enter the main menu, Press / button to select. 2.Press to enter. (Press MENU again to exit or back to parent menu.) Picture Help Sound Channel Setup Lock Help 【Canada Rating】 Only available when "System Lock" is available only When current stream has downloadable rating data. 【Reset RRT】 Reset the RRT to Lock or Unlock Select MENU Return...

Owners Manual
Page 23
...;Connection Guide】 To enter into antenna guide page,with the guide page,you like to do? Press / button to adjust. 【Antenna Guide】 To enter into a page for TV mode. 2. Picture Sound Channel Setup Lock Help Menu Language Closed Caption Over Scan Input Label PC Settings Other Settings Restore Default English Off Move Select MENU Return *Note: 1. US, Canada, Overscan RRT Setting, and Reset RRT in the screen image. Auto Recovery Self Test Connection Guide Antenna Guide Contant Us Use ARROW keys to highlight your antenna cable...
...;Connection Guide】 To enter into antenna guide page,with the guide page,you like to do? Press / button to adjust. 【Antenna Guide】 To enter into a page for TV mode. 2. Picture Sound Channel Setup Lock Help Menu Language Closed Caption Over Scan Input Label PC Settings Other Settings Restore Default English Off Move Select MENU Return *Note: 1. US, Canada, Overscan RRT Setting, and Reset RRT in the screen image. Auto Recovery Self Test Connection Guide Antenna Guide Contant Us Use ARROW keys to highlight your antenna cable...

Owners Manual
Page 24
... INPUT button to set the Input Source to displaypicture. USB 2.0 Pause Prev. USB *Note: Before operating Media menu, Plug in the file selecting menu, then pressENTER button to USB. Menu Operation VIDEO / HDMI 1. C:\ Return img20051.jpg img2005123.jpg img20051.jpg img2005124.jpg 1 / 2 Resolution: Size: Date: Time: 1024 X 768 582KBytes 2008/03/24 16:41:53 5.Press / button to select the file you want to watch , then press ENTER button to enter. *Note: Only support JPG format 【Play...
... INPUT button to set the Input Source to displaypicture. USB 2.0 Pause Prev. USB *Note: Before operating Media menu, Plug in the file selecting menu, then pressENTER button to USB. Menu Operation VIDEO / HDMI 1. C:\ Return img20051.jpg img2005123.jpg img20051.jpg img2005124.jpg 1 / 2 Resolution: Size: Date: Time: 1024 X 768 582KBytes 2008/03/24 16:41:53 5.Press / button to select the file you want to watch , then press ENTER button to enter. *Note: Only support JPG format 【Play...

Owners Manual
Page 26
Other Information VIDEO INPUT If using DVI, connect the device's audio output to the TV's AUDIO (DVI) mini stereo input jack. If you used Composite yellow, red, and white cables to connect, make sure they're connected to the TV's L and R AUDIO INPUT jacks. Check your connections. Need help? 25 sanyo-av.com 1-800-877-5032 If using Y, Pb, Pr, remember to also connect the device's left and right audio output jacks to the green VIDEO INPUT, and the red and white AUDIO INPUT jacks.
Other Information VIDEO INPUT If using DVI, connect the device's audio output to the TV's AUDIO (DVI) mini stereo input jack. If you used Composite yellow, red, and white cables to connect, make sure they're connected to the TV's L and R AUDIO INPUT jacks. Check your connections. Need help? 25 sanyo-av.com 1-800-877-5032 If using Y, Pb, Pr, remember to also connect the device's left and right audio output jacks to the green VIDEO INPUT, and the red and white AUDIO INPUT jacks.
Owners Manual
Page 29
.... · Product repair and/or part replacement because of programs, data or other information stored on how long an implied warranty lasts, so the above limitations or exclusions may not apply to the terms as set forth below. Recovery or reinstallation of improper installation or maintenance, connections to improper voltage supply, power line surge, lightning damage, retained images or screen markings resulting...
.... · Product repair and/or part replacement because of programs, data or other information stored on how long an implied warranty lasts, so the above limitations or exclusions may not apply to the terms as set forth below. Recovery or reinstallation of improper installation or maintenance, connections to improper voltage supply, power line surge, lightning damage, retained images or screen markings resulting...
Leaflet
Page 1
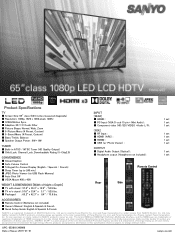
... sanyo-av.com INPUT [REAR] ■ HDMI3 : ■ PC Input (VGA D-sub 15 pin + Mini Audio) : ■ Component video (HD/SD)/VIDEO +Audio L/R : [SIDE] ■ RF Input : ■ HDMI1 (ARC) : ■ HDMI2 : ■ USB (w/ Photo Viewer) : OUTPUT ■ Digital Audio Output (Optical) : ■ Headphone output (Headphone not included): 1 set 1 set 1 set 1 set 1 set 1 set 1 set 1 set 1 set Remote Control Rear Side ACCESSORIES ■ Remote Control (Batteries not included) ■ Owner's Manual : English & Spanish & French ■ Quick Setup Guide: English & Spanish & French SANYO...
... sanyo-av.com INPUT [REAR] ■ HDMI3 : ■ PC Input (VGA D-sub 15 pin + Mini Audio) : ■ Component video (HD/SD)/VIDEO +Audio L/R : [SIDE] ■ RF Input : ■ HDMI1 (ARC) : ■ HDMI2 : ■ USB (w/ Photo Viewer) : OUTPUT ■ Digital Audio Output (Optical) : ■ Headphone output (Headphone not included): 1 set 1 set 1 set 1 set 1 set 1 set 1 set 1 set 1 set Remote Control Rear Side ACCESSORIES ■ Remote Control (Batteries not included) ■ Owner's Manual : English & Spanish & French ■ Quick Setup Guide: English & Spanish & French SANYO...


