User Manual (ENGLISH)
Page 4
... the Player with Samsung Media Studio 20 4 Chapter 3. Preparation Basic Information 6 Components 6 Screen Display Information 9 Button Functions 10 Charging the battery 11 Basic Use 12 Chapter 2. Loading Your Desired File Loading Your Desired File 16 Installing Samsung Media Studio 16 Connecting to your PC 17 Adding Folders/Files in Samsung Media Studio 18 Transferring Files to FM Radio 47 Setting a Frequency 49 To Delete Presets 51 Using FM Radio menu 52 Recording 53 Recording 53 Voice/FM Radio Recording 54 Recorded File...
... the Player with Samsung Media Studio 20 4 Chapter 3. Preparation Basic Information 6 Components 6 Screen Display Information 9 Button Functions 10 Charging the battery 11 Basic Use 12 Chapter 2. Loading Your Desired File Loading Your Desired File 16 Installing Samsung Media Studio 16 Connecting to your PC 17 Adding Folders/Files in Samsung Media Studio 18 Transferring Files to FM Radio 47 Setting a Frequency 49 To Delete Presets 51 Using FM Radio menu 52 Recording 53 Recording 53 Voice/FM Radio Recording 54 Recorded File...

User Manual (ENGLISH)
Page 10
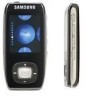
Basic Information Button Functions Buttons Functions and Use s Press and hold to move to an upper item/menu. s Press to return to /delete from the beginning. s Press to set section repetition, stop recording and add to the previous stage. s Press and hold to next track. s Press to move to start recording. s Press and hold to display the menu screen. s Press to move to quickly scan tracks. s Press to reduce the...
Basic Information Button Functions Buttons Functions and Use s Press and hold to move to an upper item/menu. s Press to return to /delete from the beginning. s Press to set section repetition, stop recording and add to the previous stage. s Press and hold to next track. s Press to move to start recording. s Press and hold to display the menu screen. s Press to move to quickly scan tracks. s Press to reduce the...

User Manual (ENGLISH)
Page 17
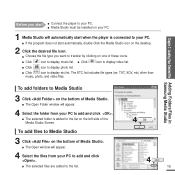
... USB port ( ) on your PC. Chapter 2. Loading Your Desired File Installing Samsung Media Studio/ Connecting to your PC 1 2 1 Connect the larger end of the USB cable to the USB Connection Port on the screen display of free hard disc space s USB Port 2.0 s CD Rom Drive (2X or higher) s Windows XP Service Pack 2 or higher s Windows Media Player 10.0 or higher s DirectX 9.0 or higher s Resolution 1024 X 768 or higher 17 Use the USB Cable provided when connecting the player...
... USB port ( ) on your PC. Chapter 2. Loading Your Desired File Installing Samsung Media Studio/ Connecting to your PC 1 2 1 Connect the larger end of the USB cable to the USB Connection Port on the screen display of free hard disc space s USB Port 2.0 s CD Rom Drive (2X or higher) s Windows XP Service Pack 2 or higher s Windows Media Player 10.0 or higher s DirectX 9.0 or higher s Resolution 1024 X 768 or higher 17 Use the USB Cable provided when connecting the player...
User Manual (ENGLISH)
Page 19
... Open Folder window will appear. 4 Select the files from your PC. The ETC list includes file types (ex: TXT, XOV, etc) other than music, photo, and video files. s The selected files are added to display music list. s Click icon to the list. 4 4 19 s The selected folder is connected to add and click . s Media Studio must be installed on the left side of Media Studio. Loading Your Desired File Adding Folders/Files in Samsung Media...
... Open Folder window will appear. 4 Select the files from your PC. The ETC list includes file types (ex: TXT, XOV, etc) other than music, photo, and video files. s The selected files are added to display music list. s Click icon to the list. 4 4 19 s The selected folder is connected to add and click . s Media Studio must be installed on the left side of Media Studio. Loading Your Desired File Adding Folders/Files in Samsung Media...
User Manual (ENGLISH)
Page 21
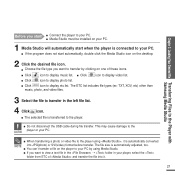
... video file to view a text file in the ➝ folder in the left file list. 4 Click icon. Loading Your Desired File Transferring Files to the Player with Samsung Media Studio Before you want to the player using Media Studio. s Click icon to display video list. s Click icon to display photo list. s If the program does not start automatically, double click the Media Studio icon on one of and transfer the file into it is connected...
... video file to view a text file in the ➝ folder in the left file list. 4 Click icon. Loading Your Desired File Transferring Files to the Player with Samsung Media Studio Before you want to the player using Media Studio. s Click icon to display video list. s Click icon to display photo list. s If the program does not start automatically, double click the Media Studio icon on one of and transfer the file into it is connected...
User Manual (ENGLISH)
Page 22
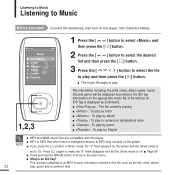
... menu. Listening to Music Listening to Music Before you press the [ ] button in numeric or alphabetical order s : To play by genre s : To play by album s : To play on the screen and the Street mode is attached to an MP3 to carry information relevant to On. s If you start! s MP1 or MP2 files which have a changed extension to the ID3 tag information on the player...
... menu. Listening to Music Listening to Music Before you press the [ ] button in numeric or alphabetical order s : To play by genre s : To play by album s : To play on the screen and the Street mode is attached to an MP3 to carry information relevant to On. s If you start! s MP1 or MP2 files which have a changed extension to the ID3 tag information on the player...

User Manual (ENGLISH)
Page 31
...:42 00:05:06 then press the [ ] button. Multimedia Function To Play a Playlist/Using Music menu To select Street mode This allows you are in the music playback mode. 2 Press the [ ] button to select and then press the [ ] button. 3 Press the [ ] button to Music Using Music menu Chapter 3. It must be set in this menu. s Select . s The User EQ cannot be set in the Settings menu. √ Page 59 NOTE 31
...:42 00:05:06 then press the [ ] button. Multimedia Function To Play a Playlist/Using Music menu To select Street mode This allows you are in the music playback mode. 2 Press the [ ] button to select and then press the [ ] button. 3 Press the [ ] button to Music Using Music menu Chapter 3. It must be set in this menu. s Select . s The User EQ cannot be set in the Settings menu. √ Page 59 NOTE 31

User Manual (ENGLISH)
Page 32
... the desired background 00:01:42 00:05:06 image and then press the [ ] button. s Selecting will play a to Music Using Music menu (Continued) To select Play mode (Repeat) Street Mode DNSe Play Mode Music Backgrou.. s If there is played. Listening to background image each time a different file is an image contained in size. s Select either or . Street Mode DNSe Play Mode Music Backgrou.. s : To play files at random. To select a background image for Music mode You can set a background image for Music mode.
... the desired background 00:01:42 00:05:06 image and then press the [ ] button. s Selecting will play a to Music Using Music menu (Continued) To select Play mode (Repeat) Street Mode DNSe Play Mode Music Backgrou.. s If there is played. Listening to background image each time a different file is an image contained in size. s Select either or . Street Mode DNSe Play Mode Music Backgrou.. s : To play files at random. To select a background image for Music mode You can set a background image for Music mode.

User Manual (ENGLISH)
Page 40
NOTE 40 s This returns to display the Zoom Setting menu. s Press the [ ] button in the Photo Viewing mode to the original size. Photo Viewing Using Photo menu Photo Enlarging 1 Press the [MENU] while viewing a photo 100% 2 Press the [ ] button to select and then press 200% the [ ] button. 400% s The Zoom Setting menu appears. 3 Press the [ ] button to the portion of the photo 5 To cancel the magnification, select from the Zoom options and then press...
NOTE 40 s This returns to display the Zoom Setting menu. s Press the [ ] button in the Photo Viewing mode to the original size. Photo Viewing Using Photo menu Photo Enlarging 1 Press the [MENU] while viewing a photo 100% 2 Press the [ ] button to select and then press 200% the [ ] button. 400% s The Zoom Setting menu appears. 3 Press the [ ] button to the portion of the photo 5 To cancel the magnification, select from the Zoom options and then press...
User Manual (ENGLISH)
Page 42
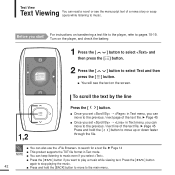
... and hold the [BACK] button to move to move to play a music while viewing text. For instructions on transferring a text file to the player, refer to select Text and then press the [ ] button. To scroll the text by the line 1,2 Press the [ ] button. s Press the [ ] button if you select . Turn on the screen. s You can also use the to music. s Once you set ¡ in Text menu, you...
... and hold the [BACK] button to move to move to play a music while viewing text. For instructions on transferring a text file to the player, refer to select Text and then press the [ ] button. To scroll the text by the line 1,2 Press the [ ] button. s Press the [ ] button if you select . Turn on the screen. s You can also use the to music. s Once you set ¡ in Text menu, you...

User Manual (ENGLISH)
Page 49
... 1 Press the [MENU] button in FM Radio mode. 2 Press the [ ] button to FM Radio Setting a Frequency Chapter 3. s The window will be set up to 30 frequencies will appear. 3 Press the [ ] button to Preset Mo.. s If is canceled and frequencies set automatically. NOTE 49 s The Auto Preset Confirm window will be deleted. Listening to select and then press the [ ] button. s The auto preset setting is selected...
... 1 Press the [MENU] button in FM Radio mode. 2 Press the [ ] button to FM Radio Setting a Frequency Chapter 3. s The window will be set up to 30 frequencies will appear. 3 Press the [ ] button to Preset Mo.. s If is canceled and frequencies set automatically. NOTE 49 s The Auto Preset Confirm window will be deleted. Listening to select and then press the [ ] button. s The auto preset setting is selected...

User Manual (ENGLISH)
Page 52
... FM Radio Using FM Radio menu To set FM sensitivity Go to Preset Mo.. s You can be received. s The FM Region menu appears. 3 Press the [ ] button to select the search level and then press the [ ] button. Japan: ...change the FM region, the previously stored radio frequencies are removed. s The higher FM Sensitivity is, the more frequencies can select from and . s You can select from . Add to Preset Auto Preset FM Region FM Sensitivity 52 1 Press the [MENU] button in FM Radio mode. 2 Press the [ ] button to select and then press the [ ] button. Add to Preset Auto...
... FM Radio Using FM Radio menu To set FM sensitivity Go to Preset Mo.. s You can be received. s The FM Region menu appears. 3 Press the [ ] button to select the search level and then press the [ ] button. Japan: ...change the FM region, the previously stored radio frequencies are removed. s The higher FM Sensitivity is, the more frequencies can select from and . s You can select from . Add to Preset Auto Preset FM Region FM Sensitivity 52 1 Press the [MENU] button in FM Radio mode. 2 Press the [ ] button to select and then press the [ ] button. Add to Preset Auto...

User Manual (ENGLISH)
Page 58
... save the menu. s Press and hold the [BACK] button to move to the next item. - Press the [ ] button to select and then press the [ ] button. s The Music menu appears. 3 Use the [ ] and [ ] buttons to set detailed settings for approximately 1 minute in the Settings screen, settings will be canceled and the player will return to the last function you were using. 58 Press the [ ] button to move to the main menu. Settings Music Record Time Display...
... save the menu. s Press and hold the [BACK] button to move to the next item. - Press the [ ] button to select and then press the [ ] button. s The Music menu appears. 3 Use the [ ] and [ ] buttons to set detailed settings for approximately 1 minute in the Settings screen, settings will be canceled and the player will return to the last function you were using. 58 Press the [ ] button to move to the main menu. Settings Music Record Time Display...

User Manual (ENGLISH)
Page 63
s The Display menu appears. 3 Use the [ ] and [ ] buttons to your listening experience. When is played. You can select a background image to add to set the desired functions s : You can set the background color for text. Settings Setting Display You can set the background color for the display screen. Select either vertically or horizontally. Choose one from . 63 Setting Time/ Setting Display s The Settings menu appears. 2 Press the [ ] button to select and then press...
s The Display menu appears. 3 Use the [ ] and [ ] buttons to your listening experience. When is played. You can select a background image to add to set the desired functions s : You can set the background color for text. Settings Setting Display You can set the background color for the display screen. Select either vertically or horizontally. Choose one from . 63 Setting Time/ Setting Display s The Settings menu appears. 2 Press the [ ] button to select and then press...

User Manual (ENGLISH)
Page 65
... set the desired functions s : You can set to the default value. s The System menu appears. 3 Use the [ ] and [ ] buttons to select and then press the [ ] button. Select either or . The maximum volume level when Volume Limit is set the start window after playback is 40. s : Displays the current firmware version. 65 Setting Language/ Setting System s : Returns all settings to is stopped. If set to , the last file will play...
... set the desired functions s : You can set to the default value. s The System menu appears. 3 Use the [ ] and [ ] buttons to select and then press the [ ] button. Select either or . The maximum volume level when Volume Limit is set the start window after playback is 40. s : Displays the current firmware version. 65 Setting Language/ Setting System s : Returns all settings to is stopped. If set to , the last file will play...
User Manual (ENGLISH)
Page 67
... on the sound mode and display setting. Make sure to reset the system. s Press and hold the [MENU] and [A B/ ] buttons at the same time to your PC, the file transfer rate will be low. s Check if the [HOLD] switch is stated in the direction of your PC to run Windows Update. Power is experienced, check the following If the problem persists, contact 1-800-SAMSUNG for extended periods in...
... on the sound mode and display setting. Make sure to reset the system. s Press and hold the [MENU] and [A B/ ] buttons at the same time to your PC, the file transfer rate will be low. s Check if the [HOLD] switch is stated in the direction of your PC to run Windows Update. Power is experienced, check the following If the problem persists, contact 1-800-SAMSUNG for extended periods in...

User Manual (ENGLISH)
Page 68
... also to the product. Check if the USB cable has been disconnected during Play. Abnormal Play Time Display during file or data transmission. Move to reset the system. This has no effect on the product life or functions. File upload is enough battery power. s Press and hold the [MENU] and [A B/ ] buttons at the same time to ¡ ¡ in the memory. Reconnect if necessary. s Check if there...
... also to the product. Check if the USB cable has been disconnected during Play. Abnormal Play Time Display during file or data transmission. Move to reset the system. This has no effect on the product life or functions. File upload is enough battery power. s Press and hold the [MENU] and [A B/ ] buttons at the same time to ¡ ¡ in the memory. Reconnect if necessary. s Check if there...

User Manual (ENGLISH)
Page 69
Menu Select Screen Music File Browser FM Radio Text Photo Video Game Record Settings Chapter 6. Appendix Troubleshooting/ Menu Tree Music Street Mode DNSe 3D User Set User EQ Set Play Mode Play Speed Skip Interval Record Time FM Recording Bit Rate Date/Time Set Voice Recording Bit Rate Sleep Timer LCD Off Auto Power Off Screen Saver Display Color Theme Music Background Text Viewer Color Text Viewer Type LCD Brightness Language Menu ID3 Tag System Booting Mode Resume Button Sound Volume Limit Default Set Memory Firmware Version 69 Menu Tree You can quickly view the...
Menu Select Screen Music File Browser FM Radio Text Photo Video Game Record Settings Chapter 6. Appendix Troubleshooting/ Menu Tree Music Street Mode DNSe 3D User Set User EQ Set Play Mode Play Speed Skip Interval Record Time FM Recording Bit Rate Date/Time Set Voice Recording Bit Rate Sleep Timer LCD Off Auto Power Off Screen Saver Display Color Theme Music Background Text Viewer Color Text Viewer Type LCD Brightness Language Menu ID3 Tag System Booting Mode Resume Button Sound Volume Limit Default Set Memory Firmware Version 69 Menu Tree You can quickly view the...

User Manual (ENGLISH)
Page 70
... Power Built-in Battery Power File Compatibility Supported Number of folders and Files Earphone Output Output Frequency Range Noise Ratio Play Time Temperature Range for Operation Case Weight Dimension (WxHxD) YP-T9 3.7V (Li-Polymer Rechargeable) 740 mAh AUDIO: MPEG1/2/2.5 Layer3(8kbps~320kbps, 8kHz~48kHz), WMA(5kbps~320kbps,8kHz~48kHz) Video: SVI (Video: MPEG4, Audio: MP3 (44.1kHZ, 128kbps), Resolution: 208X176, Frame Rate: 15fps) Image: JPG (Progressive, Sequential Scanning, File Size...
... Power Built-in Battery Power File Compatibility Supported Number of folders and Files Earphone Output Output Frequency Range Noise Ratio Play Time Temperature Range for Operation Case Weight Dimension (WxHxD) YP-T9 3.7V (Li-Polymer Rechargeable) 740 mAh AUDIO: MPEG1/2/2.5 Layer3(8kbps~320kbps, 8kHz~48kHz), WMA(5kbps~320kbps,8kHz~48kHz) Video: SVI (Video: MPEG4, Audio: MP3 (44.1kHZ, 128kbps), Resolution: 208X176, Frame Rate: 15fps) Image: JPG (Progressive, Sequential Scanning, File Size...

User Manual (ENGLISH)
Page 74
... been removed or changed after the original purchase of the product from the dealer. 2.Samsung's obligations are to the Authorized Service Centers contact; 1-800-SAMSUNG (1-800-726-7864) www.samsung.com WARRANTY CONDITIONS: 1.The warranty is only valid when the warranty card is limited to the retailer from the original date of purchase. Repair or direct replacement under normal use and service...
... been removed or changed after the original purchase of the product from the dealer. 2.Samsung's obligations are to the Authorized Service Centers contact; 1-800-SAMSUNG (1-800-726-7864) www.samsung.com WARRANTY CONDITIONS: 1.The warranty is only valid when the warranty card is limited to the retailer from the original date of purchase. Repair or direct replacement under normal use and service...


