
User Manual Ver.1.0 (English)
Page 6
... record a video by selecting a mode. Extended functions 42 Learn how to play back photos or videos, and edit photos. Shooting options 61 Learn how to configure your computer or TV. Appendixes 135 Get information about your camera's layout, icons, and basic functions for shooting. ...
... record a video by selecting a mode. Extended functions 42 Learn how to play back photos or videos, and edit photos. Shooting options 61 Learn how to configure your computer or TV. Appendixes 135 Get information about your camera's layout, icons, and basic functions for shooting. ...

User Manual Ver.1.0 (English)
Page 7
for all scenes or modes. In these cases, you must select to get a better photo. 3AvParielassb[le/in this manual Icon Function Additional information Safety warnings and precautions [ ] Camera buttons. EV : 0 Darker (-) Neutral (0) 1 In ...easlnidder or touch +/- For example, [Shutter] represents the shutter button. ( ) Page number of related information The order of the ambient light, your photos may not support functions for → example: Select Face Detection → Normal (represents Select Face Detection, and then select Normal). * Annotation Shooting ...
for all scenes or modes. In these cases, you must select to get a better photo. 3AvParielassb[le/in this manual Icon Function Additional information Safety warnings and precautions [ ] Camera buttons. EV : 0 Darker (-) Neutral (0) 1 In ...easlnidder or touch +/- For example, [Shutter] represents the shutter button. ( ) Page number of related information The order of the ambient light, your photos may not support functions for → example: Select Face Detection → Normal (represents Select Face Detection, and then select Normal). * Annotation Shooting ...
User Manual Ver.1.0 (English)
Page 8
... in a scene, such as a person, animal, or still life • Background: The objects around the subject • Composition: The combination of light that enters your photos will be darker or lighter. Half-press [Shutter] Press [Shutter] Subject, background, and composition • Subject: The main object in this manual Pressing the shutter...
... in a scene, such as a person, animal, or still life • Background: The objects around the subject • Composition: The combination of light that enters your photos will be darker or lighter. Half-press [Shutter] Press [Shutter] Subject, background, and composition • Subject: The main object in this manual Pressing the shutter...

User Manual Ver.1.0 (English)
Page 10
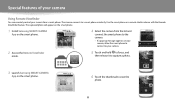
... to your camera, the photo is saved to the camera, and then transferred to the smart phone automatically. S pecial features of your camera Using AutoShare When you capture a photo with your camera. 2 Turn on the AutoShare feature. 3 Launch Samsung SMART CAMERA App on the... smart phone. 5 Capture a photo. • The captured photo is saved to the smart phone. 9
... to your camera, the photo is saved to the camera, and then transferred to the smart phone automatically. S pecial features of your camera Using AutoShare When you capture a photo with your camera. 2 Turn on the AutoShare feature. 3 Launch Samsung SMART CAMERA App on the... smart phone. 5 Capture a photo. • The captured photo is saved to the smart phone. 9
User Manual Ver.1.0 (English)
Page 12
... appear on the smart phone. 1 Install Samsung SMART CAMERA App on the smart phone. 4 Select the camera from the list and connect the smart phone to the camera. • If a pop-up message appears on the smart phone. 6 Touch the thumbnail to view the photo. 11 Use the smart phone as... Using Remote Viewfinder You can remotely control your camera. 2 Access the Remote Viewfinder mode. 5 Touch and hold to focus, and then release it to capture a photo. 3 Launch Samsung SMART CAMERA App on your camera, allow the smart phone to connect to your camera from a smart phone.
... appear on the smart phone. 1 Install Samsung SMART CAMERA App on the smart phone. 4 Select the camera from the list and connect the smart phone to the camera. • If a pop-up message appears on the smart phone. 6 Touch the thumbnail to view the photo. 11 Use the smart phone as... Using Remote Viewfinder You can remotely control your camera. 2 Access the Remote Viewfinder mode. 5 Touch and hold to focus, and then release it to capture a photo. 3 Launch Samsung SMART CAMERA App on your camera, allow the smart phone to connect to your camera from a smart phone.

User Manual Ver.1.0 (English)
Page 13
The example image may differ from the actual photo that you capture. 2 Capture a photo. 12 Macro You can capture close up shots of your camera Shooting samples - S pecial features of small subjects, such as flowers or insects. 1 Select the macro option ( ).
The example image may differ from the actual photo that you capture. 2 Capture a photo. 12 Macro You can capture close up shots of your camera Shooting samples - S pecial features of small subjects, such as flowers or insects. 1 Select the macro option ( ).

User Manual Ver.1.0 (English)
Page 14
This can occur if you use the flash. • Turn off the flash or avoid capturing photos in a dusty place. • Set ISO sensitivity options. (p. 67) Photos are blurred. The subject's eyes appear red. When the light source is behind the subject or when there is a high contrast between light... of backlighting. Basic troubleshooting Learn to Red-eye or Red-eye Fix. (p. 64) • If the photo has already been captured, select Red-eye Fix in the edit menu. (p. 98) Photos have dust spots. Red eye occurs when the subject's eyes reflect light from shaking. Subjects come out too ...
This can occur if you use the flash. • Turn off the flash or avoid capturing photos in a dusty place. • Set ISO sensitivity options. (p. 67) Photos are blurred. The subject's eyes appear red. When the light source is behind the subject or when there is a high contrast between light... of backlighting. Basic troubleshooting Learn to Red-eye or Red-eye Fix. (p. 64) • If the photo has already been captured, select Red-eye Fix in the edit menu. (p. 98) Photos have dust spots. Red eye occurs when the subject's eyes reflect light from shaking. Subjects come out too ...

User Manual Ver.1.0 (English)
Page 15
...eye/Red-eye Fix (to prevent or correct red-eye) 64 • Face Detection 73 • Self-Portrait 73 Capturing photos at night or in the dark • mode > Silhouette, Fireworks, Night 50 • Flash options 65 • ISO sensitivity (to... • Viewing files on a TV 99 • Connecting your camera to a computer 100 • Sending photos or videos via email 122 • Using photo or video sharing websites 123 • Adjusting sound and volume 131 • Adjusting the brightness of the display ...
...eye/Red-eye Fix (to prevent or correct red-eye) 64 • Face Detection 73 • Self-Portrait 73 Capturing photos at night or in the dark • mode > Silhouette, Fireworks, Night 50 • Flash options 65 • ISO sensitivity (to... • Viewing files on a TV 99 • Connecting your camera to a computer 100 • Sending photos or videos via email 122 • Using photo or video sharing websites 123 • Adjusting sound and volume 131 • Adjusting the brightness of the display ...

User Manual Ver.1.0 (English)
Page 16
...by touch 32 Setting the display and sound 34 Setting the display type 34 Setting the sound 35 Capturing photos ...36 Zooming ...37 Reducing camera shake (OIS 39 Tips for getting a clearer photo 40 Extended functions ...42 Using the Smart Auto mode 43 Using the Program mode 45 Using the Aperture ... 51 Using the Magic Plus mode 53 Using the My Magic Frame mode 53 Using the Split Shot mode 55 Using the Motion Photo mode 56 Using the Photo Filter mode 57 Using the Movie Filter mode 58 Recording a video 59 Recording a video with the Smart Scene Detection function 60 ...
...by touch 32 Setting the display and sound 34 Setting the display type 34 Setting the sound 35 Capturing photos ...36 Zooming ...37 Reducing camera shake (OIS 39 Tips for getting a clearer photo 40 Extended functions ...42 Using the Smart Auto mode 43 Using the Program mode 45 Using the Aperture ... 51 Using the Magic Plus mode 53 Using the My Magic Frame mode 53 Using the Split Shot mode 55 Using the Motion Photo mode 56 Using the Photo Filter mode 57 Using the Movie Filter mode 58 Recording a video 59 Recording a video with the Smart Scene Detection function 60 ...

User Manual Ver.1.0 (English)
Page 17
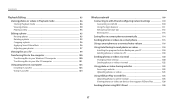
Contents Shooting options ...61 Selecting a resolution and quality 62 Selecting a resolution 62 Selecting a photo quality 63 Shooting in the dark 64 Preventing red-eye 64 Using the flash ...64 Setting a flash option 65 Adjusting the ISO sensitivity 67 Changing ... exposure manually (EV 76 Compensating for backlighting (ACB 77 Changing the metering option 77 Selecting a White Balance setting 78 Using burst modes 81 Capturing continuous photos 81 Using the timer ...82 Capturing bracketed photos 82 Adjusting images ...83 Reducing the sound of the zoom 84 16
Contents Shooting options ...61 Selecting a resolution and quality 62 Selecting a resolution 62 Selecting a photo quality 63 Shooting in the dark 64 Preventing red-eye 64 Using the flash ...64 Setting a flash option 65 Adjusting the ISO sensitivity 67 Changing ... exposure manually (EV 76 Compensating for backlighting (ACB 77 Changing the metering option 77 Selecting a White Balance setting 78 Using burst modes 81 Capturing continuous photos 81 Using the timer ...82 Capturing bracketed photos 82 Adjusting images ...83 Reducing the sound of the zoom 84 16
User Manual Ver.1.0 (English)
Page 18
... videos in Playback mode 86 Starting Playback mode 86 Viewing photos ...90 Playing a video ...93 Editing a photo ...95 Resizing photos ...95 Rotating a photo ...95 Cropping a photo ...96 Applying Smart Filter effects 96 Adjusting your photos 97 Viewing files on a TV 99 Transferring files to the computer 100 Transferring files to your... 110 Using the login browser 111 Network connection tips 112 Entering text ...113 Saving files to a smart phone automatically 114 Sending photos or videos to a smart phone 115 Using a smart phone as a remote shutter release 116 Using Auto Backup to send...
... videos in Playback mode 86 Starting Playback mode 86 Viewing photos ...90 Playing a video ...93 Editing a photo ...95 Resizing photos ...95 Rotating a photo ...95 Cropping a photo ...96 Applying Smart Filter effects 96 Adjusting your photos 97 Viewing files on a TV 99 Transferring files to the computer 100 Transferring files to your... 110 Using the login browser 111 Network connection tips 112 Entering text ...113 Saving files to a smart phone automatically 114 Sending photos or videos to a smart phone 115 Using a smart phone as a remote shutter release 116 Using Auto Backup to send...

User Manual Ver.1.0 (English)
Page 20
... 31 Selecting with buttons 31 Selecting by touch 32 Setting the display and sound 34 Setting the display type 34 Setting the sound 35 Capturing photos 36 Zooming 37 Reducing camera shake (OIS 39 Tips for shooting. Basic functions Learn about your camera 25 Performing the initial setup 26 Learning icons...
... 31 Selecting with buttons 31 Selecting by touch 32 Setting the display and sound 34 Setting the display type 34 Setting the sound 35 Capturing photos 36 Zooming 37 Reducing camera shake (OIS 39 Tips for shooting. Basic functions Learn about your camera 25 Performing the initial setup 26 Learning icons...
User Manual Ver.1.0 (English)
Page 23
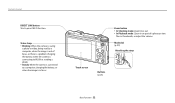
... by a computer, when the image is out of focus, or there is a problem charging the battery, when the camera is connecting to WLAN or sending a photo • Steady: When the camera is connected to a computer, charging the battery, or when the image is in focus Zoom button • In Shooting mode...: Zoom in or out • In Playback mode: Zoom in on part of a photo or view files as thumbnails, or adjust the volume Mode dial (p. 29) Attaching the strap Touch screen Buttons (p. 23) Basic functions 22
... by a computer, when the image is out of focus, or there is a problem charging the battery, when the camera is connecting to WLAN or sending a photo • Steady: When the camera is connected to a computer, charging the battery, or when the image is in focus Zoom button • In Shooting mode...: Zoom in or out • In Playback mode: Zoom in on part of a photo or view files as thumbnails, or adjust the volume Mode dial (p. 29) Attaching the strap Touch screen Buttons (p. 23) Basic functions 22

User Manual Ver.1.0 (English)
Page 29
... 1 Shooting information Icon Description Shooting mode Aperture value Shutter speed Available recording time Exposure value Current date Current time Available number of photos Icon Description Memory card inserted • : Fully charged • : Partially charged • : Empty (Recharge) • ...with the charger) Auto focus frame Camera shake Zoom indicator Photo resolution when the Intelli zoom is on Zoom ratio Histogram (p. 34) 2 Shooting option Icon Description ISO sensitivity Flash Photo resolution Video resolution Icon Description Frame rate (per second) ...
... 1 Shooting information Icon Description Shooting mode Aperture value Shutter speed Available recording time Exposure value Current date Current time Available number of photos Icon Description Memory card inserted • : Fully charged • : Partially charged • : Empty (Recharge) • ...with the charger) Auto focus frame Camera shake Zoom indicator Photo resolution when the Intelli zoom is on Zoom ratio Histogram (p. 34) 2 Shooting option Icon Description ISO sensitivity Flash Photo resolution Video resolution Icon Description Frame rate (per second) ...
User Manual Ver.1.0 (English)
Page 30
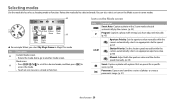
... the mode dial to another mode screen. Icons on the Mode screen in some modes. 1 My Magic Split Shot Motion Photo Frame Photo Filter 2 Movie Photo Filter Editor ▲ For example: When you have adjusted manually. (p. 45) Aperture Priority: Set the aperture value manually while.... (p. 48) Manual: Adjust both the aperture value and the shutter speed manually. (p. 49) Smart: Capture a photo with options that are preset for a specific scene. (p. 50) Panorama: Capture and combine a series of photos to create a panoramic image. (p. 51) Basic functions 29 Mode icons 2 • Press [ / / / ...
... the mode dial to another mode screen. Icons on the Mode screen in some modes. 1 My Magic Split Shot Motion Photo Frame Photo Filter 2 Movie Photo Filter Editor ▲ For example: When you have adjusted manually. (p. 45) Aperture Priority: Set the aperture value manually while.... (p. 48) Manual: Adjust both the aperture value and the shutter speed manually. (p. 49) Smart: Capture a photo with options that are preset for a specific scene. (p. 50) Panorama: Capture and combine a series of photos to create a panoramic image. (p. 51) Basic functions 29 Mode icons 2 • Press [ / / / ...

User Manual Ver.1.0 (English)
Page 31
...) Motion Photo: Capture and combine a series of photos, and then select an area to be animated to create a GIF animation. (p. 56) Photo Filter: Capture a photo with various filter effects. (p. 57) Movie Filter: Record a video with various filter effects. (p. 58) Photo Editor: Edit photos with various... effects. (p. 95) Settings: Adjust settings to match your preferences. (p. 129) Icon Description MobileLink: Send photos or videos to a smart phone. (p. 115) Remote Viewfinder: Use a smart...
...) Motion Photo: Capture and combine a series of photos, and then select an area to be animated to create a GIF animation. (p. 56) Photo Filter: Capture a photo with various filter effects. (p. 57) Movie Filter: Record a video with various filter effects. (p. 58) Photo Editor: Edit photos with various... effects. (p. 95) Settings: Adjust settings to match your preferences. (p. 129) Icon Description MobileLink: Send photos or videos to a smart phone. (p. 115) Remote Viewfinder: Use a smart...

User Manual Ver.1.0 (English)
Page 34
... or pencils, to the screen. • Depending on the screen, and then drag your finger across the screen. My Magic Split Shot Motion Photo Frame Photo Filter Movie Photo Filter Editor Dragging: Touch and hold an area on the viewing angle, the screen may appear dim. Selecting options or menus Learning touch gestures...
... or pencils, to the screen. • Depending on the screen, and then drag your finger across the screen. My Magic Split Shot Motion Photo Frame Photo Filter Movie Photo Filter Editor Dragging: Touch and hold an area on the viewing angle, the screen may appear dim. Selecting options or menus Learning touch gestures...

User Manual Ver.1.0 (English)
Page 35
Setting the display type You can select a display type for the Shooting or Playback mode. About histograms A histogram is a graph that the photo is related to color information. Press [ ] repeatedly to change the basic display information and sound settings. Mode Shooting Playback Display type • Hide all information ... a high peak on the right of the graph means that illustrates how light is underexposed and will appear washed out. A peak on the left, the photo is distributed in your...
Setting the display type You can select a display type for the Shooting or Playback mode. About histograms A histogram is a graph that the photo is related to color information. Press [ ] repeatedly to change the basic display information and sound settings. Mode Shooting Playback Display type • Hide all information ... a high peak on the right of the graph means that illustrates how light is underexposed and will appear washed out. A peak on the left, the photo is distributed in your...

User Manual Ver.1.0 (English)
Page 36
On The camera emits sounds. Press [ ] repeatedly. • Hide the option display. • Show the option display. Setting the display and sound Setting the option display view You can hide or show the option display appearing in Photo Filter mode Setting the sound Turn the sound your camera emits when you perform functions on or off. 1 Rotate the mode dial to . 2 Select Sound → Beep Sound. 3 Select an option. Basic functions 35 Option display OK : Panel off ▲ For example, in some modes. Option Description Off The camera does not emit any sounds.
On The camera emits sounds. Press [ ] repeatedly. • Hide the option display. • Show the option display. Setting the display and sound Setting the option display view You can hide or show the option display appearing in Photo Filter mode Setting the sound Turn the sound your camera emits when you perform functions on or off. 1 Rotate the mode dial to . 2 Select Sound → Beep Sound. 3 Select an option. Basic functions 35 Option display OK : Panel off ▲ For example, in some modes. Option Description Off The camera does not emit any sounds.

User Manual Ver.1.0 (English)
Page 37
Capturing photos Learn how to capture photos easily and quickly in Smart Auto mode. 1 Rotate the mode dial to . 2 Align your subject in the frame. 3 Half-press [Shutter] to focus. • A green frame means the subject is in focus. • A red frame means the subject is out of focus. 4 Press [Shutter] to capture a photo. 5 Press [ ] to view the captured photo. • To delete the photo, press [ ], and then select Yes. 6 Press [ ] to return to get clearer photos. Basic functions 36 See page 40 for tips to Shooting mode.
Capturing photos Learn how to capture photos easily and quickly in Smart Auto mode. 1 Rotate the mode dial to . 2 Align your subject in the frame. 3 Half-press [Shutter] to focus. • A green frame means the subject is in focus. • A red frame means the subject is out of focus. 4 Press [Shutter] to capture a photo. 5 Press [ ] to view the captured photo. • To delete the photo, press [ ], and then select Yes. 6 Press [ ] to return to get clearer photos. Basic functions 36 See page 40 for tips to Shooting mode.


