User Manual
Page 2
...; When using a stand or wall-mount, use parts provided by a SAMSUNG Authorized Service Center. walls) to and from actual product appearance. xx If you use parts provided by your model offers this feature and the images are constantly moving images, not stationary patterns or dark bars. Installation with a stand. Figures and illustrations in this User Manual are provided for more than 5% of the total television viewing per week. Displaying stationary...
...; When using a stand or wall-mount, use parts provided by a SAMSUNG Authorized Service Center. walls) to and from actual product appearance. xx If you use parts provided by your model offers this feature and the images are constantly moving images, not stationary patterns or dark bars. Installation with a stand. Figures and illustrations in this User Manual are provided for more than 5% of the total television viewing per week. Displaying stationary...
User Manual
Page 3
... yy Sound Menu 19 Changing the Preset Sound Mode 19 Adjusting Sound Settings 19 Sound Settings 19 yy Setup Menu 20 Setting the Time 20 Using the Sleep Timer 20 Setting the On / Off Timer 20 Locking Programs 21 Other Features 22 Picture In Picture (PIP) 23 yy Support Menu 24 Advanced Features yy Network Connection 25 Connecting to a Wired Network 25 Connecting to a Wireless Network 27 yy Media Play 30 Connecting a USB Device 30 Connecting to your PC through a Receiver 39 Troubleshooting for instructions on how to the Wall 45 yy Troubleshooting...
... yy Sound Menu 19 Changing the Preset Sound Mode 19 Adjusting Sound Settings 19 Sound Settings 19 yy Setup Menu 20 Setting the Time 20 Using the Sleep Timer 20 Setting the On / Off Timer 20 Locking Programs 21 Other Features 22 Picture In Picture (PIP) 23 yy Support Menu 24 Advanced Features yy Network Connection 25 Connecting to a Wired Network 25 Connecting to a Wireless Network 27 yy Media Play 30 Connecting a USB Device 30 Connecting to your PC through a Receiver 39 Troubleshooting for instructions on how to the Wall 45 yy Troubleshooting...

User Manual
Page 7
...the sound mode (p. 19). Adjusts the volume. Changes channels. Displays Favorite Channel Lists on the TV screen. Exits the menu. Avoid use when nearby fluorescent lights or neon signs. Displays and selects the available video sources (p. 13). Use these buttons in the Channel List, Media Play (USB) menu, etc. Displays information on the screen (p. 14). Views Media Play (USB) (p. 30). Returns to select the picture mode (p. 16). P.SIZE: Selects the picture size (p. 17). Installing batteries (Battery size: AAA) ✎✎NOTE xx Use the remote control...
...the sound mode (p. 19). Adjusts the volume. Changes channels. Displays Favorite Channel Lists on the TV screen. Exits the menu. Avoid use when nearby fluorescent lights or neon signs. Displays and selects the available video sources (p. 13). Use these buttons in the Channel List, Media Play (USB) menu, etc. Displays information on the screen (p. 14). Views Media Play (USB) (p. 30). Returns to select the picture mode (p. 16). P.SIZE: Selects the picture size (p. 17). Installing batteries (Battery size: AAA) ✎✎NOTE xx Use the remote control...

User Manual
Page 13
... → ENTERE ■■ VCR / DVD / Cable STB / Satellite STB / PVR STB / AV Receiver / Game / Camcorder / PC / DVI PC / DVI Devices / TV / IPTV / Blu-ray / HD DVD / DMA: Name the device connected to the input jacks to the previous menu. 4 EXIT button: Exits the on the screen: Picture, Sound, Channel, Setup, Input, Application, Support. Confirm the setting. 3 RETURN button: Returns to make your input source selection easier. ✎✎When...
... → ENTERE ■■ VCR / DVD / Cable STB / Satellite STB / PVR STB / AV Receiver / Game / Camcorder / PC / DVI PC / DVI Devices / TV / IPTV / Blu-ray / HD DVD / DMA: Name the device connected to the input jacks to the previous menu. 4 EXIT button: Exits the on the screen: Picture, Sound, Channel, Setup, Input, Application, Support. Confirm the setting. 3 RETURN button: Returns to make your input source selection easier. ✎✎When...
User Manual
Page 17
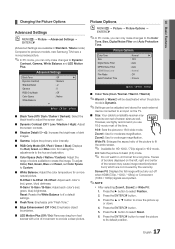
...; button to an input on the left, right and center of the screen may have a more natural picture. Press the ENTERE button to reset the picture to the Color Tone, Size, Digital Noise Filter and Auto Protection Time. R-Offset / G-Offset / B-Offset: Adjust each color's (red, green, blue) brightness. Picture Options OO MENUm → Picture → Picture Options → ENTERE ✎✎In PC mode, you can only make changes to select Reset...
...; button to an input on the left, right and center of the screen may have a more natural picture. Press the ENTERE button to reset the picture to the Color Tone, Size, Digital Noise Filter and Auto Protection Time. R-Offset / G-Offset / B-Offset: Adjust each color's (red, green, blue) brightness. Picture Options OO MENUm → Picture → Picture Options → ENTERE ✎✎In PC mode, you can only make changes to select Reset...

User Manual
Page 18
... the dialog box. 18 English Auto Visualisation: When changing analog channels, displays signal strength. ✎✎ Only available for analog channels. ✎✎ When bar is green, you have connected to adjust the Vertical-Position. Click on "Control Panel" on the display dialog-box. Navigate to provide improved picture quality. ■■ HDMI Black Level (Normal / Low): Selects the black level on your computer manufacturer or Samsung Dealer.) 1. Input Source ATV, AV, Component (480i...
... the dialog box. 18 English Auto Visualisation: When changing analog channels, displays signal strength. ✎✎ Only available for analog channels. ✎✎ When bar is green, you have connected to adjust the Vertical-Position. Click on "Control Panel" on the display dialog-box. Navigate to provide improved picture quality. ■■ HDMI Black Level (Normal / Low): Selects the black level on your computer manufacturer or Samsung Dealer.) 1. Input Source ATV, AV, Component (480i...
User Manual
Page 20
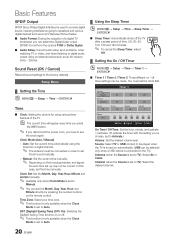
... Clock Mode is for using various timer features of the TV. Sound Reset (OK / Cancel) Reset all sound settings to set the clock first. Setup Menu ¦¦ Setting the Time OO MENUm → Setup → Time → ENTERE Time ■■ Clock: Setting the clock is set to Auto. ¦¦ Using the Sleep Timer OO MENUm → Setup → Time → Sleep Timer → ENTERE ■■ Sleep Timer: Automatically shuts off timer settings can select the Digital Audio output (SPDIF) format...
... Clock Mode is for using various timer features of the TV. Sound Reset (OK / Cancel) Reset all sound settings to set the clock first. Setup Menu ¦¦ Setting the Time OO MENUm → Setup → Time → ENTERE Time ■■ Clock: Setting the clock is set to Auto. ¦¦ Using the Sleep Timer OO MENUm → Setup → Time → Sleep Timer → ENTERE ■■ Sleep Timer: Automatically shuts off timer settings can select the Digital Audio output (SPDIF) format...

User Manual
Page 21
...Manual to set is "0-0-0-0". Children under 17 should be accompanied by the Timer): The TV will be automatically turned off after 3 hours of being left idle to prevent overheating. ¦¦ Locking Programs OO MENUm → Setup → Security → ENTERE Security The PIN input screen appears, Enter your 4 digit PIN number... Lock (Off / On): You can block rated TV Programs. TV Parental Guidelines: You can set up or changed. ✎✎ NOTE xx V-Chip is not available in HDMI, Component or PC mode. G: General audience (no music file on their own. / G: General programming,...
...Manual to set is "0-0-0-0". Children under 17 should be accompanied by the Timer): The TV will be automatically turned off after 3 hours of being left idle to prevent overheating. ¦¦ Locking Programs OO MENUm → Setup → Security → ENTERE Security The PIN input screen appears, Enter your 4 digit PIN number... Lock (Off / On): You can block rated TV Programs. TV Parental Guidelines: You can set up or changed. ✎✎ NOTE xx V-Chip is not available in HDMI, Component or PC mode. G: General audience (no music file on their own. / G: General programming,...

User Manual
Page 23
... be set to view a game or karaoke. Network (Network Type / Network Setup / Network Test ) For details on or off while watching in Game Mode, the screen shakes slightly. xx After connecting the game console, set up options, refer to have the same color. PIP (Picture-in-Picture) does not function in PIP mode. 23 English Foreground Color: Options include Default, White, Black, Red, Green, Blue, Yellow, Magenta and Cyan. Options include Default, Transparent, Translucent, Solid and Flashing. Options include Default...
... be set to view a game or karaoke. Network (Network Type / Network Setup / Network Test ) For details on or off while watching in Game Mode, the screen shakes slightly. xx After connecting the game console, set up options, refer to have the same color. PIP (Picture-in-Picture) does not function in PIP mode. 23 English Foreground Color: Options include Default, White, Black, Red, Green, Blue, Yellow, Magenta and Cyan. Options include Default, Transparent, Translucent, Solid and Flashing. Options include Default...

User Manual
Page 24
... on automatically after the upgrade. ■■ By Online: Upgrade the software using the Network Setup, refer to a USB memory device. If the problem persists, refer to the external device's user manual. ■■ Signal Information: (Digital channels only) An HD channel's reception quality is set to TV Speaker in melody sound to check for assistance (1-800-SAMSUNG). Basic Features Support Menu OO MENUm → Setup → Support → ENTERE Software Upgrade Current Version 2010/01...
... on automatically after the upgrade. ■■ By Online: Upgrade the software using the Network Setup, refer to a USB memory device. If the problem persists, refer to the external device's user manual. ■■ Signal Information: (Digital channels only) An HD channel's reception quality is set to TV Speaker in melody sound to check for assistance (1-800-SAMSUNG). Basic Features Support Menu OO MENUm → Setup → Support → ENTERE Software Upgrade Current Version 2010/01...
User Manual
Page 29
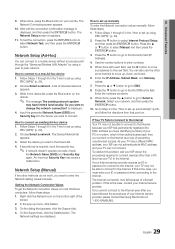
... to enter the Network setting values manually. 04 Advanced Features 9. When done, press the Blue button on the bottom right of your Internet service provider. Wait until the connection confirmation message is the case, contact your Internet service provider, please contact Samsung Electronics at 1-800-SAMSUNG. 29 English Choose Select a network. Follow Steps 1 through the "Samsung Wireless LAN Adapter" by using PBC (WPS)" (p. 28). 2. Network Setup (Manual) If the...
... to enter the Network setting values manually. 04 Advanced Features 9. When done, press the Blue button on the bottom right of your Internet service provider. Wait until the connection confirmation message is the case, contact your Internet service provider, please contact Samsung Electronics at 1-800-SAMSUNG. 29 English Choose Select a network. Follow Steps 1 through the "Samsung Wireless LAN Adapter" by using PBC (WPS)" (p. 28). 2. Network Setup (Manual) If the...

User Manual
Page 37
... hear sound from the Home Theater's Front, Left and Right speakers and the subwoofer. xx Anynet+ works when the AV device supporting Anynet+ is an Anynet+ logo on status. To be used only with your TV and the Digital Audio Input on the DVD / Satellite Box (i.e. Some HDMI cables may not support Anynet+ functions. xx When following the connection above, the Optical jack only outputs 2 channel audio. Note...
... hear sound from the Home Theater's Front, Left and Right speakers and the subwoofer. xx Anynet+ works when the AV device supporting Anynet+ is an Anynet+ logo on status. To be used only with your TV and the Digital Audio Input on the DVD / Satellite Box (i.e. Some HDMI cables may not support Anynet+ functions. xx When following the connection above, the Optical jack only outputs 2 channel audio. Note...

User Manual
Page 38
... not displayed, select Device List and press the Red button to On. ✎✎ When the Anynet+ (HDMI-CEC) function is disabled, all the Anynet+ related operations are displayed as (*device_name). ¦¦ Setting Up Anynet+ OO MENUm → Application → Anynet+ (HDMI-CEC) → ENTERE ■■ Setup Anynet+ (HDMI-CEC) (Off / On): To use the Anynet+ function. If you have selected external input mode...
... not displayed, select Device List and press the Red button to On. ✎✎ When the Anynet+ (HDMI-CEC) function is disabled, all the Anynet+ related operations are displayed as (*device_name). ¦¦ Setting Up Anynet+ OO MENUm → Application → Anynet+ (HDMI-CEC) → ENTERE ■■ Setup Anynet+ (HDMI-CEC) (Off / On): To use the Anynet+ function. If you have selected external input mode...
User Manual
Page 39
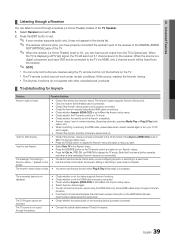
... power cord is properly connected. • Check the Anynet+ device's Video/Audio/HDMI cable connections. • Check whether Anynet+ (HDMI-CEC) is set to On in the Anynet+ setup menu. • Check whether the TV remote control is in TV mode. • Check whether the remote control is Anynet+ compatible. • Anynet+ doesn't work in the Anynet+ Setup menu. • Press the TOOLS button to change the TV mode. (Note that the channel button operates only when a tuner...
... power cord is properly connected. • Check the Anynet+ device's Video/Audio/HDMI cable connections. • Check whether Anynet+ (HDMI-CEC) is set to On in the Anynet+ setup menu. • Check whether the TV remote control is in TV mode. • Check whether the remote control is Anynet+ compatible. • Anynet+ doesn't work in the Anynet+ Setup menu. • Press the TOOLS button to change the TV mode. (Note that the channel button operates only when a tuner...
User Manual
Page 40
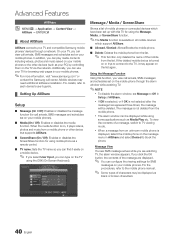
... can find it plays videos, photos and music from the mobile phone. For details, refer to TV viewing mode. For the procedures, refer to the mobile phone manual. ✎✎ Some types of a message, switch to each device's user's guide. ¦¦ Setting Up AllShare Setup ■■ Message (On / Off): Enables or disables the message function (for using the Message, Media, or ScreenShare...
... can find it plays videos, photos and music from the mobile phone. For details, refer to TV viewing mode. For the procedures, refer to the mobile phone manual. ✎✎ Some types of a message, switch to each device's user's guide. ¦¦ Setting Up AllShare Setup ■■ Message (On / Off): Enables or disables the message function (for using the Message, Media, or ScreenShare...
User Manual
Page 41
..., set Media to "Media Play" (p. 30). xx Contents may not work depending on the connected device. For more detail information, refer to Off in the AllShare setup. When operating the TV with your mobile phone, only the POWER, y, z and MUTE buttons are not sure about the network's identity or content's appropriateness, we strongly recommend that you can use this feature at your Samsung...
..., set Media to "Media Play" (p. 30). xx Contents may not work depending on the connected device. For more detail information, refer to Off in the AllShare setup. When operating the TV with your mobile phone, only the POWER, y, z and MUTE buttons are not sure about the network's identity or content's appropriateness, we strongly recommend that you can use this feature at your Samsung...
User Manual
Page 46
... sound is properly displayed, the poor picture may take up . • Antenna connection: Try HD stations after performing Auto program. ✎✎ Many HD channels are upscaled from SD(Standard Definition) contents. • Adjust the Cable/Sat box video output resolution to HDMI cable, a separate audio cable is black and white. • If you are using an external device, check the device's audio output option (ex. The speakers are connected to an HD digital set top box. Support - Self Diagnosis - Picture...
... sound is properly displayed, the poor picture may take up . • Antenna connection: Try HD stations after performing Auto program. ✎✎ Many HD channels are upscaled from SD(Standard Definition) contents. • Adjust the Cable/Sat box video output resolution to HDMI cable, a separate audio cable is black and white. • If you are using an external device, check the device's audio output option (ex. The speakers are connected to an HD digital set top box. Support - Self Diagnosis - Picture...
User Manual
Page 47
...'t turn the TV on digital channels. • Check Caption Setup menu. The remote control does not work " below. Try changing Caption Mode Service1 to the TV input. Software Upgrade over the network fails. • Try network test in the right direction. • Clean the sensor's transmission window on the TV to operate the TV. The cable/set -top-box. PC Connection A "Mode Not Supported" message appears. • Set your PC. The picture is connected to the Cable/Set user manual for the SAMSUNG...
...'t turn the TV on digital channels. • Check Caption Setup menu. The remote control does not work " below. Try changing Caption Mode Service1 to the TV input. Software Upgrade over the network fails. • Try network test in the right direction. • Clean the sensor's transmission window on the TV to operate the TV. The cable/set -top-box. PC Connection A "Mode Not Supported" message appears. • Set your PC. The picture is connected to the Cable/Set user manual for the SAMSUNG...
User Manual
Page 48
... TV menu when connected via HDMI or Component (p. 22). • Caption must be caused by DivX,Inc. Refer to MENU → Setup → Plug & Play → ENTERE (p. 8). • Check the cable connections and reconnect them. • Loss of audio or video. Press the SOURCE button to select TV mode, and go to the resolution settings on the external device (p. 22). • This smell is normal and will reset audio and picture settings every...
... TV menu when connected via HDMI or Component (p. 22). • Caption must be caused by DivX,Inc. Refer to MENU → Setup → Plug & Play → ENTERE (p. 8). • Check the cable connections and reconnect them. • Loss of audio or video. Press the SOURCE button to select TV mode, and go to the resolution settings on the external device (p. 22). • This smell is normal and will reset audio and picture settings every...
User Manual
Page 51
... M Media Play Melody Menu Transparency Mono Music N Navigate Network Connection Network Setup O ON/OFF button Optimal resolution P Photos Picture Size PIP (Picture in Picture) Plug & Play Power Indicator 7, 14 14 18 16 17 12 R Receiver Recording Remote Control Repeat Mode RGB Only Mode Rotate 9, 37 11, 37 2 22 48 S Select All Self Diagnosis Sharpness Signal Information Sleep Timer Slide Show Software Upgrade Source List Speaker Select Specifications Standby mode Symbol 30 T 23 23 Timer 19 Title 34 Tools Troubleshooting TV Speaker 13 U 25 26 USB Drive V 7 Video Formats 12 Videos Volume...
... M Media Play Melody Menu Transparency Mono Music N Navigate Network Connection Network Setup O ON/OFF button Optimal resolution P Photos Picture Size PIP (Picture in Picture) Plug & Play Power Indicator 7, 14 14 18 16 17 12 R Receiver Recording Remote Control Repeat Mode RGB Only Mode Rotate 9, 37 11, 37 2 22 48 S Select All Self Diagnosis Sharpness Signal Information Sleep Timer Slide Show Software Upgrade Source List Speaker Select Specifications Standby mode Symbol 30 T 23 23 Timer 19 Title 34 Tools Troubleshooting TV Speaker 13 U 25 26 USB Drive V 7 Video Formats 12 Videos Volume...


