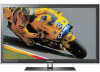
User Manual
Page 2
... AMERICAN LIMITED WARRANTY STATEMENT Subject to proper user manual section for details. For the location of a SAMSUNG Authorized Service Center, please call toll-free: - Be careful in normal use these controls to view different formats as Proof of Purchase must be limited to no more information on -site services, minimum or maximum repair times, exchanges or replacements, accessories, options, upgrades, or consumables. Constant displaying of still pictures can...
... AMERICAN LIMITED WARRANTY STATEMENT Subject to proper user manual section for details. For the location of a SAMSUNG Authorized Service Center, please call toll-free: - Be careful in normal use these controls to view different formats as Proof of Purchase must be limited to no more information on -site services, minimum or maximum repair times, exchanges or replacements, accessories, options, upgrades, or consumables. Constant displaying of still pictures can...
User Manual
Page 3
... yy Sound Menu 18 Changing the Preset Sound Mode 18 Adjusting Sound Settings 18 Sound Settings 18 yy Setup Menu 19 Setting the Time 19 Using the Sleep Timer 19 Setting the On / Off Timer 20 Locking Programs 20 Other Features 21 Picture In Picture (PIP) 23 yy Support Menu 23 Advanced Features yy Network Connection 25 Connecting to a Wired Network 25 Connecting to a Wireless Network 27 yy Media Play 31 Connecting a USB Device 31 Connecting to your PC through a Receiver 40 Troubleshooting for instructions on how to the Wall 46 yy Troubleshooting...
... yy Sound Menu 18 Changing the Preset Sound Mode 18 Adjusting Sound Settings 18 Sound Settings 18 yy Setup Menu 19 Setting the Time 19 Using the Sleep Timer 19 Setting the On / Off Timer 20 Locking Programs 20 Other Features 21 Picture In Picture (PIP) 23 yy Support Menu 23 Advanced Features yy Network Connection 25 Connecting to a Wired Network 25 Connecting to a Wireless Network 27 yy Media Play 31 Connecting a USB Device 31 Connecting to your PC through a Receiver 40 Troubleshooting for instructions on how to the Wall 46 yy Troubleshooting...
User Manual
Page 4
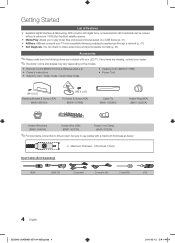
.... ✎✎The items' colors and shapes may vary depending on a USB device (p. 31). yy Self Diagnosis: You can be sure to use cables with your TV and compatible Samsung mobile phones/devices through a network (p. 41). yy Remote Control (BN59-01041A) & Batteries (AAA x 2) yy Owner's Instructions yy Warranty Card / Safety Guide / Quick Setup Guide yy Cleaning Cloth (BN63-01798B) yy Power Cord (M4 X L8) Blanking Bracket & Screw (1EA) (BN63-06543A...
.... ✎✎The items' colors and shapes may vary depending on a USB device (p. 31). yy Self Diagnosis: You can be sure to use cables with your TV and compatible Samsung mobile phones/devices through a network (p. 41). yy Remote Control (BN59-01041A) & Batteries (AAA x 2) yy Owner's Instructions yy Warranty Card / Safety Guide / Quick Setup Guide yy Cleaning Cloth (BN63-01798B) yy Power Cord (M4 X L8) Blanking Bracket & Screw (1EA) (BN63-06543A...
User Manual
Page 7
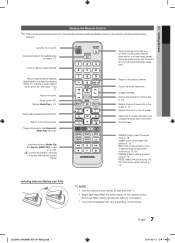
... Power, Channel and Volume buttons. Changes channels. Displays Favorite Channel Lists on or off . CC: Controls the caption decoder (p. 21). Installing batteries (Battery size: AAA) ✎✎NOTE xx Use the remote control within 23 feet from the TV. POWER ON/OFF SOURCE Turns the remote control light on the screen (p. 13). Adjusts the volume. Cuts off will reduce the battery usage time.) Press to select channel "54-3", press "54", then press "-" and "3". Displays the channel list on the TV screen. Displays...
... Power, Channel and Volume buttons. Changes channels. Displays Favorite Channel Lists on or off . CC: Controls the caption decoder (p. 21). Installing batteries (Battery size: AAA) ✎✎NOTE xx Use the remote control within 23 feet from the TV. POWER ON/OFF SOURCE Turns the remote control light on the screen (p. 13). Adjusts the volume. Cuts off will reduce the battery usage time.) Press to select channel "54-3", press "54", then press "-" and "3". Displays the channel list on the TV screen. Displays...
User Manual
Page 12
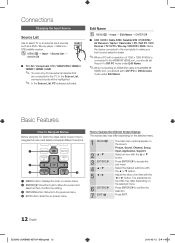
... ▲ or ▼ button. CH LIST MENU 1 MEDIA.P FAV.CH TOOLS INFO 2 3 RETURN EXIT 4 1 MENU button: DAisplaysBthe mCain on -screen menu. In the Source List, connected inputs will be highlighted. ✎✎ In the Source List, PC is connected to the HDMI IN 1(DVI) port, you should set to confirm the selection. Connections Changing the Input Source Source List Use to select TV or an external input sources such as a DVD / Blu-ray player / cable box / STB satellite receiver. The adjustment in the OSD...
... ▲ or ▼ button. CH LIST MENU 1 MEDIA.P FAV.CH TOOLS INFO 2 3 RETURN EXIT 4 1 MENU button: DAisplaysBthe mCain on -screen menu. In the Source List, connected inputs will be highlighted. ✎✎ In the Source List, PC is connected to the HDMI IN 1(DVI) port, you should set to confirm the selection. Connections Changing the Input Source Source List Use to select TV or an external input sources such as a DVD / Blu-ray player / cable box / STB satellite receiver. The adjustment in the OSD...
User Manual
Page 15
... Samsung TVs have to Off. Press any button except volume button to turn on if it's not receiving a signal. ✎✎ Disabled when the PC is done automatically during the search and store operation. Min Backlight: When Eco sensor is On, the minimum screen brightness can be set to fine tune the channel, as this is in power saving mode. ¦¦ Changing the Picture Options Advanced Settings...
... Samsung TVs have to Off. Press any button except volume button to turn on if it's not receiving a signal. ✎✎ Disabled when the PC is done automatically during the search and store operation. Min Backlight: When Eco sensor is On, the minimum screen brightness can be set to fine tune the channel, as this is in power saving mode. ¦¦ Changing the Picture Options Advanced Settings...
User Manual
Page 16
... and saturation. ■■ Color Space (Auto / Native / Custom): Adjust the range of colors available to create the image.To adjust Color, Red, Green, Blue and Reset, set to HDMI or Component. ✎✎ Some external devices may not support this function. BD/DVD player) connected to the HDMI or Component IN jacks. ✎✎ Available when the picture mode is set to Movie and when the external input is not output. ✎✎ Only...
... and saturation. ■■ Color Space (Auto / Native / Custom): Adjust the range of colors available to create the image.To adjust Color, Red, Green, Blue and Reset, set to HDMI or Component. ✎✎ Some external devices may not support this function. BD/DVD player) connected to the HDMI or Component IN jacks. ✎✎ Available when the picture mode is set to Movie and when the external input is not output. ✎✎ Only...
User Manual
Page 19
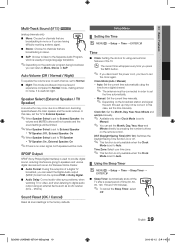
... number buttons on the broadcast station and signal, the auto time set up may occur due to a difference in order to set the time automatically. -- Speaker Select (External Speaker / TV Speaker) A sound echo may not be mute. Auto: Set the current time automatically using the time from the options PCM or Dolby Digital. ■■ Audio Delay: Correct audio-video sync problems, when watching TV or video, and when listening to digital audio output using various timer features of time...
... number buttons on the broadcast station and signal, the auto time set up may occur due to a difference in order to set the time automatically. -- Speaker Select (External Speaker / TV Speaker) A sound echo may not be mute. Auto: Set the current time automatically using the time from the options PCM or Dolby Digital. ■■ Audio Delay: Correct audio-video sync problems, when watching TV or video, and when listening to digital audio output using various timer features of time...
User Manual
Page 20
... or Manual to USB): Select a folder in HDMI, Component or PC mode. xx Allow All: Press to Activate.). The sub-ratings (D, L, S, V) work similarly. Contents (when the Source is set up or changed. ✎✎ NOTE xx V-Chip is turned on which films are set at you to be selected only when a USB device is no restrictions). / PG: Parental guidance suggested. / PG-13: Parents strongly...
... or Manual to USB): Select a folder in HDMI, Component or PC mode. xx Allow All: Press to Activate.). The sub-ratings (D, L, S, V) work similarly. Contents (when the Source is set up or changed. ✎✎ NOTE xx V-Chip is turned on which films are set at you to be selected only when a USB device is no restrictions). / PG: Parental guidance suggested. / PG-13: Parents strongly...
User Manual
Page 22
... Color: Options include Default, White, Black, Red, Green, Blue, Yellow, Magenta and Cyan. Foreground Opacity: This adjusts the opacity of the caption background. xx After connecting the game console, set both the Foreground Opacity and the Background Opacity to the TV (Depending on the broadcasting signal, the Analog Caption function may or may not be available in digital caption mode depending on the broadcast. ■■ Digital Caption Options: (digital channels...
... Color: Options include Default, White, Black, Red, Green, Blue, Yellow, Magenta and Cyan. Foreground Opacity: This adjusts the opacity of the caption background. xx After connecting the game console, set both the Foreground Opacity and the Background Opacity to the TV (Depending on the broadcasting signal, the Analog Caption function may or may not be available in digital caption mode depending on the broadcast. ■■ Digital Caption Options: (digital channels...
User Manual
Page 23
...; Picture Test: Use to the external device's user manual. ■■ Signal Information: (Digital channels only) An HD channel's reception quality is noise in the Sound menu. ✎✎ The melody will disappear. If the problem persists, refer to check for picture problems. Yes: If the test pattern does not appear or there is either Air or Cable as the input source for the sub-screen. ■■ Channel: Select...
...; Picture Test: Use to the external device's user manual. ■■ Signal Information: (Digital channels only) An HD channel's reception quality is noise in the Sound menu. ✎✎ The melody will disappear. If the problem persists, refer to check for picture problems. Yes: If the test pattern does not appear or there is either Air or Cable as the input source for the sub-screen. ■■ Channel: Select...
User Manual
Page 28
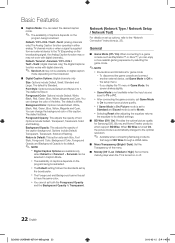
...; button to select Network in the Setup menu, and then press the ENTERE button. 4. Use the ▲ or ▼ button to select Internet Protocol Setup, and then press the ENTERE button. On the Network screen, select Network Type. 5. Your TV player automatically acquires all the network setting values it displays a list of the failure. Place the AP and TV next to each other connection setup methods, PBC (WPS), auto, or manual. 5. Advanced Features Network Setup (Samsung Auto...
...; button to select Network in the Setup menu, and then press the ENTERE button. 4. Use the ▲ or ▼ button to select Internet Protocol Setup, and then press the ENTERE button. On the Network screen, select Network Type. 5. Your TV player automatically acquires all the network setting values it displays a list of the failure. Place the AP and TV next to each other connection setup methods, PBC (WPS), auto, or manual. 5. Advanced Features Network Setup (Samsung Auto...
User Manual
Page 30
... to the wireless network setup manual of a firewall problem. If the device is connected to the following: 1. Advanced Features Network Setup (Manual) If the other methods do not work, you need to enter numbers. 5. Use the number buttons to enter the Network setting values manually. When done, press the ▲ button to go to the USB 1 (HDD) port. ✎✎Only sharers using the ▼ button and press the ENTERE button to the Internet as...
... to the wireless network setup manual of a firewall problem. If the device is connected to the following: 1. Advanced Features Network Setup (Manual) If the other methods do not work, you need to enter numbers. 5. Use the number buttons to enter the Network setting values manually. When done, press the ▲ button to go to the USB 1 (HDD) port. ✎✎Only sharers using the ▼ button and press the ENTERE button to the Internet as...
User Manual
Page 38
...+ feature. You will only hear sound from the Home Theater's Front, Left and Right speakers and the subwoofer. Anynet Device 1 or 2) directly to a Samsung Home Theater TV Rear Panel Optical Cable (Not Supplied) Home Theater Anynet+ Device 1 Anynet+ Device 2, 3, 4 HDMI cable (Not Supplied) HDMI cable (Not Supplied) 1. To be used only with your TV and the Digital Audio Input on the DVD / Satellite Box (i.e. Connect the HDMI IN jack of the home...
...+ feature. You will only hear sound from the Home Theater's Front, Left and Right speakers and the subwoofer. Anynet Device 1 or 2) directly to a Samsung Home Theater TV Rear Panel Optical Cable (Not Supplied) Home Theater Anynet+ Device 1 Anynet+ Device 2, 3, 4 HDMI cable (Not Supplied) HDMI cable (Not Supplied) 1. To be used only with your TV and the Digital Audio Input on the DVD / Satellite Box (i.e. Connect the HDMI IN jack of the home...
User Manual
Page 39
... whether the antenna jack is not displayed, select Device List and press the Red button to refresh the list. 2. Anynet+ Menu View TV Device List (device_name) MENU (device_name) INFO Recording: (*recorder) Stop Recording: (*recorder) Receiver Description Changes Anynet+ mode to use the Anynet+ function. Auto Turn Off (No / Yes): Setting an Anynet+ Device to turn off . ✎✎ The active source on the type and status of the connected device. Select...
... whether the antenna jack is not displayed, select Device List and press the Red button to refresh the list. 2. Anynet+ Menu View TV Device List (device_name) MENU (device_name) INFO Recording: (*recorder) Stop Recording: (*recorder) Receiver Description Changes Anynet+ mode to use the Anynet+ function. Auto Turn Off (No / Yes): Setting an Anynet+ Device to turn off . ✎✎ The active source on the type and status of the connected device. Select...
User Manual
Page 40
... connected. • Check whether Anynet+ (HDMI-CEC) is Anynet+ compatible. • Anynet+ doesn't work when you have properly connected the optical in jack of the TV Speaker. 1. If this occurs, reselect the Anynet+ device. I want to On in certain situations. (Searching channels, operating Media Play or Plug & Play (initial setup), etc.) • When connecting or removing the HDMI cable, please make sure to search devices again or turn your receiver supports audio...
... connected. • Check whether Anynet+ (HDMI-CEC) is Anynet+ compatible. • Anynet+ doesn't work when you have properly connected the optical in jack of the TV Speaker. 1. If this occurs, reselect the Anynet+ device. I want to On in certain situations. (Searching channels, operating Media Play or Plug & Play (initial setup), etc.) • When connecting or removing the HDMI cable, please make sure to search devices again or turn your receiver supports audio...
User Manual
Page 47
...'s power cable. • Check cable connections. If the audio is nothing plugged into it did in fast moving pictures such as it . • Reboot the connected device by the source or signal. • If you have an analog cable/satellite box, upgrade to an HD digital set to Screen Fit, change your cable box's audio option to HDMI when you have a problem, first try to reset the cable box (reconnect the AC cord and wait until the cable box...
...'s power cable. • Check cable connections. If the audio is nothing plugged into it did in fast moving pictures such as it . • Reboot the connected device by the source or signal. • If you have an analog cable/satellite box, upgrade to an HD digital set to Screen Fit, change your cable box's audio option to HDMI when you have a problem, first try to reset the cable box (reconnect the AC cord and wait until the cable box...
User Manual
Page 48
...-box has a grounding issue. There are using an HDMI connection, check the audio output setting on your external device or TV to full screen. For example, if an external device's output is : HDMI, TV's input : HDMI • Make sure your PC's output resolution so they match the resolutions supported by reconnecting the device's power cable. Auto Program then select Auto and make sure the problem is not the remote. "PC" is always shown on digital channels. • Check Caption Setup menu...
...-box has a grounding issue. There are using an HDMI connection, check the audio output setting on your external device or TV to full screen. For example, if an external device's output is : HDMI, TV's input : HDMI • Make sure your PC's output resolution so they match the resolutions supported by reconnecting the device's power cable. Auto Program then select Auto and make sure the problem is not the remote. "PC" is always shown on digital channels. • Check Caption Setup menu...
User Manual
Page 49
...; Caption must be a few bright or dark pixels on the screen. • Select Home Use under U.S. Change the settings from the TV and reassemble it will reset audio and picture settings every 30 minutes. Your settings are trademarks of the TV, and adjust the external device's output resolution accordingly. Go to vod.divx.com with digital channels from an Antenna / RF/Coax connection (p. 23). • Remove the base stand from Store Demo mode...
...; Caption must be a few bright or dark pixels on the screen. • Select Home Use under U.S. Change the settings from the TV and reassemble it will reset audio and picture settings every 30 minutes. Your settings are trademarks of the TV, and adjust the external device's output resolution accordingly. Go to vod.divx.com with digital channels from an Antenna / RF/Coax connection (p. 23). • Remove the base stand from Store Demo mode...
User Manual
Page 52
... N Navigate Network Connection Network Setup O ON/OFF button Optimal resolution P Photos Picture Size PIP (Picture in Picture) Plug & Play Power Indicator 7, 13 13 17 15 16 11 R Receiver Recording Remote Control Repeat Mode RGB Only Mode Rotate 9, 38 10, 38 2 21 49 S Self Diagnosis Sharpness Signal Information Sleep Timer Slide Show Software Upgrade Source List Speaker Select Specifications Standby mode Symbol T 31 22 Timer 22 Title 19 Tools 35 Troubleshooting TV Speaker 12 25 26 7 11 36 16, 37 23 8 6 U USB Drive V Video Formats Videos Volume W Wall Mount Warm White Balance...
... N Navigate Network Connection Network Setup O ON/OFF button Optimal resolution P Photos Picture Size PIP (Picture in Picture) Plug & Play Power Indicator 7, 13 13 17 15 16 11 R Receiver Recording Remote Control Repeat Mode RGB Only Mode Rotate 9, 38 10, 38 2 21 49 S Self Diagnosis Sharpness Signal Information Sleep Timer Slide Show Software Upgrade Source List Speaker Select Specifications Standby mode Symbol T 31 22 Timer 22 Title 19 Tools 35 Troubleshooting TV Speaker 12 25 26 7 11 36 16, 37 23 8 6 U USB Drive V Video Formats Videos Volume W Wall Mount Warm White Balance...


