User Manual (user Manual) (ver.1.0) (English)
Page 2
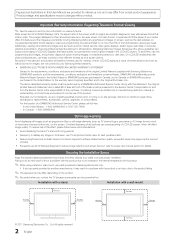
... user manual section for details. To reduce risk of Purchase must be in the wide screen 16:9 ratio format, or expanded to , are any image on the screen. xx If you contact the TV because some parts can cause uneven aging of LCD/LED Displays that offer picture sizing features, use these controls to view different formats as the dark sidebars on nonexpanded standard format television video and programming...
... user manual section for details. To reduce risk of Purchase must be in the wide screen 16:9 ratio format, or expanded to , are any image on the screen. xx If you contact the TV because some parts can cause uneven aging of LCD/LED Displays that offer picture sizing features, use these controls to view different formats as the dark sidebars on nonexpanded standard format television video and programming...
User Manual (user Manual) (ver.1.0) (English)
Page 3
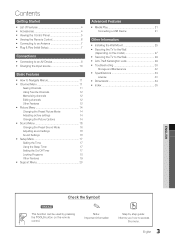
... yy Sound Menu 16 Changing the Preset Sound Mode 16 Adjusting sound settings 16 Sound Settings 16 yy Setup Menu 17 Setting the Time 17 Using the Sleep Timer 17 Setting the On/Off Timer 17 Locking Programs 18 Other Features 19 yy Support Menu 20 Advanced Features yy Media Play 21 Connecting a USB Device 21 Other Information yy Installing the Wall Mount 25 yy Securing the TV to the Wall (depending on the remote control. t ✎ This function can be used by step guide...
... yy Sound Menu 16 Changing the Preset Sound Mode 16 Adjusting sound settings 16 Sound Settings 16 yy Setup Menu 17 Setting the Time 17 Using the Sleep Timer 17 Setting the On/Off Timer 17 Locking Programs 18 Other Features 19 yy Support Menu 20 Advanced Features yy Media Play 21 Connecting a USB Device 21 Other Information yy Installing the Wall Mount 25 yy Securing the TV to the Wall (depending on the remote control. t ✎ This function can be used by step guide...
User Manual (user Manual) (ver.1.0) (English)
Page 4
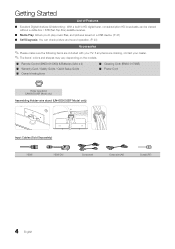
... with your dealer. ✎✎The items' colors and shapes may vary depending on the models. ■■ Remote Control (BN59-01006A) & Batteries (AAA x 2) ■■ Warranty Card / Safety Guide / Quick Setup Guide ■■ Owner's Instructions ■■ Cleaning Cloth (BN63-01798B) ■■ Power Cord Holder wire stand (UN40D5003BF Model only) Assembling Holder-wire stand (UN40D5003BF Model only) Input Cables (Sold Separately) HDMI HDMI-DVI Component Composite (AV) Coaxial (RF) 4 English
... with your dealer. ✎✎The items' colors and shapes may vary depending on the models. ■■ Remote Control (BN59-01006A) & Batteries (AAA x 2) ■■ Warranty Card / Safety Guide / Quick Setup Guide ■■ Owner's Instructions ■■ Cleaning Cloth (BN63-01798B) ■■ Power Cord Holder wire stand (UN40D5003BF Model only) Assembling Holder-wire stand (UN40D5003BF Model only) Input Cables (Sold Separately) HDMI HDMI-DVI Component Composite (AV) Coaxial (RF) 4 English
User Manual (user Manual) (ver.1.0) (English)
Page 5
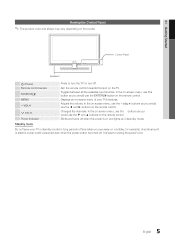
... on-screen menu, use the z buttons as you are away on the remote control. Toggles between all the available input sources. Adjusts the volume. Changes the channels. Blinks and turns off . Displays an on-screen menu of time (when you would use this spot on and lights up in standby mode for example). It is on the TV. Control Panel Speakers P (Power) Remote control sensor SOURCEE MEnU y z Power Indicator Press to unplug the power cord. 5 English 01 getting Started Viewing the Control Panel ✎ The product color...
... on-screen menu, use the z buttons as you are away on the remote control. Toggles between all the available input sources. Adjusts the volume. Changes the channels. Blinks and turns off . Displays an on-screen menu of time (when you would use this spot on and lights up in standby mode for example). It is on the TV. Control Panel Speakers P (Power) Remote control sensor SOURCEE MEnU y z Power Indicator Press to unplug the power cord. 5 English 01 getting Started Viewing the Control Panel ✎ The product color...
User Manual (user Manual) (ver.1.0) (English)
Page 6
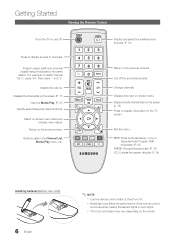
...) View the Media Play. (P. 21) Quickly select frequently used in the Channel list, Media Play menu, etc. Exit the menu. For example, to display information on the TV screen. Buttons used functions. Displays the main on -screen menu items and change menu values. Getting Started Viewing the Remote Control Turns the TV on and off the sound temporarily. Display favorite channel lists on the model. Avoid use when nearby fluorescent lights or neon signs. Return to the previous channel. Select on -screen menu. x Bright light...
...) View the Media Play. (P. 21) Quickly select frequently used in the Channel list, Media Play menu, etc. Exit the menu. For example, to display information on the TV screen. Buttons used functions. Displays the main on -screen menu items and change menu values. Getting Started Viewing the Remote Control Turns the TV on and off the sound temporarily. Display favorite channel lists on the model. Avoid use when nearby fluorescent lights or neon signs. Return to the previous channel. Select on -screen menu. x Bright light...
User Manual (user Manual) (ver.1.0) (English)
Page 7
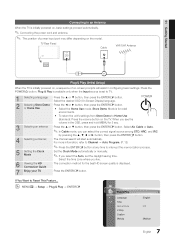
... hold MENU for retail environments. 01 Getting Started Setup Connecting to an Antenna When the TV is initially powered on, basic settings proceed automatically. ✎✎Connecting the power cord and antenna. ✎✎ The position of on-screen prompts will start automatically. TV Rear Panel Cable VHF/UHF Antenna or Plug & Play (Initial Setup) When the TV is for 5 sec. Store Demo Mode is initially powered on, a sequence of power input port may...
... hold MENU for retail environments. 01 Getting Started Setup Connecting to an Antenna When the TV is initially powered on, basic settings proceed automatically. ✎✎Connecting the power cord and antenna. ✎✎ The position of on-screen prompts will start automatically. TV Rear Panel Cable VHF/UHF Antenna or Plug & Play (Initial Setup) When the TV is for 5 sec. Store Demo Mode is initially powered on, a sequence of power input port may...
User Manual (user Manual) (ver.1.0) (English)
Page 8
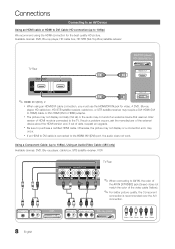
... Rear Y W R ✎ When connecting to AV In, the color of R W R B G the AV In [Y/VIDEO] jack (Green) does not match the color of the video cable (Yellow). ✎ For better picture quality, the Component connection is connected to the TV. A DVD, Blu-ray player, HD cable box, HD STB satellite receiver, cable box, or STB satellite receiver may not work . Otherwise, the picture may not display or a connection error may occur. x If an HDMI to DVI cable is connected...
... Rear Y W R ✎ When connecting to AV In, the color of R W R B G the AV In [Y/VIDEO] jack (Green) does not match the color of the video cable (Yellow). ✎ For better picture quality, the Component connection is connected to the TV. A DVD, Blu-ray player, HD cable box, HD STB satellite receiver, cable box, or STB satellite receiver may not work . Otherwise, the picture may not display or a connection error may occur. x If an HDMI to DVI cable is connected...
User Manual (user Manual) (ver.1.0) (English)
Page 10
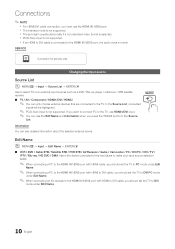
... the TOOlS button in the Source list. x The set might operate abnormally if a non-standard video format is not supported. MEDIA.P Changing the Input source P.SIZE Source list O MEnUm → Input → Source list → EnTERE Use to select TV or an external input sources such as a DVD / Blu-ray player / cable box / STB satellite receiver. ■ TV / AV / Component / hDMI1/DVI / hDMI2 ✎ You can only choose external devices that are connected to the TV, use hDMI1/DVI input. ✎ You...
... the TOOlS button in the Source list. x The set might operate abnormally if a non-standard video format is not supported. MEDIA.P Changing the Input source P.SIZE Source list O MEnUm → Input → Source list → EnTERE Use to select TV or an external input sources such as a DVD / Blu-ray player / cable box / STB satellite receiver. ■ TV / AV / Component / hDMI1/DVI / hDMI2 ✎ You can only choose external devices that are connected to the TV, use hDMI1/DVI input. ✎ You...
User Manual (user Manual) (ver.1.0) (English)
Page 11
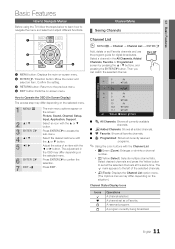
...; or ▼ button. Press EnTERE to navigate the menu and select and adjust different functions. Select desired channels and press the Yellow button to set all currently reserved programs. ✎ Using the color buttons with the ◄ or ► button. The c mark appears to Operate the OSD (On Screen Display) MEDIA.P The access step may differ depending on the screen: Picture, Sound, Channel, Setup, Input, Application, Support. A channel set Favorite channels and use the program guide for digital broadcasts. Select...
...; or ▼ button. Press EnTERE to navigate the menu and select and adjust different functions. Select desired channels and press the Yellow button to set all currently reserved programs. ✎ Using the color buttons with the ◄ or ► button. The c mark appears to Operate the OSD (On Screen Display) MEDIA.P The access step may differ depending on the screen: Picture, Sound, Channel, Setup, Input, Application, Support. A channel set Favorite channels and use the program guide for digital broadcasts. Select...
User Manual (user Manual) (ver.1.0) (English)
Page 14
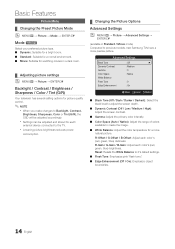
...; Movie: Suitable for watching movies in Standard / Movie mode) Compared to previous models, new Samsung TVs have a more natural picture. xx Settings can be adjusted accordingly. R-Gain / G-Gain / B-Gain: Adjust each color's (red, green, blue) darkness. R-Offset / G-Offset / B-Offset: Adjust each color's (red, green, blue) brightness. Advanced Settings Black Tone : Off ► Dynamic Contrast : Medium Gamma : 0 Color Space : Native White Balance Flesh Tone : 0 Edge Enhancement : On U Move E Enter...
...; Movie: Suitable for watching movies in Standard / Movie mode) Compared to previous models, new Samsung TVs have a more natural picture. xx Settings can be adjusted accordingly. R-Gain / G-Gain / B-Gain: Adjust each color's (red, green, blue) darkness. R-Offset / G-Offset / B-Offset: Adjust each color's (red, green, blue) brightness. Advanced Settings Black Tone : Off ► Dynamic Contrast : Medium Gamma : 0 Color Space : Native White Balance Flesh Tone : 0 Edge Enhancement : On U Move E Enter...
User Manual (user Manual) (ver.1.0) (English)
Page 15
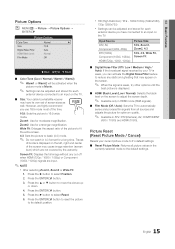
... your current picture mode to it's default settings. ■■ Reset Picture Mode: Returns all sources and adjusts the picture for each external device you have its default position. Input Source ATV, AV, Component (480i, 480p) DTV(1080i), Component (1080i, 1080p), HDMI (720p, 1080i, 1080p) Picture Size 16:9, Zoom1, Zoom2, 4:3 16:9, 4:3, Wide Fit, Screen Fit ■■ Digital Noise Filter (Off / Low / Medium / High / Auto): If the broadcast signal received by the warranty. Screen Fit: Displays the...
... your current picture mode to it's default settings. ■■ Reset Picture Mode: Returns all sources and adjusts the picture for each external device you have its default position. Input Source ATV, AV, Component (480i, 480p) DTV(1080i), Component (1080i, 1080p), HDMI (720p, 1080i, 1080p) Picture Size 16:9, Zoom1, Zoom2, 4:3 16:9, 4:3, Wide Fit, Screen Fit ■■ Digital Noise Filter (Off / Low / Medium / High / Auto): If the broadcast signal received by the warranty. Screen Fit: Displays the...
User Manual (user Manual) (ver.1.0) (English)
Page 17
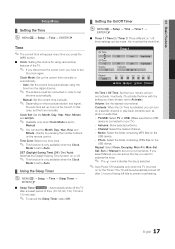
... you convenience. Clock Mode: Set up may not be connected in order to Auto. ¦¦ Using the Sleep Timer OO MENUm → Setup → Time → Sleep Timer → ENTERE ■■ Sleep Timer t : Automatically shuts off . ✎✎ This function is only available when the Clock Mode is turned on the remote control. Manual: Set the current time manually. ✎✎ Depending on the broadcast station and signal, the auto time set the time manually.
... you convenience. Clock Mode: Set up may not be connected in order to Auto. ¦¦ Using the Sleep Timer OO MENUm → Setup → Time → Sleep Timer → ENTERE ■■ Sleep Timer t : Automatically shuts off . ✎✎ This function is only available when the Clock Mode is turned on the remote control. Manual: Set the current time manually. ✎✎ Depending on the broadcast station and signal, the auto time set the time manually.

User Manual (user Manual) (ver.1.0) (English)
Page 18
... material. The Motion Picture Association of the V-Chip restrictions are appropriate for use . Basic Features ¦¦ Locking Programs OO MENUm → Setup → V-Chip → ENTERE V-Chip The V-Chip feature automatically locks out programs that are watching. xx Parental restriction information is deactivated. Rating menu is automatically downloaded while watching DTV channels. The user must enter a PIN (personal identification number) before any...
... material. The Motion Picture Association of the V-Chip restrictions are appropriate for use . Basic Features ¦¦ Locking Programs OO MENUm → Setup → V-Chip → ENTERE V-Chip The V-Chip feature automatically locks out programs that are watching. xx Parental restriction information is deactivated. Rating menu is automatically downloaded while watching DTV channels. The user must enter a PIN (personal identification number) before any...

User Manual (user Manual) (ver.1.0) (English)
Page 19
... game console and connect another external device, set to a game console such as PlayStation™ or Xbox™, you forget the PIN, press the remote-control buttons in digital caption mode depending on the broadcast. ■■ Digital Caption Options: (digital channels only) Size: Options include Default, Small, Standard and Large. xx Game Mode is not available when the input source is supplied from an external device to Off in Component or HDMI modes. ■■ Caption Mode...
... game console and connect another external device, set to a game console such as PlayStation™ or Xbox™, you forget the PIN, press the remote-control buttons in digital caption mode depending on the broadcast. ■■ Digital Caption Options: (digital channels only) Size: Options include Default, Small, Standard and Large. xx Game Mode is not available when the input source is supplied from an external device to Off in Component or HDMI modes. ■■ Caption Mode...

User Manual (user Manual) (ver.1.0) (English)
Page 20
... TV is turned off by downloading the latest firmware from the TV because the MUTE button has been pressed. -- Support Menu OO MENUm → Support → ENTERE ■■ Sound Test: Use the built-in Caption Mode. There may be a problem with the TV. Software Upgrade Software Upgrade can find information regarding our call centers and how to check for assistance (1-800-SAMSUNG). TV Rear Panel USB Drive HD Connection Guide Refer...
... TV is turned off by downloading the latest firmware from the TV because the MUTE button has been pressed. -- Support Menu OO MENUm → Support → ENTERE ■■ Sound Test: Use the built-in Caption Mode. There may be a problem with the TV. Software Upgrade Software Upgrade can find information regarding our call centers and how to check for assistance (1-800-SAMSUNG). TV Rear Panel USB Drive HD Connection Guide Refer...
User Manual (user Manual) (ver.1.0) (English)
Page 25
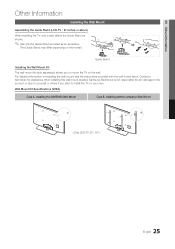
... the wall. Samsung Electronics is not responsible for assistance when installing the wall mount bracket. Wall Mount Kit Specifications (VESA) Case A. Installing the SAMSUNG Wall-Mount Case B. 05 Other Information Other Information Installing the Wall Mount Assembling the Guide Stand (LCD-TV - 32 inches or above) When installing the TV onto a wall, attach the Guide Stand as shown. ✎✎Use only the Guide Stand provided as an accessory. (The Guide Stand may differ depending on the model.) Guide Stand Installing the Wall Mount Kit The wall mount kit...
... the wall. Samsung Electronics is not responsible for assistance when installing the wall mount bracket. Wall Mount Kit Specifications (VESA) Case A. Installing the SAMSUNG Wall-Mount Case B. 05 Other Information Other Information Installing the Wall Mount Assembling the Guide Stand (LCD-TV - 32 inches or above) When installing the TV onto a wall, attach the Guide Stand as shown. ✎✎Use only the Guide Stand provided as an accessory. (The Guide Stand may differ depending on the model.) Guide Stand Installing the Wall Mount Kit The wall mount kit...

User Manual (user Manual) (ver.1.0) (English)
Page 26
... table below. xx Do not fasten the screws too strongly; Other Information ✎✎The wall mount kit is turned on. Screws that do not comply with the VESA standard screw specifications. Install your nearest dealer. xx Do not use two people to mount the TV to personal injury. If installed on a ceiling or slanted wall, it may cause damage to follow the product installation instructions. Samsung...
... table below. xx Do not fasten the screws too strongly; Other Information ✎✎The wall mount kit is turned on. Screws that do not comply with the VESA standard screw specifications. Install your nearest dealer. xx Do not use two people to mount the TV to personal injury. If installed on a ceiling or slanted wall, it may cause damage to follow the product installation instructions. Samsung...
User Manual (user Manual) (ver.1.0) (English)
Page 30
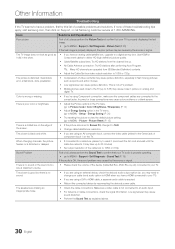
...; Set output resolution of possible problems and solutions. Self Diagnosis - Energy Saving) (P. 20) • Try resetting the picture to view the default picture setting. (go to MENU - The picture is wrong or missing. • If you are using a DVI to a digital set to Screen Fit, change your cable box's audio option to HDMI when you have a HDMI connected to your TV is poor color or brightness. • Adjust the Picture options in the TV menu. (go to Picture mode / Color...
...; Set output resolution of possible problems and solutions. Self Diagnosis - Energy Saving) (P. 20) • Try resetting the picture to view the default picture setting. (go to MENU - The picture is wrong or missing. • If you are using a DVI to a digital set to Screen Fit, change your cable box's audio option to HDMI when you have a HDMI connected to your TV is poor color or brightness. • Adjust the Picture options in the TV menu. (go to Picture mode / Color...
User Manual (user Manual) (ver.1.0) (English)
Page 31
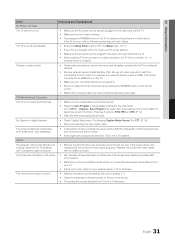
... TV speakers with an HDMI connection. If the TV turns on, refer to select the TV's correct source by pressing the SOURCE button on the remote control. • Reboot the connected device by reconnecting the device's power cable. Try changing Caption Mode Service 1 to CC1. (P. 19) • Some channels may cause picture distortion. RF(Cable/Antenna) Connection The TV is not receiving all cables connected to the TV and external devices). • Set your TV. • Adjust picture size...
... TV speakers with an HDMI connection. If the TV turns on, refer to select the TV's correct source by pressing the SOURCE button on the remote control. • Reboot the connected device by reconnecting the device's power cable. Try changing Caption Mode Service 1 to CC1. (P. 19) • Some channels may cause picture distortion. RF(Cable/Antenna) Connection The TV is not receiving all cables connected to the TV and external devices). • Set your TV. • Adjust picture size...
User Manual (user Manual) (ver.1.0) (English)
Page 32
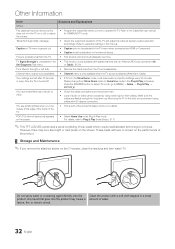
... volume. • Program the Cable/Sat remote control to the wall, we recommend using overly rigid or thick cables. For details, refer to Plug & Play (Initial Setup). (P. 7) ✎✎This TFT LCD/LED panel uses a panel consisting of the TV and adjust the external device's output resolution accordingly. Do not spray water or a cleaning agent directly onto the product. Clean the product with an Antenna (RF/Coax) connection (Air Self Diagnosis Test menu...
... volume. • Program the Cable/Sat remote control to the wall, we recommend using overly rigid or thick cables. For details, refer to Plug & Play (Initial Setup). (P. 7) ✎✎This TFT LCD/LED panel uses a panel consisting of the TV and adjust the external device's output resolution accordingly. Do not spray water or a cleaning agent directly onto the product. Clean the product with an Antenna (RF/Coax) connection (Air Self Diagnosis Test menu...


